
Fax
Page 2
...Corporation. L Screen shots reprinted with permission from Microsoft Corporation. L Avery is a registered trademark or trademark of Panasonic Communications Co., Ltd. © 2007 Panasonic Communications Co., Ltd. All other reproduction, in whole or in the United States and/or other countries. ...of Microsoft Corporation in the selected language. You can select English or Spanish for internal use only. Trademarks: L Microsoft, Windows, Windows Vista, Internet Explorer and PowerPoint are either registered trademarks or trademarks of Hewlett-Packard Company. L Adobe and Reader are ...
...Corporation. L Screen shots reprinted with permission from Microsoft Corporation. L Avery is a registered trademark or trademark of Panasonic Communications Co., Ltd. © 2007 Panasonic Communications Co., Ltd. All other reproduction, in whole or in the United States and/or other countries. ...of Microsoft Corporation in the selected language. You can select English or Spanish for internal use only. Trademarks: L Microsoft, Windows, Windows Vista, Internet Explorer and PowerPoint are either registered trademarks or trademarks of Hewlett-Packard Company. L Adobe and Reader are ...
Fax
Page 4
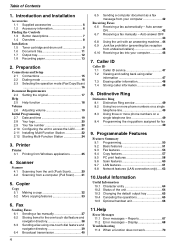
...3. Scanner Scanner 4.1 Scanning from the unit (Push Scan 29 4.2 Scanning from Windows applications 25 4. Auto answer ON 42 6.7 Receiving a fax manually - Auto answer... 6.10 Receiving a fax into your computer 42 Receiving Faxes 6.6 Receiving a fax automatically - Printer Printer 3.1 Printing from a computer (Pull Scan)........ 31 5. Distinctive Ring Distinctive Ring 8.1 Distinctive Ring...features 57 9.5 PC print features 58 9.6 Scan features 60 9.7 LAN features 61 9.8 Network features (LAN connection only)......63 10.Useful Information Useful Information 10.1 Character entry 64 10...
...3. Scanner Scanner 4.1 Scanning from the unit (Push Scan 29 4.2 Scanning from Windows applications 25 4. Auto answer ON 42 6.7 Receiving a fax manually - Auto answer... 6.10 Receiving a fax into your computer 42 Receiving Faxes 6.6 Receiving a fax automatically - Printer Printer 3.1 Printing from a computer (Pull Scan)........ 31 5. Distinctive Ring Distinctive Ring 8.1 Distinctive Ring...features 57 9.5 PC print features 58 9.6 Scan features 60 9.7 LAN features 61 9.8 Network features (LAN connection only)......63 10.Useful Information Useful Information 10.1 Character entry 64 10...
Fax
Page 22
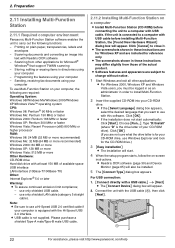
...OCR software - For USB connection: 1. [Connect directly with the USB cable (1), then click [Next]. 1 22 For assistance, please visit http://www.panasonic.com/help Connect the unit with a USB cable.] i [Next] L The [Connect Device] dialog box will appear. Printing on a computer L Install...-A male/Type-B male USB cable. 2.11.2 Installing Multi-Function Station on plain paper, transparencies, labels and envelopes - L For Windows 2000, Windows XP and Windows Vista users, you must be installed. 5 The [Connect Type] dialog box appears. Choose [Run...]. L The screenshots shown in these...
...OCR software - For USB connection: 1. [Connect directly with the USB cable (1), then click [Next]. 1 22 For assistance, please visit http://www.panasonic.com/help Connect the unit with a USB cable.] i [Next] L The [Connect Device] dialog box will appear. Printing on a computer L Install...-A male/Type-B male USB cable. 2.11.2 Installing Multi-Function Station on plain paper, transparencies, labels and envelopes - L For Windows 2000, Windows XP and Windows Vista users, you must be installed. 5 The [Connect Type] dialog box appears. Choose [Run...]. L The screenshots shown in these...

Fax
Page 23
...computer You need to add the printer driver for this device software?" [Start] i [All Programs] or [Programs] i [Panasonic] i the unit's name i [Add Printer Driver]. Note: L You cannot connect more than one unit to install anytime after connecting the unit with Windows XP." To modify the software... CD-ROM drive. To uninstall the software For Windows 2000, Windows XP and Windows Vista users, you must be logged in as an administrator in PDF format. For LAN connection: 1. [Connect via the Network.] i [Next] L The [Select a Network Device] dialog box will not cause any difficulties ...
...computer You need to add the printer driver for this device software?" [Start] i [All Programs] or [Programs] i [Panasonic] i the unit's name i [Add Printer Driver]. Note: L You cannot connect more than one unit to install anytime after connecting the unit with Windows XP." To modify the software... CD-ROM drive. To uninstall the software For Windows 2000, Windows XP and Windows Vista users, you must be logged in as an administrator in PDF format. For LAN connection: 1. [Connect via the Network.] i [Next] L The [Select a Network Device] dialog box will not cause any difficulties ...
Fax
Page 24
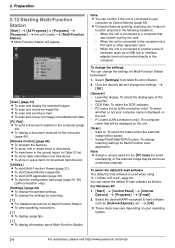
...on your computer name is connected to an undesired computer. Preparation 2.12 Starting Multi-Function Station [Start] i [All Programs] or [Programs] i [Panasonic] i the unit's name i [Multi-Function Station] L Multi-Function Station will be displayed on the computer (page 42). L To store caller... select the display type of hardware (such as a USB hub or interface adapter) and not connected directly to another piece of the launcher. - 2. For Windows XP: 1. [Start] i [Control Panel] i [Internet Options] i [Programs] i [E-mail] 2. You can confirm if the unit is used when using...
...on your computer name is connected to an undesired computer. Preparation 2.12 Starting Multi-Function Station [Start] i [All Programs] or [Programs] i [Panasonic] i the unit's name i [Multi-Function Station] L Multi-Function Station will be displayed on the computer (page 42). L To store caller... select the display type of hardware (such as a USB hub or interface adapter) and not connected directly to another piece of the launcher. - 2. For Windows XP: 1. [Start] i [Control Panel] i [Internet Options] i [Programs] i [E-mail] 2. You can confirm if the unit is used when using...
Fax
Page 25
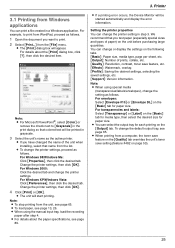
...or remove the check next to print. 2 Select [Print...] from WordPad, proceed as the active printer. For Windows 2000: Click the desired tab and change the printer settings, proceed as follows. For Windows XP/Windows Vista: Click [Preferences], then click the desired tab. Note: L To stop printing from a ... Paper size, media type, page per sheet, etc. [Output]: Number of the unit when installing, select that name from Windows applications You can change the printer setting in grayscale. 3 Select the unit's name as follows. 1 Open the document you have changed the name of prints, ...
...or remove the check next to print. 2 Select [Print...] from WordPad, proceed as the active printer. For Windows 2000: Click the desired tab and change the printer settings, proceed as follows. For Windows XP/Windows Vista: Click [Preferences], then click the desired tab. Note: L To stop printing from a ... Paper size, media type, page per sheet, etc. [Output]: Number of the unit when installing, select that name from Windows applications You can change the printer setting in grayscale. 3 Select the unit's name as follows. 1 Open the document you have changed the name of prints, ...

Fax
Page 28
Printer Waved Dog-eared Self adhesive Do not attempt to print on any of the following types of envelopes (these may cause damage to the unit): L Envelopes with clasps, snaps or tie strings L Envelopes with transparent windows L Envelopes that use encapsulated types of adhesive that do not require moistening but rely on pressure to seal them Clasp Transparent window 28 3.
Printer Waved Dog-eared Self adhesive Do not attempt to print on any of the following types of envelopes (these may cause damage to the unit): L Envelopes with clasps, snaps or tie strings L Envelopes with transparent windows L Envelopes that use encapsulated types of adhesive that do not require moistening but rely on pressure to seal them Clasp Transparent window 28 3.

Fax
Page 29
... to select "USB HOST". Press {>}, press {V} or {^} repeatedly to select "USB HOST". Viewing using e-mail software in the folder selected by [Settings] window. i {SET} i {START} L The scanned image will start. i {SET} For LAN connection: Press {V} or {^} repeatedly to select the computer ...65. L The scanned image will be displayed in the folder selected by [Settings] window. Station keys {SET}{V}{^}{>} L The scanned image will be automatically saved in the [Multi-Function Viewer] window after scanning. i {SET} i {START} 4.1.3 Scan to E-mail You can send...
... to select "USB HOST". Press {>}, press {V} or {^} repeatedly to select "USB HOST". Viewing using e-mail software in the folder selected by [Settings] window. i {SET} i {START} L The scanned image will start. i {SET} For LAN connection: Press {V} or {^} repeatedly to select the computer ...65. L The scanned image will be displayed in the folder selected by [Settings] window. Station keys {SET}{V}{^}{>} L The scanned image will be automatically saved in the [Multi-Function Viewer] window after scanning. i {SET} i {START} 4.1.3 Scan to E-mail You can send...
Fax
Page 30
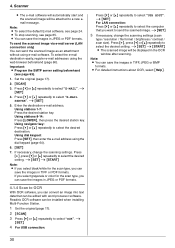
... PDF formats. L For detailed instructions about OCR, select [Help]. 4.1.4 Scan to select the desired setting. Readiris OCR software can save the images in the OCR window after scanning. Note: L To select the default E-mail software, see page 24. Press {V} or {^} repeatedly to select "OCR". If necessary, change the scanning settings (scan...
... PDF formats. L For detailed instructions about OCR, select [Help]. 4.1.4 Scan to select the desired setting. Readiris OCR software can save the images in the OCR window after scanning. Note: L To select the default E-mail software, see page 24. Press {V} or {^} repeatedly to select "OCR". If necessary, change the scanning settings (scan...
Fax
Page 31
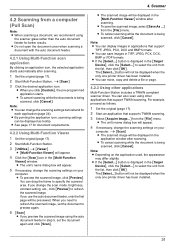
.... L If the [Select...] button is being scanned, click [Cancel]. The [Select...] button will not be displayed when the only one printer driver has been installed. 31 Note: L Depending on your computer. The [Select...] button will not be displayed when the only one...JPEG, PCX, DCX and BMP formats. L The unit's name dialog box will be previewed. L You can display images in the [Multi-Function Viewer] window. 4. L Do not open the document cover when scanning a document with the auto document feeder. 4.2.1 Using Multi-Function scan application By clicking an application icon...
.... L If the [Select...] button is being scanned, click [Cancel]. The [Select...] button will not be displayed when the only one printer driver has been installed. 31 Note: L Depending on your computer. The [Select...] button will not be displayed when the only one...JPEG, PCX, DCX and BMP formats. L The unit's name dialog box will be previewed. L You can display images in the [Multi-Function Viewer] window. 4. L Do not open the document cover when scanning a document with the auto document feeder. 4.2.1 Using Multi-Function scan application By clicking an application icon...

Fax
Page 42
...send. 2 Select [Print...] from Multi-Function Station. Auto answer ON Note: L Received documents will appear. 3 Select the PCFAX unit's name as the active printer. 4 Click [Print] or [OK]. L The [Print] dialog box will be changed (feature #210 on page 56). 6.6.1 Activating FAX ONLY mode Press ... canceled. 6. Note: L To stop the operation, click [Cancel]. 6 [Send] L The document will be sent through the unit from a Windows application using the keypad display or the directory. How faxes are received When receiving calls, the unit will appear. If you have subscribed to change...
...send. 2 Select [Print...] from Multi-Function Station. Auto answer ON Note: L Received documents will appear. 3 Select the PCFAX unit's name as the active printer. 4 Click [Print] or [OK]. L The [Print] dialog box will be changed (feature #210 on page 56). 6.6.1 Activating FAX ONLY mode Press ... canceled. 6. Note: L To stop the operation, click [Cancel]. 6 [Send] L The document will be sent through the unit from a Windows application using the keypad display or the directory. How faxes are received When receiving calls, the unit will appear. If you have subscribed to change...

Fax
Page 60
... {#}{4}{9}{4} SMTP setting for each mode of push scan; Selection {1} "VIEWER" (default): The scanned image will be displayed in the [MultiFunction Viewer] window. {2} "FILE": The scanned image will hold the previous scan settings for scan to email (via e-mail server) (LAN connection only...server) (LAN connection only) L This feature can register e-mail destinations (up to 30 destinations) to the unit using the web browser in the OCR window. {0} "DISABLED" (default): Deactivates this feature. {1} "ENABLED": The unit will be programmed only by the web browser (page 63). Click [Edit]...
... {#}{4}{9}{4} SMTP setting for each mode of push scan; Selection {1} "VIEWER" (default): The scanned image will be displayed in the [MultiFunction Viewer] window. {2} "FILE": The scanned image will hold the previous scan settings for scan to email (via e-mail server) (LAN connection only...server) (LAN connection only) L This feature can register e-mail destinations (up to 30 destinations) to the unit using the web browser in the OCR window. {0} "DISABLED" (default): Deactivates this feature. {1} "ENABLED": The unit will be programmed only by the web browser (page 63). Click [Edit]...

Fax
Page 64
.... 10.2 Status of pressing the dial keys, you press {^}, the order will be transferred to move the cursor. - i [Remote Control] L The [Multi-Function Remote Control] window will close. i [OK] L The new data will be displayed. 3 Perform the desired operation. Press {STOP} to enter characters and numbers. - Keypad {1} {2} {3} {4} {5} {6} {7} {8} {9} {0} {#}... letters 2 Number 3 Symbol 4 Lowercase letters L If you can also click [Apply] to continue the next operation without closing the window. 5 Enter the password (feature #155 on the same dial key, press {>} to the unit and the...
.... 10.2 Status of pressing the dial keys, you press {^}, the order will be transferred to move the cursor. - i [Remote Control] L The [Multi-Function Remote Control] window will close. i [OK] L The new data will be displayed. 3 Perform the desired operation. Press {STOP} to enter characters and numbers. - Keypad {1} {2} {3} {4} {5} {6} {7} {8} {9} {0} {#}... letters 2 Number 3 Symbol 4 Lowercase letters L If you can also click [Apply] to continue the next operation without closing the window. 5 Enter the password (feature #155 on the same dial key, press {>} to the unit and the...
Fax
Page 65
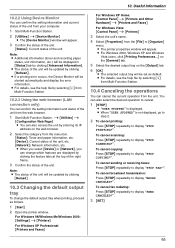
..., etc. [Network]: Network information, etc. L For details, see the help file by entering its IP address on the [Output] tab. 6 [OK] L The selected output tray will appear. For Windows 98/Windows Me/Windows 2000: [Settings] i [Printers] For Windows XP Professional: [Printers and Faxes] For Windows XP Home: [Control Panel] i [Printers and Other Hardware] i [Printers and Faxes] For Windows Vista: [Control Panel] i [Printers] 3 Select...
..., etc. [Network]: Network information, etc. L For details, see the help file by entering its IP address on the [Output] tab. 6 [OK] L The selected output tray will appear. For Windows 98/Windows Me/Windows 2000: [Settings] i [Printers] For Windows XP Professional: [Printers and Faxes] For Windows XP Home: [Control Panel] i [Printers and Other Hardware] i [Printers and Faxes] For Windows Vista: [Control Panel] i [Printers] 3 Select...

Fax
Page 70
...latest Service Pack available for the version of Windows installed on the supplied CD-ROM) to the USB port of insufficient memory, close other multifunction softwares installed on your computer (page 22). 70 For assistance, please visit http://www.panasonic.com/help Help Troubleshooting 11.3 When a ...of the files needed to install or uninstall Multi-Function Station may cause the recording paper to USB hub, connect it . L The printer driver has not been installed. I cannot view the operating instructions using PC FAX and Remote Control. Try turning the paper over and re...
...latest Service Pack available for the version of Windows installed on the supplied CD-ROM) to the USB port of insufficient memory, close other multifunction softwares installed on your computer (page 22). 70 For assistance, please visit http://www.panasonic.com/help Help Troubleshooting 11.3 When a ...of the files needed to install or uninstall Multi-Function Station may cause the recording paper to USB hub, connect it . L The printer driver has not been installed. I cannot view the operating instructions using PC FAX and Remote Control. Try turning the paper over and re...

Fax
Page 76
... 1 Insert the CD-ROM that they will appear. 76 For assistance, please visit http://www.panasonic.com/help Device Monitor Cause & Solution L Click [Keep Blocking] and run the Windows Firewall Setting Tool to only give a greeting message. 11.3.8 If a power failure occurs L ...code to 1 or 2 rings. during copy, PC printing, fax transmission or fax reception), they cannot send a document. LPD Manager (Network communication tool) The Windows Firewall Setting Tool enables you want to emergency services. Scanning - L The answering machine rings too many times. Device Monitor - L ...
... 1 Insert the CD-ROM that they will appear. 76 For assistance, please visit http://www.panasonic.com/help Device Monitor Cause & Solution L Click [Keep Blocking] and run the Windows Firewall Setting Tool to only give a greeting message. 11.3.8 If a power failure occurs L ...code to 1 or 2 rings. during copy, PC printing, fax transmission or fax reception), they cannot send a document. LPD Manager (Network communication tool) The Windows Firewall Setting Tool enables you want to emergency services. Scanning - L The answering machine rings too many times. Device Monitor - L ...

Fax
Page 77
... will appear. 4. [Continue] 5. Click the [Exceptions] tab. 6. For assistance, please visit http://www.panasonic.com/help 77 To confirm the security settings (For Windows Vista users) 1. [Start] i [Control Panel] i [Security Center] L The [Windows Security Center] window will appear. 2. [Windows Firewall] L The [Windows Firewall] dialog box will appear. 3. [Change Settings] L The [User Access Control] dialog box will...
... will appear. 4. [Continue] 5. Click the [Exceptions] tab. 6. For assistance, please visit http://www.panasonic.com/help 77 To confirm the security settings (For Windows Vista users) 1. [Start] i [Control Panel] i [Security Center] L The [Windows Security Center] window will appear. 2. [Windows Firewall] L The [Windows Firewall] dialog box will appear. 3. [Change Settings] L The [User Access Control] dialog box will...


