

Operating Instructions
Page 1
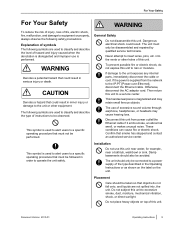
Please read this manual carefully before using this product and save this manual for purchasing an IP Proprietary Telephone (IP-PT). SD Logo is a trademark. For more details, please refer to the manuals of the PBX. IP Proprietary Telephone Model No. KX-NT400 Thank you for future use. Document Version 2010-01
Please read this manual carefully before using this product and save this manual for purchasing an IP Proprietary Telephone (IP-PT). SD Logo is a trademark. For more details, please refer to the manuals of the PBX. IP Proprietary Telephone Model No. KX-NT400 Thank you for future use. Document Version 2010-01
Operating Instructions
Page 9
..., do not fall onto, and liquids are used to alert users to be disassembled and repaired by qualified service technicians. Disconnect this unit to the IP-PT [Power-over-Ethernet], disconnect the Ethernet cable. Placement Care should only be taken so that must only be observed. Explanation of instructions to a specific...
..., do not fall onto, and liquids are used to alert users to be disassembled and repaired by qualified service technicians. Disconnect this unit to the IP-PT [Power-over-Ethernet], disconnect the Ethernet cable. Placement Care should only be taken so that must only be observed. Explanation of instructions to a specific...
Operating Instructions
Page 10
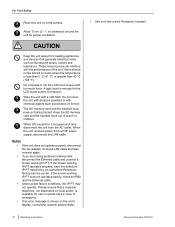
...(3 /15 16 in rooms where the temperature is shown on the unit's display, consult the network administrator. • Use only the correct Panasonic handset. 10 Operating Instructions Document Version 2010-01 Wipe the unit with the performance of emergency. • If an error message is less than ... in ) clearance around the unit for the LCD touch screen to respond. If the known working IP-PT operates properly, have the defective IP-PT repaired by an authorized Panasonic factory service center. Please ensure that generate electrical noise, such as benzene or thinner. For Your ...
...(3 /15 16 in rooms where the temperature is shown on the unit's display, consult the network administrator. • Use only the correct Panasonic handset. 10 Operating Instructions Document Version 2010-01 Wipe the unit with the performance of emergency. • If an error message is less than ... in ) clearance around the unit for the LCD touch screen to respond. If the known working IP-PT operates properly, have the defective IP-PT repaired by an authorized Panasonic factory service center. Please ensure that generate electrical noise, such as benzene or thinner. For Your ...

Operating Instructions
Page 11
User information is sent from the KX-NT400 to 2.4835 GHz and the power output is serviced by only a certified technician. • The confidentiality of the information on the SD memory card becomes ... (such as pacemakers or hearing aids, to determine if they are connected to the unit employ up-to a third party - Contacts' names, phone numbers, and IP addresses - Call logs Preventing Data Loss • Keep a copy of the unit - Before having the unit serviced • Make sure the unit is 2.5 mW [max...
User information is sent from the KX-NT400 to 2.4835 GHz and the power output is serviced by only a certified technician. • The confidentiality of the information on the SD memory card becomes ... (such as pacemakers or hearing aids, to determine if they are connected to the unit employ up-to a third party - Contacts' names, phone numbers, and IP addresses - Call logs Preventing Data Loss • Keep a copy of the unit - Before having the unit serviced • Make sure the unit is 2.5 mW [max...

Operating Instructions
Page 15
... Contacts ...109 User Options ...113 Password Settings ...113 Display Settings ...113 Dial Number Settings 114 Language Settings ...115 Directory List Select Settings 115 IP Camera Settings ...116 IP Camera Selection Buttons Settings 117 Portal Settings ...117 Presence Settings ...118 Administrator Options 121 LDAP Server Settings 121 Dial Modification Settings 122 PT Programming...
... Contacts ...109 User Options ...113 Password Settings ...113 Display Settings ...113 Dial Number Settings 114 Language Settings ...115 Directory List Select Settings 115 IP Camera Settings ...116 IP Camera Selection Buttons Settings 117 Portal Settings ...117 Presence Settings ...118 Administrator Options 121 LDAP Server Settings 121 Dial Modification Settings 122 PT Programming...

Operating Instructions
Page 16
... 147 Connections ...147 Wall Mounting ...150 Bluetooth Headset Connections 153 Installation ...153 Bluetooth Headset Operation 155 Setting Up the KX-NT400 157 Accessing the Start-up Settings 157 Language Settings ...159 IP Address Settings ...159 IP Port Settings ...160 Quality of Service (QoS) Settings 161 Maintenance ...162 Firmware Version Update 163 Setting Initialize ...165...
... 147 Connections ...147 Wall Mounting ...150 Bluetooth Headset Connections 153 Installation ...153 Bluetooth Headset Operation 155 Setting Up the KX-NT400 157 Accessing the Start-up Settings 157 Language Settings ...159 IP Address Settings ...159 IP Port Settings ...160 Quality of Service (QoS) Settings 161 Maintenance ...162 Firmware Version Update 163 Setting Initialize ...165...
Operating Instructions
Page 37
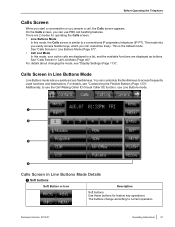
... in Call List Mode (Page 40)". This is similar to current operation. You can use Line Buttons mode. The buttons change according to a conventional IP proprietary telephone (IP-PT). For details, see "Display Settings (Page 113)". Document Version 2010-01 Operating Instructions 37 On the Calls screen, you easily access flexible keys...
... in Call List Mode (Page 40)". This is similar to current operation. You can use Line Buttons mode. The buttons change according to a conventional IP proprietary telephone (IP-PT). For details, see "Display Settings (Page 113)". Document Version 2010-01 Operating Instructions 37 On the Calls screen, you easily access flexible keys...
Operating Instructions
Page 50
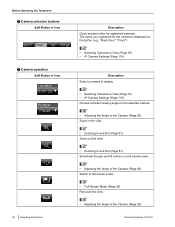
... is displayed on the button (e.g., "Back Door", "Front"). • Selecting Cameras to View (Page 81) • IP Camera Settings (Page 116) Description Select a camera to display. • Selecting Cameras to View (Page 81) • IP Camera Settings (Page 116) Choose a preset viewing angle for registered cameras. Before Operating the Telephone B Camera selection...
... is displayed on the button (e.g., "Back Door", "Front"). • Selecting Cameras to View (Page 81) • IP Camera Settings (Page 116) Description Select a camera to display. • Selecting Cameras to View (Page 81) • IP Camera Settings (Page 116) Choose a preset viewing angle for registered cameras. Before Operating the Telephone B Camera selection...
Operating Instructions
Page 81
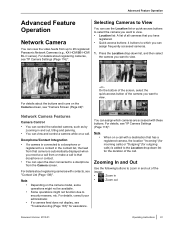
...assistance. Note • When on a call to that doorphone or contact. • You can open the door connected to 20 registered Panasonic Network Cameras (e.g., KX-HCM/BB-HCM/ BL-C series). For details about the buttons and icons on the camera model, some operations might not function due to... see "Camera Screen (Page 49)". -or- If a camera feed does not display, see "Contact List (Page 108)". For details, see "IP Camera Settings (Page 116)". Advanced Feature Operation Advanced Feature Operation Network Camera You can view the video feeds from that you have registered. • ...
...assistance. Note • When on a call to that doorphone or contact. • You can open the door connected to 20 registered Panasonic Network Cameras (e.g., KX-HCM/BB-HCM/ BL-C series). For details about the buttons and icons on the camera model, some operations might not function due to... see "Camera Screen (Page 49)". -or- If a camera feed does not display, see "Contact List (Page 108)". For details, see "IP Camera Settings (Page 116)". Advanced Feature Operation Advanced Feature Operation Network Camera You can view the video feeds from that you have registered. • ...
Operating Instructions
Page 110
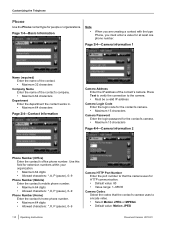
... • Allowed characters: *, #, P (pause), 0-9 Camera HTTP Port Number Enter the port number to that the contact's camera uses to the camera. • Must be a valid IP address Camera Login Code Enter the login code for the contact's camera. • Maximum 15 characters Camera Password Enter the login password for people or... contact's company. • Maximum 64 characters Department Enter the department the contact works in. • Maximum 64 characters Page 2/4-Contact Information Camera Address Enter the IP address of the contact's camera.
... • Allowed characters: *, #, P (pause), 0-9 Camera HTTP Port Number Enter the port number to that the contact's camera uses to the camera. • Must be a valid IP address Camera Login Code Enter the login code for the contact's camera. • Maximum 15 characters Camera Password Enter the login password for people or... contact's company. • Maximum 64 characters Department Enter the department the contact works in. • Maximum 64 characters Page 2/4-Contact Information Camera Address Enter the IP address of the contact's camera.
Operating Instructions
Page 111
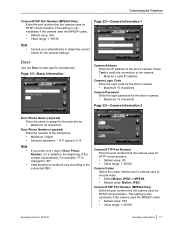
...) Enter the number of the door's camera. Press Test to verify the connection to the camera. • Must be a valid IP address Camera Login Code Enter the login code for the door's camera. • Maximum 15 characters Camera Password Enter the login password for...'s camera uses to "05". Valid doorphone numbers vary according to obtain the correct values for the camera settings. Page 1/3-Basic Information Camera Address Enter the IP address of the doorphone. • Maximum 2 digits • Allowed characters: *, #, P (pause), 0-9 Note • • If you enter only 1 digit in ...
...) Enter the number of the door's camera. Press Test to verify the connection to the camera. • Must be a valid IP address Camera Login Code Enter the login code for the door's camera. • Maximum 15 characters Camera Password Enter the login password for...'s camera uses to "05". Valid doorphone numbers vary according to obtain the correct values for the camera settings. Page 1/3-Basic Information Camera Address Enter the IP address of the doorphone. • Maximum 2 digits • Allowed characters: *, #, P (pause), 0-9 Note • • If you enter only 1 digit in ...
Operating Instructions
Page 112
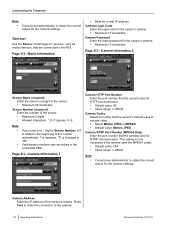
...: 1-65535 Note • Consult your administrator to the PBX. Valid sensor numbers vary according to the beginning of the number automatically. Camera Address Enter the IP address of the sensor. • Maximum 2 digits • Allowed characters: *, #, P (pause), 0-9 Note • • If you enter only...a 0 is changed to the camera. 112 Operating Instructions Document Version 2010-01 Page 1/3-Basic Information • Must be a valid IP address Camera Login Code Enter the login code for the sensor's camera. • Maximum 15 characters Camera Password Enter the login password...
...: 1-65535 Note • Consult your administrator to the PBX. Valid sensor numbers vary according to the beginning of the number automatically. Camera Address Enter the IP address of the sensor. • Maximum 2 digits • Allowed characters: *, #, P (pause), 0-9 Note • • If you enter only...a 0 is changed to the camera. 112 Operating Instructions Document Version 2010-01 Page 1/3-Basic Information • Must be a valid IP address Camera Login Code Enter the login code for the sensor's camera. • Maximum 15 characters Camera Password Enter the login password...
Operating Instructions
Page 114
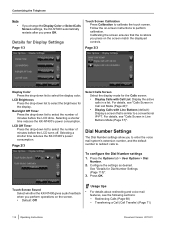
... controls. Transferring a Call (Call Transfer) (Page 71) 114 Operating Instructions Document Version 2010-01 Selecting a shorter time reduces the KX-NT400's power consumption. Configure the settings as desired. Redirecting Calls (Page 68) - Backlight Off Timer Press the drop-down list to ...Timer Press the drop-down list to a conventional IP-PT. To configure the Dial Number settings 1. Customizing the Telephone Note • If you change the Display Color or Select Calls Screen settings, the KX-NT400 automatically restarts after you to enter the voice mail ...
... controls. Transferring a Call (Call Transfer) (Page 71) 114 Operating Instructions Document Version 2010-01 Selecting a shorter time reduces the KX-NT400's power consumption. Configure the settings as desired. Redirecting Calls (Page 68) - Backlight Off Timer Press the drop-down list to ...Timer Press the drop-down list to a conventional IP-PT. To configure the Dial Number settings 1. Customizing the Telephone Note • If you change the Display Color or Select Calls Screen settings, the KX-NT400 automatically restarts after you to enter the voice mail ...
Operating Instructions
Page 116
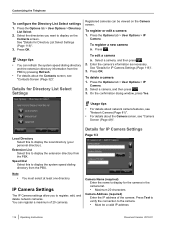
...a camera, and then press . 2. Select a camera, and then press . 3. You can register a maximum of the camera. Details for IP Camera Settings Page 1/3 Camera Name (required) Enter the name to display for Directory List Select Settings Registered cameras can refresh the system speed dialing ...Directory List Select Settings (Page 116)". 3. Details for the camera in the camera list. • Maximum 20 characters Camera Address (required) Enter the IP address of 20 cameras. To register or edit a camera 1. To delete a camera 1. To edit a camera a. Press OK. Usage tips &#...
...a camera, and then press . 2. Select a camera, and then press . 3. You can register a maximum of the camera. Details for IP Camera Settings Page 1/3 Camera Name (required) Enter the name to display for Directory List Select Settings Registered cameras can refresh the system speed dialing ...Directory List Select Settings (Page 116)". 3. Details for the camera in the camera list. • Maximum 20 characters Camera Address (required) Enter the IP address of 20 cameras. To register or edit a camera 1. To delete a camera 1. To edit a camera a. Press OK. Usage tips &#...
Operating Instructions
Page 117
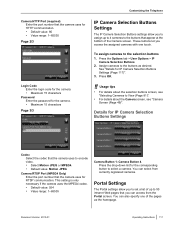
... The Portal settings allow you to assign up to 50 intranet Web pages that you can access from currently registered cameras. Details for IP Camera Selection Buttons Settings Codec Select the codec that the camera uses to View (Page 81)". • For details about the selection... buttons screen, see "Camera Screen (Page 49)". See "Details for IP Camera Selection Buttons Settings (Page 117)". 3. Usage tips • For details about the Camera screen, see "Selecting Cameras to encode video. •...
... The Portal settings allow you to assign up to 50 intranet Web pages that you can access from currently registered cameras. Details for IP Camera Selection Buttons Settings Codec Select the codec that the camera uses to View (Page 81)". • For details about the selection... buttons screen, see "Camera Screen (Page 49)". See "Details for IP Camera Selection Buttons Settings (Page 117)". 3. Usage tips • For details about the Camera screen, see "Selecting Cameras to encode video. •...
Operating Instructions
Page 118
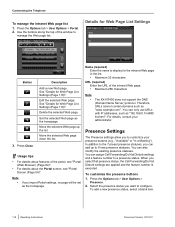
...homepage. In addition to a presence status. Press Close. Delete the selected Web page. Note • If you can only use URLs with IP addresses, such as the homepage. You can add up the list. When you want to manage the Web page list: Details for the intranet... see "Portal (Web Browser) (Page 84)". • For details about features of the intranet Web page. • Maximum 256 characters Note • The KX-NT400 does not support the DNS (Domain Name Server) protocol. You can also modify the existing presence statuses. Press the Options tab > User Options > Presence. ...
...homepage. In addition to a presence status. Press Close. Delete the selected Web page. Note • If you can only use URLs with IP addresses, such as the homepage. You can add up the list. When you want to manage the Web page list: Details for the intranet... see "Portal (Web Browser) (Page 84)". • For details about features of the intranet Web page. • Maximum 256 characters Note • The KX-NT400 does not support the DNS (Domain Name Server) protocol. You can also modify the existing presence statuses. Press the Options tab > User Options > Presence. ...
Operating Instructions
Page 121
... display for the LDAP server. • Maximum 20 characters Server Name/Address (required) Enter the IP address of the settings available in this screen: • For details about Network, see "Setting Up the KX-NT400 (Page 157)". • For details about Maintenance, see "Data Maintenance (Page 166)". •...can access on the Contacts screen. Press Close. Display Name (required) Enter the name to the LDAP server. • Must be a valid IP address Port Number (required) Enter the port number that the LDAP server uses for details about Error Log, see "Contacts Screen (Page 32)". ...
... display for the LDAP server. • Maximum 20 characters Server Name/Address (required) Enter the IP address of the settings available in this screen: • For details about Network, see "Setting Up the KX-NT400 (Page 157)". • For details about Maintenance, see "Data Maintenance (Page 166)". •...can access on the Contacts screen. Press Close. Display Name (required) Enter the name to the LDAP server. • Must be a valid IP address Port Number (required) Enter the port number that the LDAP server uses for details about Error Log, see "Contacts Screen (Page 32)". ...
Operating Instructions
Page 125
... "Feature Key Screen (Page 55)". Press the Options tab > Administrator Options > Programming. 2. During programming, you can customize the KX-NT400 beyond the settings that are performed using programming mode, you can only use the Navigator key to scroll through the programmable features and to... select parameters. • You can access programming mode on ordinary IP-PTs as necessary. Usage tips • Once you enter programming mode (step 2 in Call List mode). See "Feature Programming (Page ...
... "Feature Key Screen (Page 55)". Press the Options tab > Administrator Options > Programming. 2. During programming, you can customize the KX-NT400 beyond the settings that are performed using programming mode, you can only use the Navigator key to scroll through the programmable features and to... select parameters. • You can access programming mode on ordinary IP-PTs as necessary. Usage tips • Once you enter programming mode (step 2 in Call List mode). See "Feature Programming (Page ...
Operating Instructions
Page 157
...-up Settings 1. Note The first time you start -up screen, press Setup. IMPORTANT • The KX-NT400 requires 2 IP addresses for the settings you want to supply power. 2. Connect the KX-NT400 to an Ethernet cable capable of delivering power (PoE compliant), or use the default settings. Follow the ...instructions to the network. On the start the KX-NT400, the calibration screen appears. To make sure that 2 IP addresses are available for the KX-NT400. • Using the PC Maintenance Console to program the PBX, you must set the Incoming...
...-up Settings 1. Note The first time you start -up screen, press Setup. IMPORTANT • The KX-NT400 requires 2 IP addresses for the settings you want to supply power. 2. Connect the KX-NT400 to an Ethernet cable capable of delivering power (PoE compliant), or use the default settings. Follow the ...instructions to the network. On the start the KX-NT400, the calibration screen appears. To make sure that 2 IP addresses are available for the KX-NT400. • Using the PC Maintenance Console to program the PBX, you must set the Incoming...
Operating Instructions
Page 158
.... 2. QoS (® Page 161) If your network. 5. Exiting the start -up settings: 1. For a list of your dealer. 7. IP Port (Page 176)". 4. Firmware Version (® Page 165) View the installed version of Service) for the KX-NT400's network adaptors, and test connections to configure the start -up settings 1. Firmware Version Update (® Page 163...
.... 2. QoS (® Page 161) If your network. 5. Exiting the start -up settings: 1. For a list of your dealer. 7. IP Port (Page 176)". 4. Firmware Version (® Page 165) View the installed version of Service) for the KX-NT400's network adaptors, and test connections to configure the start -up settings 1. Firmware Version Update (® Page 163...


