

Hd Camcorder - Multi Language
Page 1
For USA and Puerto Rico assistance, please call: 1-800-211-PANA(7262) or, contact us via the web at: http://www.panasonic.com/contactinfo For Canadian assistance, please call: 1-800-561-5505 or visit us at www.panasonic.ca VQT2M51 Operating Instructions High Definition Video Camera Model No. Guía para rápida consulta en español está incluida. Spanish Quick Use Guide is included. HDC-SD60P/PC HDC-TM55P/PC HDC-TM60P/PC HDC-HS60P/PC Before connecting, operating or adjusting this product, please read the instructions completely.
For USA and Puerto Rico assistance, please call: 1-800-211-PANA(7262) or, contact us via the web at: http://www.panasonic.com/contactinfo For Canadian assistance, please call: 1-800-561-5505 or visit us at www.panasonic.ca VQT2M51 Operating Instructions High Definition Video Camera Model No. Guía para rápida consulta en español está incluida. Spanish Quick Use Guide is included. HDC-SD60P/PC HDC-TM55P/PC HDC-TM60P/PC HDC-HS60P/PC Before connecting, operating or adjusting this product, please read the instructions completely.
Hd Camcorder - Multi Language
Page 2
Used properly, we're sure it will bring you for choosing Panasonic! Model No. WARNING: TO REDUCE THE RISK OF FIRE, ELECTRIC SHOCK OR PRODUCT DAMAGE, ≥ DO NOT EXPOSE THIS APPARATUS TO RAIN, MOISTURE, DRIPPING OR ...
Used properly, we're sure it will bring you for choosing Panasonic! Model No. WARNING: TO REDUCE THE RISK OF FIRE, ELECTRIC SHOCK OR PRODUCT DAMAGE, ≥ DO NOT EXPOSE THIS APPARATUS TO RAIN, MOISTURE, DRIPPING OR ...
Hd Camcorder - Multi Language
Page 3
...no guarantee that may cause harmful interference to correct the interference by one or more of North America One Panasonic Way, Secaucus, NJ 07094 Support Contact: Panasonic Consumer Electronics Company 1-800-211-PANA (7262) This device complies with Canadian ICES-003. 3 VQT2M51 ...a circuit different from that to computer or peripheral devices. Declaration of Conformity Trade Name: Panasonic Model No.: HDC-SD60P/HDC-TM55P/HDC-TM60P/HDC-HS60P Responsible party: Panasonic Corporation of the following two conditions: (1) This device may not cause harmful interference, and ...
...no guarantee that may cause harmful interference to correct the interference by one or more of North America One Panasonic Way, Secaucus, NJ 07094 Support Contact: Panasonic Consumer Electronics Company 1-800-211-PANA (7262) This device complies with Canadian ICES-003. 3 VQT2M51 ...a circuit different from that to computer or peripheral devices. Declaration of Conformity Trade Name: Panasonic Model No.: HDC-SD60P/HDC-TM55P/HDC-TM60P/HDC-HS60P Responsible party: Panasonic Corporation of the following two conditions: (1) This device may not cause harmful interference, and ...
Hd Camcorder - Multi Language
Page 4
If any electrolyte should be connected to a 120 V AC power supply only. ≥ When connecting to an AC supply outside of units. Warning Risk of the AC adaptor. ≥ Contact an electrical parts distributor for information on the terminals. ≥ Do not touch the plug terminals (i and j) with metal objects. ≥ Do not disassemble, remodel, heat or throw into contact with water, and then consult a doctor. See www.dtsc.ca.gov/hazardouswaste/perchlorate. 4 VQT2M51 Rinse eyes thoroughly with your hands or clothes, wash it off thoroughly with the power cord connected ...
If any electrolyte should be connected to a 120 V AC power supply only. ≥ When connecting to an AC supply outside of units. Warning Risk of the AC adaptor. ≥ Contact an electrical parts distributor for information on the terminals. ≥ Do not touch the plug terminals (i and j) with metal objects. ≥ Do not disassemble, remodel, heat or throw into contact with water, and then consult a doctor. See www.dtsc.ca.gov/hazardouswaste/perchlorate. 4 VQT2M51 Rinse eyes thoroughly with your hands or clothes, wash it off thoroughly with the power cord connected ...

Hd Camcorder - Multi Language
Page 5
Follow the safety instructions on or pinched particularly at plugs, convenience receptacles, and the point where they exit from being walked on the unit and the applicable safety instructions listed below. Install in any way, such as radiators, heat registers, stoves, or other . If the provided plug does not fit into the apparatus, the apparatus has been exposed to qualified service personnel. A polarized plug has two blades with the manufacturer's instructions. 8) Do not install near water. 6) Clean only with dry cloth. 7) Do not block any heat sources such as power-supply cord...
Follow the safety instructions on or pinched particularly at plugs, convenience receptacles, and the point where they exit from being walked on the unit and the applicable safety instructions listed below. Install in any way, such as radiators, heat registers, stoves, or other . If the provided plug does not fit into the apparatus, the apparatus has been exposed to qualified service personnel. A polarized plug has two blades with the manufacturer's instructions. 8) Do not install near water. 6) Clean only with dry cloth. 7) Do not block any heat sources such as power-supply cord...

Hd Camcorder - Multi Language
Page 6
Do not connect the power supply or operate your camera if it may form on Disposal in other Countries outside the European Union This symbol is not designed to sustain direct exposure to a heater, etc... Your camera has been designed for outdoor use strong or abrasive detergents when cleaning your camera. DO NOT ALLOW CHILDREN TO HANDLE THE SD CARD. If the unit is suddenly moved from a pool or even a cup of your camera body. ≥ TO PROTECT THE LENS ... Do not use , however it to discard this product, please contact your camera. ≥ AVOID SUDDEN CHANGES IN ...
Do not connect the power supply or operate your camera if it may form on Disposal in other Countries outside the European Union This symbol is not designed to sustain direct exposure to a heater, etc... Your camera has been designed for outdoor use strong or abrasive detergents when cleaning your camera. DO NOT ALLOW CHILDREN TO HANDLE THE SD CARD. If the unit is suddenly moved from a pool or even a cup of your camera body. ≥ TO PROTECT THE LENS ... Do not use , however it to discard this product, please contact your camera. ≥ AVOID SUDDEN CHANGES IN ...
Hd Camcorder - Multi Language
Page 7
...] memory. In order to avoid erasing data due to static electricity, electromagnetic waves, breakage, and failures, back up data immediately. ∫ Indemnity about recorded content Panasonic does not accept any responsibility for . Recording data on the HDD to sound vibrations. The built-in memory is equipped with the built-in memory...
...] memory. In order to avoid erasing data due to static electricity, electromagnetic waves, breakage, and failures, back up data immediately. ∫ Indemnity about recorded content Panasonic does not accept any responsibility for . Recording data on the HDD to sound vibrations. The built-in memory is equipped with the built-in memory...
Hd Camcorder - Multi Language
Page 8
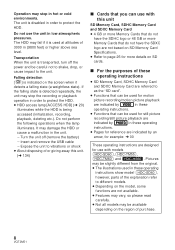
The unit is disabled in low atmospheric pressures. Do not use the unit in order to protect the HDD. Falling detection [ ] is being accessed (initialization, recording, playback, deleting etc.). Do not perform the following operations when the lamp illuminates. j Turn the unit off the power and be careful not to shake, drop, or cause impact to different models. ≥ Depending on the model, some functions are not available. ≥ Features may vary, so please read carefully. ≥ Not all models may damage the HDD or cause a malfunction in these operating instructions ...
The unit is disabled in low atmospheric pressures. Do not use the unit in order to protect the HDD. Falling detection [ ] is being accessed (initialization, recording, playback, deleting etc.). Do not perform the following operations when the lamp illuminates. j Turn the unit off the power and be careful not to shake, drop, or cause impact to different models. ≥ Depending on the model, some functions are not available. ≥ Features may vary, so please read carefully. ≥ Not all models may damage the HDD or cause a malfunction in these operating instructions ...
Hd Camcorder - Multi Language
Page 9
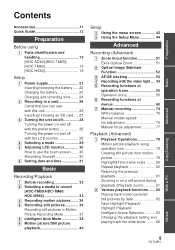
Contents Preparation Basic Advanced Accessories 11 Quick Guide 12 Preparation Before using [1] Parts identification and handling 15 [HDC-SD60]/[HDC-TM55]/ [HDC-TM60 15 [HDC-HS60 18 Setup [1] Power supply 21 Inserting/removing the battery ..... 22 Charging the battery 23 Charging and recording time........ 24 [2] Recording to a card 26 Cards that you can use with this unit 26 Inserting/removing an SD card .... 27 [3] Turning the unit on/off 28 Turning the power on and off with the power button 28 Turning the power on and off with the LCD monitor 28 [4] Selecting a mode 29 [5] ...
Contents Preparation Basic Advanced Accessories 11 Quick Guide 12 Preparation Before using [1] Parts identification and handling 15 [HDC-SD60]/[HDC-TM55]/ [HDC-TM60 15 [HDC-HS60 18 Setup [1] Power supply 21 Inserting/removing the battery ..... 22 Charging the battery 23 Charging and recording time........ 24 [2] Recording to a card 26 Cards that you can use with this unit 26 Inserting/removing an SD card .... 27 [3] Turning the unit on/off 28 Turning the power on and off with the power button 28 Turning the power on and off with the LCD monitor 28 [4] Selecting a mode 29 [5] ...
Hd Camcorder - Multi Language
Page 10
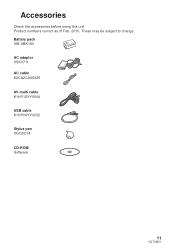
...TM60 92 With a TV [1] Watching Video/Pictures on your TV 94 Connecting with a HDMI mini cable 96 Connecting with the AV multi cable 96 [2] Playback using VIERA Link™ (HDAVI Control 97 Copy/Dubbing With this unit/other products [1] Copying between SD card....... 111 [2] Operating environment 112 Setup [1] Installation 115 [2] Connecting to a PC 117 About the PC display 119 Using with a PC [1] Starting HD Writer AE 2.0 ........ 120 Reading the operating instructions of the software applications ....... 120 [2] If using Mac 121 Others Indications [1] Indications 122 [2] Messages...
...TM60 92 With a TV [1] Watching Video/Pictures on your TV 94 Connecting with a HDMI mini cable 96 Connecting with the AV multi cable 96 [2] Playback using VIERA Link™ (HDAVI Control 97 Copy/Dubbing With this unit/other products [1] Copying between SD card....... 111 [2] Operating environment 112 Setup [1] Installation 115 [2] Connecting to a PC 117 About the PC display 119 Using with a PC [1] Starting HD Writer AE 2.0 ........ 120 Reading the operating instructions of the software applications ....... 120 [2] If using Mac 121 Others Indications [1] Indications 122 [2] Messages...
Hd Camcorder - Multi Language
Page 11
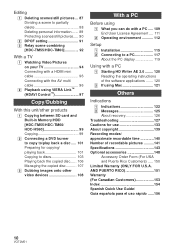
These may be subject to change. Product numbers correct as of Feb. 2010. Accessories Check the accessories before using this unit. Battery pack VW-VBK180 AC adaptor VSK0711 AC cable K2CA2CA00025 AV multi cable K1HY12YY0004 USB cable K1HY04YY0032 Stylus pen VGQ0C14 CD-ROM Software 11 VQT2M51
These may be subject to change. Product numbers correct as of Feb. 2010. Accessories Check the accessories before using this unit. Battery pack VW-VBK180 AC adaptor VSK0711 AC cable K2CA2CA00025 AV multi cable K1HY12YY0004 USB cable K1HY04YY0032 Stylus pen VGQ0C14 CD-ROM Software 11 VQT2M51
Hd Camcorder - Multi Language
Page 12
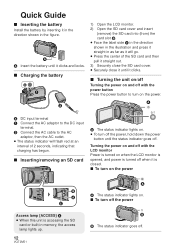
A Insert the battery until it clicks and locks. ∫ Charging the battery 1) Open the LCD monitor. 2) Open the SD card cover and insert (remove) the SD card into (from) the card slot B. ≥ Face the label side C in the direction shown in the illustration and press it straight in as far as it will flash red at an interval of the SD card and then pull it straight out. 3) Securely close the SD card cover. ≥ Securely close it until the status indicator goes off. Quick Guide ∫ Inserting the battery Install the battery by inserting it is closed. ∫ To turn on the ...
A Insert the battery until it clicks and locks. ∫ Charging the battery 1) Open the LCD monitor. 2) Open the SD card cover and insert (remove) the SD card into (from) the card slot B. ≥ Face the label side C in the direction shown in the illustration and press it straight in as far as it will flash red at an interval of the SD card and then pull it straight out. 3) Securely close the SD card cover. ≥ Securely close it until the status indicator goes off. Quick Guide ∫ Inserting the battery Install the battery by inserting it is closed. ∫ To turn on the ...
Hd Camcorder - Multi Language
Page 13
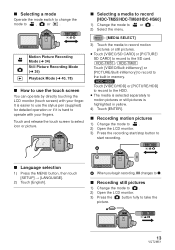
...; Recording motion pictures 1) Change the mode to . 2) Open the LCD monitor. 3) Press the recording start/stop button to start recording. ∫ Language selection 1) Press the MENU button, then touch [SETUP] # [LANGUAGE]. 2) Touch [English]. MENU : [MEDIA SELECT] 3) Touch the media to record motion pictures or still pictures. ≥ Touch [VIDEO/SD CARD] or...
...; Recording motion pictures 1) Change the mode to . 2) Open the LCD monitor. 3) Press the recording start/stop button to start recording. ∫ Language selection 1) Press the MENU button, then touch [SETUP] # [LANGUAGE]. 2) Touch [English]. MENU : [MEDIA SELECT] 3) Touch the media to record motion pictures or still pictures. ≥ Touch [VIDEO/SD CARD] or...

Hd Camcorder - Multi Language
Page 14
Touch [VIDEO/HDD] or [PICTURE/HDD] to play back the HDD. 4) Touch the scene or the still picture to be played back. (Motion picture playback) 1/;: Playback/Pause 6: Rewind playback 5: Fast forward playback ∫: Stops the playback and shows the thumbnails. 1: Displays the direct playback bar. (l 79) (Still picture playback) 1/;: Slide show (playback of the still pictures in numerical order) start/pause. 2;: Plays back the previous picture. ;1: Plays back the next picture. ∫: Stops the playback and shows the thumbnails. ≥ Touch F / F to display/not-display the...
Touch [VIDEO/HDD] or [PICTURE/HDD] to play back the HDD. 4) Touch the scene or the still picture to be played back. (Motion picture playback) 1/;: Playback/Pause 6: Rewind playback 5: Fast forward playback ∫: Stops the playback and shows the thumbnails. 1: Displays the direct playback bar. (l 79) (Still picture playback) 1/;: Slide show (playback of the still pictures in numerical order) start/pause. 2;: Plays back the previous picture. ;1: Plays back the next picture. ∫: Stops the playback and shows the thumbnails. ≥ Touch F / F to display/not-display the...
Hd Camcorder - Multi Language
Page 15
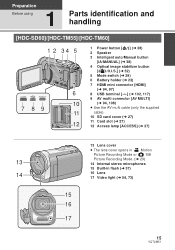
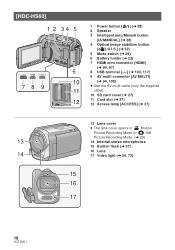
Preparation Before using 1 Parts identification and handling [HDC-SD60]/[HDC-TM55]/[HDC-TM60] 1 2 34 5 6 AV MULTI 10 7 89 11 12 1 Power button [ ] (l 28) 2 Speaker 3 Intelligent auto/Manual button [iA/MANUAL] (l 38) 4 Optical image stabilizer button [ /O.I.S.] (l 52) 5 Mode switch (l ...29) 6 Battery holder (l 22) 7 HDMI mini connector [HDMI] (l 94, 97) 8 USB terminal [ ] (l 102, 117) 9 AV multi connector [AV MULTI] (l 94, 108) ≥ Use the AV multi cable (only the supplied cable). 10 SD card cover (l 27) 11 Card slot (l 27) 12 Access lamp [ACCESS] (l 27) 13 Lens...
Preparation Before using 1 Parts identification and handling [HDC-SD60]/[HDC-TM55]/[HDC-TM60] 1 2 34 5 6 AV MULTI 10 7 89 11 12 1 Power button [ ] (l 28) 2 Speaker 3 Intelligent auto/Manual button [iA/MANUAL] (l 38) 4 Optical image stabilizer button [ /O.I.S.] (l 52) 5 Mode switch (l ...29) 6 Battery holder (l 22) 7 HDMI mini connector [HDMI] (l 94, 97) 8 USB terminal [ ] (l 102, 117) 9 AV multi connector [AV MULTI] (l 94, 108) ≥ Use the AV multi cable (only the supplied cable). 10 SD card cover (l 27) 11 Card slot (l 27) 12 Access lamp [ACCESS] (l 27) 13 Lens...
Hd Camcorder - Multi Language
Page 16
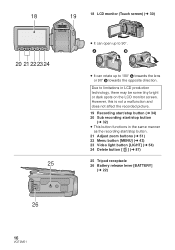
However, this is not a malfunction and does not affect the recorded picture. 19 Recording start/stop button (l 34) 20 Sub recording start /stop button (l 32) ≥ This button functions in LCD production technology, there may be some tiny bright or dark spots on the LCD monitor screen. 18 19 18 LCD monitor (Touch screen) (l 30) 20 21 222324 25 ≥ It can open up to 90o. ≥ It can rotate up to limitations in the same manner as the recording start /stop button. 21 Adjust zoom buttons (l 51) 22 Menu button [MENU] (l 43) 23 Video light button [LIGHT] (l 54) 24 Delete button [...
However, this is not a malfunction and does not affect the recorded picture. 19 Recording start/stop button (l 34) 20 Sub recording start /stop button (l 32) ≥ This button functions in LCD production technology, there may be some tiny bright or dark spots on the LCD monitor screen. 18 19 18 LCD monitor (Touch screen) (l 30) 20 21 222324 25 ≥ It can open up to 90o. ≥ It can rotate up to limitations in the same manner as the recording start /stop button. 21 Adjust zoom buttons (l 51) 22 Menu button [MENU] (l 43) 23 Video light button [LIGHT] (l 54) 24 Delete button [...
Hd Camcorder - Multi Language
Page 17
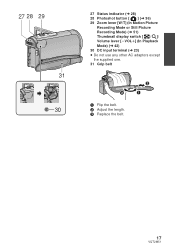
27 28 29 31 27 Status indicator (l 28) 28 Photoshot button [ ] (l 36) 29 Zoom lever [W/T] (In Motion Picture Recording Mode or Still Picture Recording Mode) (l 51) Thumbnail display switch [ / ]/ Volume lever [sVOLr] (In Playback Mode) (l 42) 30 DC input terminal (l 23) ≥ Do not use any other AC adaptors except the supplied one. 31 Grip belt 1 Flip the belt. 30 2 Adjust the length. 3 Replace the belt. 17 VQT2M51
27 28 29 31 27 Status indicator (l 28) 28 Photoshot button [ ] (l 36) 29 Zoom lever [W/T] (In Motion Picture Recording Mode or Still Picture Recording Mode) (l 51) Thumbnail display switch [ / ]/ Volume lever [sVOLr] (In Playback Mode) (l 42) 30 DC input terminal (l 23) ≥ Do not use any other AC adaptors except the supplied one. 31 Grip belt 1 Flip the belt. 30 2 Adjust the length. 3 Replace the belt. 17 VQT2M51
Hd Camcorder - Multi Language
Page 18
... image stabilizer button [ /O.I.S.] (l 52) 5 Mode switch (l 29) 6 Battery holder (l 22) 7 HDMI mini connector [HDMI] (l 94, 97) 8 USB terminal [ ] (l 102, 117) 9 AV multi connector [AV MULTI] (l 94, 108) ≥ Use the AV multi cable (only the supplied cable). 10 SD card cover (l 27) 11 Card slot (l 27) 12 Access lamp [ACCESS] (l 27) 13 Lens...
... image stabilizer button [ /O.I.S.] (l 52) 5 Mode switch (l 29) 6 Battery holder (l 22) 7 HDMI mini connector [HDMI] (l 94, 97) 8 USB terminal [ ] (l 102, 117) 9 AV multi connector [AV MULTI] (l 94, 108) ≥ Use the AV multi cable (only the supplied cable). 10 SD card cover (l 27) 11 Card slot (l 27) 12 Access lamp [ACCESS] (l 27) 13 Lens...
Hd Camcorder - Multi Language
Page 19
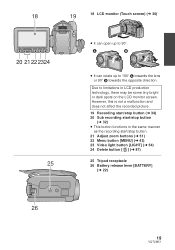
18 19 18 LCD monitor (Touch screen) (l 30) 20 21 222324 25 ≥ It can open up to 90o. ≥ It can rotate up to limitations in the same manner as the recording start/stop button. 21 Adjust zoom buttons (l 51) 22 Menu button [MENU] (l 43) 23 Video light button [LIGHT] (l 54) 24 Delete button [ ] (l 87) 25 Tripod receptacle 26 Battery release lever [BATTERY] (l 22) 26 19 VQT2M51 However, this is not a malfunction and does not affect the recorded picture. 19 Recording start/stop button (l 34) 20 Sub recording start/stop button (l 32) ≥ This button functions in LCD production...
18 19 18 LCD monitor (Touch screen) (l 30) 20 21 222324 25 ≥ It can open up to 90o. ≥ It can rotate up to limitations in the same manner as the recording start/stop button. 21 Adjust zoom buttons (l 51) 22 Menu button [MENU] (l 43) 23 Video light button [LIGHT] (l 54) 24 Delete button [ ] (l 87) 25 Tripod receptacle 26 Battery release lever [BATTERY] (l 22) 26 19 VQT2M51 However, this is not a malfunction and does not affect the recorded picture. 19 Recording start/stop button (l 34) 20 Sub recording start/stop button (l 32) ≥ This button functions in LCD production...
Hd Camcorder - Multi Language
Page 20
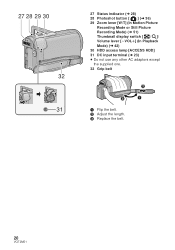
27 28 29 30 32 27 Status indicator (l 28) 28 Photoshot button [ ] (l 36) 29 Zoom lever [W/T] (In Motion Picture Recording Mode or Still Picture Recording Mode) (l 51) Thumbnail display switch [ / ]/ Volume lever [sVOLr] (In Playback Mode) (l 42) 30 HDD access lamp [ACCESS HDD] 31 DC input terminal (l 23) ≥ Do not use any other AC adaptors except the supplied one. 32 Grip belt 31 1 Flip the belt. 2 Adjust the length. 3 Replace the belt. 20 VQT2M51
27 28 29 30 32 27 Status indicator (l 28) 28 Photoshot button [ ] (l 36) 29 Zoom lever [W/T] (In Motion Picture Recording Mode or Still Picture Recording Mode) (l 51) Thumbnail display switch [ / ]/ Volume lever [sVOLr] (In Playback Mode) (l 42) 30 HDD access lamp [ACCESS HDD] 31 DC input terminal (l 23) ≥ Do not use any other AC adaptors except the supplied one. 32 Grip belt 31 1 Flip the belt. 2 Adjust the length. 3 Replace the belt. 20 VQT2M51