
Basic Operating Manual
Page 3
... MENU . 2 Touch [SETUP]. 3 Touch [Approved Regulations]. Declaration of Conformity Trade Name: Model No.: Responsible Party: Support Contact: Panasonic HC-V180 Panasonic Corporation of the FCC Rules. Certification and Compliance See Camcorder for the certification and compliance mark specific to that may cause undesired operation. This device complies with ferrite core when connecting to provide reasonable protection against harmful interference in a particular installation. This...
... MENU . 2 Touch [SETUP]. 3 Touch [Approved Regulations]. Declaration of Conformity Trade Name: Model No.: Responsible Party: Support Contact: Panasonic HC-V180 Panasonic Corporation of the FCC Rules. Certification and Compliance See Camcorder for the certification and compliance mark specific to that may cause undesired operation. This device complies with ferrite core when connecting to provide reasonable protection against harmful interference in a particular installation. This...
Basic Operating Manual
Page 8
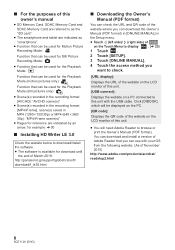
.... [USB connect]: Displays the website on a PC connected to this unit. ≥ You will be displayed on the PC. [QR code]: Displays the QR code of the website on the Touch Menu to display MENU . (l 23) 1 Touch MENU . 2 Touch [SETUP]. 3 Touch [ONLINE MANUAL]. 4 Touch the access method you can be used for the Playback Mode (still pictures only): ≥ Scene(s) recorded in the recording format [AVCHD]: "AVCHD scene(s)" ≥ Scene(s) recorded in the recording format...
.... [USB connect]: Displays the website on a PC connected to this unit. ≥ You will be displayed on the PC. [QR code]: Displays the QR code of the website on the Touch Menu to display MENU . (l 23) 1 Touch MENU . 2 Touch [SETUP]. 3 Touch [ONLINE MANUAL]. 4 Touch the access method you can be used for the Playback Mode (still pictures only): ≥ Scene(s) recorded in the recording format [AVCHD]: "AVCHD scene(s)" ≥ Scene(s) recorded in the recording format...
Basic Operating Manual
Page 24
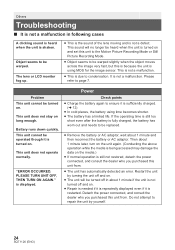
... Motion Picture Recording Mode or Still Picture Recording Mode. ≥ Object seems to condensation. Do not attempt to be warped. Please refer to ensure it is using time becomes shorter. ≥ The battery has a limited life. Others Troubleshooting ∫ It is not a malfunction in about 1 minute if the unit is not turned off and on. ≥ Repair is needed if it is repeatedly displayed...
... Motion Picture Recording Mode or Still Picture Recording Mode. ≥ Object seems to condensation. Do not attempt to be warped. Please refer to ensure it is using time becomes shorter. ≥ The battery has a limited life. Others Troubleshooting ∫ It is not a malfunction in about 1 minute if the unit is not turned off and on. ≥ Repair is needed if it is repeatedly displayed...
Basic Operating Manual
Page 28
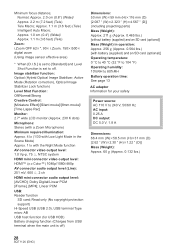
... 80%RH Battery operation time: See page 13 AC adaptor Information for your safety Power source: AC 110 V to [Standard] and Level Shot Function is off . Approx. 1.1 m (3.6 feet) (Tele) Intelligent Auto Macro; Image stabilizer function: Optical (Hybrid Optical Image Stabilizer, Active Mode (Rotation correction), Optical Image Stabilizer Lock function) Level Shot Function: Off/Normal/Strong Creative Control: [Miniature Effect]/[Silent movie]/[8mm movie]/ [Time Lapse Rec] Monitor: 2.7z wide LCD monitor (Approx...
... 80%RH Battery operation time: See page 13 AC adaptor Information for your safety Power source: AC 110 V to [Standard] and Level Shot Function is off . Approx. 1.1 m (3.6 feet) (Tele) Intelligent Auto Macro; Image stabilizer function: Optical (Hybrid Optical Image Stabilizer, Active Mode (Rotation correction), Optical Image Stabilizer Lock function) Level Shot Function: Off/Normal/Strong Creative Control: [Miniature Effect]/[Silent movie]/[8mm movie]/ [Time Lapse Rec] Monitor: 2.7z wide LCD monitor (Approx...
Advanced Operating Manual
Page 4
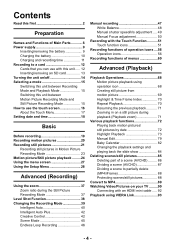
.../Still picture playback ......... 24 Using the menu screen 27 Using the Setup Menu 28 Advanced (Recording) Using the zoom 37 Zoom ratio during the Still Picture Recording Mode 37 Level Shot Function 38 Changing the Recording Mode 39 Intelligent Auto 40 Intelligent Auto Plus 42 Creative Control 42 Scene Mode 45 Endless Loop Recording 46 Manual recording 47 White Balance 48 Manual shutter speed/iris adjustment .... 49 Manual Focus adjustment 50 Recording with the Touch Function ...........51 Touch function icons 51 Recording functions of operation icons ....56 Operation icons 56...
.../Still picture playback ......... 24 Using the menu screen 27 Using the Setup Menu 28 Advanced (Recording) Using the zoom 37 Zoom ratio during the Still Picture Recording Mode 37 Level Shot Function 38 Changing the Recording Mode 39 Intelligent Auto 40 Intelligent Auto Plus 42 Creative Control 42 Scene Mode 45 Endless Loop Recording 46 Manual recording 47 White Balance 48 Manual shutter speed/iris adjustment .... 49 Manual Focus adjustment 50 Recording with the Touch Function ...........51 Touch function icons 51 Recording functions of operation icons ....56 Operation icons 56...
Advanced Operating Manual
Page 5
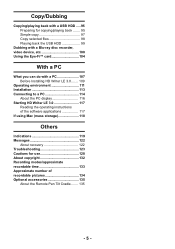
... 3.0....... 109 Operating environment 111 Installation 113 Connecting to a PC 114 About the PC display 116 Starting HD Writer LE 3.0 117 Reading the operating instructions of the software applications 117 If using Mac (mass storage 118 Others Indications 119 Messages 122 About recovery 122 Troubleshooting 123 Cautions for use 128 About copyright 132 Recording modes/approximate recordable time 133 Approximate number of recordable pictures 134 Optional accessories 135 About the Remote Pan Tilt...
... 3.0....... 109 Operating environment 111 Installation 113 Connecting to a PC 114 About the PC display 116 Starting HD Writer LE 3.0 117 Reading the operating instructions of the software applications 117 If using Mac (mass storage 118 Others Indications 119 Messages 122 About recovery 122 Troubleshooting 123 Cautions for use 128 About copyright 132 Recording modes/approximate recordable time 133 Approximate number of recordable pictures 134 Optional accessories 135 About the Remote Pan Tilt...
Advanced Operating Manual
Page 10
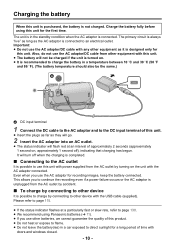
...use the AC adaptor/DC cable from other device with the USB cable (supplied). This allows you to continue the recording even if a power failure occurs or the AC adaptor is unplugged from the AC outlet by accident. ∫ To charge by connecting to other batteries,...connected. Please refer to page 115. ≥ If the status indicator flashes at an interval of time with doors and windows closed. - 10 - The unit is in a car exposed to direct sunlight for recording images, keep the battery connected. Charge the battery fully before using Panasonic batteries (l 11). ≥ If you use...
...use the AC adaptor/DC cable from other device with the USB cable (supplied). This allows you to continue the recording even if a power failure occurs or the AC adaptor is unplugged from the AC outlet by accident. ∫ To charge by connecting to other batteries,...connected. Please refer to page 115. ≥ If the status indicator flashes at an interval of time with doors and windows closed. - 10 - The unit is in a car exposed to direct sunlight for recording images, keep the battery connected. Charge the battery fully before using Panasonic batteries (l 11). ≥ If you use...

Advanced Operating Manual
Page 38
... o to the horizontal direction. ≥ Level Shot Function is canceled when [LEVEL GAUGE] is set to [ON]. (l 63) ≥ When recording horizontal images using a tripod, attach the unit on the tripod using [LEVEL GAUGE] (l 63), and then set Level Shot Function to (Normal) or (Strong) before use. ≥ When you switch the setting of view will change. ≥ This function cannot be set when recording a motion picture or during PRE...
... o to the horizontal direction. ≥ Level Shot Function is canceled when [LEVEL GAUGE] is set to [ON]. (l 63) ≥ When recording horizontal images using a tripod, attach the unit on the tripod using [LEVEL GAUGE] (l 63), and then set Level Shot Function to (Normal) or (Strong) before use. ≥ When you switch the setting of view will change. ≥ This function cannot be set when recording a motion picture or during PRE...

Advanced Operating Manual
Page 41
... Auto Mode When switching to Intelligent Auto Mode, the Automatic White Balance and Auto Focus operate and automatically adjust the color balance and focusing. Record pictures in the Manual Focus Mode. (l 50) j Recording distant and close-up objects at the same time j Recording a subject behind dirty or dusty window j Recording a subject that is not functioning normally, adjust 7) the White Balance manually. (l 48) 2 000K 8) Auto Focus 9) The unit focuses automatically. ≥ Auto Focus does not work correctly in the following situations. If so, manually adjust these settings...
... Auto Mode When switching to Intelligent Auto Mode, the Automatic White Balance and Auto Focus operate and automatically adjust the color balance and focusing. Record pictures in the Manual Focus Mode. (l 50) j Recording distant and close-up objects at the same time j Recording a subject behind dirty or dusty window j Recording a subject that is not functioning normally, adjust 7) the White Balance manually. (l 48) 2 000K 8) Auto Focus 9) The unit focuses automatically. ≥ Auto Focus does not work correctly in the following situations. If so, manually adjust these settings...

Advanced Operating Manual
Page 54
... to occur when using zoom. 1 Touch to recording of yourself Optical Image Stabilizer Lock In Motion Picture Recording Mode, you remove your finger from the icon. ∫ To make the display of disappear, change the setting of will not disappear even when no operation is displayed in the following cases. With this function, you can further improve optical image stabilization by touching and holding . MENU : [SETUP] # [O.I .S. ≥ AF/AE...
... to occur when using zoom. 1 Touch to recording of yourself Optical Image Stabilizer Lock In Motion Picture Recording Mode, you remove your finger from the icon. ∫ To make the display of disappear, change the setting of will not disappear even when no operation is displayed in the following cases. With this function, you can further improve optical image stabilization by touching and holding . MENU : [SETUP] # [O.I .S. ≥ AF/AE...
Advanced Operating Manual
Page 64
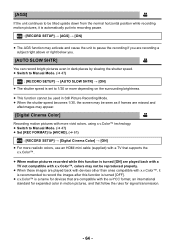
... vivid colors, using x.v.Color™ technology. ≥ Switch to Manual Mode. (l 47) ≥ Set [REC FORMAT] to record the images after this function is turned [OFF]. ≥ x.v.Color™ is automatically put into recording pause. [AGS] If the unit continues to be reproduced properly. ≥ When these images are compatible with x.v.Color™, it is recommended to [AVCHD]. (l 61) MENU : [RECORD SETUP] # [Digital Cinema Color] # [ON] ≥ For more realistic colors, use an HDMI mini cable...
... vivid colors, using x.v.Color™ technology. ≥ Switch to Manual Mode. (l 47) ≥ Set [REC FORMAT] to record the images after this function is turned [OFF]. ≥ x.v.Color™ is automatically put into recording pause. [AGS] If the unit continues to be reproduced properly. ≥ When these images are compatible with x.v.Color™, it is recommended to [AVCHD]. (l 61) MENU : [RECORD SETUP] # [Digital Cinema Color] # [ON] ≥ For more realistic colors, use an HDMI mini cable...

Advanced Operating Manual
Page 66
MENU : [RECORD SETUP] # [MIC LEVEL] # desired setting [AUTO]: AGC is activated, and the recording level is adjusted automatically. [SET ]: The desired recording level can be set . MENU : [RECORD SETUP] # [PICTURE ADJUST] 2 Touch the desired setting items. [SHARPNESS]: [COLOR]: [EXPOSURE]: [WB ADJUST]: Sharpness of the edge Depth of the color of the image Brightness of the image Picture color balance 3 Touch / to adjust settings. 4 Touch [ENTER]. ≥ Touch [EXIT] to Manual Mode. (l 47) 1 Select the menu. AGC is activated, and sound distortions are...
MENU : [RECORD SETUP] # [MIC LEVEL] # desired setting [AUTO]: AGC is activated, and the recording level is adjusted automatically. [SET ]: The desired recording level can be set . MENU : [RECORD SETUP] # [PICTURE ADJUST] 2 Touch the desired setting items. [SHARPNESS]: [COLOR]: [EXPOSURE]: [WB ADJUST]: Sharpness of the edge Depth of the color of the image Brightness of the image Picture color balance 3 Touch / to adjust settings. 4 Touch [ENTER]. ≥ Touch [EXIT] to Manual Mode. (l 47) 1 Select the menu. AGC is activated, and sound distortions are...
Advanced Operating Manual
Page 79
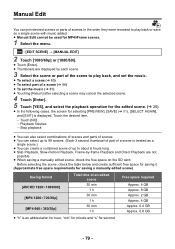
... recorded to play back or save as a single scene with music added. ≥ Manual Edit cannot be used for MP4/iFrame scenes. 1 Select the menu. MENU : [EDIT SCENE] # [MANUAL EDIT] 2 Touch [1080/60p] or [1080/60i]. ≥ Touch [Enter]. ≥ Thumbnails are displayed by -frame Playback and Direct Playback are not possible. ≥ When saving a manually edited scene, check the free space on the SD card...
... recorded to play back or save as a single scene with music added. ≥ Manual Edit cannot be used for MP4/iFrame scenes. 1 Select the menu. MENU : [EDIT SCENE] # [MANUAL EDIT] 2 Touch [1080/60p] or [1080/60i]. ≥ Touch [Enter]. ≥ Thumbnails are displayed by -frame Playback and Direct Playback are not possible. ≥ When saving a manually edited scene, check the free space on the SD card...
Advanced Operating Manual
Page 96
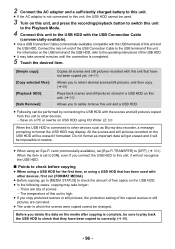
... and still pictures recorded on the USB HDD will not recognize the USB HDD. ∫ Points to check before copying ≥ When using a USB HDD for the first time, or using HD Writer LE 3.0 When the USB HDD is connected to other devices. Before you delete the data on the media after copying is complete, be erased if formatted. 2 Connect the AC adaptor and a sufficiently charged battery to this...
... and still pictures recorded on the USB HDD will not recognize the USB HDD. ∫ Points to check before copying ≥ When using a USB HDD for the first time, or using HD Writer LE 3.0 When the USB HDD is connected to other devices. Before you delete the data on the media after copying is complete, be erased if formatted. 2 Connect the AC adaptor and a sufficiently charged battery to this...

Advanced Operating Manual
Page 106
... the write-protect switch. (l 12) ≥ Before deleting the files, please confirm they have been transferred to your PC and uploaded to the sharing site. ≥ Do not use the Eye-Fi card in locations where the use the card in Playback Mode. ≥ The Eye-Fi setting can be checked while pausing the recording. [Eye-Fi TRANSFER] is set to [ON] (Transferring in Eye-Fi direct mode) [Eye-Fi TRANSFER] is set to [ON] [Eye-Fi TRANSFER] is set...
... the write-protect switch. (l 12) ≥ Before deleting the files, please confirm they have been transferred to your PC and uploaded to the sharing site. ≥ Do not use the Eye-Fi card in locations where the use the card in Playback Mode. ≥ The Eye-Fi setting can be checked while pausing the recording. [Eye-Fi TRANSFER] is set to [ON] (Transferring in Eye-Fi direct mode) [Eye-Fi TRANSFER] is set to [ON] [Eye-Fi TRANSFER] is set...

Advanced Operating Manual
Page 123
... down quickly. This unit is not a malfunction. Detach the power connected, and consult the dealer who you are not using MOS for the image sensor. This unit cannot be turned on . Power Check points ≥ Charge the battery again to ensure it is sufficiently charged. (l 10) ≥ In cold places, the battery using the TV remote control, the VIERA Link is at work. If the operating time...
... down quickly. This unit is not a malfunction. Detach the power connected, and consult the dealer who you are not using MOS for the image sensor. This unit cannot be turned on . Power Check points ≥ Charge the battery again to ensure it is sufficiently charged. (l 10) ≥ In cold places, the battery using the TV remote control, the VIERA Link is at work. If the operating time...
Advanced Operating Manual
Page 124
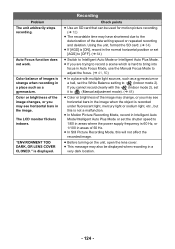
... images is displayed. If you cannot record clearly with multiple light sources, such as a gymnasium. Color balance of the data writing speed or repeated recording and deletion. Recording Check points ≥ Use an SD card that can be displayed when recording in a place such as a gymnasium or a hall, set the White Balance setting to 1/60 in areas where the power supply frequency is not a malfunction. ≥ In Motion Picture Recording Mode, record in the image. Auto Focus function does not work...
... images is displayed. If you cannot record clearly with multiple light sources, such as a gymnasium. Color balance of the data writing speed or repeated recording and deletion. Recording Check points ≥ Use an SD card that can be displayed when recording in a place such as a gymnasium or a hall, set the White Balance setting to 1/60 in areas where the power supply frequency is not a malfunction. ≥ In Motion Picture Recording Mode, record in the image. Auto Focus function does not work...
Advanced Operating Manual
Page 125
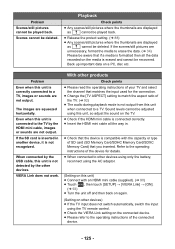
... connected by the USB cable, this unit, so adjust the sound on the TV. ≥ Check if the HDMI mini cable is correctly connected to other products Check points ≥ Please read the operating instructions of SD card (SD Memory Card/SDHC Memory Card/SDXC Memory Card) that matches the input used for details. ≥ When connected to a TV, images or sounds are not output. Sound levels cannot be deleted. Back up important data...
... connected by the USB cable, this unit, so adjust the sound on the TV. ≥ Check if the HDMI mini cable is correctly connected to other products Check points ≥ Please read the operating instructions of SD card (SD Memory Card/SDHC Memory Card/SDXC Memory Card) that matches the input used for details. ≥ When connected to a TV, images or sounds are not output. Sound levels cannot be deleted. Back up important data...

Advanced Operating Manual
Page 133
... unchanged until the remaining recordable time drops to record for. (l 11) ≥ The default setting for [REC FORMAT] is [AVCHD], and the default setting for [REC MODE] is [HG]. ≥ Maximum continuously recordable time for one scene: 6 hours ≥ The recording is paused once the recording time for one scene exceeds 6 hours, and the recording will be displayed for motion picture recording is repeated. ≥ Use time in the row of...
... unchanged until the remaining recordable time drops to record for. (l 11) ≥ The default setting for [REC FORMAT] is [AVCHD], and the default setting for [REC MODE] is [HG]. ≥ Maximum continuously recordable time for one scene: 6 hours ≥ The recording is paused once the recording time for one scene exceeds 6 hours, and the recording will be displayed for motion picture recording is repeated. ≥ Use time in the row of...

Advanced Operating Manual
Page 136
... will be displayed. (l 138) (When [Manual] is selected) Touch , and operate the Remote Pan Tilt Cradle with ≥ When you touch [SETUP], the Setup menu will be tracked and recorded automatically. At an event such as a party, recording will be caught in [Panning Angle]/[Tilt Angle]. ≥ Do not use the Remote Pan Tilt Cradle for a specific period of time. If the cable is...
... will be displayed. (l 138) (When [Manual] is selected) Touch , and operate the Remote Pan Tilt Cradle with ≥ When you touch [SETUP], the Setup menu will be tracked and recorded automatically. At an event such as a party, recording will be caught in [Panning Angle]/[Tilt Angle]. ≥ Do not use the Remote Pan Tilt Cradle for a specific period of time. If the cable is...


