
FV10NLF1 User Guide
Page 1
... Safety Information 4 InstallationI (HorizontallyBetweenJoists) 5-6 InstallationII (On Ceilings/Joists).. 7 InstallationIII (VerticallyOn Joists OrPillars) 8 Maintenance 9 Product Service g INSTALLATION INSTRUCTIONS IN-LINE Fan FV-10NLF1 FV-20NLF1 FV-20NLF1 FV-40NLF1 Panasonic READ AND SAVE THESE INSTRUCTIONS Please readtheinstructionscarefulybeforeattemptingto install,operate or servicethePanasonicIN-UNE Fan.Failure tocomplywithinstructions could resultin personal injuryand/orpropertydamage. Pleaseretain for future reference.
... Safety Information 4 InstallationI (HorizontallyBetweenJoists) 5-6 InstallationII (On Ceilings/Joists).. 7 InstallationIII (VerticallyOn Joists OrPillars) 8 Maintenance 9 Product Service g INSTALLATION INSTRUCTIONS IN-LINE Fan FV-10NLF1 FV-20NLF1 FV-20NLF1 FV-40NLF1 Panasonic READ AND SAVE THESE INSTRUCTIONS Please readtheinstructionscarefulybeforeattemptingto install,operate or servicethePanasonicIN-UNE Fan.Failure tocomplywithinstructions could resultin personal injuryand/orpropertydamage. Pleaseretain for future reference.
FV10NLF1 User Guide
Page 2
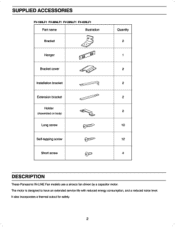
It also incorporates a therms cutout for safety. 2 SUPPLIED ACCESSORIES FV-IONLF1 FV-20NLF1 FV4ONLF1 FV4ONLF1 Part name Illustration Bracket Hanger Bracket cover Installation bracket Extension bracket Holder (asserrizisd on body) Long screw Sett-tapping screw Short screw 01,11 a sic l CISZt i. (i: 7' 4,:1 P C' Quantity 2 1 2 2 2 2 10 12 4 DESCRIPTION These Panasonic IN.LINE Fan models use a sirocco fan driven by a capaPtor motor. The motor is designed to have an extended service life with reduced energy consumption, and a reduced noise level.
It also incorporates a therms cutout for safety. 2 SUPPLIED ACCESSORIES FV-IONLF1 FV-20NLF1 FV4ONLF1 FV4ONLF1 Part name Illustration Bracket Hanger Bracket cover Installation bracket Extension bracket Holder (asserrizisd on body) Long screw Sett-tapping screw Short screw 01,11 a sic l CISZt i. (i: 7' 4,:1 P C' Quantity 2 1 2 2 2 2 10 12 4 DESCRIPTION These Panasonic IN.LINE Fan models use a sirocco fan driven by a capaPtor motor. The motor is designed to have an extended service life with reduced energy consumption, and a reduced noise level.

FV10NLF1 User Guide
Page 3
Refer b the supplied accessories list to verify that all pans are present. 3 Pan name a 0 Motor 0 Inspectionpanel • e Body (a) Adaper ® BakkeGOYS! ..., Installationbracket 0 Fan CV Extension bracket e Jordanbox 0 Bracket e ® Junctionbox cover Holder ModelNo. Speed and air delete, values have been maenad at Sum WG (02' WO) An clayey (...
Refer b the supplied accessories list to verify that all pans are present. 3 Pan name a 0 Motor 0 Inspectionpanel • e Body (a) Adaper ® BakkeGOYS! ..., Installationbracket 0 Fan CV Extension bracket e Jordanbox 0 Bracket e ® Junctionbox cover Holder ModelNo. Speed and air delete, values have been maenad at Sum WG (02' WO) An clayey (...

FV10NLF1 User Guide
Page 4
... Installation, Confirm that the service supply voltage is to the outdoors. Sufficient air is needed for use to prevent backdrafting. D. Ducted fans must always be vented to be installed over a bathtub or shower when installed in cooking areas.(Flg.B) 3. F. Always switch the power...and exhausting of gases through the flue (chimney) of fire, electric shock or personal injury, observe the following: A. If this IN-LINE Fan where the temperature may exceed & •C(140 °F). 2. Coddrej opi/pmet Floe 4. Not for Heating Refrigeration and Air Conditioning Engineers (ASHRAE...
... Installation, Confirm that the service supply voltage is to the outdoors. Sufficient air is needed for use to prevent backdrafting. D. Ducted fans must always be vented to be installed over a bathtub or shower when installed in cooking areas.(Flg.B) 3. F. Always switch the power...and exhausting of gases through the flue (chimney) of fire, electric shock or personal injury, observe the following: A. If this IN-LINE Fan where the temperature may exceed & •C(140 °F). 2. Coddrej opi/pmet Floe 4. Not for Heating Refrigeration and Air Conditioning Engineers (ASHRAE...
FV10NLF1 User Guide
Page 6
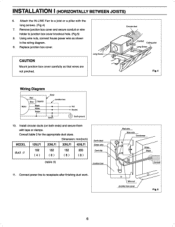
...,connect housepower wire asshown in the wiring diagram. 9. CAUTION Mount junctionbox cover carefully so that wires are not pinched. INSTALLATION I (HORIZONTALLYBETWEENJOISTS) 6. Attach the IN-LINE Fan to receptacleafter finishingduct work.
...,connect housepower wire asshown in the wiring diagram. 9. CAUTION Mount junctionbox cover carefully so that wires are not pinched. INSTALLATION I (HORIZONTALLYBETWEENJOISTS) 6. Attach the IN-LINE Fan to receptacleafter finishingduct work.
FV10NLF1 User Guide
Page 8
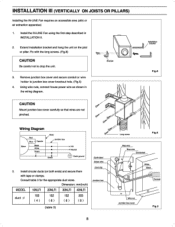
... carefully so that wires are riot pinched. 4e IrbarIsacilkte%t Fig.. Wiring Diagram Red Cl qe" of tagnew Fled**, war Blue re 5. Install the IN-LINE Fan using the first step described in the wiring diagram. Using wire nuts, connect house power wire as shown in INSTALLATIONII. 2. Extendinstallationbracket andhang the unit on...
... carefully so that wires are riot pinched. 4e IrbarIsacilkte%t Fig.. Wiring Diagram Red Cl qe" of tagnew Fled**, war Blue re 5. Install the IN-LINE Fan using the first step described in the wiring diagram. Using wire nuts, connect house power wire as shown in INSTALLATIONII. 2. Extendinstallationbracket andhang the unit on...

FV10NLF1 User Guide
Page 9
...-645-2672to locatethe PanasonicAuthorized Service Center nearest you.) PANASONIC CONSUMERELECTRONICSCOMPANY One Panasonic Way, Secaucus. However, should ycur unit ever ...require service,a nationwidesystem of covers. MAINTENANCE WARNING Disconnectpowerline beforeproceedingwith repairsOr maintenance. Using a cloth dampened with dampenedloth). Yourproduct is designed andmanufactured to comeinto contact with Cloth. 3. Replace inspectionpanel. CAUTION 7.Neveruse benzenebasedMirror or similarchemicals for clearingthe IN•LINE Fan...
...-645-2672to locatethe PanasonicAuthorized Service Center nearest you.) PANASONIC CONSUMERELECTRONICSCOMPANY One Panasonic Way, Secaucus. However, should ycur unit ever ...require service,a nationwidesystem of covers. MAINTENANCE WARNING Disconnectpowerline beforeproceedingwith repairsOr maintenance. Using a cloth dampened with dampenedloth). Yourproduct is designed andmanufactured to comeinto contact with Cloth. 3. Replace inspectionpanel. CAUTION 7.Neveruse benzenebasedMirror or similarchemicals for clearingthe IN•LINE Fan...
