
DMCFP5 User Guide
Page 1
VQT3F23 DMC-FP7 DMC-FP5 Before connecting, operating or adjusting this product, please read the instructions completely. Owner's Manual for advanced features Digital Camera Model No.
VQT3F23 DMC-FP7 DMC-FP5 Before connecting, operating or adjusting this product, please read the instructions completely. Owner's Manual for advanced features Digital Camera Model No.

DMCFP5 User Guide
Page 2
... in focus (such as when it is not in the center of the composition of the picture you want to take 27 • Preventing jitter (camera shake)....... 28 • Direction Detection Function 28 Touching the Screen to Release the Shutter (Touch Shutter function).......... 29 Touching the Screen to Adjust the Focus...
... in focus (such as when it is not in the center of the composition of the picture you want to take 27 • Preventing jitter (camera shake)....... 28 • Direction Detection Function 28 Touching the Screen to Release the Shutter (Touch Shutter function).......... 29 Touching the Screen to Adjust the Focus...

DMCFP5 User Guide
Page 4
... waterproof. Do not subject to strong pressure. • When you use of the camera Fully peel off the strip of tape A from the lens cover before using the camera in the following cases, the camera may malfunction, recording pictures may become impossible, or the lens, the LCD A monitor... down or forcefully insert it . Before Use Precaution Optimal use in the following places, be damaged. --Dropping or hitting the camera. --Leaving the camera in your camera. --Strongly pressing the lens or the LCD monitor. as they may be careful not to allow liquids, sand and other foreign...
... waterproof. Do not subject to strong pressure. • When you use of the camera Fully peel off the strip of tape A from the lens cover before using the camera in the following cases, the camera may malfunction, recording pictures may become impossible, or the lens, the LCD A monitor... down or forcefully insert it . Before Use Precaution Optimal use in the following places, be damaged. --Dropping or hitting the camera. --Leaving the camera in your camera. --Strongly pressing the lens or the LCD monitor. as they may be careful not to allow liquids, sand and other foreign...

DMCFP5 User Guide
Page 5
The fog will disappear naturally when the temperature of condensation since it causes lens stains, fungus and camera malfunctions. • If condensation occurs, turn the camera off and leave it for about 2 hours. Before Use „„About Condensation (When the lens is fogged up) • Condensation occurs when the ambient temperature or humidity changes. Be careful of the camera becomes close to the ambient temperature. - 5 -
The fog will disappear naturally when the temperature of condensation since it causes lens stains, fungus and camera malfunctions. • If condensation occurs, turn the camera off and leave it for about 2 hours. Before Use „„About Condensation (When the lens is fogged up) • Condensation occurs when the ambient temperature or humidity changes. Be careful of the camera becomes close to the ambient temperature. - 5 -
DMCFP5 User Guide
Page 6
...you are not using a card. • If any accessories are supplied before using the camera. • The accessories and their shape will differ depending on the country or area where the camera was purchased. Before Use Standard Accessories Check that all the accessories are lost, customers in ...the USA and Puerto Rico should contact Panasonic's parts department at 1 800 833-9626 and customers in Canada should contact...
...you are not using a card. • If any accessories are supplied before using the camera. • The accessories and their shape will differ depending on the country or area where the camera was purchased. Before Use Standard Accessories Check that all the accessories are lost, customers in ...the USA and Puerto Rico should contact Panasonic's parts department at 1 800 833-9626 and customers in Canada should contact...

DMCFP5 User Guide
Page 7
For connection details, refer to ensure that you will not drop it. 7 Touch Panel / LCD Monitor (P8, 47, 116, 129) 8 Camera ON / OFF switch (P21) 9 Shutter button (P22) 10 Zoom lever (P48) 11 Speaker 12 [AV OUT / DIGITAL] socket (P105, 107, 111) 13 Tripod receptacle 14 ...Card / Battery door (P14) 15 Release lever (P14) 16 DC coupler cover (P15) • When using an AC adaptor, ensure that the Panasonic DC coupler (optional) and AC adaptor (optional) are used. Before Use Names of the Components 1 Flash (P51) 2 Microphone 3 Lens (P5, 120) 4 Lens cover (P18) 5 Self...
For connection details, refer to ensure that you will not drop it. 7 Touch Panel / LCD Monitor (P8, 47, 116, 129) 8 Camera ON / OFF switch (P21) 9 Shutter button (P22) 10 Zoom lever (P48) 11 Speaker 12 [AV OUT / DIGITAL] socket (P105, 107, 111) 13 Tripod receptacle 14 ...Card / Battery door (P14) 15 Release lever (P14) 16 DC coupler cover (P15) • When using an AC adaptor, ensure that the Panasonic DC coupler (optional) and AC adaptor (optional) are used. Before Use Names of the Components 1 Flash (P51) 2 Microphone 3 Lens (P5, 120) 4 Lens cover (P18) 5 Self...

DMCFP5 User Guide
Page 8
... operate properly when multiple of the icon. Touch To touch and release the touch panel. icons are touched simultaneously, so try This can operate the camera by directly touching the icons or images on the LCD monitor (Touch Panel) with your finger or the supplied stylus pen. Before Use How to...
... operate properly when multiple of the icon. Touch To touch and release the touch panel. icons are touched simultaneously, so try This can operate the camera by directly touching the icons or images on the LCD monitor (Touch Panel) with your finger or the supplied stylus pen. Before Use How to...

DMCFP5 User Guide
Page 10
... batteries can be used . • Use the dedicated charger and battery. „„Charging • The battery is not charged when the camera is a possibility that these battery packs are made available to 86 °F). (The battery temperature should also be advised that we are used we... would recommend that a genuine Panasonic battery pack is used with the charger indoors. • It is recommended to charge the battery in a temperature between 10 °C to 30 ...
... batteries can be used . • Use the dedicated charger and battery. „„Charging • The battery is not charged when the camera is a possibility that these battery packs are made available to 86 °F). (The battery temperature should also be advised that we are used we... would recommend that a genuine Panasonic battery pack is used with the charger indoors. • It is recommended to charge the battery in a temperature between 10 °C to 30 ...
DMCFP5 User Guide
Page 13
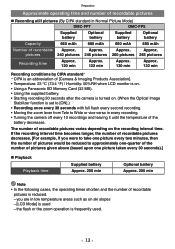
... conditions by CIPA standard ¼¼CIPA is an abbreviation of [Camera & Imaging Products Association]. • Temperature: 23 °C (73.4 °F) / Humidity: 50%RH when LCD monitor is on. • Using a Panasonic SD Memory Card (32 MB). • Using the supplied battery. •...; Starting recording 30 seconds after the camera is turned on. (When the Optical Image Stabilizer function is frequently used --the flash or the ...
... conditions by CIPA standard ¼¼CIPA is an abbreviation of [Camera & Imaging Products Association]. • Temperature: 23 °C (73.4 °F) / Humidity: 50%RH when LCD monitor is on. • Using a Panasonic SD Memory Card (32 MB). • Using the supplied battery. •...; Starting recording 30 seconds after the camera is turned on. (When the Optical Image Stabilizer function is frequently used --the flash or the ...
DMCFP5 User Guide
Page 15
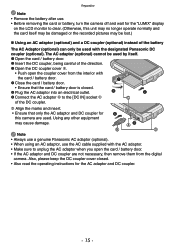
...adaptor. • Make sure to unplug the AC adaptor when you open the coupler cover from the digital camera. D Align the marks and insert. • Ensure that the card / battery door is closed . ... used . Note • Always use a genuine Panasonic AC adaptor (optional). • When using an AC adaptor, use . • Before removing the card or battery, turn the camera off and wait for the "LUMIX" display on... outlet. 6 Connect the AC adaptor B to clear. (Otherwise, this camera are not necessary, then remove them from the interior with the designated Panasonic DC coupler (optional).
...adaptor. • Make sure to unplug the AC adaptor when you open the coupler cover from the digital camera. D Align the marks and insert. • Ensure that the card / battery door is closed . ... used . Note • Always use a genuine Panasonic AC adaptor (optional). • When using an AC adaptor, use . • Before removing the card or battery, turn the camera off and wait for the "LUMIX" display on... outlet. 6 Connect the AC adaptor B to clear. (Otherwise, this camera are not necessary, then remove them from the interior with the designated Panasonic DC coupler (optional).

DMCFP5 User Guide
Page 17
.... - 17 - Note • When the Write-Protect switch A is set to ensure proper operation. (P45) • Keep the Memory Card out of reach of the camera or the card. Access operation may occur. We recommend storing important data on a PC etc. • Do not format the card on the built-in... access indication lights red. [2] (Built-in memory or the card may be stopped midway. Do not turn the power off, or do not subject the camera to its original position. • The data on your PC or other equipment. The ability to write, delete and format data is restored when the...
.... - 17 - Note • When the Write-Protect switch A is set to ensure proper operation. (P45) • Keep the Memory Card out of reach of the camera or the card. Access operation may occur. We recommend storing important data on a PC etc. • Do not format the card on the built-in... access indication lights red. [2] (Built-in memory or the card may be stopped midway. Do not turn the power off, or do not subject the camera to its original position. • The data on your PC or other equipment. The ability to write, delete and format data is restored when the...

DMCFP5 User Guide
Page 18
Open the lens cover. • The camera is turned on the screen. Select the language. • The [Please set when the camera is shipped. Preparation Setting Date / Time (Clock Set) • The clock is not set the clock] message appears. Touch [Clock Set]. - 18 - Touch the language select icon on . • If the language select screen is not displayed, proceed to step 4.
Open the lens cover. • The camera is turned on the screen. Select the language. • The [Please set when the camera is shipped. Preparation Setting Date / Time (Clock Set) • The clock is not set the clock] message appears. Touch [Clock Set]. - 18 - Touch the language select icon on . • If the language select screen is not displayed, proceed to step 4.

DMCFP5 User Guide
Page 19
... and noon is displayed as PM 12:00. Touch [Set]. Preparation Touch the items you stamp the text or date on the screen of the camera. - 19 - A : Time at the home area B : Time at the travel destination • You can be changed in steps 5 and 6 to set the clock. • The...
... and noon is displayed as PM 12:00. Touch [Set]. Preparation Touch the items you stamp the text or date on the screen of the camera. - 19 - A : Time at the home area B : Time at the travel destination • You can be changed in steps 5 and 6 to set the clock. • The...

DMCFP5 User Guide
Page 20
Basic Recording Sequence Open the lens cover. The camera is turned on in Recording Mode. (Recording is possible with this setting.) A Shutter button Select Recording Mode. 1 Touch [w1]. 2 Touch the mode icon. • The ... Recording Mode, and then perform 1. „„List of [Rec] Modes 4 Intelligent Auto Mode (P22) The subjects are recorded using settings automatically selected by the camera. 1 Normal Picture Mode (P26) The subjects are recorded using your own settings. < Cosmetic Mode (P59) Takes a picture adjusting the skin texture. 5 Scene Mode (P60) / / My...
Basic Recording Sequence Open the lens cover. The camera is turned on in Recording Mode. (Recording is possible with this setting.) A Shutter button Select Recording Mode. 1 Touch [w1]. 2 Touch the mode icon. • The ... Recording Mode, and then perform 1. „„List of [Rec] Modes 4 Intelligent Auto Mode (P22) The subjects are recorded using settings automatically selected by the camera. 1 Normal Picture Mode (P26) The subjects are recorded using your own settings. < Cosmetic Mode (P59) Takes a picture adjusting the skin texture. 5 Scene Mode (P60) / / My...

DMCFP5 User Guide
Page 21
..., [Please open the lens cover] appears. Let the lens cover down . Press the shutter button halfway to focus and then press it . • Hold the camera gently with both hands, keep your arms still at your side and stand with your feet slightly apart. • Be careful not to take the... or other objects. • Do not touch the front of the lens. Press and hold the camera ON / OFF switch with the lens cover down . - 21 - Basic Take the picture. The camera is off by pressing the camera ON / OFF switch. „„To view the recorded pictures Touch [9]. (For details, see P22...
..., [Please open the lens cover] appears. Let the lens cover down . Press the shutter button halfway to focus and then press it . • Hold the camera gently with both hands, keep your arms still at your side and stand with your feet slightly apart. • Be careful not to take the... or other objects. • Do not touch the front of the lens. Press and hold the camera ON / OFF switch with the lens cover down . - 21 - Basic Take the picture. The camera is off by pressing the camera ON / OFF switch. „„To view the recorded pictures Touch [9]. (For details, see P22...

DMCFP5 User Guide
Page 22
... to match the subject and the recording conditions so we recommend this mode for beginners or those who want to leave the settings to the camera and take pictures using the Touch Shutter function (P29). - 22 - Touch [4]. Press the shutter button halfway 1 (push lightly) to focus. • The focus indication 1 (green...
... to match the subject and the recording conditions so we recommend this mode for beginners or those who want to leave the settings to the camera and take pictures using the Touch Shutter function (P29). - 22 - Touch [4]. Press the shutter button halfway 1 (push lightly) to focus. • The focus indication 1 (green...

DMCFP5 User Guide
Page 23
...flash is minimal when the Scene Mode has been identified as [1], the shutter speed will be set . • When [3] or [5] is selected, the camera automatically detects a person's face, and it will adjust the focus and exposure (Face Detection). • If a tripod is used, for 2 seconds, ...Sunset] • Only when [w] is selected • [4] is set if none of the scenes are applicable, and the standard settings are set to move the camera while taking pictures using the flash (P51) • When [w] is selected, [w], [e], [r] or [{] is set depending on the type or brightness of 8 seconds...
...flash is minimal when the Scene Mode has been identified as [1], the shutter speed will be set . • When [3] or [5] is selected, the camera automatically detects a person's face, and it will adjust the focus and exposure (Face Detection). • If a tripod is used, for 2 seconds, ...Sunset] • Only when [w] is selected • [4] is set if none of the scenes are applicable, and the standard settings are set to move the camera while taking pictures using the flash (P51) • When [w] is selected, [w], [e], [r] or [{] is set depending on the type or brightness of 8 seconds...

DMCFP5 User Guide
Page 24
... beforehand. (Cannot be identified for AF Tracking on the screen. • The AF area (AF tracking frame) is displayed in yellow and the camera determines the best suited scene. • Touch [T] to cancel the AF Tracking. 2 Press the shutter button halfway to fix the focus and then ... the screen can focus the targeted subject and adjust the exposure. Tracking moving --Recording conditions: Sunset, sunrise, under low brightness conditions, when the camera is shaken, when zoom is used at the same time.) • Read the note for the same subject. --Subject conditions: When the face...
... beforehand. (Cannot be identified for AF Tracking on the screen. • The AF area (AF tracking frame) is displayed in yellow and the camera determines the best suited scene. • Touch [T] to cancel the AF Tracking. 2 Press the shutter button halfway to fix the focus and then ... the screen can focus the targeted subject and adjust the exposure. Tracking moving --Recording conditions: Sunset, sunrise, under low brightness conditions, when the camera is shaken, when zoom is used at the same time.) • Read the note for the same subject. --Subject conditions: When the face...

DMCFP5 User Guide
Page 26
... want to the brightness of the subject. Touch [w1] in the [Rec]. You can also take pictures with Your Favorite Settings (1: Normal Picture Mode) The camera automatically sets the shutter speed and the aperture value according to focus on. Press the shutter button halfway to focus. • The focus range is...
... want to the brightness of the subject. Touch [w1] in the [Rec]. You can also take pictures with Your Favorite Settings (1: Normal Picture Mode) The camera automatically sets the shutter speed and the aperture value according to focus on. Press the shutter button halfway to focus. • The focus range is...

DMCFP5 User Guide
Page 27
... the subject, and then press the shutter button halfway to fix the focus and exposure. 2 Press and hold the shutter button halfway while moving the camera as you compose the picture. • You can repeatedly retry the actions in step 1 before pressing the shutter button fully. • Touching the screen can... appeared in red • When recording subjects through windows or near shiny objects • When it is dark or when jitter occurs • When the camera is too close to the subject or when taking a picture of both distant and near subjects - 27 -
... the subject, and then press the shutter button halfway to fix the focus and exposure. 2 Press and hold the shutter button halfway while moving the camera as you compose the picture. • You can repeatedly retry the actions in step 1 before pressing the shutter button fully. • Touching the screen can... appeared in red • When recording subjects through windows or near shiny objects • When it is dark or when jitter occurs • When the camera is too close to the subject or when taking a picture of both distant and near subjects - 27 -


