
Digital Still Cam/non Usa
Page 58
...(Tele) to ¶]. • The ISO sensitivity is fixed to [AUTO]. • After turning on the camera in [BABY] or switching to the separate operating instructions for PC connection.) • The focus range becomes the ... using 2/1, and set birthday following the above steps 2 and 3. BABY • If the camera is set the camera to [WITHOUT AGE], the age is not properly displayed, check the clock and birthday settings...., select items (year, month and day) using the software [LUMIX Simple Viewer] in advance, a message is displayed as that the age WITHOUT AGE BIRTHDAY SET.
...(Tele) to ¶]. • The ISO sensitivity is fixed to [AUTO]. • After turning on the camera in [BABY] or switching to the separate operating instructions for PC connection.) • The focus range becomes the ... using 2/1, and set birthday following the above steps 2 and 3. BABY • If the camera is set the camera to [WITHOUT AGE], the age is not properly displayed, check the clock and birthday settings...., select items (year, month and day) using the software [LUMIX Simple Viewer] in advance, a message is displayed as that the age WITHOUT AGE BIRTHDAY SET.

Digital Still Cam/non Usa
Page 77
...∫ To cancel all settings Select [YES] to order the printing of Digital Print Order Format. NO YES SELECT SET MENU ∫ To print the ... is not based on the DCF standard, the DPOF print setting cannot be printed depending on the camera, delete any previous DPOF print settings made by pressing the [DISPLAY] button after setting the number ...date print icon [ DATE ] appears. • When using the software [LUMIX Simple Viewer] in the CD-ROM (supplied), you go to a photo studio for Camera File system], stipulated by setting the date print on the DPOF-compliant system...
...∫ To cancel all settings Select [YES] to order the printing of Digital Print Order Format. NO YES SELECT SET MENU ∫ To print the ... is not based on the DCF standard, the DPOF print setting cannot be printed depending on the camera, delete any previous DPOF print settings made by pressing the [DISPLAY] button after setting the number ...date print icon [ DATE ] appears. • When using the software [LUMIX Simple Viewer] in the CD-ROM (supplied), you go to a photo studio for Camera File system], stipulated by setting the date print on the DPOF-compliant system...

Digital Still Cam/non Usa
Page 86
...you set [USB MODE] to [PictBridge (PTP)] and then connect the camera to a PC, print, or send them by e-mail easily. optional), turn the camera off before the connection. The software [LUMIX Simple Viewer] (for PC connection. 1 Turn the camera on and then set [USB MODE] on the [My Computer] folder....optional) • For using the AC adaptor (DMW-AC5; If you to load pictures recorded with the [ ] mark facing the [2] mark on the [DIGITAL] socket. • Hold the plug C to the separate operating instructions for Windows® ) in the CD-ROM (supplied) allows you use Windows 98/98SE...
...you set [USB MODE] to [PictBridge (PTP)] and then connect the camera to a PC, print, or send them by e-mail easily. optional), turn the camera off before the connection. The software [LUMIX Simple Viewer] (for PC connection. 1 Turn the camera on and then set [USB MODE] on the [My Computer] folder....optional) • For using the AC adaptor (DMW-AC5; If you to load pictures recorded with the [ ] mark facing the [2] mark on the [DIGITAL] socket. • Hold the plug C to the separate operating instructions for Windows® ) in the CD-ROM (supplied) allows you use Windows 98/98SE...
Digital Still Cam/non Usa
Page 88
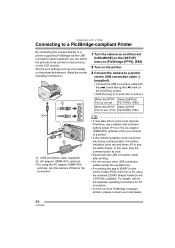
...print quality on the printer beforehand. (Read the printer operating instructions.) AV OUT DIGITAL 1 Turn the camera on and then set [USB MODE] on the [SETUP] menu to [PictBridge (PTP)]. (P85) 2 Turn on the printer. 3 Connect the camera to a printer via the USB connection cable (supplied), you connect to a ... the [ ] mark facing the [2] mark on the LCD monitor. When the DPOF Select [SINGLE Print is set . optional) • For using the software [LUMIX Simple Viewer] in the CD-ROM (supplied). PICTURE]. (P89) When the DPOF Select [DPOF Print is not set . (P76) PICTURE]. (P90) DC IN ...
...print quality on the printer beforehand. (Read the printer operating instructions.) AV OUT DIGITAL 1 Turn the camera on and then set [USB MODE] on the [SETUP] menu to [PictBridge (PTP)]. (P85) 2 Turn on the printer. 3 Connect the camera to a printer via the USB connection cable (supplied), you connect to a ... the [ ] mark facing the [2] mark on the LCD monitor. When the DPOF Select [SINGLE Print is set . optional) • For using the software [LUMIX Simple Viewer] in the CD-ROM (supplied). PICTURE]. (P89) When the DPOF Select [DPOF Print is not set . (P76) PICTURE]. (P90) DC IN ...


