Digital Camera
Page 2
...this battery.... one of pre-recorded tapes or discs or other than your Digital Camera may infringe copyright laws. The serial number is a trademark....note that is recyclable powers the product you and your convenient Camera information source. Serial No. Recording of the most sophisticated and...PERSONNEL. THERE ARE NO USER SERVICEABLE PARTS INSIDE. Please call 1-800-8-BATTERY for Your Safety WARNING: TO REDUCE THE RISK OF FIRE, ELECTRIC ... THE COVER (OR BACK); You have purchased. RBRC A lithium ion battery that the actual controls and components, menu items, etc. Please take ...
...this battery.... one of pre-recorded tapes or discs or other than your Digital Camera may infringe copyright laws. The serial number is a trademark....note that is recyclable powers the product you and your convenient Camera information source. Serial No. Recording of the most sophisticated and...PERSONNEL. THERE ARE NO USER SERVICEABLE PARTS INSIDE. Please call 1-800-8-BATTERY for Your Safety WARNING: TO REDUCE THE RISK OF FIRE, ELECTRIC ... THE COVER (OR BACK); You have purchased. RBRC A lithium ion battery that the actual controls and components, menu items, etc. Please take ...

Digital Camera
Page 3
...with the instructions, may cause harmful interference to provide reasonable protection against harmful interference in a particular installation. This Class B digital apparatus complies with the same or equivalent type recommended by one or more of the following measures: • Reorient or ...can radiate radio frequency energy and, if not installed and used batteries according to the manufacturer's instructions. Any changes or modifications not expressly approved by the party responsible for a Class B digital device, pursuant to which the receiver is no guarantee that interference...
...with the instructions, may cause harmful interference to provide reasonable protection against harmful interference in a particular installation. This Class B digital apparatus complies with the same or equivalent type recommended by one or more of the following measures: • Reorient or ...can radiate radio frequency energy and, if not installed and used batteries according to the manufacturer's instructions. Any changes or modifications not expressly approved by the party responsible for a Class B digital device, pursuant to which the receiver is no guarantee that interference...
Digital Camera
Page 4
Before Use Declaration of Conformity Trade Name: Panasonic Model No.: DMC-FX500 Responsible party: Panasonic Corporation of North America One Panasonic Way, Secaucus, NJ 07094 Support Contact: Panasonic Consumer Electronics Company 1-800-211-PANA (7262) This device complies with metal objects. • Do not disassemble...thoroughly with water, and then consult a doctor. • Do not heat or expose to flame. • Do not leave the battery(ies) in other Countries outside the European Union This symbol is subject to the following two conditions: (1) This device may cause undesired...
Before Use Declaration of Conformity Trade Name: Panasonic Model No.: DMC-FX500 Responsible party: Panasonic Corporation of North America One Panasonic Way, Secaucus, NJ 07094 Support Contact: Panasonic Consumer Electronics Company 1-800-211-PANA (7262) This device complies with metal objects. • Do not disassemble...thoroughly with water, and then consult a doctor. • Do not heat or expose to flame. • Do not leave the battery(ies) in other Countries outside the European Union This symbol is subject to the following two conditions: (1) This device may cause undesired...
Digital Camera
Page 5
.... Places with "Cautions for about 2 hours. Places where water can come into contact with dirty hands. ∫ About the battery charger Before Use CAUTION! Battery charger This battery charger operates on a beach. • Do not touch the lens or the sockets with this unit to get into a full... or tight bag, etc. and Canada, the battery charger must be careful not to allow liquids, sand and other foreign matter to malfunction. - Be careful of the camera • Do not strongly shake or bump the camera by dropping it, etc. Damage to the LCD monitor or...
.... Places with "Cautions for about 2 hours. Places where water can come into contact with dirty hands. ∫ About the battery charger Before Use CAUTION! Battery charger This battery charger operates on a beach. • Do not touch the lens or the sockets with this unit to get into a full... or tight bag, etc. and Canada, the battery charger must be careful not to allow liquids, sand and other foreign matter to malfunction. - Be careful of the camera • Do not strongly shake or bump the camera by dropping it, etc. Damage to the LCD monitor or...
Digital Camera
Page 6
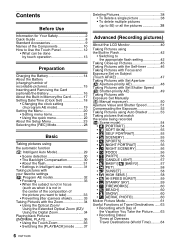
...the Touch Panel 12 • What can be done by touch operation 13 Preparation Charging the Battery 14 About the Battery (charging/number of recordable pictures 15 Inserting and Removing the Card (optional)/the Battery 16 About the Built-in Memory/the Card 17 Setting Date/Time (Clock Set 18 •... the composition of the picture you want to take 33 • Preventing jitter (camera shake 33 Taking Pictures with the Zoom 34 • Using the Optical Zoom/ Using the Extended Optical Zoom (EZ)/ Using the Digital Zoom 34 Playing back Pictures ([NORMAL PLAY 36 • Using the Touch Zoom...
...the Touch Panel 12 • What can be done by touch operation 13 Preparation Charging the Battery 14 About the Battery (charging/number of recordable pictures 15 Inserting and Removing the Card (optional)/the Battery 16 About the Built-in Memory/the Card 17 Setting Date/Time (Clock Set 18 •... the composition of the picture you want to take 33 • Preventing jitter (camera shake 33 Taking Pictures with the Zoom 34 • Using the Optical Zoom/ Using the Extended Optical Zoom (EZ)/ Using the Digital Zoom 34 Playing back Pictures ([NORMAL PLAY 36 • Using the Touch Zoom...

Digital Camera
Page 8
...REC]/[PLAYBACK] selector switch to [¦/!]. 2 Press the shutter button to take pictures. Charge the battery before use. 90˃ 2 Insert the battery and the card. (P16) • When you do not use a card. 3 Turn the camera on to take 1 pictures. (P29) 4 Play back the pictures. 1 Slide the [REC...]/[PLAYBACK] selector switch to [(]. 2 Select the picture you want to the pages indicated in brackets. 1 Charge the battery. (P14) • The battery is not charged when the camera is an overview of how to record and play back pictures on the built-in memory. (P17) Refer to P17 when...
...REC]/[PLAYBACK] selector switch to [¦/!]. 2 Press the shutter button to take pictures. Charge the battery before use. 90˃ 2 Insert the battery and the card. (P16) • When you do not use a card. 3 Turn the camera on to take 1 pictures. (P29) 4 Play back the pictures. 1 Slide the [REC...]/[PLAYBACK] selector switch to [(]. 2 Select the picture you want to the pages indicated in brackets. 1 Charge the battery. (P14) • The battery is not charged when the camera is an overview of how to record and play back pictures on the built-in memory. (P17) Refer to P17 when...
Digital Camera
Page 9
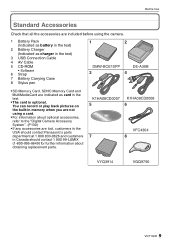
...Digital Camera Accessory System". (P130) • If any accessories are indicated as charger in the text) 3 USB Connection Cable 4 AV Cable 5 CD-ROM • Software 6 Strap 7 Battery Carrying Case 8 Stylus pen 1 2 DMW-BCE10PP 3 4 DE-A39B • SD Memory Card, SDHC Memory Card and MultiMediaCard are lost, customers in the USA should contact Panasonic...-in memory when you are not using the camera. 1 Battery Pack (Indicated as battery in the text) 2 Battery Charger (Indicated as card in Canada should contact 1 800 99-LUMIX (1-800-995-8649) for further information about obtaining...
...Digital Camera Accessory System". (P130) • If any accessories are indicated as charger in the text) 3 USB Connection Cable 4 AV Cable 5 CD-ROM • Software 6 Strap 7 Battery Carrying Case 8 Stylus pen 1 2 DMW-BCE10PP 3 4 DE-A39B • SD Memory Card, SDHC Memory Card and MultiMediaCard are lost, customers in the USA should contact Panasonic...-in memory when you are not using the camera. 1 Battery Pack (Indicated as battery in the text) 2 Battery Charger (Indicated as card in Canada should contact 1 800 99-LUMIX (1-800-995-8649) for further information about obtaining...

Digital Camera
Page 11
... 16 17 Strap eyelet 17 • Be sure to attach the strap when using the camera to ensure that you will not 18 drop it. 19 18 Lens barrel 19 [COMPONENT OUT] socket (P107) 20 [AV OUT/DIGITAL] socket (P100, 102, 12 20 21 106) 21 [DC IN] socket (P100, 102)... • Always use a tripod, make sure the tripod is stable when the camera is connected to it . 22 Tripod receptacle • When you use a genuine Panasonic AC adaptor (DMW-AC5PP; optional). • This camera cannot charge the battery even...
... 16 17 Strap eyelet 17 • Be sure to attach the strap when using the camera to ensure that you will not 18 drop it. 19 18 Lens barrel 19 [COMPONENT OUT] socket (P107) 20 [AV OUT/DIGITAL] socket (P100, 102, 12 20 21 106) 21 [DC IN] socket (P100, 102)... • Always use a tripod, make sure the tripod is stable when the camera is connected to it . 22 Tripod receptacle • When you use a genuine Panasonic AC adaptor (DMW-AC5PP; optional). • This camera cannot charge the battery even...

Digital Camera
Page 14
...attention to disconnect the power supply device from the electrical outlet. • The battery becomes warm after properly charging the battery, the life of the charger or the battery are dirty. The camera also becomes warm during and after charging is completed. ∫ When the ...[CHARGE] indicator flashes • The battery temperature is shipped. Preparation Preparation Charging the Battery • Use the dedicated charger and battery. • The battery is not charged when the camera is excessively high or low. Charge the battery before use . The charging time will reduce...
...attention to disconnect the power supply device from the electrical outlet. • The battery becomes warm after properly charging the battery, the life of the charger or the battery are dirty. The camera also becomes warm during and after charging is completed. ∫ When the ...[CHARGE] indicator flashes • The battery temperature is shipped. Preparation Preparation Charging the Battery • Use the dedicated charger and battery. • The battery is not charged when the camera is excessively high or low. Charge the battery before use . The charging time will reduce...

Digital Camera
Page 15
... Association]. • Temperature: 23 oC (73.4 oF)/Humidity: 50% when LCD monitor is on.¢ • Using a Panasonic SD Memory Card (16 MB). • Using the supplied battery. • Starting recording 30 seconds after the camera is turned on. (When the optical image stabilizer function is set to [MODE2].) • Recording once every...
... Association]. • Temperature: 23 oC (73.4 oF)/Humidity: 50% when LCD monitor is on.¢ • Using a Panasonic SD Memory Card (16 MB). • Using the supplied battery. • Starting recording 30 seconds after the camera is turned on. (When the optical image stabilizer function is set to [MODE2].) • Recording once every...

Digital Camera
Page 16
... the arrow and open the card/battery door. • Always use genuine Panasonic batteries (DMW-BCE10PP). • If you use other equipment. • Before removing the card or battery, turn off as the settings on the camera may not be stored properly. • The supplied battery is designed only for the camera. To remove the card, push...
... the arrow and open the card/battery door. • Always use genuine Panasonic batteries (DMW-BCE10PP). • If you use other equipment. • Before removing the card or battery, turn off as the settings on the camera may not be stored properly. • The supplied battery is designed only for the camera. To remove the card, push...

Digital Camera
Page 18
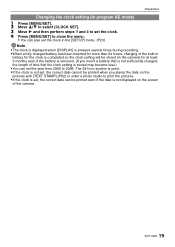
... area B: Time at the travel destination (P64) ,: Cancel without the clock having been set, set . • After completing the clock settings, turn the camera off , remove its battery or card or disconnect the AC adaptor (DMW-AC5PP; optional) when the access indication is lit [when pictures are being read or deleted or... the built-in memory or the card is shipped. 1 Turn the camera on the built-in memory or the card may be damaged, and ...
... area B: Time at the travel destination (P64) ,: Cancel without the clock having been set, set . • After completing the clock settings, turn the camera off , remove its battery or card or disconnect the AC adaptor (DMW-AC5PP; optional) when the access indication is lit [when pictures are being read or deleted or... the built-in memory or the card is shipped. 1 Turn the camera on the built-in memory or the card may be damaged, and ...
Digital Camera
Page 19
The 24-hour system is used. • If the clock is not set, the correct date cannot be printed when you insert a battery that is not sufficiently charged, the length of time that the clock setting is stored may become less.) • You can be printed even if ...the date is not displayed on the screen of the built-in battery for the clock is completed so the clock setting will be stored (in the camera) for at least 3 months even if the battery is removed. (If you stamp the date on the pictures with [TEXT STAMP] (P92...
The 24-hour system is used. • If the clock is not set, the correct date cannot be printed when you insert a battery that is not sufficiently charged, the length of time that the clock setting is stored may become less.) • You can be printed even if ...the date is not displayed on the screen of the built-in battery for the clock is completed so the clock setting will be stored (in the camera) for at least 3 months even if the battery is removed. (If you stamp the date on the pictures with [TEXT STAMP] (P92...

Digital Camera
Page 24
...24 VQT1Q36 INFO.]: [OFF]/[ON] [PATTERN]: [ ]/[ ] • The [PATTERN] setting is turned off if the camera has not been used for the time selected on the setting. Press any of 7 levels. • When you to...turn off the LCD monitor automatically when not in the Intelligent auto mode. [HISTOGRAM] This allows you connect the camera to P63 for the time selected on to cancel [POWER SAVE]. • [POWER SAVE] is set to ...TRAVEL DATE] Set the departure date and the return date of the battery. The camera is automatically turned off if the camera has not been used for details.
...24 VQT1Q36 INFO.]: [OFF]/[ON] [PATTERN]: [ ]/[ ] • The [PATTERN] setting is turned off if the camera has not been used for the time selected on the setting. Press any of 7 levels. • When you to...turn off the LCD monitor automatically when not in the Intelligent auto mode. [HISTOGRAM] This allows you connect the camera to P63 for the time selected on to cancel [POWER SAVE]. • [POWER SAVE] is set to ...TRAVEL DATE] Set the departure date and the return date of the battery. The camera is automatically turned off if the camera has not been used for details.

Digital Camera
Page 26
...TV. • This will work when the AV cable is connected. [m/ft] Change the unit displayed for the distance at : http://www.panasonic.com/contactinfo For Canadian assistance, please call : 1-800-211-PANA(7262) or, contact us via the web at which pictures can be formatted,... 1-800-99-LUMIX (1-800-995-8649) or send e-mail to: lumixconcierge@ca.panasonic.com 26 VQT1Q36 Formatting irretrievably deletes all the data so check the data carefully before formatting. • Use a battery with sufficient battery power or the AC adaptor (DMW-AC5PP; Do not turn the camera off during formatting....
...TV. • This will work when the AV cable is connected. [m/ft] Change the unit displayed for the distance at : http://www.panasonic.com/contactinfo For Canadian assistance, please call : 1-800-211-PANA(7262) or, contact us via the web at which pictures can be formatted,... 1-800-99-LUMIX (1-800-995-8649) or send e-mail to: lumixconcierge@ca.panasonic.com 26 VQT1Q36 Formatting irretrievably deletes all the data so check the data carefully before formatting. • Use a battery with sufficient battery power or the AC adaptor (DMW-AC5PP; Do not turn the camera off during formatting....

Digital Camera
Page 39
Use a battery with the [FAVORITE] (P85) setting The selection screen is displayed again. optional). • If you press [MENU/SET] while deleting pictures using [DELETE MULTI], [DELETE ... number of pictures to be deleted even if [DELETE ALL] or [ALL DELETE EXCEPTÜ] is displayed). VQT1Q36 39 Note • Do not turn the camera off while deleting (while [,] is selected. Basic ∫ When [DELETE ALL] has been selected with a sufficient power or the AC adaptor (DMW-AC5PP...
Use a battery with the [FAVORITE] (P85) setting The selection screen is displayed again. optional). • If you press [MENU/SET] while deleting pictures using [DELETE MULTI], [DELETE ... number of pictures to be deleted even if [DELETE ALL] or [ALL DELETE EXCEPTÜ] is displayed). VQT1Q36 39 Note • Do not turn the camera off while deleting (while [,] is selected. Basic ∫ When [DELETE ALL] has been selected with a sufficient power or the AC adaptor (DMW-AC5PP...
Digital Camera
Page 100
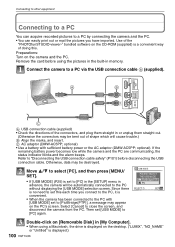
...MODE] (P25) is displayed.) 100 VQT1Q36 Then set to [PC] in the [SETUP] menu in advance, the camera will cause trouble.) B Align the marks, and insert. OUT A B AV OUT/ COMPONENT DIGITAL DC IN C A USB connection cable (supplied) • Check the directions of the connectors, and plug them ...("LUMIX", "NO_NAME" or "Untitled" is set [USB MODE] to the PC without displaying the [USB MODE] selection screen. Since there is a convenient way of shape which will be bent out of doing this each time you have imported. If the remaining battery power becomes low while the camera ...
...MODE] (P25) is displayed.) 100 VQT1Q36 Then set to [PC] in the [SETUP] menu in advance, the camera will cause trouble.) B Align the marks, and insert. OUT A B AV OUT/ COMPONENT DIGITAL DC IN C A USB connection cable (supplied) • Check the directions of the connectors, and plug them ...("LUMIX", "NO_NAME" or "Untitled" is set [USB MODE] to the PC without displaying the [USB MODE] selection screen. Since there is a convenient way of shape which will be bent out of doing this each time you have imported. If the remaining battery power becomes low while the camera ...

Digital Camera
Page 102
...). • Before inserting or removing a card, turn the camera off before printing the pictures in the built-in memory. Remove the card before connecting or disconnecting the AC adaptor (DMW-AC5PP; OUT A B AV OUT/ COMPONENT DIGITAL DC IN C A USB connection cable (supplied) • Check... the directions of shape which will cause trouble.) B Align the marks, and insert. If the remaining battery power becomes low while the camera and the printer are connected, the status indicator...
...). • Before inserting or removing a card, turn the camera off before printing the pictures in the built-in memory. Remove the card before connecting or disconnecting the AC adaptor (DMW-AC5PP; OUT A B AV OUT/ COMPONENT DIGITAL DC IN C A USB connection cable (supplied) • Check... the directions of shape which will cause trouble.) B Align the marks, and insert. If the remaining battery power becomes low while the camera and the printer are connected, the status indicator...

Digital Camera
Page 108
...) 1 Recording mode 12 2 Flash mode (P42) 3 AF area (P33) 4 Focus (P33) 16 5 Picture size (P66) 15 6 Quality (P67) 7 Battery indication (P15) 8 Number of recordable pictures (P124) 9 Built-in memory (P17) : Card (P17) (displayed only during recording) 10 Recording state 11 ISO sensitivity...) : Intelligent ISO (P67) 28 Current date and time/": Travel destination setting (P64)¢2 W T 1X : Zoom/Extended optical zoom (P34)/Digital zoom (P34, 74) BACKLIGHT : Operation for backlight compensation (P30) 29 Minimum shutter speed (P75) 30 Age¢1 (P57) 31 Exposure compensation...
...) 1 Recording mode 12 2 Flash mode (P42) 3 AF area (P33) 4 Focus (P33) 16 5 Picture size (P66) 15 6 Quality (P67) 7 Battery indication (P15) 8 Number of recordable pictures (P124) 9 Built-in memory (P17) : Card (P17) (displayed only during recording) 10 Recording state 11 ISO sensitivity...) : Intelligent ISO (P67) 28 Current date and time/": Travel destination setting (P64)¢2 W T 1X : Zoom/Extended optical zoom (P34)/Digital zoom (P34, 74) BACKLIGHT : Operation for backlight compensation (P30) 29 Minimum shutter speed (P75) 30 Age¢1 (P57) 31 Exposure compensation...

Digital Camera
Page 109
...seconds when this unit is turned on in [BABY1]/[BABY2] or [PET] in scene mode. ¢2 This is displayed for about 5 seconds when the camera is turned on, after setting the clock and after switching from playback mode to recording mode. ∫ In playback 1 Playback mode (P36) 1 23 4... 5 6 7 2 Protected picture (P97) 3 Favorites (P85) 4 Stamped with text indication (P92) 5 Picture size (P66) Picture quality (P61) 6 Quality (P67) 7 Battery indication (P15) 8 Folder/File number (P101) 22 100_0001 8 21 20 1 1/9 9 9s 10 19 11 18 1ST DAY 12 17 2 months 10 days 13 16 10...
...seconds when this unit is turned on in [BABY1]/[BABY2] or [PET] in scene mode. ¢2 This is displayed for about 5 seconds when the camera is turned on, after setting the clock and after switching from playback mode to recording mode. ∫ In playback 1 Playback mode (P36) 1 23 4... 5 6 7 2 Protected picture (P97) 3 Favorites (P85) 4 Stamped with text indication (P92) 5 Picture size (P66) Picture quality (P61) 6 Quality (P67) 7 Battery indication (P15) 8 Folder/File number (P101) 22 100_0001 8 21 20 1 1/9 9 9s 10 19 11 18 1ST DAY 12 17 2 months 10 days 13 16 10...


