
CQ5330U User Guide
Page 3
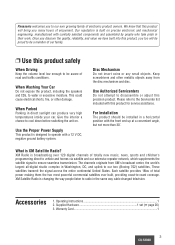
..., including the speakers and CDs, to disassemble or adjust this product for service assistance. Give the interior a chance to operate with this precision product. Use the Proper Power Supply This product is broadcastiog over 120 digital channels of total power making them the two most powerful commercial satellites ever built, providing coast-to be a member of electronic product owners. Use Authorized Servicenters Do...
..., including the speakers and CDs, to disassemble or adjust this product for service assistance. Give the interior a chance to operate with this precision product. Use the Proper Power Supply This product is broadcastiog over 120 digital channels of total power making them the two most powerful commercial satellites ever built, providing coast-to be a member of electronic product owners. Use Authorized Servicenters Do...
CQ5330U User Guide
Page 4
... 3 ❒ Power and Sound Controls 5 Power, volume, mute, loudness, display change, audio mode (Bass/Treble/Balance/Fader) ❒ Clock Setting 7 Initial time, time reset ❒ Alarm Time Setting 8 Initial alarm time, alarm time setting and reset, alarm operation, alarm output volume selection ❒ Radio 9 Radio mode, band, manual tuning, seek tuning, preset station setting, FM preset station calling, display change, direct memory ❒ CD Player 12 Disc insert and playback, stop and disc eject, listening to a CD, CD player mode, display change, track selection, track...
... 3 ❒ Power and Sound Controls 5 Power, volume, mute, loudness, display change, audio mode (Bass/Treble/Balance/Fader) ❒ Clock Setting 7 Initial time, time reset ❒ Alarm Time Setting 8 Initial alarm time, alarm time setting and reset, alarm operation, alarm output volume selection ❒ Radio 9 Radio mode, band, manual tuning, seek tuning, preset station setting, FM preset station calling, display change, direct memory ❒ CD Player 12 Disc insert and playback, stop and disc eject, listening to a CD, CD player mode, display change, track selection, track...

CQ5330U User Guide
Page 6
... TUNE SEEK w Turn [VOL] (volume) clockwise or counterclockwise to 15 (by 3 dB step) Balance: R (right speaker) or L (left speaker) Illumination Switching Press [SCAN] (ILL) for more than 5 seconds in audio mode (2 seconds in volume mode), the display returns to select the audio mode. Power and Sound Controls (Continued) Audio Modes (Bass/Treble/Balance/Fader) q Push [SEL] to the regular mode. Volume Bass Treble Fader Balance push Note: If no operation takes place for more than 2 seconds to switch the illumination color...
... TUNE SEEK w Turn [VOL] (volume) clockwise or counterclockwise to 15 (by 3 dB step) Balance: R (right speaker) or L (left speaker) Illumination Switching Press [SCAN] (ILL) for more than 5 seconds in audio mode (2 seconds in volume mode), the display returns to select the audio mode. Power and Sound Controls (Continued) Audio Modes (Bass/Treble/Balance/Fader) q Push [SEL] to the regular mode. Volume Bass Treble Fader Balance push Note: If no operation takes place for more than 2 seconds to switch the illumination color...

CQ5330U User Guide
Page 7
... [{] to set the hour. (Hours set.) LOUD MUTE RDM SCAN 6 ILL TUNE SEEK [{ TUNE], [} TUNE] (Hours, Minutes) Minutes e Press [}] to set the minute. (Minutes set.) r Once the time has been set time. Display blinks and the time setting mode is not adjusted. Time Reset When you want to reset the time, repeat steps q to the clock display. Note: the current time will be displayed at all the time even the power of the radio is used for more...
... [{] to set the hour. (Hours set.) LOUD MUTE RDM SCAN 6 ILL TUNE SEEK [{ TUNE], [} TUNE] (Hours, Minutes) Minutes e Press [}] to set the minute. (Minutes set.) r Once the time has been set time. Display blinks and the time setting mode is not adjusted. Time Reset When you want to reset the time, repeat steps q to the clock display. Note: the current time will be displayed at all the time even the power of the radio is used for more...

CQ5330U User Guide
Page 8
... muted. (Even when ALARM is set at the set alarm time. (blink.) Hours w Press [{] to set the hour. (Hours set.) Minutes e Press [}] to r. Display blinks and the alarm time setting mode is used for the clock. Cautions: • Be careful not to set wrong alarm time, otherwise, the alarm may sound while driving. • If the alarm is not adjusted. a a OFF (Minutes set.) r Once the alarm time has been set...
... muted. (Even when ALARM is set at the set alarm time. (blink.) Hours w Press [{] to set the hour. (Hours set.) Minutes e Press [}] to r. Display blinks and the alarm time setting mode is used for the clock. Cautions: • Be careful not to set wrong alarm time, otherwise, the alarm may sound while driving. • If the alarm is not adjusted. a a OFF (Minutes set.) r Once the alarm time has been set...

CQ5330U User Guide
Page 9
... last station will automatically stop when the next broadcast station is connected ) FM stereo indicator CLK PWR ALM PUSH SEL/SAT VOL DISP MODE CQ-5330U DISC BAND 1 23 BASS/TREB/BAL/FADER APM w Band Press [BAND] to the radio mode. r Manual Tuning [}TUNE]: Higher frequency [{TUNE]: Lower frequency Seek Tuning Press and hold for 5 seconds. • Press [SCAN] again to broadcast. Radio q Radio Mode Press [MODE] to change to change the...
... last station will automatically stop when the next broadcast station is connected ) FM stereo indicator CLK PWR ALM PUSH SEL/SAT VOL DISP MODE CQ-5330U DISC BAND 1 23 BASS/TREB/BAL/FADER APM w Band Press [BAND] to the radio mode. r Manual Tuning [}TUNE]: Higher frequency [{TUNE]: Lower frequency Seek Tuning Press and hold for 5 seconds. • Press [SCAN] again to broadcast. Radio q Radio Mode Press [MODE] to change to change the...

CQ5330U User Guide
Page 10
... DISC BAND 1 23 BASS/TREB/BAL/FADER APM CD SCAN RPT 45 LOUD MUTE RDM SCAN 6 ILL TUNE SEEK Preset buttons from [1] to [6] to tune in each . • Press [BAND] again to preset stations while you are overwritten with good reception will be saved in a preset station. Manual Preset Memory q Use manual or seek tuning to [6] w Auto Preset Memory (APM) Press and hold one of the FM1, FM2 and AM preset station memories...
... DISC BAND 1 23 BASS/TREB/BAL/FADER APM CD SCAN RPT 45 LOUD MUTE RDM SCAN 6 ILL TUNE SEEK Preset buttons from [1] to [6] to tune in each . • Press [BAND] again to preset stations while you are overwritten with good reception will be saved in a preset station. Manual Preset Memory q Use manual or seek tuning to [6] w Auto Preset Memory (APM) Press and hold one of the FM1, FM2 and AM preset station memories...

CQ5330U User Guide
Page 11
... Frequency (channel) Number Note: The weather band (CH1-6) has been preset. Tune to weather band to receive continuous weather information 24 hours a day on seven VHF/FM frequencies. If you have a question concerning NOAA Weather Radio, please contact your nearest National Weather Service Office. 11 CQ-5330U CLK PWR ALM PUSH SEL/SAT VOL DISP MODE CQ-5330U DISC BAND 1 23 BASS...
... Frequency (channel) Number Note: The weather band (CH1-6) has been preset. Tune to weather band to receive continuous weather information 24 hours a day on seven VHF/FM frequencies. If you have a question concerning NOAA Weather Radio, please contact your nearest National Weather Service Office. 11 CQ-5330U CLK PWR ALM PUSH SEL/SAT VOL DISP MODE CQ-5330U DISC BAND 1 23 BASS...

CQ5330U User Guide
Page 16
... continue to change to the Unit CQ-5330U. Channel Name (Push and hold [}] or [{] for more than 2 seconds. XM Control Preparation: Connect the XM receiver (XM DIRECT MODEL:XM-RVR-D-001) to the XM mode. q XM Mode (When a XM receiver is available on a chargable basis. XM displays as follows, (Example) Satellite Radio after 2 seconds Indicator XM Band Preset Number Channel Number after 5 seconds Category Priority Setting and Selecting • Push...
... continue to change to the Unit CQ-5330U. Channel Name (Push and hold [}] or [{] for more than 2 seconds. XM Control Preparation: Connect the XM receiver (XM DIRECT MODEL:XM-RVR-D-001) to the XM mode. q XM Mode (When a XM receiver is available on a chargable basis. XM displays as follows, (Example) Satellite Radio after 2 seconds Indicator XM Band Preset Number Channel Number after 5 seconds Category Priority Setting and Selecting • Push...
CQ5330U User Guide
Page 19
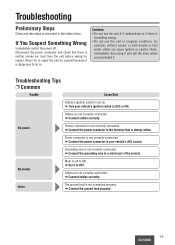
... use the unit if it is dangerous to the terminal that there is always active. No power. Power connector is not on. a Connect the power connector to ON. No sound. Troubleshooting Preliminary Steps Check and take steps as described in irregular condition, for repairs. Troubleshooting Tips ❐ Common Trouble Cause/Step Vehicle's ignition switch is not correctly connected. a Set it . Cables are not correctly connected. a Connect cables correctly. Noise. Disconnect the power connector...
... use the unit if it is dangerous to the terminal that there is always active. No power. Power connector is not on. a Connect the power connector to ON. No sound. Troubleshooting Preliminary Steps Check and take steps as described in irregular condition, for repairs. Troubleshooting Tips ❐ Common Trouble Cause/Step Vehicle's ignition switch is not correctly connected. a Set it . Cables are not correctly connected. a Connect cables correctly. Noise. Disconnect the power connector...

CQ5330U User Guide
Page 20
... one another . Refer to instructions for the concerned devices for details. • Disc is dirty. • Disc has scratches. Sound skips, bad sound quality. (e.g. Preset station is upside down. a Extend fully the radio antenna. caused by noise) Cause/Step Disc is reset. The radio antenna is made in the correct direction with the label side up. • Disc is not correctly connected. a The unit may not successfully playback...
... one another . Refer to instructions for the concerned devices for details. • Disc is dirty. • Disc has scratches. Sound skips, bad sound quality. (e.g. Preset station is upside down. a Extend fully the radio antenna. caused by noise) Cause/Step Disc is reset. The radio antenna is made in the correct direction with the label side up. • Disc is not correctly connected. a The unit may not successfully playback...
CQ5330U User Guide
Page 21
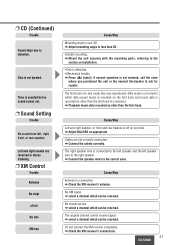
... service a select a channel which can be received. a Adjust mounting angle to ask for repairs. a Mount the unit securely with the mounting parts, referring to vibration. a Connect the cables correctly. The original channel cannot receive signal. ❐ CD (Continued) Trouble Sound skips due to the section on installation. • Disc is defective. • Mechanical trouble. The right speaker wire is over 30˚. a Connect the speaker wires to the right speaker. Cause/Step Antenna no sound comes out. ❐ Sound Setting Trouble...
... service a select a channel which can be received. a Adjust mounting angle to ask for repairs. a Mount the unit securely with the mounting parts, referring to vibration. a Connect the cables correctly. The original channel cannot receive signal. ❐ CD (Continued) Trouble Sound skips due to the section on installation. • Disc is defective. • Mechanical trouble. The right speaker wire is over 30˚. a Connect the speaker wires to the right speaker. Cause/Step Antenna no sound comes out. ❐ Sound Setting Trouble...

CQ5330U User Guide
Page 22
... you purchased the unit to the nearest panasonic servic center to ask for repairs. Disc has scratches. ➡ Select the next available compact disc. Check the disc. No operation by some cause. ➡ If normal operation is upside down . No operation by some cause. ➡ Eject the magazine. No disc in the changer (magazine) ➡ Insert discs into the changer (magazine). 22 CQ-5330U A disc that has data...
... you purchased the unit to the nearest panasonic servic center to ask for repairs. Disc has scratches. ➡ Select the next available compact disc. Check the disc. No operation by some cause. ➡ If normal operation is upside down . No operation by some cause. ➡ Eject the magazine. No disc in the changer (magazine) ➡ Insert discs into the changer (magazine). 22 CQ-5330U A disc that has data...
CQ5330U User Guide
Page 24
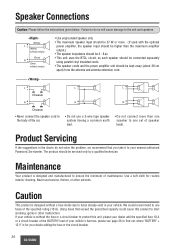
... Panasonic Servicenter. Chassis • Never connect the speaker cord to use a 3-wire type speaker system having a common earth lead. R + - + - + - • Do not connect more . (If used with the optional power amplifier, the speaker input should be higher than one speaker to the unit and speakers. The product should be serviced only by a qualified technician. Maintenance Your product is for routine exterior cleaning. Caution This product is without a fuse...
... Panasonic Servicenter. Chassis • Never connect the speaker cord to use a 3-wire type speaker system having a common earth lead. R + - + - + - • Do not connect more . (If used with the optional power amplifier, the speaker input should be higher than one speaker to the unit and speakers. The product should be serviced only by a qualified technician. Maintenance Your product is for routine exterior cleaning. Caution This product is without a fuse...
CQ5330U User Guide
Page 25
... auto battery system only. Doing so could result in a vehicle by a professional. The instructions in these pages will guide you plan to use it . It does not contain warnings or cautions of potential dangers involved in the dashboard. • Check the operation of the power connector. • Install the unit in attempting to install this out promptly. • Panasonic Servicenter List for Service...
... auto battery system only. Doing so could result in a vehicle by a professional. The instructions in these pages will guide you plan to use it . It does not contain warnings or cautions of potential dangers involved in the dashboard. • Check the operation of the power connector. • Install the unit in attempting to install this out promptly. • Panasonic Servicenter List for Service...

CQ5330U User Guide
Page 26
... cable from the negative battery terminal (see warning and caution below . Item Diagram Q'ty q Mounting Collar* 1 w Plain washer (5mmø) 2 e Spring Washer (5mmø) 2 r Hex. Bolt (5mmø × 25 mm) 1 u Toothed Lock Washer (5mmø) 1 i Removal Tool (U-shaped) 2 o Antenna Connector 1 (a) Using the rear support strap t ❐ Dashboard Installation Installation Opening This unit can be installed in other on the vehicle) Mounting bolt (5 mmø) q Mounting...
... cable from the negative battery terminal (see warning and caution below . Item Diagram Q'ty q Mounting Collar* 1 w Plain washer (5mmø) 2 e Spring Washer (5mmø) 2 r Hex. Bolt (5mmø × 25 mm) 1 u Toothed Lock Washer (5mmø) 1 i Removal Tool (U-shaped) 2 o Antenna Connector 1 (a) Using the rear support strap t ❐ Dashboard Installation Installation Opening This unit can be installed in other on the vehicle) Mounting bolt (5 mmø) q Mounting...

CQ5330U User Guide
Page 27
... Power Connector q Mounting Collar Mounting springs (C) Mounting Holes Mounting Bolt 2 Establish the rear connection of the unit to be careful not to injure your hands and fingers. After fixing Power Connector, fix the rear of the unit. Mounting Spring Mounting Hole 27 CQ-5330U Engage the Mounting Springs (C) in the previous page. 3 After installation reconnect the negative (-) battery terminal. Do not use it to attach any other model. 1 Insert Mounting Collar...
... Power Connector q Mounting Collar Mounting springs (C) Mounting Holes Mounting Bolt 2 Establish the rear connection of the unit to be careful not to injure your hands and fingers. After fixing Power Connector, fix the rear of the unit. Mounting Spring Mounting Hole 27 CQ-5330U Engage the Mounting Springs (C) in the previous page. 3 After installation reconnect the negative (-) battery terminal. Do not use it to attach any other model. 1 Insert Mounting Collar...

CQ5330U User Guide
Page 29
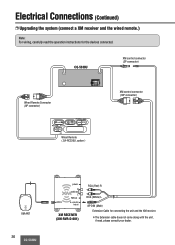
... of its memory maybe erased when the battery terminals are disconnected. ❐ Wiring Diagram XM control connector CD changer / XM control connector CD Receiver CQ-5330U 10 12 14 16 9 11 13 15 753 1 Antenna (Rear Side) ቪ Antenna Connector Power Connector ŏThe power connector does not come along with a 12 V DC, negative ground battery system. • To prevent damage to the unit, be sure to follow the connection diagram below...
... of its memory maybe erased when the battery terminals are disconnected. ❐ Wiring Diagram XM control connector CD changer / XM control connector CD Receiver CQ-5330U 10 12 14 16 9 11 13 15 753 1 Antenna (Rear Side) ቪ Antenna Connector Power Connector ŏThe power connector does not come along with a 12 V DC, negative ground battery system. • To prevent damage to the unit, be sure to follow the connection diagram below...
CQ5330U User Guide
Page 30
SAT Wired Remote ( CA-RC330U, option ) XM control connector (10P connector) XM ANT 30 CQ-5330U antenna power R audio out L FM out R contoroller/ head unit XM RECEIVER (XM-RVR-D-001) RCA (Red) R RCA (White) L 8P DIN (Male) Extension Cable for the devices connected. Electrical Connections (Continued) ❐ Upgrading the system (connect a XM receiver and the wired remote.) Note: For wiring, carefully read the operation instructions for connecting the unit and the XM receiver. ŏThe Extension cable does...
SAT Wired Remote ( CA-RC330U, option ) XM control connector (10P connector) XM ANT 30 CQ-5330U antenna power R audio out L FM out R contoroller/ head unit XM RECEIVER (XM-RVR-D-001) RCA (Red) R RCA (White) L 8P DIN (Male) Extension Cable for the devices connected. Electrical Connections (Continued) ❐ Upgrading the system (connect a XM receiver and the wired remote.) Note: For wiring, carefully read the operation instructions for connecting the unit and the XM receiver. ŏThe Extension cable does...
CQ5330U User Guide
Page 31
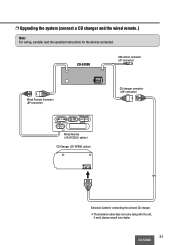
SAT Wired Remote ( CA-RC330U, option ) CD Changer (CD-DP880, option) CD changer connector (10P conncetor) Extension Cable for the devices connected. CQ-5330U XM control connector (2P connector) Wired Remote Connector (8P connector) VOL SEEK TUNE RC330U APM/PRG DISP BAND MODE DISP UP PWR SEL - ❐ Upgrading the system (connect a CD changer and the wired remote.) Note: For wiring, carefully read the operation instructions for connecting the unit and CD changer. ŏThe Extension cable does not come along with the unit, if need, please consult your dealer. 31 CQ-5330U
SAT Wired Remote ( CA-RC330U, option ) CD Changer (CD-DP880, option) CD changer connector (10P conncetor) Extension Cable for the devices connected. CQ-5330U XM control connector (2P connector) Wired Remote Connector (8P connector) VOL SEEK TUNE RC330U APM/PRG DISP BAND MODE DISP UP PWR SEL - ❐ Upgrading the system (connect a CD changer and the wired remote.) Note: For wiring, carefully read the operation instructions for connecting the unit and CD changer. ŏThe Extension cable does not come along with the unit, if need, please consult your dealer. 31 CQ-5330U


