
CQ5300U User Guide
Page 3
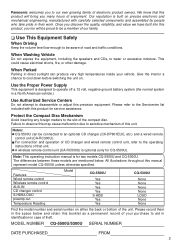
.... ❏ Use This Equipment Safely When Driving Keep the volume level low enough to be connected to aid in identification in a North American vehicle.) Use Authorized Service Centers Do not attempt to the operating instructions of electronic product owners. This could cause electrical shorts, fire, or other damage. MODEL NUMBER CQ-5500U/5300U SERIAL NUMBER DATE PURCHASED FROM 2 Features Wired remote control Wireless remote control AUX-IN CD changer control S.HDB/LOUD...
.... ❏ Use This Equipment Safely When Driving Keep the volume level low enough to be connected to aid in identification in a North American vehicle.) Use Authorized Service Centers Do not attempt to the operating instructions of electronic product owners. This could cause electrical shorts, fire, or other damage. MODEL NUMBER CQ-5500U/5300U SERIAL NUMBER DATE PURCHASED FROM 2 Features Wired remote control Wireless remote control AUX-IN CD changer control S.HDB/LOUD...
CQ5300U User Guide
Page 4
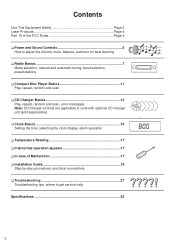
..., electrical connections ❏ Troubleshooting 27 Troubleshooting tips, where to adjust the volume, mute, balance, and tone for best listening ❏ Radio Basics 7 Mode selection, manual and automatic tuning, band selection, preset stations ❏ Compact Disc Player Basics 11 Play, repeat, random and scan ❏ CD Changer Basics 13 Play, repeat, random and scan, error messages. Note: CD changer controls are applicable to units with optional CD changer unit (sold separeately). ❏ Clock Basics 15 Setting the time, selecting the clock display, alarm operation ❏...
..., electrical connections ❏ Troubleshooting 27 Troubleshooting tips, where to adjust the volume, mute, balance, and tone for best listening ❏ Radio Basics 7 Mode selection, manual and automatic tuning, band selection, preset stations ❏ Compact Disc Player Basics 11 Play, repeat, random and scan ❏ CD Changer Basics 13 Play, repeat, random and scan, error messages. Note: CD changer controls are applicable to units with optional CD changer unit (sold separeately). ❏ Clock Basics 15 Setting the time, selecting the clock display, alarm operation ❏...

CQ5300U User Guide
Page 5
... nm Laser Power No hazardous radiation is subject to the condition that this unit. 4 ❏ Laser Products (Applies to this device does not cause harmful interference. Part 15 of the FCC Rules This unit has been manufactured under the Part 15 of the FCC Rules. Do not attempt to make any changes or modifications to laser product used in...
... nm Laser Power No hazardous radiation is subject to the condition that this unit. 4 ❏ Laser Products (Applies to this device does not cause harmful interference. Part 15 of the FCC Rules This unit has been manufactured under the Part 15 of the FCC Rules. Do not attempt to make any changes or modifications to laser product used in...

CQ5300U User Guide
Page 6
... bass/ treble level. -12 to 12 -12 to the previous level slowly if the level was at 20 or higher. Volume Press the knob to select the volume mode and then turn it clockwise or counterclockwise to adjust the volume level. 0 to 40 Volume Level Anti-Volume-Blast Circuit At power on the power. BASS/TREB/BAL/FADER d 5 Changing Audio Modes Press this knob [SEL] to switch on , the volume returns to 12 Power and Sound Controls l BASS...
... bass/ treble level. -12 to 12 -12 to the previous level slowly if the level was at 20 or higher. Volume Press the knob to select the volume mode and then turn it clockwise or counterclockwise to adjust the volume level. 0 to 40 Volume Level Anti-Volume-Blast Circuit At power on the power. BASS/TREB/BAL/FADER d 5 Changing Audio Modes Press this knob [SEL] to switch on , the volume returns to 12 Power and Sound Controls l BASS...

CQ5300U User Guide
Page 7
... VOL mode). or R 1 to 15 (F: Front, R: Rear) Fader Center Note: In the audio mode (BASS/TRE/BAL/FADE), the display will return to regular operation mode when there is no input for CQ-5500U) This featare enhances bass definition. Power and Sound Controls (continued) Balance Press the knob to select the BALANCE mode and then turn it clockwise or counterclockwise to shift the sound volume to the right or left speakers.
... VOL mode). or R 1 to 15 (F: Front, R: Rear) Fader Center Note: In the audio mode (BASS/TRE/BAL/FADE), the display will return to regular operation mode when there is no input for CQ-5500U) This featare enhances bass definition. Power and Sound Controls (continued) Balance Press the knob to select the BALANCE mode and then turn it clockwise or counterclockwise to shift the sound volume to the right or left speakers.
CQ5300U User Guide
Page 9
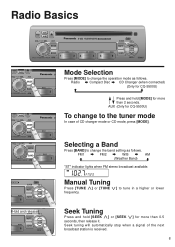
.../FADER SS/TREB/BAL/FADER FEW k 5500U Mode Selection Press [MODE] to the tuner mode In case of the next broadcast station is received. 8 Manual Tuning Press [TUNE j] or [TUNE i] to change the operation mode as follows. FM1 a FM2 a W/B a AM c (Weather Band) d "ST" indicator lights when FM stereo broadcast available. Seek tuning will automatically stop when a signal of CD changer mode or CD mode, press [MODE]. Radio a Compact Disc a CD Changer (when connected) (Only for CQ-5500U) c d Press and...
.../FADER SS/TREB/BAL/FADER FEW k 5500U Mode Selection Press [MODE] to the tuner mode In case of the next broadcast station is received. 8 Manual Tuning Press [TUNE j] or [TUNE i] to change the operation mode as follows. FM1 a FM2 a W/B a AM c (Weather Band) d "ST" indicator lights when FM stereo broadcast available. Seek tuning will automatically stop when a signal of CD changer mode or CD mode, press [MODE]. Radio a Compact Disc a CD Changer (when connected) (Only for CQ-5500U) c d Press and...
CQ5300U User Guide
Page 10
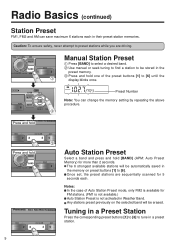
...; Auto Station Preset Select a band and press and hold one of Auto Station Preset mode, only FM2 is not activated in a preset station. The 6 strongest available stations will be erased. Radio Basics (continued) Station Preset FM1, FM2 and AM can change the memory setting by repeating the above procedure. Any stations preset previously on preset buttons [1] to be automatically saved in their preset station memories. Notes: In the case of the preset buttons [1] to tune in Weather Band. Preset Number...
...; Auto Station Preset Select a band and press and hold one of Auto Station Preset mode, only FM2 is not activated in a preset station. The 6 strongest available stations will be erased. Radio Basics (continued) Station Preset FM1, FM2 and AM can change the memory setting by repeating the above procedure. Any stations preset previously on preset buttons [1] to be automatically saved in their preset station memories. Notes: In the case of the preset buttons [1] to tune in Weather Band. Preset Number...
CQ5300U User Guide
Page 11
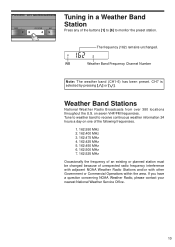
... Band Frequency Channel Number Note: The weather band (CH1-6) has been preset. Tune to weather band to monitor the preset station. If you have a question concerning NOAA Weather Radio, please contact your nearest National Weather Service Office. 10 Tuning in a Weather Band Station Press any of unexpected radio frequency interference with adjacent NOAA Weather Radio Stations and/or with other Government or Commercial Operations within the...
... Band Frequency Channel Number Note: The weather band (CH1-6) has been preset. Tune to weather band to monitor the preset station. If you have a question concerning NOAA Weather Radio, please contact your nearest National Weather Service Office. 10 Tuning in a Weather Band Station Press any of unexpected radio frequency interference with adjacent NOAA Weather Radio Stations and/or with other Government or Commercial Operations within the...
CQ5300U User Guide
Page 16
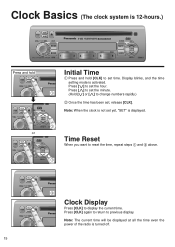
... [j] to change numbers rapidly.) ባ Once the time has been set the hour. Press [i] to set yet, "SET" is activated. Note: The current time will be displayed at all the time even the power of the radio is 12-hours.) l BASS/TREB/BAL/FADER FEW k 5500U Press and hold ቢ d l Initial Time ቢ Press and hold [CLK] to set , release [CLK]. Display blinks, and the time setting mode is displayed...
... [j] to change numbers rapidly.) ባ Once the time has been set the hour. Press [i] to set yet, "SET" is activated. Note: The current time will be displayed at all the time even the power of the radio is 12-hours.) l BASS/TREB/BAL/FADER FEW k 5500U Press and hold ቢ d l Initial Time ቢ Press and hold [CLK] to set , release [CLK]. Display blinks, and the time setting mode is displayed...
CQ5300U User Guide
Page 17
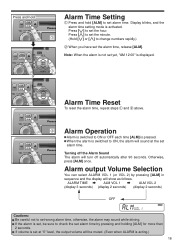
... switched to set alarm time. Press and hold ቢ d l Alarm Time Setting ቢ Press and hold [ALM] to ON, the alarm will sound at "0" level, the output volume will be sure to change numbers rapidly.) ባ When you have set the alarm time, release [ALM]. Otherwise, press [ALM] once. Press [j] to set the minute. (Hold [i] or [j] to check the set alarm time. Display blinks, and the alarm time setting mode...
... switched to set alarm time. Press and hold ቢ d l Alarm Time Setting ቢ Press and hold [ALM] to ON, the alarm will sound at "0" level, the output volume will be sure to change numbers rapidly.) ባ When you have set the alarm time, release [ALM]. Otherwise, press [ALM] once. Press [j] to set the minute. (Hold [i] or [j] to check the set alarm time. Display blinks, and the alarm time setting mode...
CQ5300U User Guide
Page 18
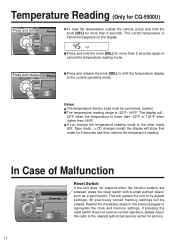
... clock and memory settings. The current temperature in the previous pages to the other mode (EX. Tape mode CD changer mode) the display will be connected. (option) The temperature reading range is lower than -22°F or 140°F when higher than 2 seconds again to the nearest authorikzed service center for more than 2 seconds. In Case of Malfunction BASS/TREB/BAL/FADER Reset Switch...
... clock and memory settings. The current temperature in the previous pages to the other mode (EX. Tape mode CD changer mode) the display will be connected. (option) The temperature reading range is lower than -22°F or 140°F when higher than 2 seconds again to the nearest authorikzed service center for more than 2 seconds. In Case of Malfunction BASS/TREB/BAL/FADER Reset Switch...
CQ5300U User Guide
Page 19
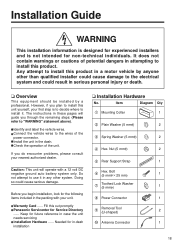
...φ) 1 ቩ Power Connector 1 ቪ Removal Tool (U-shaped) 2 ቫ Antenna Connector 1 18 Doing so could result in a motor vehicle by a professional. Warranty Card ...... Identify and label the vehicle wires. Check the operation of the power connector. Nut (5 mmφ) 2 ቦ Rear Support Strap 1 ቧ Hex. Connect the vehicle wires to the wires of the unit. Install the unit in these pages will operate with your unit. Fill this product...
...φ) 1 ቩ Power Connector 1 ቪ Removal Tool (U-shaped) 2 ቫ Antenna Connector 1 18 Doing so could result in a motor vehicle by a professional. Warranty Card ...... Identify and label the vehicle wires. Check the operation of the power connector. Nut (5 mmφ) 2 ቦ Rear Support Strap 1 ቧ Hex. Connect the vehicle wires to the wires of the unit. Install the unit in these pages will operate with your unit. Fill this product...
CQ5300U User Guide
Page 20
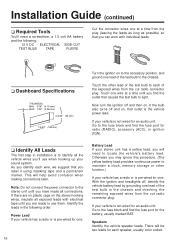
... on . Note: Do not connect the power connector to the stereo unit until you have made all the vehicle wires you identify each speaker, usually color coded. Touch one at a time until you find the fuse port for the battery, usually marked BAT. If your vehicle is not wired for an audio unit: Go to the fuse block and find the fuse port for radio (RADIO), accessory (ACC), or...
... on . Note: Do not connect the power connector to the stereo unit until you have made all the vehicle wires you identify each speaker, usually color coded. Touch one at a time until you find the fuse port for the battery, usually marked BAT. If your vehicle is not wired for an audio unit: Go to the fuse block and find the fuse port for radio (RADIO), accessory (ACC), or...
CQ5300U User Guide
Page 21
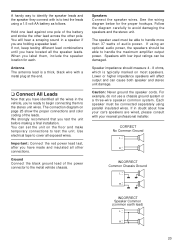
... ground the speaker cords. R + - You can set the unit on page 25 show the proper connections and color coding of audio power. INCORRECT Common Chassis Ground L + - R + - If not, keep testing different lead combinations until you have identified all exposed wires. Follow the diagram carefully to test the unit. For example, do not use a chassis ground system or a three-wire speaker common system. Antenna The antenna lead is...
... ground the speaker cords. R + - You can set the unit on page 25 show the proper connections and color coding of audio power. INCORRECT Common Chassis Ground L + - R + - If not, keep testing different lead combinations until you have identified all exposed wires. Follow the diagram carefully to test the unit. For example, do not use a chassis ground system or a three-wire speaker common system. Antenna The antenna lead is...
CQ5300U User Guide
Page 22
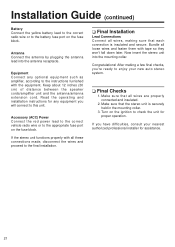
... stereo unit is insulated and secure. Equipment Connect any equipment you will connect to this unit. Read the operating and installation instructions for assistance. 21 After making sure that each connection is securely held in the mounting collar. 3. Antenna Connect the antenna by plugging the antenna lead into the mounting collar. Bundle all wires are properly connected and insulated. 2. Installation Guide (continued) Battery Connect the yellow battery lead to the correct radio wire or to the battery fuse...
... stereo unit is insulated and secure. Equipment Connect any equipment you will connect to this unit. Read the operating and installation instructions for assistance. 21 After making sure that each connection is securely held in the mounting collar. 3. Antenna Connect the antenna by plugging the antenna lead into the mounting collar. Bundle all wires are properly connected and insulated. 2. Installation Guide (continued) Battery Connect the yellow battery lead to the correct radio wire or to the battery fuse...

CQ5300U User Guide
Page 23
... Power Connector ቩ to protect yourself from the negative (-) battery terminal. 1. c) Insert the unit into the vehicle's dashboard, and bend mounting tabs out with a screwdriver, be careful not to this operating instructions. Securre the rear of the mounting collar with a screwdriver. ❏ Installation Procedures When bending the mounting tab of the unit. Secure the Mounting Collar ቢ. Mounting Tab Dashboard 1 Mounting Collar Screwdriver 2. Note: Disconnect the cable...
... Power Connector ቩ to protect yourself from the negative (-) battery terminal. 1. c) Insert the unit into the vehicle's dashboard, and bend mounting tabs out with a screwdriver, be careful not to this operating instructions. Securre the rear of the mounting collar with a screwdriver. ❏ Installation Procedures When bending the mounting tab of the unit. Secure the Mounting Collar ቢ. Mounting Tab Dashboard 1 Mounting Collar Screwdriver 2. Note: Disconnect the cable...

CQ5300U User Guide
Page 26
...-Out (L) (White) AUX-In Pre-Out (Rear) ቩ Power Connector CD Changer Control Connector Amp. Do not insert the power connector into the unit until the wiring is designed to insulate any metal parts. Bundle all cables and keep cable terminals free from touching any exposed wires from a possible short-circuit from their end before connecting. CD Receiver CQ-5500U Temperature Sensor Lead Sleeper Room Remote Connector (Connect to follow the connection diagram below. Remove the covering...
...-Out (L) (White) AUX-In Pre-Out (Rear) ቩ Power Connector CD Changer Control Connector Amp. Do not insert the power connector into the unit until the wiring is designed to insulate any metal parts. Bundle all cables and keep cable terminals free from touching any exposed wires from a possible short-circuit from their end before connecting. CD Receiver CQ-5500U Temperature Sensor Lead Sleeper Room Remote Connector (Connect to follow the connection diagram below. Remove the covering...

CQ5300U User Guide
Page 27
... Speaker (Rear) 26 CD Receiver CQ-5300U Antenna (Rear Side) ቫ Antenna Connector ቩ Power Connector ACC (Red) Ground (Black) Battery (Yellow) Fuse(10A) Accessory Power(ACC) (+12V DC, negative ground only) Ground Lead (Connect to insulate any metal parts. Bundle all cables and keep cable terminals free from touching any exposed wires from a possible short-circuit from their end before connecting. To prevent damage to the unit, be sure to operate...
... Speaker (Rear) 26 CD Receiver CQ-5300U Antenna (Rear Side) ቫ Antenna Connector ቩ Power Connector ACC (Red) Ground (Black) Battery (Yellow) Fuse(10A) Accessory Power(ACC) (+12V DC, negative ground only) Ground Lead (Connect to insulate any metal parts. Bundle all cables and keep cable terminals free from touching any exposed wires from a possible short-circuit from their end before connecting. To prevent damage to the unit, be sure to operate...

CQ5300U User Guide
Page 28
... amps). The unit should be ejected automatically, even if this error message is dirty or inverted. Error Display Messages E 1 Appears on the display when the compact disc stops operating for possible causes and solutions to any problem you take it to your nearest Panasonic Servicenter for routine exterior cleaning. But, the disc may be serviced only by a qualified technician. ❏ Replacing the Fuse Use fuses of maintenance. Using different...
... amps). The unit should be ejected automatically, even if this error message is dirty or inverted. Error Display Messages E 1 Appears on the display when the compact disc stops operating for possible causes and solutions to any problem you take it to your nearest Panasonic Servicenter for routine exterior cleaning. But, the disc may be serviced only by a qualified technician. ❏ Replacing the Fuse Use fuses of maintenance. Using different...
CQ5300U User Guide
Page 29
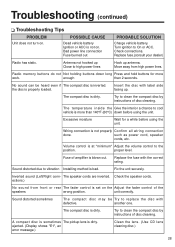
... connection Fuse burned out PROBABLE SOLUTION Charge vehicle battery. Insert the disc with the correct rating. A compact disc is sometimes The pickup lens is not on . such as power cord, speaker cords, etc. unit correctly. Try to replace the disc with defective. Radio memory buttons do not Not holding buttons down before using the unit. ejected. (Display shows "E1", an error message.) Clean the lens. (Use CD lens cleaning disc.) 28 Replace the fuse with label side facing...
... connection Fuse burned out PROBABLE SOLUTION Charge vehicle battery. Insert the disc with the correct rating. A compact disc is sometimes The pickup lens is not on . such as power cord, speaker cords, etc. unit correctly. Try to replace the disc with defective. Radio memory buttons do not Not holding buttons down before using the unit. ejected. (Display shows "E1", an error message.) Clean the lens. (Use CD lens cleaning disc.) 28 Replace the fuse with label side facing...


