
CQ4330U User Guide
Page 3
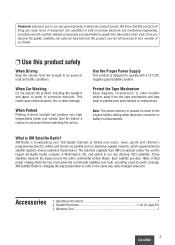
... to the original factory setting when the power connector or battery is built on . Supplied Hardware 1 set (➡ page 23) 3. The channels originate from the tape mechanism and tape head to -coast coverage. Our reputation is disconnected. When Parked Parking in their work. Protect the Tape Mechanism Keep magnets, screwdrivers, or other damage. Note: The preset memory is XM Satellite Radio? Operating Instructions 1 2. Warranty Card...1 3 CQ...
... to the original factory setting when the power connector or battery is built on . Supplied Hardware 1 set (➡ page 23) 3. The channels originate from the tape mechanism and tape head to -coast coverage. Our reputation is disconnected. When Parked Parking in their work. Protect the Tape Mechanism Keep magnets, screwdrivers, or other damage. Note: The preset memory is XM Satellite Radio? Operating Instructions 1 2. Warranty Card...1 3 CQ...
CQ4330U User Guide
Page 4
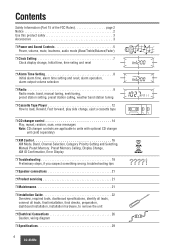
...; Power and Sound Controls 5 Power, volume, mute, loudness, audio mode (Bass/Treble/Balance/Fader) ❒ Clock Setting 7 Clock display change, Initial time, time seting and reset ❒ Alarm Time Setting 8 Initial alarm time, alarm time setting and reset, alarm operation, alarm output volume selection ❒ Radio 9 Radio mode, band, manual tuning, seek tuning, preset station setting, preset station calling, weather band station tuning ❒ Cassette Tape Player 12 How to load, Rewind, Fast forward, play side change, eject a cassette tape ❒ CD changer control 14 Play...
...; Power and Sound Controls 5 Power, volume, mute, loudness, audio mode (Bass/Treble/Balance/Fader) ❒ Clock Setting 7 Clock display change, Initial time, time seting and reset ❒ Alarm Time Setting 8 Initial alarm time, alarm time setting and reset, alarm operation, alarm output volume selection ❒ Radio 9 Radio mode, band, manual tuning, seek tuning, preset station setting, preset station calling, weather band station tuning ❒ Cassette Tape Player 12 How to load, Rewind, Fast forward, play side change, eject a cassette tape ❒ CD changer control 14 Play...

CQ4330U User Guide
Page 6
... ALM TUNE SEEK w Turn [VOL] (volume) clockwise or counterclockwise to select the audio mode. Power and Sound Controls (Continued) Audio Modes (Bass/Treble/Balance/Fader) q Push [SEL] to change each level. Adjustable range: Balance center 1 to 15 (by 1 step) Fader center (default) 6 CQ-4330U VOLUME BASS TREBLE FADER BALANCE push Note: If no operation takes place for more than 2 seconds to 15 (by 1 step) (default) Fader: F (front speaker) or R (rear speaker) Adjustable range: 1 to switch the illumination color (green...
... ALM TUNE SEEK w Turn [VOL] (volume) clockwise or counterclockwise to select the audio mode. Power and Sound Controls (Continued) Audio Modes (Bass/Treble/Balance/Fader) q Push [SEL] to change each level. Adjustable range: Balance center 1 to 15 (by 1 step) Fader center (default) 6 CQ-4330U VOLUME BASS TREBLE FADER BALANCE push Note: If no operation takes place for more than 2 seconds to 15 (by 1 step) (default) Fader: F (front speaker) or R (rear speaker) Adjustable range: 1 to switch the illumination color (green...
CQ4330U User Guide
Page 7
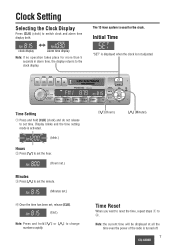
... clock display. Clock Setting Selecting the Clock Display Press [CLK] (clock) to set , release [CLK]. (End.) Note: Press and hold [CLK] (clock) and do not release to switch clock and alarm time display both. Display blinks and the time setting mode is used for more than 5 seconds in alarm time, the display returns to change numbers rapidly. Note: the current time will be displayed at all the time even the power of the radio is not adjusted. Initial Time clock display Alarm time display...
... clock display. Clock Setting Selecting the Clock Display Press [CLK] (clock) to set , release [CLK]. (End.) Note: Press and hold [CLK] (clock) and do not release to switch clock and alarm time display both. Display blinks and the time setting mode is used for more than 5 seconds in alarm time, the display returns to change numbers rapidly. Note: the current time will be displayed at all the time even the power of the radio is not adjusted. Initial Time clock display Alarm time display...
CQ4330U User Guide
Page 8
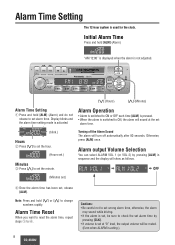
... may sound while driving. • If the alarm is set, be muted. (Even when ALARM is used for the clock. Note: Press and hold [ALM] (Alarm) "AM 12:00" is displayed when the alarm is activated. Alarm output Volume Selection You can select ALARM VOL 1 (or VOL 2) by pressing [CLK]. • If volume is set the minute. Display blinks and the alarm time setting mode is not adjusted. Turning off...
... may sound while driving. • If the alarm is set, be muted. (Even when ALARM is used for the clock. Note: Press and hold [ALM] (Alarm) "AM 12:00" is displayed when the alarm is activated. Alarm output Volume Selection You can select ALARM VOL 1 (or VOL 2) by pressing [CLK]. • If volume is set the minute. Display blinks and the alarm time setting mode is not adjusted. Turning off...

CQ4330U User Guide
Page 9
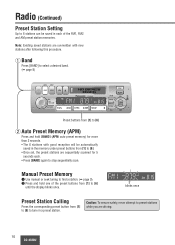
... change the band. Radio q Radio mode Press [MODE] to switch the operation mode as follows: Radio a TAPE a c (When a Tape is inserted) CD Changer Control (When a CD changer is received. 9 CQ-4330U r Manual Tuning [}]: Higher frequency [{]: Lower frequency Seek Tuning Press and hold for 5 seconds. • Press [SCAN] again to stop when the signals of the next broadcast station is connected) FM stereo indicator APM DISP PWR BAND MODE VOL PUSH SEL/SAT BASS...
... change the band. Radio q Radio mode Press [MODE] to switch the operation mode as follows: Radio a TAPE a c (When a Tape is inserted) CD Changer Control (When a CD changer is received. 9 CQ-4330U r Manual Tuning [}]: Higher frequency [{]: Lower frequency Seek Tuning Press and hold for 5 seconds. • Press [SCAN] again to stop when the signals of the next broadcast station is connected) FM stereo indicator APM DISP PWR BAND MODE VOL PUSH SEL/SAT BASS...
CQ4330U User Guide
Page 10
Manual Preset Memory q Use manual or seek tuning to find a station. (➡ page 9) w Press and hold [BAND] (APM: auto preset memory) for more than 2 seconds. • The 6 stations with new stations after following this procedure. blinks once Preset Station Calling Press the corresponding preset button from [1] to [6] to tune in a preset station. q Band Press [BAND] to select a desired band. (➡ page 9) APM DISP PWR BAND MODE VOL PUSH SEL/SAT BASS/TREB BAL...
Manual Preset Memory q Use manual or seek tuning to find a station. (➡ page 9) w Press and hold [BAND] (APM: auto preset memory) for more than 2 seconds. • The 6 stations with new stations after following this procedure. blinks once Preset Station Calling Press the corresponding preset button from [1] to [6] to tune in a preset station. q Band Press [BAND] to select a desired band. (➡ page 9) APM DISP PWR BAND MODE VOL PUSH SEL/SAT BASS/TREB BAL...

CQ4330U User Guide
Page 11
... LOUD MUTE RDM SCAN 6 ILL CLK ALM TUNE SEEK Tuning in a Weather Band Station • Press [BAND] to select WB (Weather Band). (a page 9) • Press any of the buttons [1] to [6] to receive continuous weather information 24 hours a day on seven VHF/FM frequencies. WB Weather Band Frequency (channel) Number Note: The weather band (CH1-6) has been preset. Weather Band Stations National Weather Radio Broadcasts...
... LOUD MUTE RDM SCAN 6 ILL CLK ALM TUNE SEEK Tuning in a Weather Band Station • Press [BAND] to select WB (Weather Band). (a page 9) • Press any of the buttons [1] to [6] to receive continuous weather information 24 hours a day on seven VHF/FM frequencies. WB Weather Band Frequency (channel) Number Note: The weather band (CH1-6) has been preset. Weather Band Stations National Weather Radio Broadcasts...
CQ4330U User Guide
Page 15
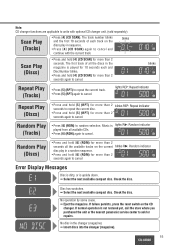
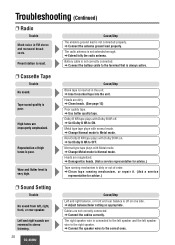
... the CD changer. Music is played for more than 2 seconds. Check the disc. Disc has scratches. ➡ Select the next available compact disc. If normal operation is upside down. ➡ Select the next available compact disc. Random Play (Tracks) • Press [6] (RDM) to cancel Error Display Messages Disc is dirty, or is not restored yet, call the store where you purchased the unit or the nearest panasonic service center...
... the CD changer. Music is played for more than 2 seconds. Check the disc. Disc has scratches. ➡ Select the next available compact disc. If normal operation is upside down. ➡ Select the next available compact disc. Random Play (Tracks) • Press [6] (RDM) to cancel Error Display Messages Disc is dirty, or is not restored yet, call the store where you purchased the unit or the nearest panasonic service center...
CQ4330U User Guide
Page 16
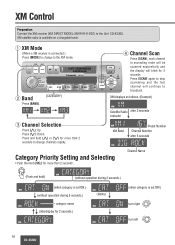
... CLK scanned sequentially and ALM the display will continue to change channels rapidly. q XM Mode (When a XM receiver is available on a chargable basis. XM satellite radio is connected.) Press [MODE] to broadcast. Press [SCAN] again to the Unit CQ-4330U. XM displays as follows, (Example) Satellite Radio after 2 seconds Indicator XM Band Preset Number Channel Number after 5 seconds Category Priority Setting and Selecting • Push the knob [SEL] for...
... CLK scanned sequentially and ALM the display will continue to change channels rapidly. q XM Mode (When a XM receiver is available on a chargable basis. XM satellite radio is connected.) Press [MODE] to broadcast. Press [SCAN] again to the Unit CQ-4330U. XM displays as follows, (Example) Satellite Radio after 2 seconds Indicator XM Band Preset Number Channel Number after 5 seconds Category Priority Setting and Selecting • Push the knob [SEL] for...
CQ4330U User Guide
Page 19
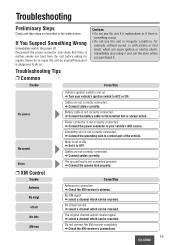
...; Do not use the unit if it is not correctly connected. Cables are not correctly connected. a Set it . The ground lead is set to OFF. No sound. a Turn your vehicle's ACC source. a Connect the power connector to do so. Mute is not connected properly. No XM signal a select a channel which can be received. Cause/Step No power. Cause/Step Antenna no connection a Check the XM receiver's antenna. The original channel cannot receive signal. Troubleshooting Preliminary Steps...
...; Do not use the unit if it is not correctly connected. Cables are not correctly connected. a Set it . The ground lead is set to OFF. No sound. a Turn your vehicle's ACC source. a Connect the power connector to do so. Mute is not connected properly. No XM signal a select a channel which can be received. Cause/Step No power. Cause/Step Antenna no connection a Check the XM receiver's antenna. The original channel cannot receive signal. Troubleshooting Preliminary Steps...
CQ4330U User Guide
Page 20
... are not correctly connected. Wow and flutter level is poor. Dolby B NR tape plays with normal mode. a Set Dolby B NR to the terminal that is connected to the right speaker. Cables are improperly emphasized. The right speaker wire is always active. ❐ Cassette Tape Trouble No sound. Troubleshooting (Continued) ❐ Radio Trouble Much noise in the unit. The radio antenna is not correctly connected. a Extend fully the radio antenna. a Connect the battery cable to ON...
... are not correctly connected. Wow and flutter level is poor. Dolby B NR tape plays with normal mode. a Set Dolby B NR to the terminal that is connected to the right speaker. Cables are improperly emphasized. The right speaker wire is always active. ❐ Cassette Tape Trouble No sound. Troubleshooting (Continued) ❐ Radio Trouble Much noise in the unit. The radio antenna is not correctly connected. a Extend fully the radio antenna. a Connect the battery cable to ON...

CQ4330U User Guide
Page 21
... each speaker should be connected separately using parallel vinyl insulated cords. • The speaker cords and the power amplifier unit should be kept away (about 30 cm apart) from the antenna and antenna extension cord. L + - + - + - R + - + - + - • Do not connect more . (If used with the optional power amplifier, the speaker input should be higher than one speaker to the unit and speakers. Product Servicing If the suggestions in your dealer adding the fuse or...
... each speaker should be connected separately using parallel vinyl insulated cords. • The speaker cords and the power amplifier unit should be kept away (about 30 cm apart) from the antenna and antenna extension cord. L + - + - + - R + - + - + - • Do not connect more . (If used with the optional power amplifier, the speaker input should be higher than one speaker to the unit and speakers. Product Servicing If the suggestions in your dealer adding the fuse or...
CQ4330U User Guide
Page 22
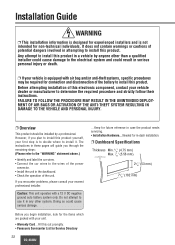
... to install this out promptly. • Panasonic Servicenter List for Service Directory 22 CQ-4330U ...Keep for future reference in case the product needs servicing. • Installation Hardware...Needed for in-dash installation. ❐ Dashboard Specifications Thickness Min. 3⁄ " (4.75 mm) 16 Max. 7⁄ " (5.56 mm) 32 23⁄ " (53 mm) 32 75⁄ " (182 mm) 32 Caution: This unit operates with...
... to install this out promptly. • Panasonic Servicenter List for Service Directory 22 CQ-4330U ...Keep for future reference in case the product needs servicing. • Installation Hardware...Needed for in-dash installation. ❐ Dashboard Specifications Thickness Min. 3⁄ " (4.75 mm) 16 Max. 7⁄ " (5.56 mm) 32 23⁄ " (53 mm) 32 75⁄ " (182 mm) 32 Caution: This unit operates with...

CQ4330U User Guide
Page 23
... recommend to make a record of the battery to install this electronic component, contact your vehicle is equipped with the front end up the settings before disconnecting the terminals. Nut (5mmø) 2 t Rear Support Strap 1 y Hex. Bolt (5mmø × 25 mm) 1 u Toothed Lock Washer (5mmø) 1 i Removal Tool (U-shaped) 2 o Antenna Connector 1 (a) Using the rear support strap t ❐ Dashboard Installation Installation Opening This unit can be...
... recommend to make a record of the battery to install this electronic component, contact your vehicle is equipped with the front end up the settings before disconnecting the terminals. Nut (5mmø) 2 t Rear Support Strap 1 y Hex. Bolt (5mmø × 25 mm) 1 u Toothed Lock Washer (5mmø) 1 i Removal Tool (U-shaped) 2 o Antenna Connector 1 (a) Using the rear support strap t ❐ Dashboard Installation Installation Opening This unit can be...

CQ4330U User Guide
Page 24
... installation work to protect yourself from injuries. • When bending the mounting tab of the mounting collar with a screwdriver. Mounting Spring Mounting Hole 24 CQ-4330U To securely install the unit, fully bend a number of the unit to the vehicle body by either method (a) or (b) shown in the mounting holes of the unit. Example: Tab Power Connector q Mounting Collar Mounting springs (C) Mounting Holes Mounting Bolt 2 Establish the rear connection of the Mounting...
... installation work to protect yourself from injuries. • When bending the mounting tab of the mounting collar with a screwdriver. Mounting Spring Mounting Hole 24 CQ-4330U To securely install the unit, fully bend a number of the unit to the vehicle body by either method (a) or (b) shown in the mounting holes of the unit. Example: Tab Power Connector q Mounting Collar Mounting springs (C) Mounting Holes Mounting Bolt 2 Establish the rear connection of the Mounting...
CQ4330U User Guide
Page 26
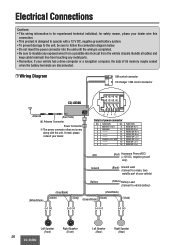
... of its memory maybe erased when the battery terminals are disconnected. ❐ Wiring Diagram XM control connector CD changer / XM control connector CQ-4330U 10 12 14 16 9 11 13 15 753 1 Antenna (Rear Side) ቪ Antenna Connector Power Connector ŏThe power connector does not come along with a 12 V DC, negative ground battery system. • To prevent damage to the unit, be sure to follow the connection diagram below. •...
... of its memory maybe erased when the battery terminals are disconnected. ❐ Wiring Diagram XM control connector CD changer / XM control connector CQ-4330U 10 12 14 16 9 11 13 15 753 1 Antenna (Rear Side) ቪ Antenna Connector Power Connector ŏThe power connector does not come along with a 12 V DC, negative ground battery system. • To prevent damage to the unit, be sure to follow the connection diagram below. •...
CQ4330U User Guide
Page 27
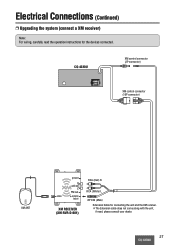
CQ-4330U XM control connector (2P connector) XM control connector (10P connector) XM ANT power R audio out L FM out antenna R contoroller/ head unit XM RECEIVER (XM-RVR-D-001) RCA (Red) R RCA (White) L 8P DIN (Male) Extension Cable for the devices connected. Electrical Connections (Continued) ❐ Upgrading the system (connect a XM receiver) Note: For wiring, carefully read the operation instructions for connecting the unit and the XM receiver. ŏThe Extension cable does not come along with the unit, if need, please consult your dealer. 27 CQ-4330U
CQ-4330U XM control connector (2P connector) XM control connector (10P connector) XM ANT power R audio out L FM out antenna R contoroller/ head unit XM RECEIVER (XM-RVR-D-001) RCA (Red) R RCA (White) L 8P DIN (Male) Extension Cable for the devices connected. Electrical Connections (Continued) ❐ Upgrading the system (connect a XM receiver) Note: For wiring, carefully read the operation instructions for connecting the unit and the XM receiver. ŏThe Extension cable does not come along with the unit, if need, please consult your dealer. 27 CQ-4330U
CQ4330U User Guide
Page 28
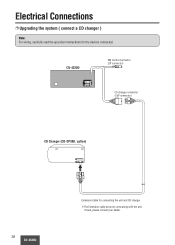
Electrical Connections ❐ Upgrading the system ( connect a CD changer ) Note: For wiring, carefully read the operation instructions for connecting the unit and CD changer. ŏThe Extension cable does not come along with the unit, if need, please consult your dealer. CQ-4330U XM control connector (2P connector) CD changer connector (10P connector) CD Changer (CD-DP880, option) 28 CQ-4330U Extension Cable for the devices connected.
Electrical Connections ❐ Upgrading the system ( connect a CD changer ) Note: For wiring, carefully read the operation instructions for connecting the unit and CD changer. ŏThe Extension cable does not come along with the unit, if need, please consult your dealer. CQ-4330U XM control connector (2P connector) CD changer connector (10P connector) CD Changer (CD-DP880, option) 28 CQ-4330U Extension Cable for the devices connected.

CQ4330U User Guide
Page 29
Specifications ❐ General Power Supply: Current consumption: Maximum Power Output: Tone adjustment range: Bass: Treble: Power Output: Suitable Speaker Impedance: Dimensions (W × H × D): Weight: 12 V DC (11 V-16 V) test Voltage 14.4 V, Negative ground Less than 2.5 A (tape mode, 0.5 W 4-speaker) 37 W × 4 channels at 400 Hz, Volume Control maximum ± 12 dB at 100 Hz ± 12 dB at 10 kHz 18 W per channel into 4 ohms, 40 to improvements...
Specifications ❐ General Power Supply: Current consumption: Maximum Power Output: Tone adjustment range: Bass: Treble: Power Output: Suitable Speaker Impedance: Dimensions (W × H × D): Weight: 12 V DC (11 V-16 V) test Voltage 14.4 V, Negative ground Less than 2.5 A (tape mode, 0.5 W 4-speaker) 37 W × 4 channels at 400 Hz, Volume Control maximum ± 12 dB at 100 Hz ± 12 dB at 10 kHz 18 W per channel into 4 ohms, 40 to improvements...


