
Operating Instructions
Page 2
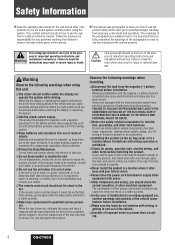
..., please seek immediate medical attention. ❑ Protect the Deck Mechanism. If the remote control unit lies about, it , is exposed to attach or wire the product, first check where the wire harness, gasoline tank, and electric wiring are explained below. Then open a hole in the vehicle chassis to water, is out of important operating instructions and installation instructions. Do not disassemble, modify the...
..., please seek immediate medical attention. ❑ Protect the Deck Mechanism. If the remote control unit lies about, it , is exposed to attach or wire the product, first check where the wire harness, gasoline tank, and electric wiring are explained below. Then open a hole in the vehicle chassis to water, is out of important operating instructions and installation instructions. Do not disassemble, modify the...
Operating Instructions
Page 3
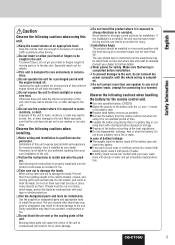
... product should bear in mind that wiring is completed. ❑ Do not connect more than one speaker to one set of speaker leads. (except for infants. ❑ This unit is exposed to install and wire the product. Keep the volume level low enough to be installed. To prevent injury, do not connect the power connector until the whole wiring is completed before disposal or storage...
... product should bear in mind that wiring is completed. ❑ Do not connect more than one speaker to one set of speaker leads. (except for infants. ❑ This unit is exposed to install and wire the product. Keep the volume level low enough to be installed. To prevent injury, do not connect the power connector until the whole wiring is completed before disposal or storage...
Operating Instructions
Page 5
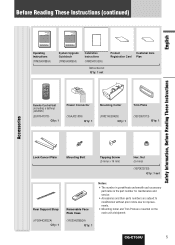
... parts numbers are subject to modification without prior notice due to improvements. ¡ Mounting Collar and Trim Plate are mounted on the main unit at shipment. (YFC054C089CA) Q'ty: 1 CQ-C700U 5 Nut (5 mmø) (YEP0FZ5739) Q'ty: 1 set Product Customer Care Registration Card Plan POWER SOURCE MENU SRC SEL SET VOL BAND MUTE 12 RANDOM SCAN 45 3 REPEAT 6 78 TUNE #0 NUMBER 9 TUNE DISP CAR AUDIO Remote Control Unit (including a battery) (CR2025) (EUR7641010) Q'ty: 1 Power Connector...
... parts numbers are subject to modification without prior notice due to improvements. ¡ Mounting Collar and Trim Plate are mounted on the main unit at shipment. (YFC054C089CA) Q'ty: 1 CQ-C700U 5 Nut (5 mmø) (YEP0FZ5739) Q'ty: 1 set Product Customer Care Registration Card Plan POWER SOURCE MENU SRC SEL SET VOL BAND MUTE 12 RANDOM SCAN 45 3 REPEAT 6 78 TUNE #0 NUMBER 9 TUNE DISP CAR AUDIO Remote Control Unit (including a battery) (CR2025) (EUR7641010) Q'ty: 1 Power Connector...
Operating Instructions
Page 7
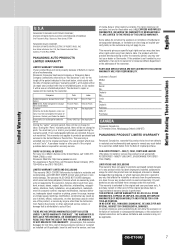
... for lost time, cost of having someone remove or re-install an installed unit if applicable, travel to defects in the United States or Puerto Rico. One (1) Year Two (2) Years One (1) Year One (1) Year Two (2) Years Not Applicable Accessories (in your Dealer for parts. This warranty only applies to the original end user purchaser only. Categories Parts Labor Audio Components...
... for lost time, cost of having someone remove or re-install an installed unit if applicable, travel to defects in the United States or Puerto Rico. One (1) Year Two (2) Years One (1) Year One (1) Year Two (2) Years Not Applicable Accessories (in your Dealer for parts. This warranty only applies to the original end user purchaser only. Categories Parts Labor Audio Components...
Operating Instructions
Page 8
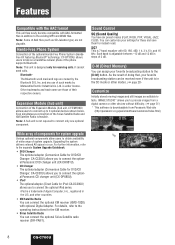
... allow users to taste. For details, refer to connect the optional iPod series. You can connect the optional Sirius Satellite radio receiver (SIR-PAN1). 8 CQ-C700U Upgrading the system delivers relaxed AV space in addition to the [D·M] button. For further information, refer to the separate System Upgrade Guidebook. ¡ DVD Changer The optional adapter (Conversion Cable for DVD/CD Changer: CA-CC30U) allows you to connect the optional Panasonic DVD changer unit (CX...
... allow users to taste. For details, refer to connect the optional iPod series. You can connect the optional Sirius Satellite radio receiver (SIR-PAN1). 8 CQ-C700U Upgrading the system delivers relaxed AV space in addition to the [D·M] button. For further information, refer to the separate System Upgrade Guidebook. ¡ DVD Changer The optional adapter (Conversion Cable for DVD/CD Changer: CA-CC30U) allows you to connect the optional Panasonic DVD changer unit (CX...
Operating Instructions
Page 9
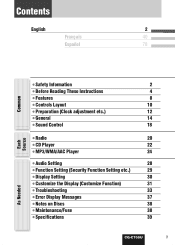
... 8 ¡Controls Layout 10 ¡Preparation (Clock adjustment etc.) 12 ¡General 14 ¡Sound Control 18 ¡Radio 20 ¡CD Player 22 ¡MP3/WMA/AAC Player 24 ¡Audio Setting 28 ¡Function Setting (Security Function Setting etc.) 29 ¡Display Setting 30 ¡Customize the Display (Customize Function) 31 ¡Troubleshooting 33 ¡Error Display Messages 37 ¡Notes on Discs 38 ¡Maintenance/Fuse 38 ¡Specifications 39 CQ-C700U 9 As Needed
... 8 ¡Controls Layout 10 ¡Preparation (Clock adjustment etc.) 12 ¡General 14 ¡Sound Control 18 ¡Radio 20 ¡CD Player 22 ¡MP3/WMA/AAC Player 24 ¡Audio Setting 28 ¡Function Setting (Security Function Setting etc.) 29 ¡Display Setting 30 ¡Customize the Display (Customize Function) 31 ¡Troubleshooting 33 ¡Error Display Messages 37 ¡Notes on Discs 38 ¡Maintenance/Fuse 38 ¡Specifications 39 CQ-C700U 9 As Needed

Operating Instructions
Page 11
...; Direct memory setting and calling (a page 20) Operations executable only with remote control ¡Preset station calling with one-touch operation (a page 21) ¡ Direct access to 9 # NUMBER Number RANDOM 4 RANDOM SCAN 5 SCAN REPEAT REPEAT 6 7 9 TUNE TRACK (FILE) SEL Select MENU POWER SRC (SOURCE) BAND Pause/Play SET APM Auto Preset Memory POWER SOURCE MENU SRC SEL SET VOL BAND MUTE 12 RANDOM SCAN 45 3 REPEAT 6 78 TUNE #0 NUMBER 9 TUNE DISP 8 0 P·SET (Preset) DISC (FOLDER) CAR AUDIO Although most of the functions of this unit are...
...; Direct memory setting and calling (a page 20) Operations executable only with remote control ¡Preset station calling with one-touch operation (a page 21) ¡ Direct access to 9 # NUMBER Number RANDOM 4 RANDOM SCAN 5 SCAN REPEAT REPEAT 6 7 9 TUNE TRACK (FILE) SEL Select MENU POWER SRC (SOURCE) BAND Pause/Play SET APM Auto Preset Memory POWER SOURCE MENU SRC SEL SET VOL BAND MUTE 12 RANDOM SCAN 45 3 REPEAT 6 78 TUNE #0 NUMBER 9 TUNE DISP 8 0 P·SET (Preset) DISC (FOLDER) CAR AUDIO Although most of the functions of this unit are...

Operating Instructions
Page 13
... may need to set the following functions are required when a Sirius receiver, an XM receiver, or a Hands-Free Phone System is ON. (a page 29) ¡ The security indicator lights up when removing the face plate. ¡ The alarm sounds and the message appears on the devices to select "CLOCK ADJ". For using the remote control, use [BAND] (SET). 7 Press [MENU] to close the menu screen. For using the remote control, use [}] or [{]. 4 Press [PUSH SEL], and the clock adjustment screen...
... may need to set the following functions are required when a Sirius receiver, an XM receiver, or a Hands-Free Phone System is ON. (a page 29) ¡ The security indicator lights up when removing the face plate. ¡ The alarm sounds and the message appears on the devices to select "CLOCK ADJ". For using the remote control, use [BAND] (SET). 7 Press [MENU] to close the menu screen. For using the remote control, use [}] or [{]. 4 Press [PUSH SEL], and the clock adjustment screen...
Operating Instructions
Page 15
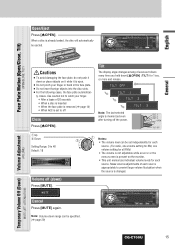
.../Eject Press [uOPEN]. Tilt The display angle changes among 4 levels as follows every time you hold down ) Press [MUTE]. Make volume adjustments of 20 seconds ¡ When a disc is inserted ¡ When the face plate is removed (a page 14) ¡ When ACC is set independently for each source. (For radio, one volume setting for AM, one volume setting for all FMs) ¡ The volume is not adjustable while an error or the menu screen...
.../Eject Press [uOPEN]. Tilt The display angle changes among 4 levels as follows every time you hold down ) Press [MUTE]. Make volume adjustments of 20 seconds ¡ When a disc is inserted ¡ When the face plate is removed (a page 14) ¡ When ACC is set independently for each source. (For radio, one volume setting for AM, one volume setting for all FMs) ¡ The volume is not adjustable while an error or the menu screen...
Operating Instructions
Page 16
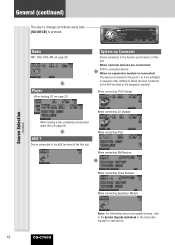
... connecting DVD Changer When loading a disc containing compressed audio files (a page 24) AUX 1 Device connected to the AUX terminal of the this unit When optional devices are activated in sequence after shifting to AUX2 (devices connected to the AUX terminal of this unit When connecting CD Changer When connecting iPod When connecting XM Receiver Source Selection (SOURCE) When connecting Sirius Receiver When connecting Expansion Module 16 CQ-C700U Note: For information about connectable devices, refer to the System Upgrade Guidebook or the instruction manual for each device...
... connecting DVD Changer When loading a disc containing compressed audio files (a page 24) AUX 1 Device connected to the AUX terminal of the this unit When optional devices are activated in sequence after shifting to AUX2 (devices connected to the AUX terminal of this unit When connecting CD Changer When connecting iPod When connecting XM Receiver Source Selection (SOURCE) When connecting Sirius Receiver When connecting Expansion Module 16 CQ-C700U Note: For information about connectable devices, refer to the System Upgrade Guidebook or the instruction manual for each device...

Operating Instructions
Page 18
... SEL]. or more on your taste. 1 Hold down for 2 sec. For using the remote control, use [BAND] (SET). 5 Press [DISP: DISPLAY]. The screen of SQ, bass/treble and volume are influenced one another. Note: Setting of Step 1 appears again. SQ adjustment (USER) SQ Selection Based on Genre (SQ: SOUND QUALITY) Sound Control The equalizer curve is selectable from among preset 6 types (FLAT, ROCK, POP, VOCAL, JAZZ, and CLUB) depending on...
... SEL]. or more on your taste. 1 Hold down for 2 sec. For using the remote control, use [BAND] (SET). 5 Press [DISP: DISPLAY]. The screen of SQ, bass/treble and volume are influenced one another. Note: Setting of Step 1 appears again. SQ adjustment (USER) SQ Selection Based on Genre (SQ: SOUND QUALITY) Sound Control The equalizer curve is selectable from among preset 6 types (FLAT, ROCK, POP, VOCAL, JAZZ, and CLUB) depending on...

Operating Instructions
Page 19
or more toggles SBC-SW on and off. Off (default) Lights when SBC-SW is selected, the settings of subwoofer level adjustment and subwoofer low pass filter are activatOn ed. (a page 28) Sound Control CQ-C700U 19 Notes: ¡ If ON is activated. CQ-C700U Holding down [SBC-SW] for 2 sec. English Substitutional Subwoofer (SBC-SW: SUPER BASS CONTROL-SUBWOOFER) The rear speaker can be used as a substitutional subwoofer when a subwoofer is not connected.
or more toggles SBC-SW on and off. Off (default) Lights when SBC-SW is selected, the settings of subwoofer level adjustment and subwoofer low pass filter are activatOn ed. (a page 28) Sound Control CQ-C700U 19 Notes: ¡ If ON is activated. CQ-C700U Holding down [SBC-SW] for 2 sec. English Substitutional Subwoofer (SBC-SW: SUPER BASS CONTROL-SUBWOOFER) The rear speaker can be used as a substitutional subwoofer when a subwoofer is not connected.

Operating Instructions
Page 20
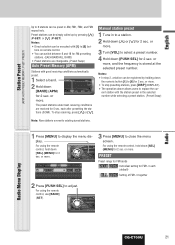
...; The volume is not adjustable while the preset list screen is useful for 0.5 sec. You can be executed with [1] to [6] buttons on remote control. ¡ A preset station is selectable by turning on the unit. 20 CQ-C700U w Hold down for users to select a band. 3 Select a station. or more . or more and release for 2 sec. Band CQ-C700U Frequency adjustment []] (TUNE): Lower [[] (TUNE): Higher Note: Hold down [D.M] (DIRECT MEMORY) for station search. Direct Memory D.M station Calling Press [D.M] (DIRECT MEMORY). Operation Flow Radio This chapter...
...; The volume is not adjustable while the preset list screen is useful for 0.5 sec. You can be executed with [1] to [6] buttons on remote control. ¡ A preset station is selectable by turning on the unit. 20 CQ-C700U w Hold down for users to select a band. 3 Select a station. or more . or more and release for 2 sec. Band CQ-C700U Frequency adjustment []] (TUNE): Lower [[] (TUNE): Higher Note: Hold down [D.M] (DIRECT MEMORY) for station search. Direct Memory D.M station Calling Press [D.M] (DIRECT MEMORY). Operation Flow Radio This chapter...
Operating Instructions
Page 21
...-3 each after presetting the stations (SCAN). Radio Radio Menu Display CQ-C700U 21 CQ-C700U 2 Hold down [}] or [{] for 2 sec. Manual station preset 1 Tune in the selected number while selecting a preset station. (Preset Swap) Note: New stations overwrite existing saved stations. 1 Press [MENU] to adjust. or more . For using the remote control, hold down [PUSH SEL] for 2 sec. Preset stations can switch between 6 and 18 for FM presetting stations. (EACH BAND/ALL BAND) ¡ Preset stations are received for 2 sec. tons on remote control. ¡...
...-3 each after presetting the stations (SCAN). Radio Radio Menu Display CQ-C700U 21 CQ-C700U 2 Hold down [}] or [{] for 2 sec. Manual station preset 1 Tune in the selected number while selecting a preset station. (Preset Swap) Note: New stations overwrite existing saved stations. 1 Press [MENU] to adjust. or more . For using the remote control, hold down [PUSH SEL] for 2 sec. Preset stations can switch between 6 and 18 for FM presetting stations. (EACH BAND/ALL BAND) ¡ Preset stations are received for 2 sec. tons on remote control. ¡...
Operating Instructions
Page 22
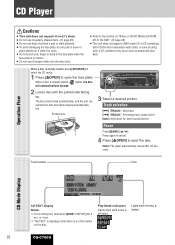
...; This unit does not support a MIX mode CD (a CD containing both CD-DA and compressed audio data). When a disc is activated. Printed side CQ-C700U 3 Select a desired portion. The face plate closes automatically, and the unit recognizes the disc and starts playing automatically, too. Operation Flow When a disc is no information on the disc. or more. ¡ "NO TEXT" is displayed when there is already loaded, press [SOURCE] to select the CD mode...
...; This unit does not support a MIX mode CD (a CD containing both CD-DA and compressed audio data). When a disc is activated. Printed side CQ-C700U 3 Select a desired portion. The face plate closes automatically, and the unit recognizes the disc and starts playing automatically, too. Operation Flow When a disc is no information on the disc. or more. ¡ "NO TEXT" is displayed when there is already loaded, press [SOURCE] to select the CD mode...
Operating Instructions
Page 26
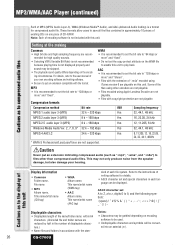
...in the number of displayable characters.) ¡ Name files and folders in accordance with the format. MP3/WMA/AAC Player (continued) Cautions as to the display of this unit Display Information ...compatible with the stan- Refer to the instructions of writing software for high quality sounds. ¡ Selecting VBR (Variable Bit Rate) is not recommended because playing time is recommended to set A to Z, a to z, digits 0 to "128 kbps or more " and "fixed". ASCII character set the bit rate to 9, and the following symbols: (space Displayable characters ¡ Displayable length of CD...
...in the number of displayable characters.) ¡ Name files and folders in accordance with the format. MP3/WMA/AAC Player (continued) Cautions as to the display of this unit Display Information ...compatible with the stan- Refer to the instructions of writing software for high quality sounds. ¡ Selecting VBR (Variable Bit Rate) is not recommended because playing time is recommended to set A to Z, a to z, digits 0 to "128 kbps or more " and "fixed". ASCII character set the bit rate to 9, and the following symbols: (space Displayable characters ¡ Displayable length of CD...

Operating Instructions
Page 28
... AUDIO menu display. HPF High Pass Filter (Setting range: Filter OFF, 90 Hz, 135 Hz, 180 Hz, 225 Hz, Default: Filter OFF) q : Up w : Down 28 CQ-C700U For using the remote control, use [SEL] (MENU). 2 Press [PUSH SEL: SELECT] to select a mode to adjust. Audio Setting Adjustment to each speaker and an optional subwoofer 1 Press [PUSH SEL: SELECT] to avoid causing sound distortion. For using the remote control, use [VOL }] or [VOL {]. For using the remote control, use [SEL] (MENU). 3 Turn...
... AUDIO menu display. HPF High Pass Filter (Setting range: Filter OFF, 90 Hz, 135 Hz, 180 Hz, 225 Hz, Default: Filter OFF) q : Up w : Down 28 CQ-C700U For using the remote control, use [SEL] (MENU). 2 Press [PUSH SEL: SELECT] to select a mode to adjust. Audio Setting Adjustment to each speaker and an optional subwoofer 1 Press [PUSH SEL: SELECT] to avoid causing sound distortion. For using the remote control, use [VOL }] or [VOL {]. For using the remote control, use [SEL] (MENU). 3 Turn...
Operating Instructions
Page 32
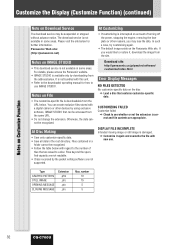
... Display (Customize Function) (continued) Notes on Customize Function Note on File ¡ The customize-specific file is downloadable from the URL below. Panasonic Web site: (http://panasonic.net) Notes on account of turning off the power, stopping the engine, removing the face plate or other devices by the packet writing software are appropriate. The download service is not available in the root directory. At Disc Making...
... Display (Customize Function) (continued) Notes on Customize Function Note on File ¡ The customize-specific file is downloadable from the URL below. Panasonic Web site: (http://panasonic.net) Notes on account of turning off the power, stopping the engine, removing the face plate or other devices by the packet writing software are appropriate. The download service is not available in the root directory. At Disc Making...
Operating Instructions
Page 33
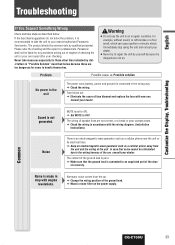
... fuse blowout and replace the fuse with the wiring diagram. (Installation Instructions) There is connected to the wiring harness of the ground lead is not generated. CQ-C700U 33 a Make sure that noise cannot be serviced only by italic letters in accordance with new one. a Check the wiring. The product should be eliminated due to an unpainted part of the ground lead. Sound is poor. a Change the wiring...
... fuse blowout and replace the fuse with the wiring diagram. (Installation Instructions) There is connected to the wiring harness of the ground lead is not generated. CQ-C700U 33 a Make sure that noise cannot be serviced only by italic letters in accordance with new one. a Check the wiring. The product should be eliminated due to an unpainted part of the ground lead. Sound is poor. a Change the wiring...
Operating Instructions
Page 34
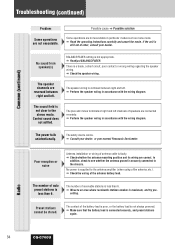
... always powered. No sound from speaker(s) BALANCE/FADER setting is a break, a short circuit, poor contact or wrong wiring regarding the speaker wiring. a Readjust BALANCE/FADER. The speaker channels are connected reversely. a Move to an area where receivable stations number is securely connected to see whether the antenna ground is maximum, and try presetting. Radio 34 CQ-C700U In addition, check to the chassis. a Read the operating instructions carefully and cancel the mode. Poor...
... always powered. No sound from speaker(s) BALANCE/FADER setting is a break, a short circuit, poor contact or wrong wiring regarding the speaker wiring. a Readjust BALANCE/FADER. The speaker channels are connected reversely. a Move to an area where receivable stations number is securely connected to see whether the antenna ground is maximum, and try presetting. Radio 34 CQ-C700U In addition, check to the chassis. a Read the operating instructions carefully and cancel the mode. Poor...


