
AJHVF20 User Guide
Page 4
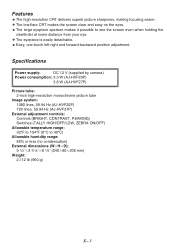
...; (240a80a206 mm) Weight: 2.112 lb (960 g) E- 3 Features OThe high-resolution CRT delivers superb picture sharpness, making focusing easier. Specifications Power supply: DC 12 V (supplied by camera) Power consumption: 3.3 W (AJ-HVF20P) 3.8 W (AJ-HVF27P) Picture tube: 2-inch high-resolution monochrome picture tube Image system: 1080 lines, 59.94 Hz (AJ-HVF20P) 720 lines...
...; (240a80a206 mm) Weight: 2.112 lb (960 g) E- 3 Features OThe high-resolution CRT delivers superb picture sharpness, making focusing easier. Specifications Power supply: DC 12 V (supplied by camera) Power consumption: 3.3 W (AJ-HVF20P) 3.8 W (AJ-HVF27P) Picture tube: 2-inch high-resolution monochrome picture tube Image system: 1080 lines, 59.94 Hz (AJ-HVF20P) 720 lines...
AJHVF20 User Guide
Page 5
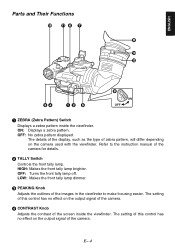
.... The details of the display, such as the type of zebra pattern, will differ depending on the output signal of the camera. 4 CONTRAST Knob Adjusts the contrast of the camera for details. 2 TALLY Switch Controls the front tally lamp. HIGH: Makes the front tally lamp brighter. The setting of the... camera. ENGLISH Parts and Their Functions ON OFF 1 ZEBRA (Zebra Pattern) Switch Displays a zebra pattern inside the viewfinder. The setting of this control has ...
.... The details of the display, such as the type of zebra pattern, will differ depending on the output signal of the camera. 4 CONTRAST Knob Adjusts the contrast of the camera for details. 2 TALLY Switch Controls the front tally lamp. HIGH: Makes the front tally lamp brighter. The setting of the... camera. ENGLISH Parts and Their Functions ON OFF 1 ZEBRA (Zebra Pattern) Switch Displays a zebra pattern inside the viewfinder. The setting of this control has ...
AJHVF20 User Guide
Page 6
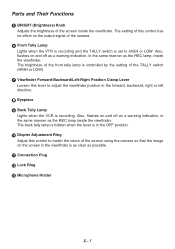
... lever is as clear as the REC lamp inside the viewfinder. The brightness of the front tally lamp is controlled by the setting of the camera. 6 Front Tally Lamp Lights when the VTR is recording and the TALLY switch is recording. Connection Plug < Lock Ring = Microphone Holder E- 5 The setting of this... Lights when the VCR is set to HIGH or LOW. Parts and Their Functions 5 BRIGHT (Brightness) Knob Adjusts the brightness of the person using the camera so that the image on and off as the REC lamp, inside the viewfinder.
... lever is as clear as the REC lamp inside the viewfinder. The brightness of the front tally lamp is controlled by the setting of the camera. 6 Front Tally Lamp Lights when the VTR is recording and the TALLY switch is recording. Connection Plug < Lock Ring = Microphone Holder E- 5 The setting of this... Lights when the VCR is set to HIGH or LOW. Parts and Their Functions 5 BRIGHT (Brightness) Knob Adjusts the brightness of the person using the camera so that the image on and off as the REC lamp, inside the viewfinder.
AJHVF20 User Guide
Page 7
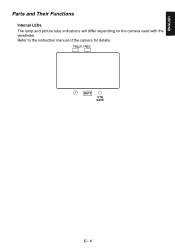
TALLY / REC BATT VTR SAVE E- 6 ENGLISH Parts and Their Functions Internal LEDs The lamp and picture tube indications will differ depending on the camera used with the viewfinder. Refer to the instruction manual of the camera for details.
TALLY / REC BATT VTR SAVE E- 6 ENGLISH Parts and Their Functions Internal LEDs The lamp and picture tube indications will differ depending on the camera used with the viewfinder. Refer to the instruction manual of the camera for details.

AJHVF20 User Guide
Page 9
Use both hands to the viewfinder. 3. Confirm that the POWER switch of the camera is "OFF". 2. Push the viewfinder down into the connection jack. 3. Confirm that the POWER switch of the viewfinder. The viewfinder may not detach smoothly with ... viewfinder cable connector. Loosen the stopper screw and detach the viewfinder by pulling it straight up. Insert the plug into the connection jack of the camera is "OFF". 2. Tighten the stopper screw firmly. Stopper screw Detaching the Viewfinder 1. ENGLISH Adjusting the Viewfinder Mounting the Viewfinder 1.
Use both hands to the viewfinder. 3. Confirm that the POWER switch of the camera is "OFF". 2. Push the viewfinder down into the connection jack. 3. Confirm that the POWER switch of the viewfinder. The viewfinder may not detach smoothly with ... viewfinder cable connector. Loosen the stopper screw and detach the viewfinder by pulling it straight up. Insert the plug into the connection jack of the camera is "OFF". 2. Tighten the stopper screw firmly. Stopper screw Detaching the Viewfinder 1. ENGLISH Adjusting the Viewfinder Mounting the Viewfinder 1.
AJHVF20 User Guide
Page 11
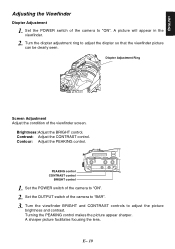
...viewfinder. 2. Contour: Adjust the PEAKING control. PEAKING CONTRAST BRIGHT PEAKING control CONTRAST control BRIGHT control 1. Set the OUTPUT switch of the camera to "ON". ENGLISH Adjusting the Viewfinder Diopter Adjustment 1. E- 10 Turn the viewfinder BRIGHT and CONTRAST controls to adjust the diopter so ...that the viewfinder picture can be clearly seen. Set the POWER switch of the camera to "ON". 2. Contrast: Adjust the CONTRAST control. Set the POWER switch of the viewfinder screen. Turn the diopter adjustment ...
...viewfinder. 2. Contour: Adjust the PEAKING control. PEAKING CONTRAST BRIGHT PEAKING control CONTRAST control BRIGHT control 1. Set the OUTPUT switch of the camera to "ON". ENGLISH Adjusting the Viewfinder Diopter Adjustment 1. E- 10 Turn the viewfinder BRIGHT and CONTRAST controls to adjust the diopter so ...that the viewfinder picture can be clearly seen. Set the POWER switch of the camera to "ON". 2. Contrast: Adjust the CONTRAST control. Set the POWER switch of the viewfinder screen. Turn the diopter adjustment ...


