

AGDVC15 User Guide
Page 1
NTSC Digital Video Camera Recorder AG- P Before attempting to connect, operate or adjust this product, please read these instructions completely.
NTSC Digital Video Camera Recorder AG- P Before attempting to connect, operate or adjust this product, please read these instructions completely.

AGDVC15 User Guide
Page 2
... to alert the user to radio communications. NO USER-SERVICEABLE PARTS INSIDE. The lightning flash with Part 15 of the unit. FCC NOTE: This device complies with arrowhead symbol, within an equilateral triangle is operated in Standard Play (SP) mode only. Operation of electric shcok to provide excellent video pictures. ENGLISH For your safety CAUTION RISK OF ELECTRIC SHOCK DO NOT OPEN CAUTION: TO REDUCE...
... to alert the user to radio communications. NO USER-SERVICEABLE PARTS INSIDE. The lightning flash with Part 15 of the unit. FCC NOTE: This device complies with arrowhead symbol, within an equilateral triangle is operated in Standard Play (SP) mode only. Operation of electric shcok to provide excellent video pictures. ENGLISH For your safety CAUTION RISK OF ELECTRIC SHOCK DO NOT OPEN CAUTION: TO REDUCE...

AGDVC15 User Guide
Page 5
... External Microphone 52 » Using the External Microphone connected to rear audio input connector 52 » Connecting an Audio Line Input 52 » Adjusting the audio level manually 52 Adding New Sound on a Recorded Cassette (Audio Dubbing 53 Remote Controller 55 » Inserting the Button-type Battery 58 » Using the Remote Controller 59 Editing Copying onto an S-VHS (or VHS) Cassette (Dubbing 60 Using with Digital Video Equipment (Recording 61 Notes, Others ND Filter 62 Using the Menu Screen 63 Menu Functions 64 Setting the Date and Time 67 Adjusting the LCD...
... External Microphone 52 » Using the External Microphone connected to rear audio input connector 52 » Connecting an Audio Line Input 52 » Adjusting the audio level manually 52 Adding New Sound on a Recorded Cassette (Audio Dubbing 53 Remote Controller 55 » Inserting the Button-type Battery 58 » Using the Remote Controller 59 Editing Copying onto an S-VHS (or VHS) Cassette (Dubbing 60 Using with Digital Video Equipment (Recording 61 Notes, Others ND Filter 62 Using the Menu Screen 63 Menu Functions 64 Setting the Date and Time 67 Adjusting the LCD...

AGDVC15 User Guide
Page 7
...) 2. Cleaning Cassette 5. [B] Noyau en ferrite pour microphone en option 6. Cassette de nettoyage -7- AC Adapter and AC Power Cable (m 12, 13) 2. Shoulder Strap (m 18) 8. Bandoulière (m 18) 8. Capuchon d'objectif (m 32) 9. DC Input Cable (m 12) 3. Ferrite Cores for Optional Microphone 6. Batterie (m 13) 4. CGR-D16 6. FRANÇAIS Accessoires standard 1. Fil d'entrée c.c. (m 12) 3. VFC3573 VKF3305 AY-DVMCLA ENGLISH Standard Accessories 1. Lens Cap (m 32) 9. 1. 2. 3. 4. Remote Controller and Button-Type Battery...
...) 2. Cleaning Cassette 5. [B] Noyau en ferrite pour microphone en option 6. Cassette de nettoyage -7- AC Adapter and AC Power Cable (m 12, 13) 2. Shoulder Strap (m 18) 8. Bandoulière (m 18) 8. Capuchon d'objectif (m 32) 9. DC Input Cable (m 12) 3. Ferrite Cores for Optional Microphone 6. Batterie (m 13) 4. CGR-D16 6. FRANÇAIS Accessoires standard 1. Fil d'entrée c.c. (m 12) 3. VFC3573 VKF3305 AY-DVMCLA ENGLISH Standard Accessories 1. Lens Cap (m 32) 9. 1. 2. 3. 4. Remote Controller and Button-Type Battery...

AGDVC15 User Guide
Page 11
... Audio Level meter of LCD type. µ AUDIO REC CH1/CH2 LEVEL VOLUME ∂ AUDIO IN CH1/CH2 CONNECTORS ∑ DV Input/Output Terminal (m 61) To input and output digital video and audio signals. ∏ AUDIO MIC/LINE SELECTOR SWITCH LINE: XLR Input is used as MIC lnput. π REC START/STOP BUTTON (m 19) ∫ HANDLE ZOOM SWITCH (m 23) To operate zooming that can be some tiny bright or dark spots on monitor LCD, VIDEO OUT and S-VIDEO OUT. ≤ ZOOM SPEED (m 23) To set...
... Audio Level meter of LCD type. µ AUDIO REC CH1/CH2 LEVEL VOLUME ∂ AUDIO IN CH1/CH2 CONNECTORS ∑ DV Input/Output Terminal (m 61) To input and output digital video and audio signals. ∏ AUDIO MIC/LINE SELECTOR SWITCH LINE: XLR Input is used as MIC lnput. π REC START/STOP BUTTON (m 19) ∫ HANDLE ZOOM SWITCH (m 23) To operate zooming that can be some tiny bright or dark spots on monitor LCD, VIDEO OUT and S-VIDEO OUT. ≤ ZOOM SPEED (m 23) To set...
AGDVC15 User Guide
Page 24
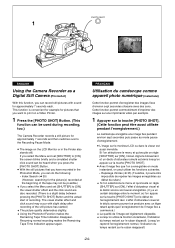
... a Video Printer. 1 Press the [PHOTO SHOT] Button. (This function can be possible.) ♦ If you select the Menu and set [SHUTTER] to the Recording Pause Mode. ¡ The image on the LCD Monitor or in the Photoshot Mode, you can do the following: mIndex Search (m 35) (However, searching for approximately 7 seconds each. PHOTO SHOT 1 PHOTO PHOTO ENGLISH Using the Camera Recorder as a Digital Still Camera (Photoshot) With this function, you can record still pictures with sound...
... a Video Printer. 1 Press the [PHOTO SHOT] Button. (This function can be possible.) ♦ If you select the Menu and set [SHUTTER] to the Recording Pause Mode. ¡ The image on the LCD Monitor or in the Photoshot Mode, you can do the following: mIndex Search (m 35) (However, searching for approximately 7 seconds each. PHOTO SHOT 1 PHOTO PHOTO ENGLISH Using the Camera Recorder as a Digital Still Camera (Photoshot) With this function, you can record still pictures with sound...

AGDVC15 User Guide
Page 25
... ʴ3dB ʴ6dB ˔AUTO ˣ END : PUSH MENU KEY 2,3 1,4 PUSH ENGLISH Recording in the Wide Mode (Wide Mode) This mode lets you record in the Wide-Screen format. 1 Press the [MENU] Button. FRANÇAIS Enregistrement en mode grand écran (mode grand écran) Ce mode permet d'enregistrer en mode grand écran. 1 Appuyer sur la touche [MENU]. Le menu apparaît. 2 Tourner la molette...
... ʴ3dB ʴ6dB ˔AUTO ˣ END : PUSH MENU KEY 2,3 1,4 PUSH ENGLISH Recording in the Wide Mode (Wide Mode) This mode lets you record in the Wide-Screen format. 1 Press the [MENU] Button. FRANÇAIS Enregistrement en mode grand écran (mode grand écran) Ce mode permet d'enregistrer en mode grand écran. 1 Appuyer sur la touche [MENU]. Le menu apparaît. 2 Tourner la molette...

AGDVC15 User Guide
Page 31
...;cran apparaissent aussi sur l'écran du téléviseur. ʔVOLUME 1 S-VIDEO OUT VIDEO OUT CH1-AUDIO OUT-CH2 4 2 1 3 CAMERA DISPLAY COUNTER/ TC RESET DATE/ TIME PHOTO SHOT A.DUB REC REC/ PAUSE Tʴ W MENU REW/ Q PLAY FF/ P SLOW/ F.ADV PAUSE/ SEL SLOW/ F.ADV INDEX SEARCH STOP/ SET INDEX SEARCH ENGLISH Playing Back on a TV 1 Connect the Video and Audio Output Sockets to the Video and Audio Input Sockets on veut couper le son sur le haut-parleur, baisser...
...;cran apparaissent aussi sur l'écran du téléviseur. ʔVOLUME 1 S-VIDEO OUT VIDEO OUT CH1-AUDIO OUT-CH2 4 2 1 3 CAMERA DISPLAY COUNTER/ TC RESET DATE/ TIME PHOTO SHOT A.DUB REC REC/ PAUSE Tʴ W MENU REW/ Q PLAY FF/ P SLOW/ F.ADV PAUSE/ SEL SLOW/ F.ADV INDEX SEARCH STOP/ SET INDEX SEARCH ENGLISH Playing Back on a TV 1 Connect the Video and Audio Output Sockets to the Video and Audio Input Sockets on veut couper le son sur le haut-parleur, baisser...

AGDVC15 User Guide
Page 34
...a cassette, the Camera Recorder stops at the end of the tape. ¡ When the Blank Search has finished, you can press the [VCR/CAM] Button so that the [VCR] Lamp lights. 1 2 Press the [MENU] Button. The new scene is no blank part on peut appuyer sur la touche [VCR/CAM] ...the end of the last recorded scene, the Camera Recorder switches over to the Still Playback Mode. ¡ If there is recorded with a smooth transition from the last to the new scene. PUSH 3,4 SHUTTER/IRIS VOL/JOG 2 MENU AUTO MANUAL AE LOCK WHITE BAL 1 CAM VCR 1 ɹɹMENU PHOTO OFF SCENE ON ̖...
...a cassette, the Camera Recorder stops at the end of the tape. ¡ When the Blank Search has finished, you can press the [VCR/CAM] Button so that the [VCR] Lamp lights. 1 2 Press the [MENU] Button. The new scene is no blank part on peut appuyer sur la touche [VCR/CAM] ...the end of the last recorded scene, the Camera Recorder switches over to the Still Playback Mode. ¡ If there is recorded with a smooth transition from the last to the new scene. PUSH 3,4 SHUTTER/IRIS VOL/JOG 2 MENU AUTO MANUAL AE LOCK WHITE BAL 1 CAM VCR 1 ɹɹMENU PHOTO OFF SCENE ON ̖...

AGDVC15 User Guide
Page 52
... external microphones can adjust the audio level so that the level meter appears up to i8 dB at the maximum volume. ¡ Set the [MIC LEVEL] on the Camera Mode Menu (m 64) to REAR. » Connecting an Audio Line Input 1. When using an audio line input signal source, connect the audio component to LINE. » Adjusting the audio level manually 1. Set the AUDIO MIC/LINE switch to the unit's AUDIO IN CH1/CH2 connectors. 2. FRANÇAIS » Utilisation du microphone interne...
... external microphones can adjust the audio level so that the level meter appears up to i8 dB at the maximum volume. ¡ Set the [MIC LEVEL] on the Camera Mode Menu (m 64) to REAR. » Connecting an Audio Line Input 1. When using an audio line input signal source, connect the audio component to LINE. » Adjusting the audio level manually 1. Set the AUDIO MIC/LINE switch to the unit's AUDIO IN CH1/CH2 connectors. 2. FRANÇAIS » Utilisation du microphone interne...

AGDVC15 User Guide
Page 54
This could cause the playback picture and sound to be distorted. ¡ If you reset the Tape Counter to zero at the point where you set [AUDIO-REC] on the Menu to end and turn on the VCR Mode Menu (m 63-66): ST1: The original sound alone is played back. FRANÇAIS ... non enregistrées du ruban. ST2: The dubbed sound alone is played back. ENGLISH Playing Back the Sound Recorded with Audio Dubbing ♦ If you want the audio dubbing to [12bit] for [AUDIO OUT] on the Memory Stop Function (m 81), the audio dubbing automatically stops when the tape reaches that point.
This could cause the playback picture and sound to be distorted. ¡ If you reset the Tape Counter to zero at the point where you set [AUDIO-REC] on the Menu to end and turn on the VCR Mode Menu (m 63-66): ST1: The original sound alone is played back. FRANÇAIS ... non enregistrées du ruban. ST2: The dubbed sound alone is played back. ENGLISH Playing Back the Sound Recorded with Audio Dubbing ♦ If you want the audio dubbing to [12bit] for [AUDIO OUT] on the Memory Stop Function (m 81), the audio dubbing automatically stops when the tape reaches that point.

AGDVC15 User Guide
Page 57
..., the functions of the following buttons are changed: Pause Button ¢ Select Button To select items on appuie sur la touche [MENU]. L'image de lecture reste immobile. CAMERA DISPLAY COUNTER/ TC RESET DATE/ TIME PHOTO SHOT A.DUB REC REC/ PAUSE Tʴ W MENU REW/ Q PLAY FF/ P ʔVOLUME 9 SLOW/ F.ADV PAUSE/ SEL SLOW/ F.ADV INDEX SEARCH STOP/ SET INDEX SEARCH ENGLISH 9 Slow Motion/Frame Advance Button [E, O] (m 29, 30) To perform Slow Motion Playback if pressed in forward direction) Stop/Set Button [B] (m 27) To stop the tape. Pause/Select Button [G] (m 30...
..., the functions of the following buttons are changed: Pause Button ¢ Select Button To select items on appuie sur la touche [MENU]. L'image de lecture reste immobile. CAMERA DISPLAY COUNTER/ TC RESET DATE/ TIME PHOTO SHOT A.DUB REC REC/ PAUSE Tʴ W MENU REW/ Q PLAY FF/ P ʔVOLUME 9 SLOW/ F.ADV PAUSE/ SEL SLOW/ F.ADV INDEX SEARCH STOP/ SET INDEX SEARCH ENGLISH 9 Slow Motion/Frame Advance Button [E, O] (m 29, 30) To perform Slow Motion Playback if pressed in forward direction) Stop/Set Button [B] (m 27) To stop the tape. Pause/Select Button [G] (m 30...

AGDVC15 User Guide
Page 59
... INDEX STOP/ INDEX SEARCH SET SEARCH 4 ENGLISH FRANÇAIS « Using the Remote Controller 1 Set the [POWER] Switch on the Camera Recorder to [ON]. ¡ When the [CAM] Lamp lights, you want to the Camera Recorder: Less than 2q (5 meters). ADV PAUSE/ SEL SLOW/ F. Distance to use the recording functions. 1 ¡ If you can use the playback functions, press the [VCR/CAM] Button so that the [VCR] Lamp lights. 2 2 Aim the Remote Controller at the same time, selecting different Remote Controller Modes makes...
... INDEX STOP/ INDEX SEARCH SET SEARCH 4 ENGLISH FRANÇAIS « Using the Remote Controller 1 Set the [POWER] Switch on the Camera Recorder to [ON]. ¡ When the [CAM] Lamp lights, you want to the Camera Recorder: Less than 2q (5 meters). ADV PAUSE/ SEL SLOW/ F. Distance to use the recording functions. 1 ¡ If you can use the playback functions, press the [VCR/CAM] Button so that the [VCR] Lamp lights. 2 2 Aim the Remote Controller at the same time, selecting different Remote Controller Modes makes...

AGDVC15 User Guide
Page 65
...], the noise of the sound reproduction in the bass range. s Date and Time Indication [DATE/TIME] (m 27) t Other Items [OTHERS] If you set [OTHERS] to zero. However, the Time Code cannot be reset. u Self-Recording [SELF-REC] v LCD Lighting Mode [LCD B.L] w LCD and Finder Adjustment [LCD/EVF SET] (m 69) x Remote Controller Mode [REMOTE] (m 59) y Scene Index Mode [INDEX] (m 35) z Tally-LED [TALLY-LED] (m 19) { Date and Time Setting [CLOCK-SET] (m 67) FRANÇAIS o Image zébrée [ZEBRA...
...], the noise of the sound reproduction in the bass range. s Date and Time Indication [DATE/TIME] (m 27) t Other Items [OTHERS] If you set [OTHERS] to zero. However, the Time Code cannot be reset. u Self-Recording [SELF-REC] v LCD Lighting Mode [LCD B.L] w LCD and Finder Adjustment [LCD/EVF SET] (m 69) x Remote Controller Mode [REMOTE] (m 59) y Scene Index Mode [INDEX] (m 35) z Tally-LED [TALLY-LED] (m 19) { Date and Time Setting [CLOCK-SET] (m 67) FRANÇAIS o Image zébrée [ZEBRA...

AGDVC15 User Guide
Page 66
...; ˔ST1 ST2 MIX SP LP 20dB ʵ10dB 0dB ˣ ʴ3dB ʴ6dB ˔AUTO END : PUSH MENU KEY ENGLISH VCR Mode Menu 1 Index Search [INDEX] (m 35, 36, 37) 2 Blank Search [B.SEARCH] (m 34) 3 Audio Output Mode [AUDIO] (m 54) 4 Recording Speed Mode [REC-SPEED] (m 16) 5 Microphone Sensitivity level [MIC LEVEL] (m 52) 6 Automatic Printing [AUTOPRINT]* 7 LCD Lighting Mode [LCD B.L] 8 LCD and Finder Adjustment [LCD/EVF SET] (m 69) 9 Counter Display Mode [COUNTER] (m 85) 0 Counter Reset [C.RESET] (m 81) To reset the counter to zero.
...; ˔ST1 ST2 MIX SP LP 20dB ʵ10dB 0dB ˣ ʴ3dB ʴ6dB ˔AUTO END : PUSH MENU KEY ENGLISH VCR Mode Menu 1 Index Search [INDEX] (m 35, 36, 37) 2 Blank Search [B.SEARCH] (m 34) 3 Audio Output Mode [AUDIO] (m 54) 4 Recording Speed Mode [REC-SPEED] (m 16) 5 Microphone Sensitivity level [MIC LEVEL] (m 52) 6 Automatic Printing [AUTOPRINT]* 7 LCD Lighting Mode [LCD B.L] 8 LCD and Finder Adjustment [LCD/EVF SET] (m 69) 9 Counter Display Mode [COUNTER] (m 85) 0 Counter Reset [C.RESET] (m 81) To reset the counter to zero.

AGDVC15 User Guide
Page 67
... [MENU] Button, select [OTHERS], and then set [CLOCK-SET] to finish the date and time setting. Le compte des secondes s'enclenche alors à partir de [00]. -67- PUSH DATE/TIME SETTING 1~9 SHUTTER/IRIS VOL/JOG AUTO MANUAL AE LOCK MENU WHITE BAL 10 YEAR :2001 MONTH :OCT DAY :15 HOUR :2PM MINUTE :30 END: PUSH MENU KEY ENGLISH Setting the Date and Time If the Camera Recorder is in the VCR Mode, press the [MENU] Button...
... [MENU] Button, select [OTHERS], and then set [CLOCK-SET] to finish the date and time setting. Le compte des secondes s'enclenche alors à partir de [00]. -67- PUSH DATE/TIME SETTING 1~9 SHUTTER/IRIS VOL/JOG AUTO MANUAL AE LOCK MENU WHITE BAL 10 YEAR :2001 MONTH :OCT DAY :15 HOUR :2PM MINUTE :30 END: PUSH MENU KEY ENGLISH Setting the Date and Time If the Camera Recorder is in the VCR Mode, press the [MENU] Button...

AGDVC15 User Guide
Page 68
...When the [0] Indication appears, the built-in lithium battery is finished, set the date and time again. ¡ The years change in the following way and after charging is discharged. Lorsque l'indication [0] apparaît, charger la pile au lithium incorporée et ré...162;1990 ¢.. When the [0] Indication appears, charge the built-in lithium battery and set the date and time. 1 Connect the AC Adapter to the Camera Recorder and to an AC Outlet. (m 12) 2 Leave the Camera Recorder turned off. 3 Leave the Camera Recorder in this condition for approximately 4 hours. WHEN NECESSARY...
...When the [0] Indication appears, the built-in lithium battery is finished, set the date and time again. ¡ The years change in the following way and after charging is discharged. Lorsque l'indication [0] apparaît, charger la pile au lithium incorporée et ré...162;1990 ¢.. When the [0] Indication appears, charge the built-in lithium battery and set the date and time. 1 Connect the AC Adapter to the Camera Recorder and to an AC Outlet. (m 12) 2 Leave the Camera Recorder turned off. 3 Leave the Camera Recorder in this condition for approximately 4 hours. WHEN NECESSARY...

AGDVC15 User Guide
Page 69
... 2HOUR OFF ON OFF ON ˣ END : PUSH MENU KEY LCD/EVF SETTING LCD BRIGHT LOW HIGH LCD COLOR PALE VIVID EVF BRIGHT LOW HIGH END: PUSH MENU KEY PUSH ENGLISH Adjusting the LCD Monitor If the Camera Recorder is in the VCR Mode, press the [MENU] Button, and then set [LCD/EVF SET] to [ON]. The Bar Indication is the screen. 1 Press the [PUSH] Dial to select the item...
... 2HOUR OFF ON OFF ON ˣ END : PUSH MENU KEY LCD/EVF SETTING LCD BRIGHT LOW HIGH LCD COLOR PALE VIVID EVF BRIGHT LOW HIGH END: PUSH MENU KEY PUSH ENGLISH Adjusting the LCD Monitor If the Camera Recorder is in the VCR Mode, press the [MENU] Button, and then set [LCD/EVF SET] to [ON]. The Bar Indication is the screen. 1 Press the [PUSH] Dial to select the item...


