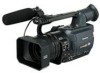
Memory Card Camcorder
Page 1
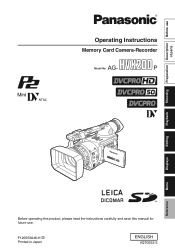
P Shooting Playback Editing Displays Menu Reference Before operating this product, please read the instructions carefully and save this manual for future use of parts Operating Instructions Memory Card Camera-Recorder AG- Model No. Preparation Description Before use . F1205S3046-H D Printed in Japan ENGLISH VQT0S52-3
P Shooting Playback Editing Displays Menu Reference Before operating this product, please read the instructions carefully and save this manual for future use of parts Operating Instructions Memory Card Camera-Recorder AG- Model No. Preparation Description Before use . F1205S3046-H D Printed in Japan ENGLISH VQT0S52-3

Memory Card Camcorder
Page 2
...RISK OF ELECTRIC SHOCK, DO NOT REMOVE COVER (OR BACK). CAUTION: TO REDUCE THE RISK OF FIRE OR SHOCK HAZARD AND ANNOYING INTERFERENCE, USE THE RECOMMENDED ACCESSORIES ONLY. Camera-Recorder The rating plate is on the underside of the viewfinder. indicates safety information. WARNING: • TO ...Battery of electric shock to copyright laws." 2 The exclamation point within an equilateral triangle, is on the underside of the AC Adapter. USE AND STORE ONLY IN LOCATIONS WHICH ARE NOT EXPOSED TO THE RISK OF DRIPPING OR SPLASHING LIQUIDS, AND DO NOT PLACE ANY LIQUID CONTAINERS...
...RISK OF ELECTRIC SHOCK, DO NOT REMOVE COVER (OR BACK). CAUTION: TO REDUCE THE RISK OF FIRE OR SHOCK HAZARD AND ANNOYING INTERFERENCE, USE THE RECOMMENDED ACCESSORIES ONLY. Camera-Recorder The rating plate is on the underside of the viewfinder. indicates safety information. WARNING: • TO ...Battery of electric shock to copyright laws." 2 The exclamation point within an equilateral triangle, is on the underside of the AC Adapter. USE AND STORE ONLY IN LOCATIONS WHICH ARE NOT EXPOSED TO THE RISK OF DRIPPING OR SPLASHING LIQUIDS, AND DO NOT PLACE ANY LIQUID CONTAINERS...

Memory Card Camcorder
Page 3
...must accept any interference received, including interference that to which can radiate radio frequency energy and, if not installed and used in a residential installation. NOTIFICATION (Canada) This class B digital apparatus complies with the limits for a Class B... modifications. FCC NOTICE (USA) Declaration of Conformity Model Number: AG-HVX200P Trade Name: PANASONIC Responsible Party: Panasonic Corporation of North America One Panasonic Way, Secaucus, NJ 07094 Support contact: Panasonic Broadcast & Television Systems Company 1-800-524-1448 This device complies...
...must accept any interference received, including interference that to which can radiate radio frequency energy and, if not installed and used in a residential installation. NOTIFICATION (Canada) This class B digital apparatus complies with the limits for a Class B... modifications. FCC NOTICE (USA) Declaration of Conformity Model Number: AG-HVX200P Trade Name: PANASONIC Responsible Party: Panasonic Corporation of North America One Panasonic Way, Secaucus, NJ 07094 Support contact: Panasonic Broadcast & Television Systems Company 1-800-524-1448 This device complies...

Memory Card Camcorder
Page 5
... apparatus during lightning storms or when unused for replacement of time. 14) Refer all instructions. 5) Do not use attachments/accessories specified by the manufacturer. 12) Use only with the cart, stand, tripod, bracket, or table specified by the manufacturer, or sold with dry cloth. 7) Do not block any ventilation.... A grounding-type plug has two blades and a third grounding prong. Install in any heat sources such as power-supply cord or plug is used, use caution when moving the cart/ apparatus combination to rain or moisture, does not operate normally, or has been dropped. 5
... apparatus during lightning storms or when unused for replacement of time. 14) Refer all instructions. 5) Do not use attachments/accessories specified by the manufacturer. 12) Use only with the cart, stand, tripod, bracket, or table specified by the manufacturer, or sold with dry cloth. 7) Do not block any ventilation.... A grounding-type plug has two blades and a third grounding prong. Install in any heat sources such as power-supply cord or plug is used, use caution when moving the cart/ apparatus combination to rain or moisture, does not operate normally, or has been dropped. 5
Memory Card Camcorder
Page 6
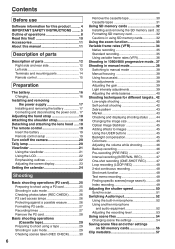
...remote control 19 Insert the battery 19 Remote control setup 19 Turn on/off the camera 20 Tally lamp 20 Viewfinder 21 Using the viewfinder 21 Using the LCD 22 Emphasizing outlines 22 Adjusting the screen display 23 Setting the calendar 24 Shooting Basic shooting operations (P2 card ...43 Marker 43 Checking and displaying shooting status ........ 44 Changing the image size 44 Optical Image Stabilizer 45 Adding effects to images 45 Using the USER buttons 45 Backlight compensation 45 Color bars 45 Adjusting the volume while shooting 46 Backup recording 46 Pre-recording (PRE REC...
...remote control 19 Insert the battery 19 Remote control setup 19 Turn on/off the camera 20 Tally lamp 20 Viewfinder 21 Using the viewfinder 21 Using the LCD 22 Emphasizing outlines 22 Adjusting the screen display 23 Setting the calendar 24 Shooting Basic shooting operations (P2 card ...43 Marker 43 Checking and displaying shooting status ........ 44 Changing the image size 44 Optical Image Stabilizer 45 Adding effects to images 45 Using the USER buttons 45 Backlight compensation 45 Color bars 45 Adjusting the volume while shooting 46 Backup recording 46 Pre-recording (PRE REC...

Memory Card Camcorder
Page 7
...method (THUMBNAIL 67 Deleting clips and formatting cards (OPERATION 69 Checking the clip or card information (PROPERTY 70 Uploading the metadata (META DATA 72 Useful playback functions 73 Variable speed search (P2 card / Tape 73 Slow playback (P2 card / Tape 73 Fast forward/rewind playback (P2 card .../Tape 88 Analog input (Tape 89 Displays Screen displays 90 Regular displays 90 Warnings 93 Setting the DISPLAY items 95 Menus Using the setup menus 96 Using the menus 96 Initializing the menu settings 97 Setup menu structure 98 Camera mode menu 98 MCR/VCR (playback and external ...
...method (THUMBNAIL 67 Deleting clips and formatting cards (OPERATION 69 Checking the clip or card information (PROPERTY 70 Uploading the metadata (META DATA 72 Useful playback functions 73 Variable speed search (P2 card / Tape 73 Slow playback (P2 card / Tape 73 Fast forward/rewind playback (P2 card .../Tape 88 Analog input (Tape 89 Displays Screen displays 90 Regular displays 90 Warnings 93 Setting the DISPLAY items 95 Menus Using the setup menus 96 Using the menus 96 Initializing the menu settings 97 Setup menu structure 98 Camera mode menu 98 MCR/VCR (playback and external ...

Memory Card Camcorder
Page 8
... shooting and playback (Pages 29 and 73) DV cassette tape You can record onto DV tape contents that have a slow & quick motion effect. You can use the following features: • HD (High Definition) recording • Multi format recording • Variable frame rates Slow & quick motion recording • Maximum 4...transfer rate, and allows you sophisticated movie-making on the P2 card to an DV format (480i) and recording it to a DV tape is useful when backing up images and checking images on AV equipment. • You cannot simultaneously shoot on both the P2 card and the DV cassette ...
... shooting and playback (Pages 29 and 73) DV cassette tape You can record onto DV tape contents that have a slow & quick motion effect. You can use the following features: • HD (High Definition) recording • Multi format recording • Variable frame rates Slow & quick motion recording • Maximum 4...transfer rate, and allows you sophisticated movie-making on the P2 card to an DV format (480i) and recording it to a DV tape is useful when backing up images and checking images on AV equipment. • You cannot simultaneously shoot on both the P2 card and the DV cassette ...
Memory Card Camcorder
Page 9
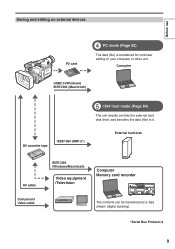
Saving and editing on external devices Before use P2 card 4 PC mode (Page 82) The data (file) is transferred for nonlinear editing on your computer or other unit. DV cassette tape IEEE1394 (SBP-2&#...
Saving and editing on external devices Before use P2 card 4 PC mode (Page 82) The data (file) is transferred for nonlinear editing on your computer or other unit. DV cassette tape IEEE1394 (SBP-2&#...

Memory Card Camcorder
Page 10
...Caution regarding laser beams • The CCD may be damaged if it is used, be careful not to allow the laser beam to check and set and check the calendar and time zone. (Page 24) Panasonic makes no guarantees for your recordings. • Please understand that restrictions apply...unit power, and check the shape and orientation of the recorded contents. Remember that Panasonic makes no guarantees for private use of certain material even if it is 5.5 mm deep. You can be used in locations where laser irradiation equipment is intended for your own personal enjoyment. Do not...
...Caution regarding laser beams • The CCD may be damaged if it is used, be careful not to allow the laser beam to check and set and check the calendar and time zone. (Page 24) Panasonic makes no guarantees for your recordings. • Please understand that restrictions apply...unit power, and check the shape and orientation of the recorded contents. Remember that Panasonic makes no guarantees for private use of certain material even if it is 5.5 mm deep. You can be used in locations where laser irradiation equipment is intended for your own personal enjoyment. Do not...

Memory Card Camcorder
Page 11
...core ∗2 plugs (3) Documents and CD A lens hood cap (page 18) and INPUT 1/2 terminal (page 14) cover are attached to the media used are shown as (Page 10). P2 : Explanations for tape usage only. 11 TAPE : Explanations for P2 card usage only. References • References .... Icons Explanations specific to the camera-recorder. ∗1 For part numbers for the battery, see "OPTIONAL UNITS". (Page 133) ∗2 When using 1394 cable (sold separately), install a ferrite core on the end nearest the PC. (Page 78) About this manual Note concerning illustrations in these ...
...core ∗2 plugs (3) Documents and CD A lens hood cap (page 18) and INPUT 1/2 terminal (page 14) cover are attached to the media used are shown as (Page 10). P2 : Explanations for tape usage only. 11 TAPE : Explanations for P2 card usage only. References • References .... Icons Explanations specific to the camera-recorder. ∗1 For part numbers for the battery, see "OPTIONAL UNITS". (Page 133) ∗2 When using 1394 cable (sold separately), install a ferrite core on the end nearest the PC. (Page 78) About this manual Note concerning illustrations in these ...

Memory Card Camcorder
Page 15
... , , on the camera-recorder. • PHOTO SHOT • MULTI/P-IN-P • STORE • PB. ZOOM MENU SET ITEM 14 4 5 15 13 10 11 17 Used during VCR mode 7 PLAY button ( ) (Page 62) 8 /REW button ( ) (Page 62) 9 PAUSE button ( ) (Page 62) Like the operation buttons of parts... Remote control The following buttons are performed using SET button. 10 STILL ADV button ( , ) (Page 73) 11 INDEX buttons ( , ) (Page 75) 12 STOP button ( ) (Page 62) 13 FF/ button ( ) (...
... , , on the camera-recorder. • PHOTO SHOT • MULTI/P-IN-P • STORE • PB. ZOOM MENU SET ITEM 14 4 5 15 13 10 11 17 Used during VCR mode 7 PLAY button ( ) (Page 62) 8 /REW button ( ) (Page 62) 9 PAUSE button ( ) (Page 62) Like the operation buttons of parts... Remote control The following buttons are performed using SET button. 10 STILL ADV button ( , ) (Page 73) 11 INDEX buttons ( , ) (Page 75) 12 STOP button ( ) (Page 62) 13 FF/ button ( ) (...

Memory Card Camcorder
Page 16
...CGR-D16 (1600mAh) (sold separately) is extremely hot or cold, the CHARGE lamp will blink several times before storing it at least once a year, use . • The recordable time reduces if you repeatedly start and stop recording. • Discharge the battery before charging starts. • If the ...CHARGE lamp continues to the camera-recorder from the battery. When storing it for when scenes are using it, but this state. • The battery becomes hot while it is normal. • You cannot charge the battery when supplying power ...
...CGR-D16 (1600mAh) (sold separately) is extremely hot or cold, the CHARGE lamp will blink several times before storing it at least once a year, use . • The recordable time reduces if you repeatedly start and stop recording. • Discharge the battery before charging starts. • If the ...CHARGE lamp continues to the camera-recorder from the battery. When storing it for when scenes are using it, but this state. • The battery becomes hot while it is normal. • You cannot charge the battery when supplying power ...

Memory Card Camcorder
Page 17
... the battery release button. • Support the battery with your hand to the camera-recorder from the power outlet when the unit is to be used. 17 Installing and removing the power supply Installing and removing the battery Installation Insert the battery until it clicks into place.
... the battery release button. • Support the battery with your hand to the camera-recorder from the power outlet when the unit is to be used. 17 Installing and removing the power supply Installing and removing the battery Installation Insert the battery until it clicks into place.

Memory Card Camcorder
Page 18
Attaching the lens hood • Turn the lens hood clockwise and fix in use it as a precaution against dropping the camera. 20 mm or more 20 mm or more Detaching and attaching the lens hood Detaching the lens hood &#... position with the screw. • Be sure to attach the lens hood cap to detach it. Attaching the shoulder strap Attach the shoulder strap and use . Adjusting the hand strap Adjust the hand strap to suit your hand. 1 Open the cover and adjust the length. 2 Close the cover. • Make sure...
Attaching the lens hood • Turn the lens hood clockwise and fix in use it as a precaution against dropping the camera. 20 mm or more 20 mm or more Detaching and attaching the lens hood Detaching the lens hood &#... position with the screw. • Be sure to attach the lens hood cap to detach it. Attaching the shoulder strap Attach the shoulder strap and use . Adjusting the hand strap Adjust the hand strap to suit your hand. 1 Open the cover and adjust the length. 2 Close the cover. • Make sure...

Memory Card Camcorder
Page 19
... control Press the STOP ( ) and STILL ADV ( ) buttons at the same time to VCR1 or VCR2. (Page 114) If different settings are used for use with VCR2. VCR2 OSD START/ DATE/ PHOTO STOP TIME SHOT COUNTER RESET TITLE ZOOM MULTI/ P-IN-P REC A.DUB /REW PLAY FF/ STILL ADV ...PAUSE STILL ADV INDEX STOP INDEX SELECT STORE VAR. SEARCH OFF/ON P.B.DIGITAL PB. Remote control setup When using two camera-recorders simultaneously, set to set the remote control unit for the camerarecorder and remote control unit, "REMOTE" lights in the direction shown...
... control Press the STOP ( ) and STILL ADV ( ) buttons at the same time to VCR1 or VCR2. (Page 114) If different settings are used for use with VCR2. VCR2 OSD START/ DATE/ PHOTO STOP TIME SHOT COUNTER RESET TITLE ZOOM MULTI/ P-IN-P REC A.DUB /REW PLAY FF/ STILL ADV ...PAUSE STILL ADV INDEX STOP INDEX SELECT STORE VAR. SEARCH OFF/ON P.B.DIGITAL PB. Remote control setup When using two camera-recorders simultaneously, set to set the remote control unit for the camerarecorder and remote control unit, "REMOTE" lights in the direction shown...

Memory Card Camcorder
Page 21
... on a TV monitor. Viewfinder diopter dial Projection Eye piece Do not point the eye piece at the sun. Preparation Viewfinder This camera has two viewfinders; Use the viewfinder that images appear in the viewfinder and the other is easiest to see. • You can see how the final images will appear... cup holder Eye cup 2 Adjust the viewfinder's angle so that you can move the view finder out to about 90° perpendicular to refit it. Using the viewfinder 1 Set the POWER switch to come off . ON Fitting the eye cup Attach the eye cup by aligning the projections on a TV monitor...
... on a TV monitor. Viewfinder diopter dial Projection Eye piece Do not point the eye piece at the sun. Preparation Viewfinder This camera has two viewfinders; Use the viewfinder that images appear in the viewfinder and the other is easiest to see. • You can see how the final images will appear... cup holder Eye cup 2 Adjust the viewfinder's angle so that you can move the view finder out to about 90° perpendicular to refit it. Using the viewfinder 1 Set the POWER switch to come off . ON Fitting the eye cup Attach the eye cup by aligning the projections on a TV monitor...

Memory Card Camcorder
Page 22
... Emphasizing the outlines of the images you see . • The monitor can damage the camera. Press EVF DTL again to return to focus. Viewfinder (continued) Using the LCD 1 Set the POWER switch to ON. 2 Press the OPEN button in the same direction as this will damage the camera. Do not try...
... Emphasizing the outlines of the images you see . • The monitor can damage the camera. Press EVF DTL again to return to focus. Viewfinder (continued) Using the LCD 1 Set the POWER switch to ON. 2 Press the OPEN button in the same direction as this will damage the camera. Do not try...

Memory Card Camcorder
Page 23
... buttons on the remote control. (Page 15) 3 Viewfinder adjustments Set YES under LCD SET on the setting menu DISPLAY SETUP screen. 5 Adjust the selected item using the or operation button. 6 Press MENU three times to exit the menus. • You can be in color or black and white. (See the setup... on the setting menu DISPLAY SETUP screen. LCD monitor adjustments Set YES under EVF SET on when you open the LCD if you have set using the or operation button. 23 Preparation Adjusting the screen display 1 Set the POWER switch to be set the EVF MODE in the DISPLAY SETUP screen...
... buttons on the remote control. (Page 15) 3 Viewfinder adjustments Set YES under LCD SET on the setting menu DISPLAY SETUP screen. 5 Adjust the selected item using the or operation button. 6 Press MENU three times to exit the menus. • You can be in color or black and white. (See the setup... on the setting menu DISPLAY SETUP screen. LCD monitor adjustments Set YES under EVF SET on when you open the LCD if you have set using the or operation button. 23 Preparation Adjusting the screen display 1 Set the POWER switch to be set the EVF MODE in the DISPLAY SETUP screen...

Memory Card Camcorder
Page 24
... to ON. (Page 20) 2 Press the MENU button. 3 In the setup menus, OTHER FUNCTIONS screen, TIME ZONE, set the time difference from Greenwich mean time using the or operation button. (Page 116) 6 Press the operation button to move the setting item to MONTH. 7 Press the or operation button to set MONTH... to DEC. (Example of MENU in the TAPE mode) SET Operation button MENU • For menu operation (Page 96) • You can also use the menu buttons on the remote control. (Page 15) 4 In the setup menus, OTHER FUNCTIONS screen, CLOCK SET, select YES. 5 Press the or operation button...
... to ON. (Page 20) 2 Press the MENU button. 3 In the setup menus, OTHER FUNCTIONS screen, TIME ZONE, set the time difference from Greenwich mean time using the or operation button. (Page 116) 6 Press the operation button to move the setting item to MONTH. 7 Press the or operation button to set MONTH... to DEC. (Example of MENU in the TAPE mode) SET Operation button MENU • For menu operation (Page 96) • You can also use the menu buttons on the remote control. (Page 15) 4 In the setup menus, OTHER FUNCTIONS screen, CLOCK SET, select YES. 5 Press the or operation button...

Memory Card Camcorder
Page 25
... button 1 ON CAMERA MCR VCR PC DUB Mode lamp Lock release REC CHECK button 3 25 Shooting Basic shooting operations (P2 card) P2 Preparing to shoot using a P2 card Shooting in auto mode 1 Switch the MEDIA switch to "P2". 2 Set the POWER switch to ON. (Page 20) 3 Lift up the viewfinder and... auto mode. • "A" appears on the POWER switch to start shooting. • Press again to return to the camera to the shooting standby mode. • Use the handle START/STOP button to make it ON again. In this case, switch OFF the power, and then switch it easier to operate the...
... button 1 ON CAMERA MCR VCR PC DUB Mode lamp Lock release REC CHECK button 3 25 Shooting Basic shooting operations (P2 card) P2 Preparing to shoot using a P2 card Shooting in auto mode 1 Switch the MEDIA switch to "P2". 2 Set the POWER switch to ON. (Page 20) 3 Lift up the viewfinder and... auto mode. • "A" appears on the POWER switch to start shooting. • Press again to return to the camera to the shooting standby mode. • Use the handle START/STOP button to make it ON again. In this case, switch OFF the power, and then switch it easier to operate the...


