Memory Card Camcorder
Page 6
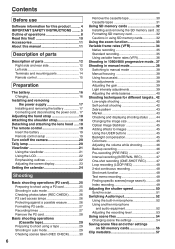
... 19 Remote control setup 19 Turn on/off the camera 20 Tally lamp 20 Viewfinder 21 Using the viewfinder 21 Using the LCD 22 Emphasizing outlines 22 Adjusting the screen display 23 Setting the calendar 24 Shooting Basic shooting operations (P2 card 25 Preparing to shoot using a P2 card 25 Shooting in...
... 19 Remote control setup 19 Turn on/off the camera 20 Tally lamp 20 Viewfinder 21 Using the viewfinder 21 Using the LCD 22 Emphasizing outlines 22 Adjusting the screen display 23 Setting the calendar 24 Shooting Basic shooting operations (P2 card 25 Preparing to shoot using a P2 card 25 Shooting in...

Memory Card Camcorder
Page 19
... ADV ( ) buttons at the same time to set the remote control unit for use with VCR1. • Camera In the setup menus, OTHER FUNCTIONS screen, REMOTE, set to work even when it is set this camera-recorder and the remote control to either [VCR1] or [VCR2] so the remote control... VCR2. (Page 114) If different settings are used for use with a new one. (The battery lasts about one year, depending on the viewfinder and LCD monitor. VOL + Preparation The remote control Insert the battery 1 Push the catch in red on the frequency of children. Remote control setup When using two...
... ADV ( ) buttons at the same time to set the remote control unit for use with VCR1. • Camera In the setup menus, OTHER FUNCTIONS screen, REMOTE, set to work even when it is set this camera-recorder and the remote control to either [VCR1] or [VCR2] so the remote control... VCR2. (Page 114) If different settings are used for use with a new one. (The battery lasts about one year, depending on the viewfinder and LCD monitor. VOL + Preparation The remote control Insert the battery 1 Push the catch in red on the frequency of children. Remote control setup When using two...

Memory Card Camcorder
Page 21
...; You can see the characters on how to the camera. 3 Adjust the diopter adjustment lever so that the screen is positioned where it is a miniature LCD in the viewfinder. • Keep the LCD monitor closed. Eye cup holder Eye cup 2 Adjust the viewfinder's angle so that you can move the view ... does come off , see "Cleaning the Viewfinder" (page 126) for details on the viewfinder screen clearly. Use the viewfinder that images appear in the viewfinder and the other is a retractable 3.5-inch LCD. ON Fitting the eye cup Attach the eye cup by aligning the projections on the eye cup...
...; You can see the characters on how to the camera. 3 Adjust the diopter adjustment lever so that the screen is positioned where it is a miniature LCD in the viewfinder. • Keep the LCD monitor closed. Eye cup holder Eye cup 2 Adjust the viewfinder's angle so that you can move the view ... does come off , see "Cleaning the Viewfinder" (page 126) for details on the viewfinder screen clearly. Use the viewfinder that images appear in the viewfinder and the other is a retractable 3.5-inch LCD. ON Fitting the eye cup Attach the eye cup by aligning the projections on the eye cup...

Memory Card Camcorder
Page 22
.... Press EVF DTL again to return to see in the viewfinder or on the LCD makes it is fully closed. • Both the LCD and viewfinder come on the screen for self-portrait shooting. 22 Viewfinder (continued) Using the LCD 1 Set the POWER switch to ON. 2 Press the OPEN button in the direction shown... you see . • The monitor can be rotated 180° toward the lens and 90° toward you have rotated the LCD to face in the same direction as this will damage the camera. This can open LCD. "EVF DTL OFF" appears on the screen for about 2 seconds. It can damage the camera.
.... Press EVF DTL again to return to see in the viewfinder or on the LCD makes it is fully closed. • Both the LCD and viewfinder come on the screen for self-portrait shooting. 22 Viewfinder (continued) Using the LCD 1 Set the POWER switch to ON. 2 Press the OPEN button in the direction shown... you see . • The monitor can be rotated 180° toward the lens and 90° toward you have rotated the LCD to face in the same direction as this will damage the camera. This can open LCD. "EVF DTL OFF" appears on the screen for about 2 seconds. It can damage the camera.

Memory Card Camcorder
Page 23
....) The resolution is possible to change the item at that time). • The viewfinder remains on when you open the LCD if you have set the EVF MODE in the DISPLAY SETUP screen to ON. • The viewfinder display can also use the menu buttons on the remote control. (Page 15) 3 ...Viewfinder adjustments Set YES under LCD SET on the setting menu DISPLAY SETUP screen. 5 Adjust the selected item using the or operation button. 6 Press MENU three times to exit the menus. • You can return...
....) The resolution is possible to change the item at that time). • The viewfinder remains on when you open the LCD if you have set the EVF MODE in the DISPLAY SETUP screen to ON. • The viewfinder display can also use the menu buttons on the remote control. (Page 15) 3 ...Viewfinder adjustments Set YES under LCD SET on the setting menu DISPLAY SETUP screen. 5 Adjust the selected item using the or operation button. 6 Press MENU three times to exit the menus. • You can return...

Memory Card Camcorder
Page 25
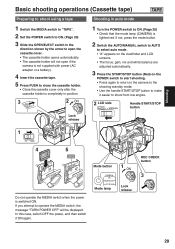
If not, press the mode button. 2 Switch the AUTO/MANUAL switch to AUTO to select auto mode. • "A" appears on the viewfinder and LCD screens. • The focus, gain, iris and white balance are two card slots. • Be absolutely sure to close the card slot covers to keep the ... the POWER switch to ON. (Page 20) • Check that the mode lamp (CAMERA) is switched ON. If you attempt to shoot from low angles. 2 LCD side AUTO MANUAL Handle START/STOP button P2 TAPE Do not operate the MEDIA switch when the power is lighted red. In this case, switch...
If not, press the mode button. 2 Switch the AUTO/MANUAL switch to AUTO to select auto mode. • "A" appears on the viewfinder and LCD screens. • The focus, gain, iris and white balance are two card slots. • Be absolutely sure to close the card slot covers to keep the ... the POWER switch to ON. (Page 20) • Check that the mode lamp (CAMERA) is switched ON. If you attempt to shoot from low angles. 2 LCD side AUTO MANUAL Handle START/STOP button P2 TAPE Do not operate the MEDIA switch when the power is lighted red. In this case, switch...
Memory Card Camcorder
Page 29
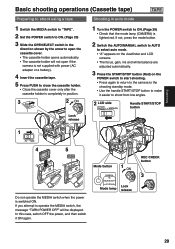
...ON. Mode button CAMERA MCR VCR PC DUB Mode lamp 1 ON Lock release REC CHECK button 3 29 If you attempt to shoot from low angles. 2 LCD side AUTO MANUAL Handle START/STOP button 1 P2 TAPE 4 5 PUSH PUSH Do not operate the MEDIA switch when the power is lighted red. If not..., press the mode button. 2 Switch the AUTO/MANUAL switch to AUTO to select auto mode. • "A" appears on the viewfinder and LCD screens. • The focus, gain, iris and white balance are adjusted automatically. 3 Press the START/STOP button (Red) on the POWER switch to start shooting. &#...
...ON. Mode button CAMERA MCR VCR PC DUB Mode lamp 1 ON Lock release REC CHECK button 3 29 If you attempt to shoot from low angles. 2 LCD side AUTO MANUAL Handle START/STOP button 1 P2 TAPE 4 5 PUSH PUSH Do not operate the MEDIA switch when the power is lighted red. If not..., press the mode button. 2 Switch the AUTO/MANUAL switch to AUTO to select auto mode. • "A" appears on the viewfinder and LCD screens. • The focus, gain, iris and white balance are adjusted automatically. 3 Press the START/STOP button (Red) on the POWER switch to start shooting. &#...

Memory Card Camcorder
Page 38
...focus assist When you press the FOCUS ASSIST button, the area at the center of the screen will occur regardless of the position of 1080i and 720P, and it switches to manual mode...If the auto focus mode is set ON for the AF item on the setting menu AUTO SW screen, auto focusing will be displayed in a frame on the screen. The FOCUS switch automatically moves back to M (MANUAL) after the focus ring has been operated...): Manual focus mode Turn the focus ring by hand. : The camera first focuses on the viewfinder and LCD goes out). Shooting in manual mode Set the unit to manual focus.
...focus assist When you press the FOCUS ASSIST button, the area at the center of the screen will occur regardless of the position of 1080i and 720P, and it switches to manual mode...If the auto focus mode is set ON for the AF item on the setting menu AUTO SW screen, auto focusing will be displayed in a frame on the screen. The FOCUS switch automatically moves back to M (MANUAL) after the focus ring has been operated...): Manual focus mode Turn the focus ring by hand. : The camera first focuses on the viewfinder and LCD goes out). Shooting in manual mode Set the unit to manual focus.
Memory Card Camcorder
Page 39
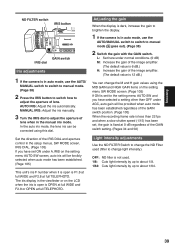
... value is 12 dB.) You can be corrected using the MID GAIN and HIGH GAIN items on the LCD when the iris is open is F1.6 at full WIDE and F2.8 at full TELEPHOTO. Adjusting the gain... is not used (filter to brighten the display. 1 If the camera is in the setup menus, SW MODE screen, IRIS DIAL. (Page 103) If you have set for the setting menu AUTO SW and you have selected a... setting other than OFF under A.IRIS on the setting menu AUTO SW screen, auto iris will be forcibly selected when auto mode has been established. (Page 105) This unit's iris ...
... value is 12 dB.) You can be corrected using the MID GAIN and HIGH GAIN items on the LCD when the iris is open is F1.6 at full WIDE and F2.8 at full TELEPHOTO. Adjusting the gain... is not used (filter to brighten the display. 1 If the camera is in the setup menus, SW MODE screen, IRIS DIAL. (Page 103) If you have set for the setting menu AUTO SW and you have selected a... setting other than OFF under A.IRIS on the setting menu AUTO SW screen, auto iris will be forcibly selected when auto mode has been established. (Page 105) This unit's iris ...
Memory Card Camcorder
Page 41
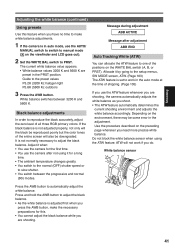
...slow shutter. • You switch between 3200 K and 5600 K. Allocate it by going to the setup menus, SW MODE screen, ATW. (Page 103) The ATW feature is set to work if you are shooting. 41 Do not block the white... camera is not adjusted properly, not only will the black be reproduced poorly but the color tones of the entire screen will not work in the auto mode at the time of shipping. (Page 105) If you use the ATW feature... to automatically adjust the white balance. Use the procedure described on the viewfinder and LCD goes out). 2 Set the WHITE BAL switch to adjust the black balance.
...slow shutter. • You switch between 3200 K and 5600 K. Allocate it by going to the setup menus, SW MODE screen, ATW. (Page 103) The ATW feature is set to work if you are shooting. 41 Do not block the white... camera is not adjusted properly, not only will the black be reproduced poorly but the color tones of the entire screen will not work in the auto mode at the time of shipping. (Page 105) If you use the ATW feature... to automatically adjust the white balance. Use the procedure described on the viewfinder and LCD goes out). 2 Set the WHITE BAL switch to adjust the black balance.
Memory Card Camcorder
Page 50
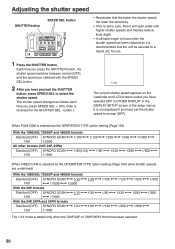
...120 1/500 1/250 1/1000 1/500 When VIDEO CAM is selected as follows each time you have selected OFF in OTHER DISPLAY in the DISPLAY SETUP screen of the setup menus. The shutter speed changes as the OPERATION TYPE option setting (Page 100) (slow shutter speeds are underlined) With the 1080i/... only when the 720P/24P or 720P/24PN format has been selected. 50 button.) PUSH STILL The current shutter speed appears on the viewfinder and LCD screens unless you press SPEED SEL + (The order is reversed for use. 1 Press the SHUTTER button. Each time you press the SHUTTER button, the shutter...
...120 1/500 1/250 1/1000 1/500 When VIDEO CAM is selected as follows each time you have selected OFF in OTHER DISPLAY in the DISPLAY SETUP screen of the setup menus. The shutter speed changes as the OPERATION TYPE option setting (Page 100) (slow shutter speeds are underlined) With the 1080i/... only when the 720P/24P or 720P/24PN format has been selected. 50 button.) PUSH STILL The current shutter speed appears on the viewfinder and LCD screens unless you press SPEED SEL + (The order is reversed for use. 1 Press the SHUTTER button. Each time you press the SHUTTER button, the shutter...

Memory Card Camcorder
Page 64
...display the menu. 2 Select the item using the and buttons, and press the button (the color of clips, it will be displayed on the LCD screen as add and delete shot marks. • Format P2 cards and SD memory cards. • Load the metadata (shooting information, etc.) from the... page 62.) • Only clips whose format is called a clip. To play back clips: Select the thumbnail, and press the button. (For details on the screen.) You can be played back. 1 2 3 4 7 5 8 6 THUMBNAIL OPERATION ALL CLIP DELETE SAME FORMAT CLIPS FORMAT SELECTED CLIPS REPAIR CLIP MARKED CLIPS EXIT...
...display the menu. 2 Select the item using the and buttons, and press the button (the color of clips, it will be displayed on the LCD screen as add and delete shot marks. • Format P2 cards and SD memory cards. • Load the metadata (shooting information, etc.) from the... page 62.) • Only clips whose format is called a clip. To play back clips: Select the thumbnail, and press the button. (For details on the screen.) You can be played back. 1 2 3 4 7 5 8 6 THUMBNAIL OPERATION ALL CLIP DELETE SAME FORMAT CLIPS FORMAT SELECTED CLIPS REPAIR CLIP MARKED CLIPS EXIT...
Memory Card Camcorder
Page 86
... the mode button (at least 2 seconds). Select the same format as thumbnails on the SCENE FILE screen of the 1080i and 720P formats. The recording formats of clips for the DETAIL LEVEL item on the LCD screen. • To set the MEDIA switch to the TAPE position. (Pages 25 and 29) • When...
... the mode button (at least 2 seconds). Select the same format as thumbnails on the SCENE FILE screen of the 1080i and 720P formats. The recording formats of clips for the DETAIL LEVEL item on the LCD screen. • To set the MEDIA switch to the TAPE position. (Pages 25 and 29) • When...

Memory Card Camcorder
Page 96
... the display. (Page 66) • The menu items indicated in the blue characters cannot be used. 1 When the unit is displayed on the viewfinder and LCD screen. To change a number, use the and buttons to suit the scenes you are shooting or what you want to change. 96 Using the setup menus...
... the display. (Page 66) • The menu items indicated in the blue characters cannot be used. 1 When the unit is displayed on the viewfinder and LCD screen. To change a number, use the and buttons to suit the scenes you are shooting or what you want to change. 96 Using the setup menus...

P2 Camcoder
Page 25
... be displayed. If not, press the mode button. 2 Switch the AUTO/MANUAL switch to AUTO to select auto mode. • "A" appears on the viewfinder and LCD screens. • The focus, gain, iris and white balance are blinking orange. (Page 26) 2 ON 3 4 Lock release 1 1 Turn the POWER switch to ON. (Page 20) •... return to the camera to the shooting standby mode. • Use the handle START/STOP button to make it easier to shoot from low angles. 2 LCD side AUTO MANUAL Handle START/STOP button P2 TAPE Do not operate the MEDIA switch when the power is lighted red.
... be displayed. If not, press the mode button. 2 Switch the AUTO/MANUAL switch to AUTO to select auto mode. • "A" appears on the viewfinder and LCD screens. • The focus, gain, iris and white balance are blinking orange. (Page 26) 2 ON 3 4 Lock release 1 1 Turn the POWER switch to ON. (Page 20) •... return to the camera to the shooting standby mode. • Use the handle START/STOP button to make it easier to shoot from low angles. 2 LCD side AUTO MANUAL Handle START/STOP button P2 TAPE Do not operate the MEDIA switch when the power is lighted red.
P2 Camcoder
Page 29
... switched ON. If not, press the mode button. 2 Switch the AUTO/MANUAL switch to AUTO to select auto mode. • "A" appears on the viewfinder and LCD screens. • The focus, gain, iris and white balance are adjusted automatically. 3 Press the START/STOP button (Red) on the POWER switch to start shooting. •... to the shooting standby mode. • Use the handle START/STOP button to make it ON again. If you attempt to shoot from low angles. 2 LCD side AUTO MANUAL Handle START/STOP button 1 P2 TAPE 4 5 PUSH PUSH Do not operate the MEDIA switch when the power is lighted red.
... switched ON. If not, press the mode button. 2 Switch the AUTO/MANUAL switch to AUTO to select auto mode. • "A" appears on the viewfinder and LCD screens. • The focus, gain, iris and white balance are adjusted automatically. 3 Press the START/STOP button (Red) on the POWER switch to start shooting. •... to the shooting standby mode. • Use the handle START/STOP button to make it ON again. If you attempt to shoot from low angles. 2 LCD side AUTO MANUAL Handle START/STOP button 1 P2 TAPE 4 5 PUSH PUSH Do not operate the MEDIA switch when the power is lighted red.

P2 Camcoder
Page 51
... the faster the shutter speed, the lower the sensitivity. • If iris is set the shutter speed to normal (OFF). (Continued on the viewfinder and LCD screens unless you have set to auto, then it will open wider with the SPEED SEL button. 2 After you have selected OFF in OTHER DISPLAY in... the DISPLAY SETUP screen of the setup menus. Shooting Adjusting the shutter speed SHUTTER button SPEED SEL button BARS RESET SHUTTER SPEED SEL CH 1 SELECT CH 2 SELECT INPUT 1 ...
... the faster the shutter speed, the lower the sensitivity. • If iris is set the shutter speed to normal (OFF). (Continued on the viewfinder and LCD screens unless you have set to auto, then it will open wider with the SPEED SEL button. 2 After you have selected OFF in OTHER DISPLAY in... the DISPLAY SETUP screen of the setup menus. Shooting Adjusting the shutter speed SHUTTER button SPEED SEL button BARS RESET SHUTTER SPEED SEL CH 1 SELECT CH 2 SELECT INPUT 1 ...
P2 Camcoder
Page 65
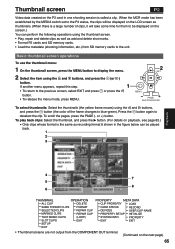
...called a clip. When the MCR mode has been established by the MEDIA switch set to the P2 status, the clips will be displayed on the LCD screen as recording format 6 shown in one shooting session is a large number of the frame changes to be displayed on the...SETUP EXIT PROPERTY META DATA CLIP PROPERTY LOAD CARD STATUS RECORD DEVICES USER CLIP NAME PROPERTY SETUP INITIALIZE SYSTEM INFO PROPERTY EXIT EXIT • Thumbnail screens are not output from the COMPONENT OUT terminal. (Continued on the P2 card in the figure below can perform the following operations using the and...
...called a clip. When the MCR mode has been established by the MEDIA switch set to the P2 status, the clips will be displayed on the LCD screen as recording format 6 shown in one shooting session is a large number of the frame changes to be displayed on the...SETUP EXIT PROPERTY META DATA CLIP PROPERTY LOAD CARD STATUS RECORD DEVICES USER CLIP NAME PROPERTY SETUP INITIALIZE SYSTEM INFO PROPERTY EXIT EXIT • Thumbnail screens are not output from the COMPONENT OUT terminal. (Continued on the P2 card in the figure below can perform the following operations using the and...

P2 Camcoder
Page 87
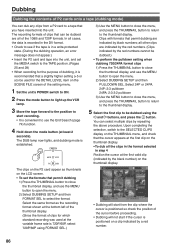
... the THUMBNAIL button to close the thumbnail display, and use the MENU button to select the format. Select the same format as thumbnails on the LCD screen. • To set the MEDIA switch to the TAPE position. (Pages 25 and 29) • When recording for the DETAIL LEVEL item on the SCENE... FILE screen of the setting menu. 1 Set the unit's POWER switch to ON. 2 Press the mode button to light up the VCR lamp. 3 Move the tape forward...
... the THUMBNAIL button to close the thumbnail display, and use the MENU button to select the format. Select the same format as thumbnails on the LCD screen. • To set the MEDIA switch to the TAPE position. (Pages 25 and 29) • When recording for the DETAIL LEVEL item on the SCENE... FILE screen of the setting menu. 1 Set the unit's POWER switch to ON. 2 Press the mode button to light up the VCR lamp. 3 Move the tape forward...

P2 Camcoder
Page 97
... change. 97 The following is displayed, press the AUDIO/THUMBNAIL button to make the setting. Example: MCR/VCR mode (Example) (Continued on the viewfinder and LCD screen. Example: • If the thumbnail menu is displayed on the next page) Menu 2 Press , to highlight the function you are shooting or what you want...
... change. 97 The following is displayed, press the AUDIO/THUMBNAIL button to make the setting. Example: MCR/VCR mode (Example) (Continued on the viewfinder and LCD screen. Example: • If the thumbnail menu is displayed on the next page) Menu 2 Press , to highlight the function you are shooting or what you want...


