
3 Ccd Dv Camcorder
Page 2
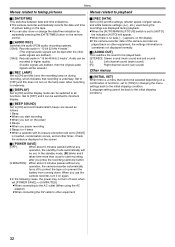
... for a long time. IMPORTANT "Unauthorized recording of copyrighted television programmes, video tapes and other confined space. When using the camera-recorder in locations where laser irradiation equipment is used, be of sufficient magnitude to constitute a risk of in fire. • Do not store in use. NO USER SERVICEABLE PARTS INSIDE. REFER TO SERVICING TO QUALIFIED SERVICE PERSONNEL. For Battery of Remote Controller • Replace battery with same or specified type. •...
... for a long time. IMPORTANT "Unauthorized recording of copyrighted television programmes, video tapes and other confined space. When using the camera-recorder in locations where laser irradiation equipment is used, be of sufficient magnitude to constitute a risk of in fire. • Do not store in use. NO USER SERVICEABLE PARTS INSIDE. REFER TO SERVICING TO QUALIFIED SERVICE PERSONNEL. For Battery of Remote Controller • Replace battery with same or specified type. •...
3 Ccd Dv Camcorder
Page 5
... electric shock. 17. Never spill liquid of any service or repairs to this video unit, ask the service technician to perform safety checks to determine that the video unit is connected to qualified service personnel under the following the operating instructions. Do not attempt to dangerous voltage or other electric light or power circuits, or where it from the wall outlet and...
... electric shock. 17. Never spill liquid of any service or repairs to this video unit, ask the service technician to perform safety checks to determine that the video unit is connected to qualified service personnel under the following the operating instructions. Do not attempt to dangerous voltage or other electric light or power circuits, or where it from the wall outlet and...
3 Ccd Dv Camcorder
Page 6
...TVs 23 Image stabilizer function 23 Recording in various situations (Scene mode 23 Recording in natural colors (White balance 24 Manual focus adjustment 25 Manual shutter speed/aperture adjustment 25 Playback mode Playing back tape 26 Slow-motion playback/frame-by-frame playback 26 Variable-speed search function 27 Playback on 13 Selecting a mode 13 Using the screen display 13 Switching the language 14 Using the menu screen 14 Setting date and time 15 Adjusting LCD monitor/viewfinder 15 Using the remote control 16 Record mode Check before recording your own private use may...
...TVs 23 Image stabilizer function 23 Recording in various situations (Scene mode 23 Recording in natural colors (White balance 24 Manual focus adjustment 25 Manual shutter speed/aperture adjustment 25 Playback mode Playing back tape 26 Slow-motion playback/frame-by-frame playback 26 Variable-speed search function 27 Playback on 13 Selecting a mode 13 Using the screen display 13 Switching the language 14 Using the menu screen 14 Setting date and time 15 Adjusting LCD monitor/viewfinder 15 Using the remote control 16 Record mode Check before recording your own private use may...

3 Ccd Dv Camcorder
Page 7
... conversion lens (AG-LW4307P) (1) (2) (3) (4) (5) (6) (7) (8) (9) (10) CAMERA VCR AUTO MANUAL FOCUS POWER MENU LCD (11) (12) (1) Focus ring -25(2) White balance sensor -24(3) Recording lamp -32(4) Remote control sensor -16(5) Lens (6) Lens hood (7) Lens hood attachment knob ≥Do not attach other conversion lenses in the Filter Kit (optional), first of your accessories. ≥Be sure to keep the lens hood attached to the camerarecorder so as to shut out unnecessary light. (8) Mode switch [CAMERA/VCR] -13...
... conversion lens (AG-LW4307P) (1) (2) (3) (4) (5) (6) (7) (8) (9) (10) CAMERA VCR AUTO MANUAL FOCUS POWER MENU LCD (11) (12) (1) Focus ring -25(2) White balance sensor -24(3) Recording lamp -32(4) Remote control sensor -16(5) Lens (6) Lens hood (7) Lens hood attachment knob ≥Do not attach other conversion lenses in the Filter Kit (optional), first of your accessories. ≥Be sure to keep the lens hood attached to the camerarecorder so as to shut out unnecessary light. (8) Mode switch [CAMERA/VCR] -13...
3 Ccd Dv Camcorder
Page 13
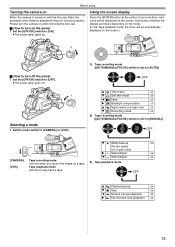
...check -19- 2) Tape recording mode ([AUTO/MANUAL/FOCUS] switch is turned on with the lens cap fitted, the automatic white balance adjustment may not function properly. OFF ON Selecting a mode 1 Set the mode switch to [CAMERA] or [VCR]. 1) Tape recording mode ([AUTO/MANUAL/FOCUS] switch is set to [ON]. ≥The power lamp lights up. Please turn the camera on the screen. OFF 3 Playback/pause -26- 4 Stop -26- 2 Rewind (review playback) -26- 1 Fast forward (cue playback) -26- 13 Each press switches the display as follows depending on the mode. (In the Tape playback mode...
...check -19- 2) Tape recording mode ([AUTO/MANUAL/FOCUS] switch is turned on with the lens cap fitted, the automatic white balance adjustment may not function properly. OFF ON Selecting a mode 1 Set the mode switch to [CAMERA] or [VCR]. 1) Tape recording mode ([AUTO/MANUAL/FOCUS] switch is set to [ON]. ≥The power lamp lights up. Please turn the camera on the screen. OFF 3 Playback/pause -26- 4 Stop -26- 2 Rewind (review playback) -26- 1 Fast forward (cue playback) -26- 13 Each press switches the display as follows depending on the mode. (In the Tape playback mode...
3 Ccd Dv Camcorder
Page 15
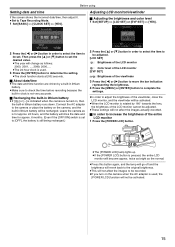
... the [POWER LCD] button. Adjusting LCD monitor/viewfinder ª Adjusting the brightness and color level 1 Set [SETUP] >> [LCD SET] or [EVF SET] >> [YES]. 2 Press the [2] or [1] button in lithium battery runs down. Before using Setting date and time If the screen shows the incorrect date/time, then adjust it. ≥Set to determine the setting. ≥The clock function starts at [00] seconds. ª About date/time ≥The date and time function are driven by 180° towards the lens, the...
... the [POWER LCD] button. Adjusting LCD monitor/viewfinder ª Adjusting the brightness and color level 1 Set [SETUP] >> [LCD SET] or [EVF SET] >> [YES]. 2 Press the [2] or [1] button in lithium battery runs down. Before using Setting date and time If the screen shows the incorrect date/time, then adjust it. ≥Set to determine the setting. ≥The clock function starts at [00] seconds. ª About date/time ≥The date and time function are driven by 180° towards the lens, the...
3 Ccd Dv Camcorder
Page 22
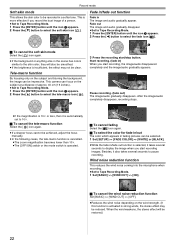
..., adjust the focus manually. ≥In the following cases, the tele-macro function is cancelled. ≥The zoom magnification becomes lower than 10k. ≥The [OFF/ON] switch or the mode switch is operated. ª To cancel fading Select the [ ] icon again. ª To select the color for fade in/out The color which appears in fading pictures can be selected. 1 Set [SETUP] >> [FADE COLOR] >> [WHITE...
..., adjust the focus manually. ≥In the following cases, the tele-macro function is cancelled. ≥The zoom magnification becomes lower than 10k. ≥The [OFF/ON] switch or the mode switch is operated. ª To cancel fading Select the [ ] icon again. ª To select the color for fade in/out The color which appears in fading pictures can be selected. 1 Set [SETUP] >> [FADE COLOR] >> [WHITE...

3 Ccd Dv Camcorder
Page 28
...) Pictures recorded by using the AV cable 1. ≥If the recorder has an S-Video terminal, then also connect an S-Video cable 2. Refer to the instructions for the recorder. ≥Place a recorded cassette in the camera-recorder, and an unrecorded DVD-RAM or cassette in the DVD recorder or VCR. 1 Connect the camera-recorder and the recorder. ≥For more information, refer to the operating instructions for your TV set and recorder. ≥When you do not need functional indications or date...
...) Pictures recorded by using the AV cable 1. ≥If the recorder has an S-Video terminal, then also connect an S-Video cable 2. Refer to the instructions for the recorder. ≥Place a recorded cassette in the camera-recorder, and an unrecorded DVD-RAM or cassette in the DVD recorder or VCR. 1 Connect the camera-recorder and the recorder. ≥For more information, refer to the operating instructions for your TV set and recorder. ≥When you do not need functional indications or date...
3 Ccd Dv Camcorder
Page 29
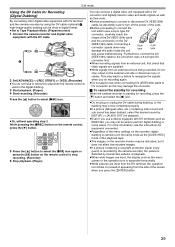
... digital format. ≥Set to Tape Playback Mode. (Player/recorder) 1 Connect the camera-recorder and digital video equipment with a DV connector and digitally transfer video and audio signals as well as time code. ≥Before proceeding to connect or disconnect DV (IEEE1394) cable, be absolutely sure to turn off the power of the units. ≥Before proceeding to the unit which uses a 6-pin type DV connector, carefully check the shape of cables. Edit mode Using the DV Cable for Recording (Digital...
... digital format. ≥Set to Tape Playback Mode. (Player/recorder) 1 Connect the camera-recorder and digital video equipment with a DV connector and digitally transfer video and audio signals as well as time code. ≥Before proceeding to connect or disconnect DV (IEEE1394) cable, be absolutely sure to turn off the power of the units. ≥Before proceeding to the unit which uses a 6-pin type DV connector, carefully check the shape of cables. Edit mode Using the DV Cable for Recording (Digital...
3 Ccd Dv Camcorder
Page 30
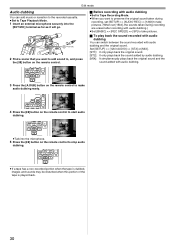
... the recorded cassette. ≥Set to make audio dubbing ready. ¥REC A.DUB ZOOM T A.DUB ; EXT MIC 2 Find a scene that you want to add sound to, and press the [;] button on the remote control to Tape Playback Mode. 1 Insert an external microphone securely into the microphone. 5 Press the [;] button on the remote control to stop audio dubbing. V/REW PLAY FF/W STILL ADV PAUSE STILL ADV W VOL 4 Press the [;] button on the remote control to start audio dubbing. V/REW PLAY...
... the recorded cassette. ≥Set to make audio dubbing ready. ¥REC A.DUB ZOOM T A.DUB ; EXT MIC 2 Find a scene that you want to add sound to, and press the [;] button on the remote control to Tape Playback Mode. 1 Insert an external microphone securely into the microphone. 5 Press the [;] button on the remote control to stop audio dubbing. V/REW PLAY FF/W STILL ADV PAUSE STILL ADV W VOL 4 Press the [;] button on the remote control to start audio dubbing. V/REW PLAY...
3 Ccd Dv Camcorder
Page 32
.... Check the sentence displayed on the screen. ª [POWER SAVE] [OFF]: When about 5 minutes passes without any operation, the camera-recorder automatically turns off even when set [POWER SAVE] >> [5 MINUTES]. ≥When connecting to the AC outlet (When using the AC adapter) ≥When connecting the DV cable to other equipment ª [REC DATA] Set to [ON] and the settings (shutter speed, iris/gain values, and white balance settings (-24-), etc.) used during the recordings are displayed during recording, which...
.... Check the sentence displayed on the screen. ª [POWER SAVE] [OFF]: When about 5 minutes passes without any operation, the camera-recorder automatically turns off even when set [POWER SAVE] >> [5 MINUTES]. ≥When connecting to the AC outlet (When using the AC adapter) ≥When connecting the DV cable to other equipment ª [REC DATA] Set to [ON] and the settings (shutter speed, iris/gain values, and white balance settings (-24-), etc.) used during the recordings are displayed during recording, which...
3 Ccd Dv Camcorder
Page 33
... it displays. This may solve the problem. Pull out the DV cable, and press the reset button (-8-). Basic indications : Remaining battery power 0h00m00s00f: Time code 3:30:45PM: Date/Time indication Recording indications R0:45: Remaining tape time ≥Remaining tape time is indicated in the [SAVE] position. MF: Manual focus -25- 5k: Zoom magnification indication -20- : Backlight mode -21- This cassette is connected) ; (Green flash): Standby mode ; (Red): Fade out : Recording check -19- Turn the LCD monitor towards the lens, the...
... it displays. This may solve the problem. Pull out the DV cable, and press the reset button (-8-). Basic indications : Remaining battery power 0h00m00s00f: Time code 3:30:45PM: Date/Time indication Recording indications R0:45: Remaining tape time ≥Remaining tape time is indicated in the [SAVE] position. MF: Manual focus -25- 5k: Zoom magnification indication -20- : Backlight mode -21- This cassette is connected) ; (Green flash): Standby mode ; (Red): Fade out : Recording check -19- Turn the LCD monitor towards the lens, the...
3 Ccd Dv Camcorder
Page 34
... View ≥While recording to a tape ≥Zoom microphone ≥An external microphone is used ≥Wind noise reduction ≥Scene mode ≥When setting the [AUTO/MANUAL/FOCUS] switch to [5 MINUTES] and do not operate the camera-recorder for about 1 minute later, turn off for tape protection and power conservation. The camera-recorder does not operate normally. • Remove the cassette and then press the reset button. (-36-) If normal conditions are disabled or cannot be used, the battery...
... View ≥While recording to a tape ≥Zoom microphone ≥An external microphone is used ≥Wind noise reduction ≥Scene mode ≥When setting the [AUTO/MANUAL/FOCUS] switch to [5 MINUTES] and do not operate the camera-recorder for about 1 minute later, turn off for tape protection and power conservation. The camera-recorder does not operate normally. • Remove the cassette and then press the reset button. (-36-) If normal conditions are disabled or cannot be used, the battery...

3 Ccd Dv Camcorder
Page 35
... adjust the focus. (-25-) • Is the color night view function set [SETUP] >> [12bit AUDIO] >> [ST2]? Please read the operating instructions of the camera-recorder or the headphones. 0 Is the volume too low? When a protected picture is not played back from the built-in speaker of your TV and select the channel that matches the input terminals used for the connection. 4: Playback picture is working ? Insert a new cassette. • Is the recording mode set to [SAVE]), recording...
... adjust the focus. (-25-) • Is the color night view function set [SETUP] >> [12bit AUDIO] >> [ST2]? Please read the operating instructions of the camera-recorder or the headphones. 0 Is the volume too low? When a protected picture is not played back from the built-in speaker of your TV and select the channel that matches the input terminals used for the connection. 4: Playback picture is working ? Insert a new cassette. • Is the recording mode set to [SAVE]), recording...
Dv Camcorder
Page 7
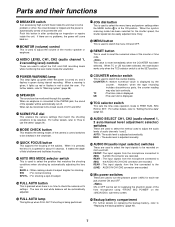
... button in the viewfinder. = QUICK FOCUS button This supports the focusing of CH1 and CH2. ; However, when the tape recording includes discontinuous parts, the counter reading may also lack continuity. E TCG selector switch This sets the time code operation mode to "Setting the time data" (page 22). H Mic power switches These are recorded. The lens iris and white balance will be set for supplying the phantom power of field shallower and facilitates focusing. > AUTO IRIS MODE selector switch This is used to turn...
... button in the viewfinder. = QUICK FOCUS button This supports the focusing of CH1 and CH2. ; However, when the tape recording includes discontinuous parts, the counter reading may also lack continuity. E TCG selector switch This sets the time code operation mode to "Setting the time data" (page 22). H Mic power switches These are recorded. The lens iris and white balance will be set for supplying the phantom power of field shallower and facilitates focusing. > AUTO IRIS MODE selector switch This is used to turn...

Dv Camcorder
Page 9
... power supply) output socket This normally serves as REC CHECK) that performs VTR playback is pressed. The variable speed playback mode is released by pressing the STOP button, PLAY/PAUSE button or EJECT button. 9 STOP button The tape stops traveling when this connector using a DV cable (optional accessory). When it will be output from the external source. 3 AUDIO IN CH1, CH2 (audio input channel 1, 2) jacks (XLR, 3-pin) An external microphone or line input signals are connected, no sound will be operated while...
... power supply) output socket This normally serves as REC CHECK) that performs VTR playback is pressed. The variable speed playback mode is released by pressing the STOP button, PLAY/PAUSE button or EJECT button. 9 STOP button The tape stops traveling when this connector using a DV cable (optional accessory). When it will be output from the external source. 3 AUDIO IN CH1, CH2 (audio input channel 1, 2) jacks (XLR, 3-pin) An external microphone or line input signals are connected, no sound will be operated while...

Dv Camcorder
Page 16
... an irregular operation status for about 3 seconds. Viewfinder screen status displays In addition to the images, messages indicating the unit's settings and the operation mode appear on the viewfinder screen when the MODE CHECK switch is made, a message informing the user of the items set to "Warning system" (page 38). 4 VTR SAVE (VTR power-saving) lamp This lights up when the VTR SAVE/STBY switch is ON (FULL AUTO) EX TAPE NEAR END...
... an irregular operation status for about 3 seconds. Viewfinder screen status displays In addition to the images, messages indicating the unit's settings and the operation mode appear on the viewfinder screen when the MODE CHECK switch is made, a message informing the user of the items set to "Warning system" (page 38). 4 VTR SAVE (VTR power-saving) lamp This lights up when the VTR SAVE/STBY switch is ON (FULL AUTO) EX TAPE NEAR END...

Dv Camcorder
Page 22
... button to enter it in the non-drop frame mode. 4 Set the TCG switch. Time data settings When both the user's bit and time code are automatically stored in the memory and retained even after the power has been turned off. ≥When DATE is selected for "UB MODE" on the sub-menu , the year/month/day on the TIME/DATE screen will function in real time. ≥When TIME is set the user...
... button to enter it in the non-drop frame mode. 4 Set the TCG switch. Time data settings When both the user's bit and time code are automatically stored in the memory and retained even after the power has been turned off. ≥When DATE is selected for "UB MODE" on the sub-menu , the year/month/day on the TIME/DATE screen will function in real time. ≥When TIME is set the user...

Dv Camcorder
Page 26
... lens VTR button to start the recording. 6 Press the VTR START/STOP button to stop the recording. Set the GAIN selector switch to select the desired white balance mode. Set the OUTPUT selector switch to start the recording. 26 Normal recording Recording methods 2 POWER ON OFF u 1 1 Set the POWER switch to ON. 2 Press the EJECT button to open the cassette compartment, and insert the cassette tape. ≥Before proceeding with the recording, check that supports the subject brightness. Select the desired shutter speed...
... lens VTR button to start the recording. 6 Press the VTR START/STOP button to stop the recording. Set the GAIN selector switch to select the desired white balance mode. Set the OUTPUT selector switch to start the recording. 26 Normal recording Recording methods 2 POWER ON OFF u 1 1 Set the POWER switch to ON. 2 Press the EJECT button to open the cassette compartment, and insert the cassette tape. ≥Before proceeding with the recording, check that supports the subject brightness. Select the desired shutter speed...

Dv Camcorder
Page 28
... 10 seconds on the submenu VTR OPTION screen. ≥ INTERVAL REC: This sets the INTERVAL REC function to a lighted "i REC." If the PLAY button is pressed again, normal playback is set , the INTERVAL REC mode is very useful for interval shooting. When the first interval shooting is completed and the rec pause mode is searched in the forward or reverse direction for the number of times that the rec review images will be detected before the operation stops...
... 10 seconds on the submenu VTR OPTION screen. ≥ INTERVAL REC: This sets the INTERVAL REC function to a lighted "i REC." If the PLAY button is pressed again, normal playback is set , the INTERVAL REC mode is very useful for interval shooting. When the first interval shooting is completed and the rec pause mode is searched in the forward or reverse direction for the number of times that the rec review images will be detected before the operation stops...


