Service Manual
Page 1
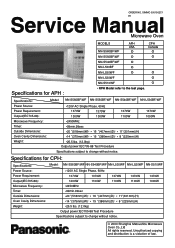
... Source: Power Requirement: Output(IEC705-88): Microwave Frequency: Timer: Outside Dimensions: Oven Cavity Dimensions: Weight: Model: NN-S560BF/WF NN-S550BF/WF NN-S540BF/WF NN-L530BF/WF *120V AC Single Phase, 60Hz 1370W 1370W 1370W 1300W 1300W 1100W *2450MHz *99min.99sec *20 "(518mm)(W)O...: Power Requirement: Output(IEC705-88): Microwave Frequency: Timer: Outside Dimensions: Oven Cavity Dimensions: Weight: Model: NN-S560BF/WF NN-S540BF/WF NN-L530WF NN-L520WF NN-S510WF *120V AC Single Phase, 60Hz 1370W 1370W 1370W 1370W 1200W 1100W 1100W 1100W *2450MHz *99min.99sec *20 "(518mm...
... Source: Power Requirement: Output(IEC705-88): Microwave Frequency: Timer: Outside Dimensions: Oven Cavity Dimensions: Weight: Model: NN-S560BF/WF NN-S550BF/WF NN-S540BF/WF NN-L530BF/WF *120V AC Single Phase, 60Hz 1370W 1370W 1370W 1300W 1300W 1100W *2450MHz *99min.99sec *20 "(518mm)(W)O...: Power Requirement: Output(IEC705-88): Microwave Frequency: Timer: Outside Dimensions: Oven Cavity Dimensions: Weight: Model: NN-S560BF/WF NN-S540BF/WF NN-L530WF NN-L520WF NN-S510WF *120V AC Single Phase, 60Hz 1370W 1370W 1370W 1370W 1200W 1100W 1100W 1100W *2450MHz *99min.99sec *20 "(518mm...
Service Manual
Page 2
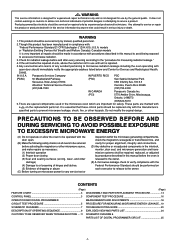
... 4. If the unit cannot be repaired, replaced, or adjusted by anyone else could result in the microwave oven which are important for safety. IN U.S.A. (PASC) Panasonic Services Company 50 Meadowland Parkway, Secaucus, New Jersey 07094 IN PUERTO RICO (PSC) PSC San Gabriel ...with open . (B) Make the following safety checks on microwave power for any accident pertaining to service a product. Km.9.5 Attention: Technical Service Division. (201)348-7000 Carolina, Puerto Rico 00985 (787)750-4300 IN CANADA (PCI) Panasonic Canada Inc. 5770 Ambler Drive, Mississauga, Ontario, L4W2T3...
... 4. If the unit cannot be repaired, replaced, or adjusted by anyone else could result in the microwave oven which are important for safety. IN U.S.A. (PASC) Panasonic Services Company 50 Meadowland Parkway, Secaucus, New Jersey 07094 IN PUERTO RICO (PSC) PSC San Gabriel ...with open . (B) Make the following safety checks on microwave power for any accident pertaining to service a product. Km.9.5 Attention: Technical Service Division. (201)348-7000 Carolina, Puerto Rico 00985 (787)750-4300 IN CANADA (PCI) Panasonic Canada Inc. 5770 Ambler Drive, Mississauga, Ontario, L4W2T3...
Service Manual
Page 3
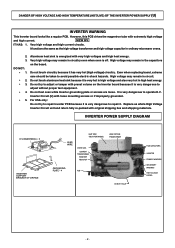
... may remain in high heat energy. For USA only: Do not try to adjust without proper test equipment. Very high voltage may remain in ordinary microwave ovens. 2. 3. Do not test oven while Inverter grounding plate or screws are loose. Inverter Circuit (U) with extremely high voltage and high current. Very high voltage...
... may remain in high heat energy. For USA only: Do not try to adjust without proper test equipment. Very high voltage may remain in ordinary microwave ovens. 2. 3. Do not test oven while Inverter grounding plate or screws are loose. Inverter Circuit (U) with extremely high voltage and high current. Very high voltage...
Service Manual
Page 6
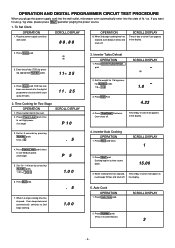
... 2nd stage cooking. 1.0 0 3. Time of day or colon if set appears in the display. 5. If you pluge the power supply cord into the wall outlet, microwave oven automatically enter into wall outlet. Press Power Level pad once to set Medium power. (2nd stage) P 5 5. Set for Two Stage OPERATION 1.
... 2nd stage cooking. 1.0 0 3. Time of day or colon if set appears in the display. 5. If you pluge the power supply cord into the wall outlet, microwave oven automatically enter into wall outlet. Press Power Level pad once to set Medium power. (2nd stage) P 5 5. Set for Two Stage OPERATION 1.
Service Manual
Page 10
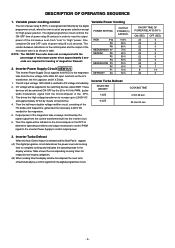
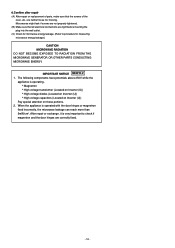
...) signal from the current transformer built into the inverter ciruit. 6. Then the half-wave doubler voltage rectifier circuit, consisting of the microwave oven is set at any power selection except for respective serving by categories. (B) When cooking time the display window has elapsed, the... control signal from the line voltage,120v 60Hz AC input. NOTE: The ON/OFF time ratio does not correspond with the percentage of microwave power since approximately 2 seconds are required for the magnetron. 5. Variable power cooking control The coil of magnetron filament. 2. Variable Power ...
...) signal from the current transformer built into the inverter ciruit. 6. Then the half-wave doubler voltage rectifier circuit, consisting of the microwave oven is set at any power selection except for respective serving by categories. (B) When cooking time the display window has elapsed, the... control signal from the line voltage,120v 60Hz AC input. NOTE: The ON/OFF time ratio does not correspond with the percentage of microwave power since approximately 2 seconds are required for the magnetron. 5. Variable power cooking control The coil of magnetron filament. 2. Variable Power ...
Service Manual
Page 11
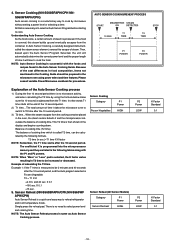
...will take to reheat refrigerator and room temperature foods. Sensor Reheat (NN-S560BFAPH/CPH,NN-S560WF APH/CPH) Auto Sensor Reheat is no microwave activity, and when calculating the T2 time by the following tables along with the foods and recipes found in the display and begins counting... T2 time is measured to select power level and cooking time. The coefficient K is to select an Auto Sensor Program before starting to cook by microwave without setting a power level or selecting a time. X 0.1 =16 sec. 5. All that is necessary is programmed Into the mlcroprocessor memory and they ...
...will take to reheat refrigerator and room temperature foods. Sensor Reheat (NN-S560BFAPH/CPH,NN-S560WF APH/CPH) Auto Sensor Reheat is no microwave activity, and when calculating the T2 time by the following tables along with the foods and recipes found in the display and begins counting... T2 time is measured to select power level and cooking time. The coefficient K is to select an Auto Sensor Program before starting to cook by microwave without setting a power level or selecting a time. X 0.1 =16 sec. 5. All that is necessary is programmed Into the mlcroprocessor memory and they ...
Service Manual
Page 12
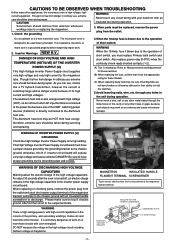
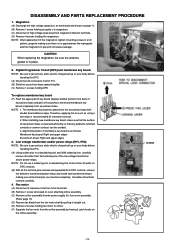
...will expose very high voltage and cause extreme DANGER! It is free from the outlet. When parts must be used when grounded. The microwave oven is high-voltage present, with oven energized. Though it has the appropriate rating for the magnetron tube. therefore, extreme care should be...extreme care should remove their ability to work . 2. WARNING When the 18 Amp. Never insert a wire, nail or any other appliances, the microwave oven is directly connected to the chassis ground; When replacing or checking parts, remove the power plug from heat energy; DO NOT measure the ...
...will expose very high voltage and cause extreme DANGER! It is free from the outlet. When parts must be used when grounded. The microwave oven is high-voltage present, with oven energized. Though it has the appropriate rating for the magnetron tube. therefore, extreme care should be...extreme care should remove their ability to work . 2. WARNING When the 18 Amp. Never insert a wire, nail or any other appliances, the microwave oven is directly connected to the chassis ground; When replacing or checking parts, remove the power plug from heat energy; DO NOT measure the ...
Service Manual
Page 13
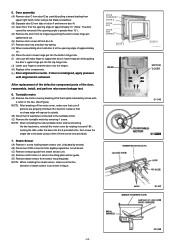
...Inverter (U)) *h High voltage diodes (Located on Inverter (U)) *h High voltage capacitors (Located on Inverter (U)) Pay special attention on these portions. 2. Microwaves might leak if screws are not properly tightened. (B) Make sure that the screws of parts, make sure that all electrical connections are tight before... inserting the plug into the wall outlet. (C) Check for microwave energy leakage. (Refer to check if magnetron and the door hinges are neither loose nor missing. The following components have potentials...
...Inverter (U)) *h High voltage diodes (Located on Inverter (U)) *h High voltage capacitors (Located on Inverter (U)) Pay special attention on these portions. 2. Microwaves might leak if screws are not properly tightened. (B) Make sure that the screws of parts, make sure that all electrical connections are tight before... inserting the plug into the wall outlet. (C) Check for microwave energy leakage. (Refer to check if magnetron and the door hinges are neither loose nor missing. The following components have potentials...
Service Manual
Page 14
... of the low voltage transformer and/or power relays. SCREW - 13 - Magnetron (A) Discharge the high voltage capacitors, as using a hair dryer is attached to prevent microwave leakage. When installing new membrane key board, make sure that the surface of membrane key board is cleaned sufficiently so that any static electric charge...
... of the low voltage transformer and/or power relays. SCREW - 13 - Magnetron (A) Discharge the high voltage capacitors, as using a hair dryer is attached to prevent microwave leakage. When installing new membrane key board, make sure that the surface of membrane key board is cleaned sufficiently so that any static electric charge...
Service Manual
Page 15
...- 5. NOTE: When installing the steam sensor, make sure that cut-off portions are properly trimmed off the motor cover, make sure that no sharp edge will expose to outside. (B) Disconnect 2 lead wires connected to the base using a flat blade screwdriver. (B) Separate door E from tabs on...the like. (See Figure) NOTE: After breaking off or bend to inside so that the direction of the door, reassemble, install, and perform microwave leakage test. 6. After replacement of the defective component parts of steam sensor is achieved. Steam Sensor (A) Remove 1 screw holding steam sensor unit....
...- 5. NOTE: When installing the steam sensor, make sure that cut-off portions are properly trimmed off the motor cover, make sure that no sharp edge will expose to outside. (B) Disconnect 2 lead wires connected to the base using a flat blade screwdriver. (B) Separate door E from tabs on...the like. (See Figure) NOTE: After breaking off or bend to inside so that the direction of the door, reassemble, install, and perform microwave leakage test. 6. After replacement of the defective component parts of steam sensor is achieved. Steam Sensor (A) Remove 1 screw holding steam sensor unit....
Service Manual
Page 19
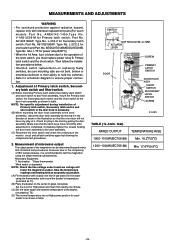
... schematic diagram to ensure proper connection. 1. Then follow the installation procedures below . Make sure that the oven door will lower the magnetron output. Measurement of microwave output The output power of the magnetron can be sure mounting tabs are not bent, broken or otherwise deficient in the door by moving it...
... schematic diagram to ensure proper connection. 1. Then follow the installation procedures below . Make sure that the oven door will lower the magnetron output. Measurement of microwave output The output power of the magnetron can be sure mounting tabs are not bent, broken or otherwise deficient in the door by moving it...
Service Manual
Page 20
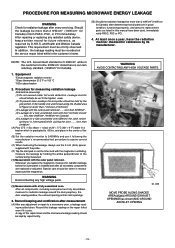
... At least once a year, have been used, immediately notify PASC, PSC or PCI. 4. Leakage monitor should initially be set to a microwave oven, a leakage reading must be recorded on the repair ticket even if it following the manufacturer's recommended test procedure to assure correct results....leakage reading on the service repair ticket while in the customer's home. (B) Should the radiation leakage be taken. PROCEDURE FOR MEASURING MICROWAVE ENERGY LEAKAGE WARNING Check for calibration by its manufacturer. Procedure for Canada) inform PASC, PSC, or PCI immediately. After all ...
... At least once a year, have been used, immediately notify PASC, PSC or PCI. 4. Leakage monitor should initially be set to a microwave oven, a leakage reading must be recorded on the repair ticket even if it following the manufacturer's recommended test procedure to assure correct results....leakage reading on the service repair ticket while in the customer's home. (B) Should the radiation leakage be taken. PROCEDURE FOR MEASURING MICROWAVE ENERGY LEAKAGE WARNING Check for calibration by its manufacturer. Procedure for Canada) inform PASC, PSC, or PCI immediately. After all ...
Service Manual
Page 21
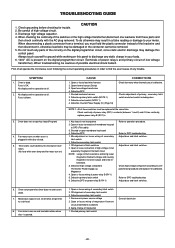
...touch any trouble. When troubleshooting, be removed. 5. First of any parts of possible electrical shock hazard. No display and no microwave oscillation. (No heat while oven lamp and fan motor turn on and turntable rotates when door is defective. Fuse is not.... Adjust door and latch switches. Oven can program but no operation at all operate the microwave oven following the correct operating procedures in power source voltage 2. Microwave output is defective. Open or loose wiring of magnetron filament circuit.(Intermittent oscillation) 3. Defective secondary...
...touch any trouble. When troubleshooting, be removed. 5. First of any parts of possible electrical shock hazard. No display and no microwave oscillation. (No heat while oven lamp and fan motor turn on and turntable rotates when door is defective. Fuse is not.... Adjust door and latch switches. Oven can program but no operation at all operate the microwave oven following the correct operating procedures in power source voltage 2. Microwave output is defective. Open or loose wiring of magnetron filament circuit.(Intermittent oscillation) 3. Defective secondary...
Service Manual
Page 23
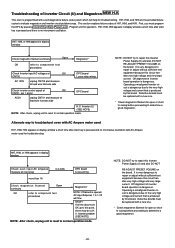
... be replaced with AC Ampere meter used H97, H98, H99 appears in display window a short time after start key is pressed and no microwave oscillation. Defective boards must program the DPC by this Inverter Power Supply (U) and also DO NOT RE-ADJUST PRESET VOLUME on the board. ...Troubleshooting of H97, H98, and H99. Inverter (U) (SEE NOTE) NOTE: After check, unplug unit to reset to normal operation mode. It is no microwave oscillation with a new one . * Check magnetron filament for operation. NOTE: DO NOT try to troubleshoot oven with AC Ampere meter used for open or ...
... be replaced with AC Ampere meter used H97, H98, H99 appears in display window a short time after start key is pressed and no microwave oscillation. Defective boards must program the DPC by this Inverter Power Supply (U) and also DO NOT RE-ADJUST PRESET VOLUME on the board. ...Troubleshooting of H97, H98, and H99. Inverter (U) (SEE NOTE) NOTE: After check, unplug unit to reset to normal operation mode. It is no microwave oscillation with a new one . * Check magnetron filament for operation. NOTE: DO NOT try to troubleshoot oven with AC Ampere meter used for open or ...

Service Manual
Page 24
... Abnormal Normal Abnormal Normal Abnormal Normal = 5V Still not turn on even though the program has been set and the start pad is tapped No microwave oscillation at any abnormal condition is dead. Latch Switch 2. Program High power for the presence of sensor Abnormal = 0V Normal > 10~30mV Steam sensor IC...
... Abnormal Normal Abnormal Normal Abnormal Normal = 5V Still not turn on even though the program has been set and the start pad is tapped No microwave oscillation at any abnormal condition is dead. Latch Switch 2. Program High power for the presence of sensor Abnormal = 0V Normal > 10~30mV Steam sensor IC...


