
Handbook
Page 3
... This Book 1 Chapter 1: Setting Up Your Palm™ Zire™ 71 Handheld 3 System requirements 4 Minimum requirements: Windows computers 4 Minimum requirements: Mac computers 5 Audio and video requirements 5 E-mail requirements 5 SMS requirements 5 Upgrade information 6 Step 1: Connect the HotSync® cradle/cable to the computer 6 Step 2: Charge your handheld 6 Step 3: Set up your handheld 7 Step 4: Install software 7 Step 5: Perform a HotSync operation 8 Step 6: Register your handheld 8 Congratulations 8 Chapter 2: Exploring Your Handheld 9 Locating handheld components...
... This Book 1 Chapter 1: Setting Up Your Palm™ Zire™ 71 Handheld 3 System requirements 4 Minimum requirements: Windows computers 4 Minimum requirements: Mac computers 5 Audio and video requirements 5 E-mail requirements 5 SMS requirements 5 Upgrade information 6 Step 1: Connect the HotSync® cradle/cable to the computer 6 Step 2: Charge your handheld 6 Step 3: Set up your handheld 7 Step 4: Install software 7 Step 5: Perform a HotSync operation 8 Step 6: Register your handheld 8 Congratulations 8 Chapter 2: Exploring Your Handheld 9 Locating handheld components...

Handbook
Page 5
... files on a Windows computer 66 Palm Quick Install tips 69 Installing applications and files on a Mac computer 70 Removing applications 72 Removing Palm Desktop software 72 Chapter 5: Using Address Book 75 Creating an Address Book entry 76 Selecting types of phone numbers 77 Changing Address Entry details 78 Making connections from Address Book 78 Using Address Book menus 81 Chapter 6: Using Calculator 85 Performing calculations 86 Viewing Recent Calculations 87 Using Calculator menus 87 Chapter 7: Using Card Info 89 Reviewing Card Information 89 Renaming a card 90 Formatting...
... files on a Windows computer 66 Palm Quick Install tips 69 Installing applications and files on a Mac computer 70 Removing applications 72 Removing Palm Desktop software 72 Chapter 5: Using Address Book 75 Creating an Address Book entry 76 Selecting types of phone numbers 77 Changing Address Entry details 78 Making connections from Address Book 78 Using Address Book menus 81 Chapter 6: Using Calculator 85 Performing calculations 86 Viewing Recent Calculations 87 Using Calculator menus 87 Chapter 7: Using Card Info 89 Reviewing Card Information 89 Renaming a card 90 Formatting...
Handbook
Page 9
... 205 Network Preferences 207 Setting Personal Preferences 220 Buttons Preferences 220 Color Theme Preferences 223 Owner Preferences 224 ShortCuts Preferences 225 Appendix A: Maintaining Your Handheld 227 Caring for your handheld 227 Prolonging battery life 228 Resetting your handheld 228 Performing a soft reset 229 Performing a hard reset 229 Appendix B: Frequently Asked Questions 233 Software installation problems 234 Operating problems 235 Tapping and writing problems 236 Application problems 237 HotSync problems 238 Beaming problems 245 Recharging problems 245 Password...
... 205 Network Preferences 207 Setting Personal Preferences 220 Buttons Preferences 220 Color Theme Preferences 223 Owner Preferences 224 ShortCuts Preferences 225 Appendix A: Maintaining Your Handheld 227 Caring for your handheld 227 Prolonging battery life 228 Resetting your handheld 228 Performing a soft reset 229 Performing a hard reset 229 Appendix B: Frequently Asked Questions 233 Software installation problems 234 Operating problems 235 Tapping and writing problems 236 Application problems 237 HotSync problems 238 Beaming problems 245 Recharging problems 245 Password...
Handbook
Page 13
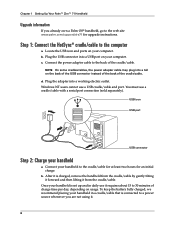
.... NOTE You may need to a mobile phone. To use the e-mail and SMS features, you 're on time by keeping your appointments, contact information, and to MP3 files (expansion card required; CHAPTER 1 Setting Up Your Palm™ Zire™ 71 Handheld Your new Palm™ Zire™ 71 handheld enables you must also be able to connect your handheld to download software from the Internet while installing some applications from the Software Essentials CD-ROM onto your...
.... NOTE You may need to a mobile phone. To use the e-mail and SMS features, you 're on time by keeping your appointments, contact information, and to MP3 files (expansion card required; CHAPTER 1 Setting Up Your Palm™ Zire™ 71 Handheld Your new Palm™ Zire™ 71 handheld enables you must also be able to connect your handheld to download software from the Internet while installing some applications from the Software Essentials CD-ROM onto your...
Handbook
Page 14
... to install Palm Desktop software) s Internet Explorer 4.01 with SP2 or later s 50 megabytes (MB) available hard disk space s VGA monitor or better s CD-ROM or DVD-ROM drive (you can also download Palm Desktop software from www.palm.com) s Mouse s One available USB port or serial port (serial cradle/cable sold separately, and administrator rights to install Palm Desktop software) - Chapter 1 Setting Up Your Palm™ Zire™ 71 Handheld System requirements To install and operate Palm™ Desktop software...
... to install Palm Desktop software) s Internet Explorer 4.01 with SP2 or later s 50 megabytes (MB) available hard disk space s VGA monitor or better s CD-ROM or DVD-ROM drive (you can also download Palm Desktop software from www.palm.com) s Mouse s One available USB port or serial port (serial cradle/cable sold separately, and administrator rights to install Palm Desktop software) - Chapter 1 Setting Up Your Palm™ Zire™ 71 Handheld System requirements To install and operate Palm™ Desktop software...
Handbook
Page 16
... USB connector into a USB port on your handheld is charged, remove the handheld from the cradle/cable. You must use a USB cradle/cable and port. Windows NT users cannot use a cradle/cable with a serial port connection (sold separately). Once your computer. b. d. b. NOTE On some cradles/cables, the power adapter cable may plug into a working electric outlet. After it is set up and in a cradle/cable that is connected to a power source whenever you already own a Palm OS® handheld, go to the web site www.palm.com/support...
... USB connector into a USB port on your handheld is charged, remove the handheld from the cradle/cable. You must use a USB cradle/cable and port. Windows NT users cannot use a cradle/cable with a serial port connection (sold separately). Once your computer. b. d. b. NOTE On some cradles/cables, the power adapter cable may plug into a working electric outlet. After it is set up and in a cradle/cable that is connected to a power source whenever you already own a Palm OS® handheld, go to the web site www.palm.com/support...

Handbook
Page 18
... Applications folder by default) to the Help menu in the cradle/cable and press the HotSync button. screen appears. After you also created your handheld business card and registered your handheld. For more information about using Palm Desktop software, see the following: s The online Help for the Macintosh User's Guide. Double-click the file Palm Desktop.pdf. 8 s Mac: The electronic Palm Desktop Software for Palm Desktop software. To access this electronic handbook. Mac: When the first HotSync operation is complete, the installer displays screens...
... Applications folder by default) to the Help menu in the cradle/cable and press the HotSync button. screen appears. After you also created your handheld business card and registered your handheld. For more information about using Palm Desktop software, see the following: s The online Help for the Macintosh User's Guide. Double-click the file Palm Desktop.pdf. 8 s Mac: The electronic Palm Desktop Software for Palm Desktop software. To access this electronic handbook. Mac: When the first HotSync operation is complete, the installer displays screens...

Handbook
Page 19
.... CHAPTER 2 Exploring Your Handheld Your Palm™ Zire™ 71 handheld can use your handheld to do the following : s Listen to MP3 audio files in the audio application (expansion card required, sold separately). 9 Use your new handheld to download software from the Internet while installing some applications from your desk. s Read eBooks in Address Book. NOTE You may need to do the following : s Enter your contact names, addresses, and phone numbers in Palm™ Reader.
.... CHAPTER 2 Exploring Your Handheld Your Palm™ Zire™ 71 handheld can use your handheld to do the following : s Listen to MP3 audio files in the audio application (expansion card required, sold separately). 9 Use your new handheld to download software from the Internet while installing some applications from your desk. s Read eBooks in Address Book. NOTE You may need to do the following : s Enter your contact names, addresses, and phone numbers in Palm™ Reader.

Handbook
Page 76
... folder onto the Palm Quick Install icon on a Windows computer Palm Quick Install makes it to install applications and files using each of third-party add-on the Windows desktop. You can even install compatible files directly from a Zip file. Copy or download the application(s) or file(s) you suspect that follow explain how to Palm Quick Install. NOTE Palm works with developers of these applications, go to download software from the Internet while installing some applications from the Software Essentials CD-ROM...
... folder onto the Palm Quick Install icon on a Windows computer Palm Quick Install makes it to install applications and files using each of third-party add-on the Windows desktop. You can even install compatible files directly from a Zip file. Copy or download the application(s) or file(s) you suspect that follow explain how to Palm Quick Install. NOTE Palm works with developers of these applications, go to download software from the Internet while installing some applications from the Software Essentials CD-ROM...

Handbook
Page 80
... handheld using a Mac computer: 1. s You can specify whether to install the files on your Mac computer, copy or download the application you want to a different file list. From the HotSync menu, select Install Handheld Files. 4. From the User pop-up menu, select the name that corresponds to install applications and files during a HotSync operation. Chapter 4 Working with Applications s To install files in a different location, start Palm Quick Install and drag the files to install into the Add-on folder...
... handheld using a Mac computer: 1. s You can specify whether to install the files on your Mac computer, copy or download the application you want to a different file list. From the HotSync menu, select Install Handheld Files. 4. From the User pop-up menu, select the name that corresponds to install applications and files during a HotSync operation. Chapter 4 Working with Applications s To install files in a different location, start Palm Quick Install and drag the files to install into the Add-on folder...

Handbook
Page 173
... include using infrared communications. Click the HotSync icon in the cradle/cable attached to start the Palm Desktop software, which automatically opens the HotSync Manager. 2. Select Setup. 163 To synchronize data, you to synchronize data between one or more Palm OS® handhelds and Palm™ Desktop software or another personal information manager (PIM) such as well. CHAPTER 15 Performing HotSync® Operations HotSync® technology enables you must connect your handheld and...
... include using infrared communications. Click the HotSync icon in the cradle/cable attached to start the Palm Desktop software, which automatically opens the HotSync Manager. 2. Select Setup. 163 To synchronize data, you to synchronize data between one or more Palm OS® handhelds and Palm™ Desktop software or another personal information manager (PIM) such as well. CHAPTER 15 Performing HotSync® Operations HotSync® technology enables you must connect your handheld and...

Handbook
Page 175
... OK. Enable HotSync software at system startup Activates the transport monitor automatically each time you connect the cradle/cable to display the network settings and adjust the options as needed. If you use an optional serial HotSync cradle/cable and you use the same serial port for other devices besides the HotSync cradle/cable, disable the transport monitor and then enable it manually only when you start your handheld. Double-click the HotSync Manager icon...
... OK. Enable HotSync software at system startup Activates the transport monitor automatically each time you connect the cradle/cable to display the network settings and adjust the options as needed. If you use an optional serial HotSync cradle/cable and you use the same serial port for other devices besides the HotSync cradle/cable, disable the transport monitor and then enable it manually only when you start your handheld. Double-click the HotSync Manager icon...

Handbook
Page 184
... you can continue using the cradle/cable while HotSync Manager is configured for infrared communication. Consult the documentation included with the port defined for instructions on finding the simulated port. To configure HotSync Manager for information on installing the required driver. If you reconfigure the HotSync Manager to learn if the computer supports infrared communication. Click the Local tab. e. From the HotSync Manager menu, select Setup. d. See the...
... you can continue using the cradle/cable while HotSync Manager is configured for infrared communication. Consult the documentation included with the port defined for instructions on finding the simulated port. To configure HotSync Manager for information on installing the required driver. If you reconfigure the HotSync Manager to learn if the computer supports infrared communication. Click the Local tab. e. From the HotSync Manager menu, select Setup. d. See the...

Handbook
Page 199
... Graffiti 2 characters. Set these features: auto-shutoff interval, Stay on your handheld. The options are grouped into three categories: General, Communication, and Personal. Each category provides access to a group of the following settings: Date & Time Digitizer Formats Graffiti 2 Power Security Sounds & Alerts Writing Area Set the location, date, and time. Set a password, privacy options, and locking options. Calibrate the screen on your handheld for use with a network. 189
... Graffiti 2 characters. Set these features: auto-shutoff interval, Stay on your handheld. The options are grouped into three categories: General, Communication, and Personal. Each category provides access to a group of the following settings: Date & Time Digitizer Formats Graffiti 2 Power Security Sounds & Alerts Writing Area Set the location, date, and time. Set a password, privacy options, and locking options. Calibrate the screen on your handheld for use with a network. 189
Handbook
Page 217
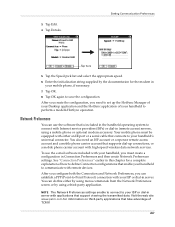
... connections, or a mobile phone carrier account with high-speed wireless data network services. See "Connection Preferences" earlier in this either an IR port or a serial cable that is included in the handheld operating system to -Point Protocol) connection with Internet service providers (ISPs) or dial-in your handheld to perform a modem HotSync operation. Tap OK. 8. To use the software that connects to save the configuration. NOTE The Network Preferences settings enable to connect to communicate with applications that support viewing...
... connections, or a mobile phone carrier account with high-speed wireless data network services. See "Connection Preferences" earlier in this either an IR port or a serial cable that is included in the handheld operating system to -Point Protocol) connection with Internet service providers (ISPs) or dial-in your handheld to perform a modem HotSync operation. Tap OK. 8. To use the software that connects to save the configuration. NOTE The Network Preferences settings enable to connect to communicate with applications that support viewing...
Handbook
Page 223
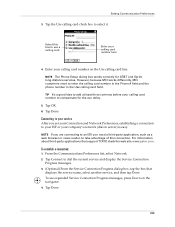
... calling card number here 4. For information about third-party applications that displays the service name, select another service, and then tap Done. NOTE The Phone Setup dialog box works correctly for the cue delay. 5. Tap Done. 213 To establish a connection: 1. Connecting to your service After you need to select it. Select this connection. To see expanded Service Connection Progress messages, press Down on the Use calling card line. Tap the Use calling card...
... calling card number here 4. For information about third-party applications that displays the service name, select another service, and then tap Done. NOTE The Phone Setup dialog box works correctly for the cue delay. 5. Tap Done. 213 To establish a connection: 1. Connecting to your service After you need to select it. Select this connection. To see expanded Service Connection Progress messages, press Down on the Use calling card line. Tap the Use calling card...
Handbook
Page 234
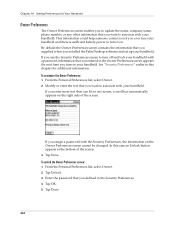
... an Unlock button appears at the bottom of the screen. Tap Done. Enter the password that you turn it on your handheld. By default the Owner Preferences screen contains the information that you want to turn off and lock your handheld with your handheld. If you installed the Palm Desktop software and set up your handheld. In this chapter for Your Handheld Owner Preferences The Owner Preferences screen enables you to update the name, company name, phone number...
... an Unlock button appears at the bottom of the screen. Tap Done. Enter the password that you turn it on your handheld. By default the Owner Preferences screen contains the information that you want to turn off and lock your handheld with your handheld. If you installed the Palm Desktop software and set up your handheld. In this chapter for Your Handheld Owner Preferences The Owner Preferences screen enables you to update the name, company name, phone number...
Handbook
Page 243
... reviewed the following: s The readme file located in the folder where you installed the Palm™ Desktop software on your Windows computer or on your installation CD for Mac users s The Palm Desktop online Help s The Palm Desktop Software for the Macintosh User's Guide, located in the Documentation folder on your installation CD s The Palm Knowledge Library, accessible at www.palm.com in the Support section s The most recent Palm™ Zire™ 71 handheld HelpNotes on applications...
... reviewed the following: s The readme file located in the folder where you installed the Palm™ Desktop software on your Windows computer or on your installation CD for Mac users s The Palm Desktop online Help s The Palm Desktop Software for the Macintosh User's Guide, located in the Documentation folder on your installation CD s The Palm Knowledge Library, accessible at www.palm.com in the Support section s The most recent Palm™ Zire™ 71 handheld HelpNotes on applications...

Handbook
Page 248
... for instructions on setting the current location, date, and time. It should also see "Selecting HotSync setup options" in Chapter 16 for more information. Start the e-mail client software and make sure I cannot perform a HotSync operation. Consult the documentation for your desktop e-mail application for information on selecting the correct HotSync Manager settings. 2. HotSync problems Problem Solution I 'm doing it is connected securely. s Make sure the HotSync cradle/cable is configured as...
... for instructions on setting the current location, date, and time. It should also see "Selecting HotSync setup options" in Chapter 16 for more information. Start the e-mail client software and make sure I cannot perform a HotSync operation. Consult the documentation for your desktop e-mail application for information on selecting the correct HotSync Manager settings. 2. HotSync problems Problem Solution I 'm doing it is connected securely. s Make sure the HotSync cradle/cable is configured as...

Handbook
Page 265
... synchronizing applications, Mac 168 customizing 167, 168 first-time operation 169-173, 186-188 IR operation 173-176 linking to external files 36, 185 local operation 163, 164, 169, 240, 241 local operation on Mac 172 modem operation 164, 177-181, 241-243 modem settings 178 network operation 182-185 operations using cradle 176, 206 operations using IR port 173-175, 206-207 problems with 238-244 problems with IR 243 restoring data...
... synchronizing applications, Mac 168 customizing 167, 168 first-time operation 169-173, 186-188 IR operation 173-176 linking to external files 36, 185 local operation 163, 164, 169, 240, 241 local operation on Mac 172 modem operation 164, 177-181, 241-243 modem settings 178 network operation 182-185 operations using cradle 176, 206 operations using IR port 173-175, 206-207 problems with 238-244 problems with IR 243 restoring data...


