
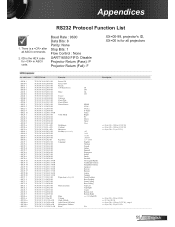
Protocol Functions
Page 1
Baud Rate : 9600 Data Bits: 8 Parity: None Stop Bits: 1 Flow Control : None UART16550 FIFO: Disable Projector Return (Pass): P Projector Return (Fail): F XX=00-99, projector's ID, XX=00 is for all ASCII commands. 2. 0D is a after all projectors SEND to projector 232 ASCII Code 307UST Code Function Description ~XX00 1 7E 30 30 30 30 20 31...
Baud Rate : 9600 Data Bits: 8 Parity: None Stop Bits: 1 Flow Control : None UART16550 FIFO: Disable Projector Return (Pass): P Projector Return (Fail): F XX=00-99, projector's ID, XX=00 is for all ASCII commands. 2. 0D is a after all projectors SEND to projector 232 ASCII Code 307UST Code Function Description ~XX00 1 7E 30 30 30 30 20 31...
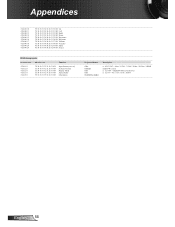
Protocol Functions
Page 2
... 30 30 31 34 30 20 32 30 0D Menu ~XX140 29 7E 30 30 31 34 30 20 32 39 0D Source READ from projector 232 ASCII Code HX3070U Code Function Projector Return Description ~XX121 1 7E 30 30 31 32 31 20 31 0D Input Source(curr.
... 30 30 31 34 30 20 32 30 0D Menu ~XX140 29 7E 30 30 31 34 30 20 32 39 0D Source READ from projector 232 ASCII Code HX3070U Code Function Projector Return Description ~XX121 1 7E 30 30 31 32 31 20 31 0D Input Source(curr.
User's Manual
Page 1
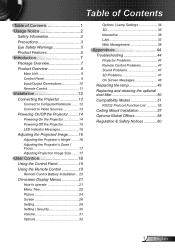
...Connecting the Projector 12 Connect to Computer/Notebook......... 12 Connect to Video Sources 13 Powering On/Off the Projector..........14 Powering On the Projector 14 Powering off the projector 15 ...LED Indicator Messages 15 Adjusting the Projected Image..........16 Adjusting the Projector's Height ........ 16 Adjusting the Projector's ...3D 35 Interactive 36 LAN 37 Web Management 38 Appendices 44 Troubleshooting 44 Projector Problems 47 Remote Control Problems 47 Sound Problems 47 3D Problems 47 ...
...Connecting the Projector 12 Connect to Computer/Notebook......... 12 Connect to Video Sources 13 Powering On/Off the Projector..........14 Powering On the Projector 14 Powering off the projector 15 ...LED Indicator Messages 15 Adjusting the Projected Image..........16 Adjusting the Projector's Height ........ 16 Adjusting the Projector's ...3D 35 Interactive 36 LAN 37 Web Management 38 Appendices 44 Troubleshooting 44 Projector Problems 47 Remote Control Problems 47 Sound Problems 47 3D Problems 47 ...
User's Manual
Page 2
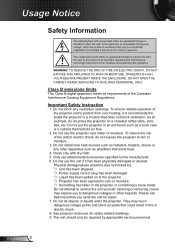
... THE CABINET. Important Safety Instruction 1. To ensure reliable operation of fire and/or electric shock, do not place the projector on to the projector. Projector has been exposed to rain or moisture. Something has fallen in the literature accompanying the appliance. To reduce .... Physical damage/abuse would be repaired by the manufacturer. 6. Please call Optoma before you to the presence of the Canadian Interference-Causing Equipment Regulations. Do not let objects or liquids enter the projector. The unit should only be (but not limited to service the unit ...
... THE CABINET. Important Safety Instruction 1. To ensure reliable operation of fire and/or electric shock, do not place the projector on to the projector. Projector has been exposed to rain or moisture. Something has fallen in the literature accompanying the appliance. To reduce .... Physical damage/abuse would be repaired by the manufacturer. 6. Please call Optoma before you to the presence of the Canadian Interference-Causing Equipment Regulations. Do not let objects or liquids enter the projector. The unit should only be (but not limited to service the unit ...
User's Manual
Page 3
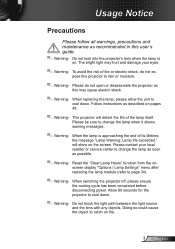
...9600;■ Warning- Follow instructions as recommended in this user's guide. ▀■ Warning- Allow 90 seconds for the projector to change the lamp as soon as this projector to rain or moisture. ▀■ Warning- Please do not expose this may hurt and damage your local reseller or ...between the light source and the lens with any objects. To avoid the risk of fire or electric shock, do not open or disassemble the projector as possible. ▀■ Warning- When the lamp is on. will detect the life of its lifetime, the message "Lamp Warning: Lamp ...
...9600;■ Warning- Follow instructions as recommended in this user's guide. ▀■ Warning- Allow 90 seconds for the projector to change the lamp as soon as this projector to rain or moisture. ▀■ Warning- Please do not expose this may hurt and damage your local reseller or ...between the light source and the lens with any objects. To avoid the risk of fire or electric shock, do not open or disassemble the projector as possible. ▀■ Warning- When the lamp is on. will detect the life of its lifetime, the message "Lamp Warning: Lamp ...
User's Manual
Page 5
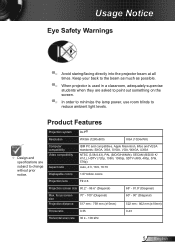
... billion colors F# 2.6 Projection screen size 80.2" - 96.6" (Diagonal) 68" - 81.9" (Diagonal) Max. Keep your back to the beam as much as possible. ▀■ When projector is used in a classroom, adequately supervise students when they are subject to reduce ambient light levels. Usage Notice Eye Safety Warnings ▀■ Avoid staring...
... billion colors F# 2.6 Projection screen size 80.2" - 96.6" (Diagonal) 68" - 81.9" (Diagonal) Max. Keep your back to the beam as much as possible. ▀■ When projector is used in a classroom, adequately supervise students when they are subject to reduce ambient light levels. Usage Notice Eye Safety Warnings ▀■ Avoid staring...

User's Manual
Page 7
Introduction Package Overview Unpack and inspect the box contents to different applications in the box. If something is missing, please contact our customer service. Projector Remote Control CR2025 3V Battery ™™Due to ensure all parts listed below are in each Country, some regions may have different accessories. AC Power Cord VGA Cable 7 English
Introduction Package Overview Unpack and inspect the box contents to different applications in the box. If something is missing, please contact our customer service. Projector Remote Control CR2025 3V Battery ™™Due to ensure all parts listed below are in each Country, some regions may have different accessories. AC Power Cord VGA Cable 7 English
User's Manual
Page 12
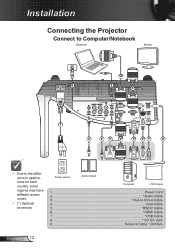
Installation Connecting the Projector Connect to Computer/Notebook Notebook Monitor 4 9 2 4 LAN 1 2 2 3 4 5 67 8 ™™Due to the difference in applications for each country, some regions may have different accessories. ™™(*) Optional accessory Power socket Audio Output Computer +12V Output 1...Power Cord 2 Audio Cable 3 VGA to DVI-A Cable 4...VGA Cable 5 RS232 Cable 6 HDMI Cable 7...*USB Cable 8 12V DC Jack 9 Network Cable * (WXGA) English 12
Installation Connecting the Projector Connect to Computer/Notebook Notebook Monitor 4 9 2 4 LAN 1 2 2 3 4 5 67 8 ™™Due to the difference in applications for each country, some regions may have different accessories. ™™(*) Optional accessory Power socket Audio Output Computer +12V Output 1...Power Cord 2 Audio Cable 3 VGA to DVI-A Cable 4...VGA Cable 5 RS232 Cable 6 HDMI Cable 7...*USB Cable 8 12V DC Jack 9 Network Cable * (WXGA) English 12
User's Manual
Page 14
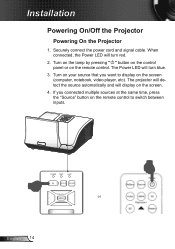
... detect the source automatically and will turn red. 2. POWER TEMP LAMP RESYNC SOURCE or MENU English 14 Installation Powering On/Off the Projector Powering On the Projector 1. Securely connect the power cord and signal cable. Turn on the lamp by pressing " " button on the control panel or on the screen. 4. Turn on...
... detect the source automatically and will turn red. 2. POWER TEMP LAMP RESYNC SOURCE or MENU English 14 Installation Powering On/Off the Projector Powering On the Projector 1. Securely connect the power cord and signal cable. Turn on the lamp by pressing " " button on the control panel or on the screen. 4. Turn on...
User's Manual
Page 15
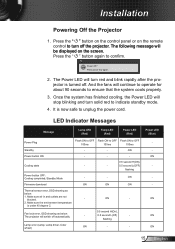
...) ON - - Power Off? Standby Mode - - Once the system has finished cooling, the Power LED will turn red and blink rapidly after the projector is turned off the projector. ON Power button ON Cooling state - - - 0.5 second H(ON), - - 0.5 second L(OFF) flashing Power button OFF: Cooling completed; ON ... The Power LED will stop blinking and turn off . Power LED (Blue) ON - Fan lock error, OSD showing as below : The projector will continue to operate for about 90 seconds to ensure that the system cools properly. 3. ON ON ON 15 English Press the " " button...
...) ON - - Power Off? Standby Mode - - Once the system has finished cooling, the Power LED will turn red and blink rapidly after the projector is turned off the projector. ON Power button ON Cooling state - - - 0.5 second H(ON), - - 0.5 second L(OFF) flashing Power button OFF: Cooling completed; ON ... The Power LED will stop blinking and turn off . Power LED (Blue) ON - Fan lock error, OSD showing as below : The projector will continue to operate for about 90 seconds to ensure that the system cools properly. 3. ON ON ON 15 English Press the " " button...
User's Manual
Page 16
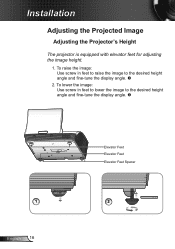
Installation Adjusting the Projected Image Adjusting the Projector's Height The projector is equipped with elevator feet for adjusting the image height. 1. To lower the image: Use screw in feet to raise the image to the desired height angle and fine-tune the display angle. 1 English 16 Elevator Feet Elevator Feet Elevator Feet Spacer 2 To raise the image: Use screw in feet to lower the image to the desired height angle and fine-tune the display angle. 2.
Installation Adjusting the Projected Image Adjusting the Projector's Height The projector is equipped with elevator feet for adjusting the image height. 1. To lower the image: Use screw in feet to raise the image to the desired height angle and fine-tune the display angle. 1 English 16 Elevator Feet Elevator Feet Elevator Feet Spacer 2 To raise the image: Use screw in feet to lower the image to the desired height angle and fine-tune the display angle. 2.

User's Manual
Page 17
... Ring Adjusting Projection Image Size Refer to the graphics and table show as below to determine the screen size and projection distance. Installation Adjusting the Projector's Zoom / Focus To focus the image, rotate the focus ring until the image is for user's reference only.
... Ring Adjusting Projection Image Size Refer to the graphics and table show as below to determine the screen size and projection distance. Installation Adjusting the Projector's Zoom / Focus To focus the image, rotate the focus ring until the image is for user's reference only.
User's Manual
Page 18
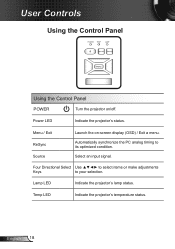
English 18 Menu / Exit ReSync Source Launch the on /off. Lamp LED Indicate the projector's lamp status. Power LED Indicate the projector's status. Select an input signal. Temp LED Indicate the projector's temperature status. User Controls Using the Control Panel POWER TEMP LAMP RESYNC SOURCE MENU Using the Control Panel POWER Turn the projector on -screen display (OSD) / Exit a menu. Automatically synchronize the PC analog timing to your selection. Four Directional Select Use to select items or make adjustments Keys to its optimized condition.
English 18 Menu / Exit ReSync Source Launch the on /off. Lamp LED Indicate the projector's lamp status. Power LED Indicate the projector's status. Select an input signal. Temp LED Indicate the projector's temperature status. User Controls Using the Control Panel POWER TEMP LAMP RESYNC SOURCE MENU Using the Control Panel POWER Turn the projector on -screen display (OSD) / Exit a menu. Automatically synchronize the PC analog timing to your selection. Four Directional Select Use to select items or make adjustments Keys to its optimized condition.
User's Manual
Page 19
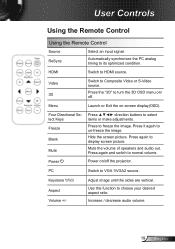
... picture. Adjust image until the sides are vertical. Press again to freeze the image. HDMI Switch to turn the 3D OSD menu on/ off the projector. Press the "3D" to HDMI source. PC Switch to un-freeze the image. Press it again to VGA 1/VGA2 source. Mute the volume of speakers...
... picture. Adjust image until the sides are vertical. Press again to freeze the image. HDMI Switch to turn the 3D OSD menu on/ off the projector. Press the "3D" to HDMI source. PC Switch to un-freeze the image. Press it again to VGA 1/VGA2 source. Mute the volume of speakers...
User's Manual
Page 21
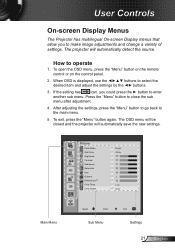
...automatically detect the source. After adjusting the settings, press the "Menu" button to go back to close the sub menu after adjustment. 4. The projector will automatically save the new settings. Press the "Menu" button to the main menu. 5. How to select the desired item and adjust the... To exit, press the "Menu" button again. When OSD is displayed, use the buttons to operate 1. User Controls On-screen Display Menus The Projector has multilingual On-screen Display menus that allow you could press the ► button to make image adjustments and change a variety of settings. If...
...automatically detect the source. After adjusting the settings, press the "Menu" button to go back to close the sub menu after adjustment. 4. The projector will automatically save the new settings. Press the "Menu" button to the main menu. 5. How to select the desired item and adjust the... To exit, press the "Menu" button again. When OSD is displayed, use the buttons to operate 1. User Controls On-screen Display Menus The Projector has multilingual On-screen Display menus that allow you could press the ► button to make image adjustments and change a variety of settings. If...
User's Manual
Page 29
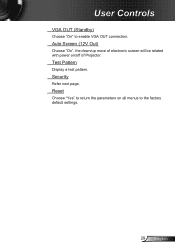
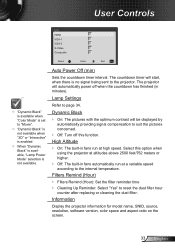
Reset Choose "Yes" to return the parameters on /off of Projector. Security Refer next page. Test Pattern Display a test pattern. User Controls VGA OUT (Standby) Choose "On" to the factory default settings. 29 English Auto Screen (12V Out) Choose "On", the down/up move of electronic screen will be related with power on all menus to enable VGA OUT connection.
Reset Choose "Yes" to return the parameters on /off of Projector. Security Refer next page. Test Pattern Display a test pattern. User Controls VGA OUT (Standby) Choose "On" to the factory default settings. 29 English Auto Screen (12V Out) Choose "On", the down/up move of electronic screen will be related with power on all menus to enable VGA OUT connection.
User's Manual
Page 30
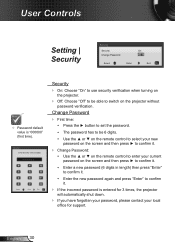
...User Controls Setting | Security Securtiy Security On Change Password Select Enter Exit ™™Password default value is entered for 3 times, the projector will automatically shut down. `` If you have forgotten your password, please contact your local office for support. Securtiy Enter Security Code (6 digits... Incorrect security code Re-enter again Select Enter Exit Security `` On: Choose "On" to use security verification when turning on the projector. `` Off: Choose "Off" to be 6 digits. yy Use the ▲ or ▼ on the remote control to select your current...
...User Controls Setting | Security Securtiy Security On Change Password Select Enter Exit ™™Password default value is entered for 3 times, the projector will automatically shut down. `` If you have forgotten your password, please contact your local office for support. Securtiy Enter Security Code (6 digits... Incorrect security code Re-enter again Select Enter Exit Security `` On: Choose "On" to use security verification when turning on the projector. `` Off: Choose "Off" to be 6 digits. yy Use the ▲ or ▼ on the remote control to select your current...
User's Manual
Page 32
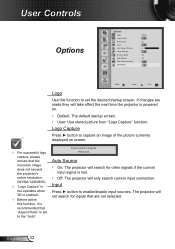
... capture an image of the picture currently displayed on . `` Default: The default startup screen. `` User: Use stored picture from "Logo Capture" function. The projector will only search current input connection. User Controls Options Options Logo Logo Capture Auto Source Input Auto Power Off (min) Lamp Settings Dynamic Black High...On Off Select Enter Exit Logo Use this function, it is recommended that are made they will take effect the next time the projector is powered on screen. ™™For successful logo capture, please ensure that the onscreen image does not exceed the...
... capture an image of the picture currently displayed on . `` Default: The default startup screen. `` User: Use stored picture from "Logo Capture" function. The projector will only search current input connection. User Controls Options Options Logo Logo Capture Auto Source Input Auto Power Off (min) Lamp Settings Dynamic Black High...On Off Select Enter Exit Logo Use this function, it is recommended that are made they will take effect the next time the projector is powered on screen. ™™For successful logo capture, please ensure that the onscreen image does not exceed the...
User's Manual
Page 33
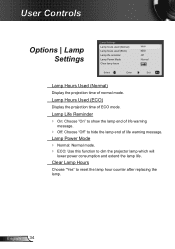
... above 2500 feet/762 meters or higher. `` Off: The built-in fans automatically run at a variable speed according to the projector. Information Display the projector information for model name, SNID, source, resolution, software version, color space and aspect ratio on the screen. 33 English Lamp ...Settings Refer to suit the pictures concerned. `` Off: Turn off when the countdown has finished (in fans run at high speed. The projector will start, when there is no signal being sent to the internal temperature. Dynamic Black `` On: The pictures with the optimum contrast will...
... above 2500 feet/762 meters or higher. `` Off: The built-in fans automatically run at a variable speed according to the projector. Information Display the projector information for model name, SNID, source, resolution, software version, color space and aspect ratio on the screen. 33 English Lamp ...Settings Refer to suit the pictures concerned. `` Off: Turn off when the countdown has finished (in fans run at high speed. The projector will start, when there is no signal being sent to the internal temperature. Dynamic Black `` On: The pictures with the optimum contrast will...
User's Manual
Page 34
... `` On: Choose "On" to show the lamp end of life warning message. Lamp Power Mode `` Normal: Normal mode. `` ECO: Use this function to dim the projector lamp which will lower power consumption and extend the lamp life. Lamp Hours Used (ECO) Display the projection time of normal mode. English 34
... `` On: Choose "On" to show the lamp end of life warning message. Lamp Power Mode `` Normal: Normal mode. `` ECO: Use this function to dim the projector lamp which will lower power consumption and extend the lamp life. Lamp Hours Used (ECO) Display the projection time of normal mode. English 34


