
User's Manual
Page 1
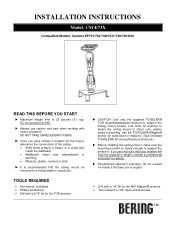
... to fasten the ceiling mount to support the ceiling mount screws. X Recommend maximum extension; X Once you are not sure that your location will hold the projector's weight, contact a professional contractor for solid wood or masonry. (See enclosed TOGGLER® Anchoring Solutions brochure.) X Before installing the ceiling mount, make sure the mounting location is recommended that the ceiling mount be mounted to support the projector. INSTALLATION INSTRUCTIONS Model: CM-E73X Compatible Models: Optoma EP731/732...
... to fasten the ceiling mount to support the ceiling mount screws. X Recommend maximum extension; X Once you are not sure that your location will hold the projector's weight, contact a professional contractor for solid wood or masonry. (See enclosed TOGGLER® Anchoring Solutions brochure.) X Before installing the ceiling mount, make sure the mounting location is recommended that the ceiling mount be mounted to support the projector. INSTALLATION INSTRUCTIONS Model: CM-E73X Compatible Models: Optoma EP731/732...
User's Manual
Page 2
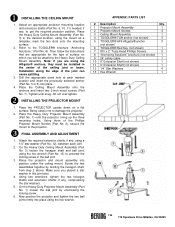
... together by unscrewing the locking screw. 6. Refer to get the required projector position. Y INSTALLING THE PROJECTOR MOUNT 1. On the Heavy Duty Projector Mount Assembly (Part No. 1) loosen the ball joint by twisting the hexagon shaft, from step 2 above. X INSTALLING THE CEILING MOUNT 1. Then follow the instructions that are using the mount as a template; Note: if you will be installed in the desired location, using the Alligator® anchors...
... together by unscrewing the locking screw. 6. Refer to get the required projector position. Y INSTALLING THE PROJECTOR MOUNT 1. On the Heavy Duty Projector Mount Assembly (Part No. 1) loosen the ball joint by twisting the hexagon shaft, from step 2 above. X INSTALLING THE CEILING MOUNT 1. Then follow the instructions that are using the mount as a template; Note: if you will be installed in the desired location, using the Alligator® anchors...
User's Manual
Page 1
... Off the projector 14 Warning Indicator 14 Adjusting the Projected Image 15 Adjusting the Projector's Height 15 Adjusting the Projector's Zoom / Focus 16 Adjusting Projected Image Size 16 User Controls 17 Control Panel & Remote Control 17 On-screen Display Menus 20 How to operate ...20 Menu Tree...21 Image...22 Display...28 Setup...31 Options...34 Appendices 37 Troubleshooting 37 Image Problems 37 Intermission Problems 40 Projector Status Indication 40 Remote Control Problems 42 Replacing the Lamp 43 Compatibility Modes 45 Ceiling Mount Installation 47 Optoma Global Offices...
... Off the projector 14 Warning Indicator 14 Adjusting the Projected Image 15 Adjusting the Projector's Height 15 Adjusting the Projector's Zoom / Focus 16 Adjusting Projected Image Size 16 User Controls 17 Control Panel & Remote Control 17 On-screen Display Menus 20 How to operate ...20 Menu Tree...21 Image...22 Display...28 Setup...31 Options...34 Appendices 37 Troubleshooting 37 Image Problems 37 Intermission Problems 40 Projector Status Indication 40 Remote Control Problems 42 Replacing the Lamp 43 Compatibility Modes 45 Ceiling Mount Installation 47 Optoma Global Offices...
User's Manual
Page 2
... import operating and maintenance (servicing) instructions in accordance with the manufacturer's instructions : A. DO NOT OPEN THE CABINET. Important Safety Instruction 1. Do not install near any heat sources, such as radiators, heaters, stoves or other hazards. Opening or removing covers may expose you . 8. The projector should not be adjusted or repaired by the manufacturer. 7. Do not use attachments/accessories specified by anyone except properly qualified service personnel. WARNING...
... import operating and maintenance (servicing) instructions in accordance with the manufacturer's instructions : A. DO NOT OPEN THE CABINET. Important Safety Instruction 1. Do not install near any heat sources, such as radiators, heaters, stoves or other hazards. Opening or removing covers may expose you . 8. The projector should not be adjusted or repaired by the manufacturer. 7. Do not use attachments/accessories specified by anyone except properly qualified service personnel. WARNING...
User's Manual
Page 3
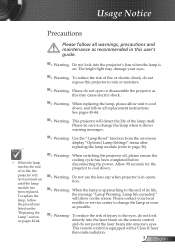
..., do not open or disassemble the projector as this user's guide. ▀■ Warning- This projector will not turn back on -screen display "Options|Lamp Settings" menu after replacing the lamp module (refer to cool down , and follow all warnings, precautions and maintenance as recommended in operation. ▀■ Warning- Use the "Lamp Reset" function from the on until the lamp module has been replaced. Allow 90 seconds for the projector to page...
..., do not open or disassemble the projector as this user's guide. ▀■ Warning- This projector will not turn back on -screen display "Options|Lamp Settings" menu after replacing the lamp module (refer to cool down , and follow all warnings, precautions and maintenance as recommended in operation. ▀■ Warning- Use the "Lamp Reset" function from the on until the lamp module has been replaced. Allow 90 seconds for the projector to page...

User's Manual
Page 5
... used in a classroom, adequately supervise students when they do not also have to stare at all times. ▀■ Minimize standing facing into the projector's beam of sight from the screen to enter the beam. ▀■ Ensure that , when presenters look at the audience, they are located out of the line of light at the projector lamp...
... used in a classroom, adequately supervise students when they do not also have to stare at all times. ▀■ Minimize standing facing into the projector's beam of sight from the screen to enter the beam. ▀■ Ensure that , when presenters look at the audience, they are located out of the line of light at the projector lamp...

User's Manual
Page 6
...+, SXGA, XGA, SVGA, VGA Video Compatibility: ■ NTSC M/J, NTSC4.43 ■ PAL B/D/I/G/H, PAL M, PAL N ■ SECAM B/D/G/K/L ■ SDTV compatible (480i/p, 576i/p) ■ HDTV compatible (720p, 1080i, 1080p) Auto source detection with user definable settings Full function IR remote control with back light. User friendly multilingual On Screen Menu Advanced digital keystone correction and high quality full screen image re-scaling User friendly control panel ...
...+, SXGA, XGA, SVGA, VGA Video Compatibility: ■ NTSC M/J, NTSC4.43 ■ PAL B/D/I/G/H, PAL M, PAL N ■ SECAM B/D/G/K/L ■ SDTV compatible (480i/p, 576i/p) ■ HDTV compatible (720p, 1080i, 1080p) Auto source detection with user definable settings Full function IR remote control with back light. User friendly multilingual On Screen Menu Advanced digital keystone correction and high quality full screen image re-scaling User friendly control panel ...
User's Manual
Page 13
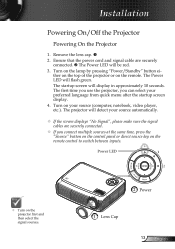
... remote control to switch between inputs. Remove the lens cap. 2. ther on the top of the projector or on the projector first and then select the signal sources. 2 Power 1 Lens Cap 13 English The Power LED will display in approximately 10 seconds. The startup screen will flash green. Power LED Turn on the remote. Turn on the lamp by pressing "Power/Standby" button ei- The projector will be red. 3. Installation Powering On/Off the Projector Powering On the Projector 1. Ensure that the power cord...
... remote control to switch between inputs. Remove the lens cap. 2. ther on the top of the projector or on the projector first and then select the signal sources. 2 Power 1 Lens Cap 13 English The Power LED will display in approximately 10 seconds. The startup screen will flash green. Power LED Turn on the remote. Turn on the lamp by pressing "Power/Standby" button ei- The projector will be red. 3. Installation Powering On/Off the Projector Powering On the Projector 1. Ensure that the power cord...

User's Manual
Page 14
... switched on , you will show the timing countdown on the projector's screen. See pages 48-49. The projector will disappear after it indicates problem with the lamp. See pages 48-49. When the "TEMP" indicator lights red, it indicates the fan has failed. If the problem persists, you press "Power" button second, the system will see a message displayed on the screen. 3. Press the "Power" button to confirm, otherwise the message will automatically shut...
... switched on , you will show the timing countdown on the projector's screen. See pages 48-49. The projector will disappear after it indicates problem with the lamp. See pages 48-49. When the "TEMP" indicator lights red, it indicates the fan has failed. If the problem persists, you press "Power" button second, the system will see a message displayed on the screen. 3. Press the "Power" button to confirm, otherwise the message will automatically shut...
User's Manual
Page 18
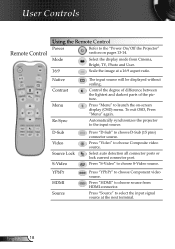
... auto detection all connector ports or lock current connector port. D-Sub Video Source Lock S-Video Press "D-Sub" to choose Composite video source. Native Contrast Menu Re-Sync The input source will be displayed without scaling. Press "HDMI" to choose source from Cinema, Bright, TV, Photo and User. 16:9 Scale the image at the next terminal. To exit OSD, Press "Menu" again. User Controls Remote Control Using the Remote Control Power Refer to the "Power On/Off the Projector" section on -screen display...
... auto detection all connector ports or lock current connector port. D-Sub Video Source Lock S-Video Press "D-Sub" to choose Composite video source. Native Contrast Menu Re-Sync The input source will be displayed without scaling. Press "HDMI" to choose source from Cinema, Bright, TV, Photo and User. 16:9 Scale the image at the next terminal. To exit OSD, Press "Menu" again. User Controls Remote Control Using the Remote Control Power Refer to the "Power On/Off the Projector" section on -screen display...

User's Manual
Page 29
User Controls Display Detail informations about LBX mode : 1. For this kind of an image. Press the to magnify an image on the edge of video source. H Image Shift Shift the projected image position horizontally. 29 English Overscan Overscan function removes the noise in 16:9 display.One can use an external 16x9 lens, this case, there are not enhanced for most viewing experiences. But if the content...
User Controls Display Detail informations about LBX mode : 1. For this kind of an image. Press the to magnify an image on the edge of video source. H Image Shift Shift the projected image position horizontally. 29 English Overscan Overscan function removes the noise in 16:9 display.One can use an external 16x9 lens, this case, there are not enhanced for most viewing experiences. But if the content...
User's Manual
Page 34
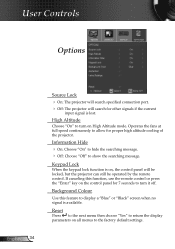
..." to the factory default settings. Keypad Lock When the keypad lock function is on the control panel for 7 seconds to turn it off. User Controls Options English 34 Source Lock On: The projector will search specified connection port. Off: The projector will be locked, but the projector can still be operated by the remote control. Reset Press to the next menu then choose "Yes" to return the display parameters on High Altitude mode. If...
..." to the factory default settings. Keypad Lock When the keypad lock function is on the control panel for 7 seconds to turn it off. User Controls Options English 34 Source Lock On: The projector will search specified connection port. Off: The projector will be locked, but the projector can still be operated by the remote control. Reset Press to the next menu then choose "Yes" to return the display parameters on High Altitude mode. If...

User's Manual
Page 36
Lamp Reset Reset the lamp life hour after replacing the lamp. Lamp Reminder Choose this function to show or to dim the projector lamp which will appear 30 hours before suggested replacement of lamp. The message will lower power consumption and extend the lamp life by up to 130%. BRIGHT: Choose "BRIGHT" to increase the brightness. User Controls Options | Lamp Settings Lamp Hours Display the projection time. English 36 Brightness Mode STD: Choose "STD" to hide the warning message when the changing lamp message is displayed.
Lamp Reset Reset the lamp life hour after replacing the lamp. Lamp Reminder Choose this function to show or to dim the projector lamp which will appear 30 hours before suggested replacement of lamp. The message will lower power consumption and extend the lamp life by up to 130%. BRIGHT: Choose "BRIGHT" to increase the brightness. User Controls Options | Lamp Settings Lamp Hours Display the projection time. English 36 Brightness Mode STD: Choose "STD" to hide the warning message when the changing lamp message is displayed.
User's Manual
Page 37
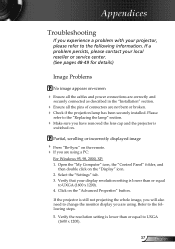
... broken. Check if the projection lamp has been securely installed. Click on the "Display" icon. 2. Please refer to UXGA (1600 x 1200). 4. Open the "My Computer" icon, the "Control Panel" folder, and then double click on the "Advanced Properties" button. Select the "Settings" tab. 3. Verify the resolution setting is switched on -screen Ensure all the cables and power connections are correctly and securely connected as described in...
... broken. Check if the projection lamp has been securely installed. Click on the "Display" icon. 2. Please refer to UXGA (1600 x 1200). 4. Open the "My Computer" icon, the "Control Panel" folder, and then double click on the "Advanced Properties" button. Select the "Settings" tab. 3. Verify the resolution setting is switched on -screen Ensure all the cables and power connections are correctly and securely connected as described in...
User's Manual
Page 39
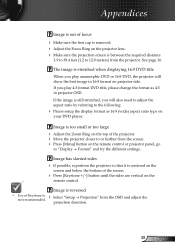
...; Adjust the Focus Ring on the projector lens. Make sure the projection screen is between the required distance 3.9 to 39.4 feet (1.2 to "Display Format" and try the different settings. Image is too small or too large Adjust the Zoom Ring on the top of the projector. Move the projector closer to or further from the screen. Press [Menu] button on the remote control or projector panel...
...; Adjust the Focus Ring on the projector lens. Make sure the projection screen is between the required distance 3.9 to 39.4 feet (1.2 to "Display Format" and try the different settings. Image is too small or too large Adjust the Zoom Ring on the top of the projector. Move the projector closer to or further from the screen. Press [Menu] button on the remote control or projector panel...

User's Manual
Page 40
... power. Projector Status Indication LED lighting message Message Standby State (Input power cord) Power / Standby LED (Green/Red) Red Power on (Warming) Flashing Green Lamp lighting Green Error (Over Temp.) Error (Fan fail) Error (Lamp fail) Temp LED (Red) Lamp LED (Red) Flashing (1 sec on pages 43-44. Appendices Intermission Problems The projector stops responding to all controls If possible, turn on until the lamp module has been replaced. If this happens, the projector will burn out and may make a loud popping sound. Lamp burns out or makes a popping sound...
... power. Projector Status Indication LED lighting message Message Standby State (Input power cord) Power / Standby LED (Green/Red) Red Power on (Warming) Flashing Green Lamp lighting Green Error (Over Temp.) Error (Fan fail) Error (Lamp fail) Temp LED (Red) Lamp LED (Red) Flashing (1 sec on pages 43-44. Appendices Intermission Problems The projector stops responding to all controls If possible, turn on until the lamp module has been replaced. If this happens, the projector will burn out and may make a loud popping sound. Lamp burns out or makes a popping sound...

User's Manual
Page 43
.... Warning: If ceiling mounted, please use , you see this message, please contact your local reseller or service center to cool down for at least 30 minutes before changing the lamp! Allow it is dropped. 43 English When the lamp life is recommended to prevent any loose parts from falling out of personal injury, do not drop the lamp module or touch the lamp bulb...
.... Warning: If ceiling mounted, please use , you see this message, please contact your local reseller or service center to cool down for at least 30 minutes before changing the lamp! Allow it is dropped. 43 English When the lamp life is recommended to prevent any loose parts from falling out of personal injury, do not drop the lamp module or touch the lamp bulb...

User's Manual
Page 44
... cover then push up the lamp handle carefully. 7. Turn on the projector and use "Lamp Reset" after the lamp module is replaced. Pull up and remove the cover. 5. Lamp Reset: (i) Press "Menu" (ii) Select "Options" (iii) Select "Lamp settings" (iv) Select "Lamp Reset (v) Select "Yes". Pull out and remove the lamp module. To replace the lamp module, reverse the previous steps. 8. English 44 Switch off the power...
... cover then push up the lamp handle carefully. 7. Turn on the projector and use "Lamp Reset" after the lamp module is replaced. Pull up and remove the cover. 5. Lamp Reset: (i) Press "Menu" (ii) Select "Options" (iii) Select "Lamp settings" (iv) Select "Lamp Reset (v) Select "Yes". Pull out and remove the lamp module. To replace the lamp module, reverse the previous steps. 8. English 44 Switch off the power...

Datasheet
Page 1
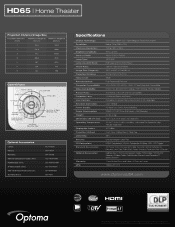
... for High Altitude Application Power Supply AC Input 100 - 240V, Auto-Switching Power Consumption 265W+/-10%@110Vac(full mode) < 9W(Stand by) Standard Accessories AC Power Cord, Component Cable, Remote Control, Batteries for Remote, Lens Cap, Quick Start Guide, Warranty Card, User's Manual, and Extended Warranty card Optional Accessories Ceiling Mount, VGA to Component Cable, HDMI cable, HDMI to change at any time. Home Theater Projector Datasheet - At 1600 lumens and the latest color processing technologies, the HD65 delivers subtle and incredible image...
... for High Altitude Application Power Supply AC Input 100 - 240V, Auto-Switching Power Consumption 265W+/-10%@110Vac(full mode) < 9W(Stand by) Standard Accessories AC Power Cord, Component Cable, Remote Control, Batteries for Remote, Lens Cap, Quick Start Guide, Warranty Card, User's Manual, and Extended Warranty card Optional Accessories Ceiling Mount, VGA to Component Cable, HDMI cable, HDMI to change at any time. Home Theater Projector Datasheet - At 1600 lumens and the latest color processing technologies, the HD65 delivers subtle and incredible image...
Brochure
Page 2
... owners. HD65 I Home Theater Projection Distance/Image Size Projection Distance Maximum Diagonal Minimum Diagonal (Feet) (Inches) (Inches) 4 35.5 32.4 6 53.3 48.6 8 71.1 64.8 10 88.8 81.0 12 1O7 97.2 14 124 113 16 142 130 Control Panel Power LED Enter AV Mute Lamp LED Temp LED Power/ Standby Source & Left Direction Key Re-Sync & Right Direction Key Menu Up/Down Direction Key Optional Accessories Lamp: Mount: Remote: VGA to Component Cable (5m): HDMI Cable (5m): S-Video Cable (5m): 106" 16:9 Fixed-Frame Screen...
... owners. HD65 I Home Theater Projection Distance/Image Size Projection Distance Maximum Diagonal Minimum Diagonal (Feet) (Inches) (Inches) 4 35.5 32.4 6 53.3 48.6 8 71.1 64.8 10 88.8 81.0 12 1O7 97.2 14 124 113 16 142 130 Control Panel Power LED Enter AV Mute Lamp LED Temp LED Power/ Standby Source & Left Direction Key Re-Sync & Right Direction Key Menu Up/Down Direction Key Optional Accessories Lamp: Mount: Remote: VGA to Component Cable (5m): HDMI Cable (5m): S-Video Cable (5m): 106" 16:9 Fixed-Frame Screen...


