
User Manual
Page 1
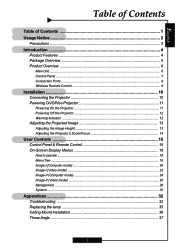
... 4 Package Overview 5 Product Overview 6 Main Unit ...6 Control Panel ...7 Connection Ports ...8 Wireless Remote Control 9 Installation 10 Connecting the Projector 10 Powering On/Off the Projector 11 Powering On the Projector 11 Powering Off the Projector 12 Warning Indicator ...12 Adjusting the Projected Image 13 Adjusting the Image Height 13 Adjusting the... Projector's Zoom/Focus 14 User Controls 15 Control Panel & Remote Control 15 On-Screen Display Menus 18 How to operate ......
... 4 Package Overview 5 Product Overview 6 Main Unit ...6 Control Panel ...7 Connection Ports ...8 Wireless Remote Control 9 Installation 10 Connecting the Projector 10 Powering On/Off the Projector 11 Powering On the Projector 11 Powering Off the Projector 12 Warning Indicator ...12 Adjusting the Projected Image 13 Adjusting the Image Height 13 Adjusting the... Projector's Zoom/Focus 14 User Controls 15 Control Panel & Remote Control 15 On-Screen Display Menus 18 How to operate ......
User Manual
Page 2
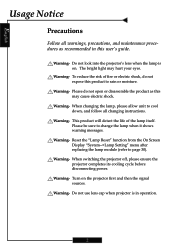
... and then the signal sources. Warning- Please be sure to page 30). Warning- Turn on . Do not look into the projector's lens when the lamp is in this user's guide. The bright light may cause electric shock. Warning- Please do not expose ... this product to cool down, and follow all warnings, precautions, and maintenance procedures as recommended in operation. 2 Warning- When switching the projector off, please ensure the projector completes its cooling cycle before disconnecting power. English Usage Notice Precautions Follow all changing instructions. Warning- Warning-
... and then the signal sources. Warning- Please be sure to page 30). Warning- Turn on . Do not look into the projector's lens when the lamp is in this user's guide. The bright light may cause electric shock. Warning- Please do not expose ... this product to cool down, and follow all warnings, precautions, and maintenance procedures as recommended in operation. 2 Warning- When switching the projector off, please ensure the projector completes its cooling cycle before disconnecting power. English Usage Notice Precautions Follow all changing instructions. Warning- Warning-
User Manual
Page 4
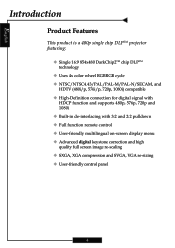
English Introduction Product Features This product is a 480p single chip DLPTM projector featuring: ‹ Single 16:9 854x480 DarkChip2TM chip DLPTM technology ‹ Uses 4x color wheel RGBRGB cycle ‹ NTSC/NTSC4.43/PAL/PAL-M/PAL-N/SECAM, and ...
English Introduction Product Features This product is a 480p single chip DLPTM projector featuring: ‹ Single 16:9 854x480 DarkChip2TM chip DLPTM technology ‹ Uses 4x color wheel RGBRGB cycle ‹ NTSC/NTSC4.43/PAL/PAL-M/PAL-N/SECAM, and ...
User Manual
Page 5
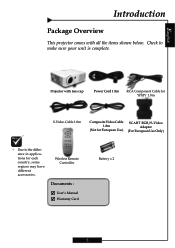
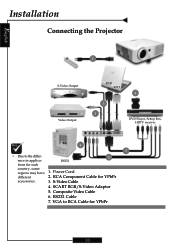
Projector with all the items shown below. User's Manual ; Wireless Remote Controller Documents : ; Warranty Card Battery x 2 5 Check to the difference in applications for European Use) SCART RGB/S-Video Adaptor (For European Use Only) ™ Due to make sure your unit is complete. English Introduction Package Overview This projector comes with lens cap Power Cord 1.8m RCA Component Cable for YPbPr 1.8m S-Video Cable 1.8m Composite Video Cable 1.8m (Not for each country, some regions may have different accessories.
Projector with all the items shown below. User's Manual ; Wireless Remote Controller Documents : ; Warranty Card Battery x 2 5 Check to the difference in applications for European Use) SCART RGB/S-Video Adaptor (For European Use Only) ™ Due to make sure your unit is complete. English Introduction Package Overview This projector comes with lens cap Power Cord 1.8m RCA Component Cable for YPbPr 1.8m S-Video Cable 1.8m Composite Video Cable 1.8m (Not for each country, some regions may have different accessories.
User Manual
Page 10
SCART RGB/S-Video Adaptor 5. VGA to the differ- 2 ence in applica- Power Cord different 2. S-Video Cable 4. Composite Video Cable 6. RS232 Cable 7. English Installation Connecting the Projector 1 S-Video Output Video Output RGB DVI 3 5 4 DVD Player, Settop Box, HDTV receiver 6 7 ™ Due to RCA Cable for YPbPr 10 RS232 tions for YPbPr accessories. 3. RCA Component Cable for each country, some regions may have 1.
SCART RGB/S-Video Adaptor 5. VGA to the differ- 2 ence in applica- Power Cord different 2. S-Video Cable 4. Composite Video Cable 6. RS232 Cable 7. English Installation Connecting the Projector 1 S-Video Output Video Output RGB DVI 3 5 4 DVD Player, Settop Box, HDTV receiver 6 7 ™ Due to RCA Cable for YPbPr 10 RS232 tions for YPbPr accessories. 3. RCA Component Cable for each country, some regions may have 1.

User Manual
Page 11
...Standby" button on the control panel.n And the Power LED will detect your source automatically. ™ Turn on the control panel to switch. The projector will turn green. The Power LED will flash green. 3. Ensure that the power cord and signal cable are securely connected. ™ If you ...connect multiple sources at the same time, use the projector, you use the "Source" button on the projector first followed by the signal sources. ™ If the screen displays "No Signal", please make sure the signal cables are...
...Standby" button on the control panel.n And the Power LED will detect your source automatically. ™ Turn on the control panel to switch. The projector will turn green. The Power LED will flash green. 3. Ensure that the power cord and signal cable are securely connected. ™ If you ...connect multiple sources at the same time, use the projector, you use the "Source" button on the projector first followed by the signal sources. ™ If the screen displays "No Signal", please make sure the signal cables are...
User Manual
Page 12
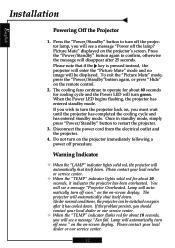
... 20 seconds, it has cooled down. When the Power LED begins flashing, the projector has entered standby mode. Lamp will disappear after it indicates the projector has been overheated. Under normal conditions, the projector can be displayed. Once in standby mode, simply press "Power/Standby" button to... problem persists, you should contact your local dealer or our service center. 12 Disconnect the power cord from the electrical outlet and the projector. 4. You will be switched on again after 25 seconds. Press the "Power/Standby" button to operate for cooling cycle and the ...
... 20 seconds, it has cooled down. When the Power LED begins flashing, the projector has entered standby mode. Lamp will disappear after it indicates the projector has been overheated. Under normal conditions, the projector can be displayed. Once in standby mode, simply press "Power/Standby" button to... problem persists, you should contact your local dealer or our service center. 12 Disconnect the power cord from the electrical outlet and the projector. 4. You will be switched on again after 25 seconds. Press the "Power/Standby" button to operate for cooling cycle and the ...
User Manual
Page 13
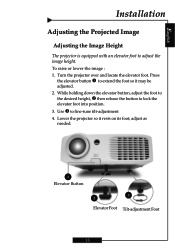
adjust as needed. 1 Elevator Button 3 2 Elevator Foot Tilt-adjustment Foot 13 Lower the projector so it may be adjusted. 2. While holding down the elevator button, adjust the foot to the desired height, o then release the button to fine-tune ... the elevator foot into position. 3. English Installation Adjusting the Projected Image Adjusting the Image Height The projector is equipped with an elevator foot to extend the foot so it rests on its foot; Turn the projector over and locate the elevator foot. Press the elevator button n to adjust the image height. To...
adjust as needed. 1 Elevator Button 3 2 Elevator Foot Tilt-adjustment Foot 13 Lower the projector so it may be adjusted. 2. While holding down the elevator button, adjust the foot to the desired height, o then release the button to fine-tune ... the elevator foot into position. 3. English Installation Adjusting the Projected Image Adjusting the Image Height The projector is equipped with an elevator foot to extend the foot so it rests on its foot; Turn the projector over and locate the elevator foot. Press the elevator button n to adjust the image height. To...
User Manual
Page 14
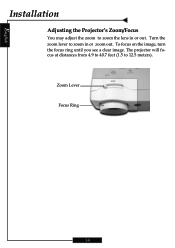
Zoom Lever Focus Ring 14 The projector will focus at distances from 4.9 to 40.7 feet (1.5 to zoom the lens in or zoom out. English Installation Adjusting the Projector's Zoom/Focus You may adjust the zoom to 12.5 meters). To focus on the image, turn the focus ring until you see a clear image. Turn the zoom lever to zoom in or out.
Zoom Lever Focus Ring 14 The projector will focus at distances from 4.9 to 40.7 feet (1.5 to zoom the lens in or zoom out. English Installation Adjusting the Projector's Zoom/Focus You may adjust the zoom to 12.5 meters). To focus on the image, turn the focus ring until you see a clear image. Turn the zoom lever to zoom in or out.
User Manual
Page 15
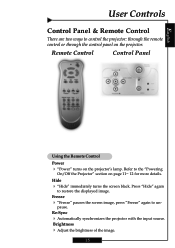
.... Hide 4 "Hide" immediately turns the screen black. Re-Sync 4 Automatically synchronizes the projector with the input source. Brightness 4 Adjust the brightness of the image. 15 Press "Hide" again to un- Freeze 4 "Freeze" pauses the screen image, press "Freeze..." again to restore the displayed image. English User Controls Control Panel & Remote Control There are two ways to control the projector: through the remote control or through the control panel on page 11~ 12 for more details. Remote Control Control Panel Using the Remote Control Power...
.... Hide 4 "Hide" immediately turns the screen black. Re-Sync 4 Automatically synchronizes the projector with the input source. Brightness 4 Adjust the brightness of the image. 15 Press "Hide" again to un- Freeze 4 "Freeze" pauses the screen image, press "Freeze..." again to restore the displayed image. English User Controls Control Panel & Remote Control There are two ways to control the projector: through the remote control or through the control panel on page 11~ 12 for more details. Remote Control Control Panel Using the Remote Control Power...
User Manual
Page 16
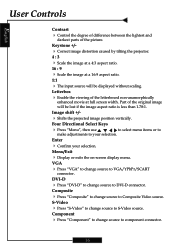
... image aspect ratio is less than 1.78:1. Menu/Exit 4 Display or exits the on-screen display menu. Keystone +/- 4 Correct image distortion caused by tilting the projector. 4 : 3 4 Scale the image at a 4:3 aspect ratio. 16 : 9 4 Scale the image at full screen width. English User Controls Contrast 4 Control the degree of difference between the...
... image aspect ratio is less than 1.78:1. Menu/Exit 4 Display or exits the on-screen display menu. Keystone +/- 4 Correct image distortion caused by tilting the projector. 4 : 3 4 Scale the image at a 4:3 aspect ratio. 16 : 9 4 Scale the image at full screen width. English User Controls Contrast 4 Control the degree of difference between the...
User Manual
Page 17
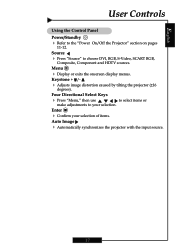
...exits the onscreen display menus. Keystone + /- 4 Adjusts image degrees). to your selection of items. Auto Image 4 Automatically synchronizes the projector with the input source. 17 English User Controls Using the Control Panel Power/Standby 4 Refer to choose DVI, RGB, S-Video, Composite..., Component and HDTV sources. distortion caused by tilting the projector (±16 Four Directional Select Keys 4 Press make "Menu," then use adjustments to select items or Enter 4 Confirm your selection...
...exits the onscreen display menus. Keystone + /- 4 Adjusts image degrees). to your selection of items. Auto Image 4 Automatically synchronizes the projector with the input source. 17 English User Controls Using the Control Panel Power/Standby 4 Refer to choose DVI, RGB, S-Video, Composite..., Component and HDTV sources. distortion caused by tilting the projector (±16 Four Directional Select Keys 4 Press make "Menu," then use adjustments to select items or Enter 4 Confirm your selection...
User Manual
Page 18
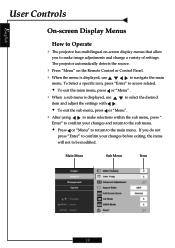
... related. Š To exit the main menu, press or "Menu" . 4 When a sub menu is displayed, use item and adjust the settings with . The projector automatically detects the source. 4 Press "Menu" on -screen display menus that allow you do not press "Enter" to confirm your changes and return to the..., the items will not to be modified. Main Menu Sub Menu Item 18 English User Controls On-screen Display Menus How to Operate 4 The projector has multilingual on the Remote Control or Control Panel. 4 When the menu is displayed, use to navigate the main menu. to select the desired...
... related. Š To exit the main menu, press or "Menu" . 4 When a sub menu is displayed, use item and adjust the settings with . The projector automatically detects the source. 4 Press "Menu" on -screen display menus that allow you do not press "Enter" to confirm your changes and return to the..., the items will not to be modified. Main Menu Sub Menu Item 18 English User Controls On-screen Display Menus How to Operate 4 The projector has multilingual on the Remote Control or Control Panel. 4 When the menu is displayed, use to navigate the main menu. to select the desired...
User Manual
Page 28
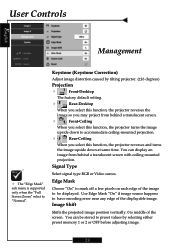
... degrees) Projection 4 Front-Desktop The factory default setting. 4 Rear-Desktop When you select this function, the projector reverses the image so you select this function, the projector reverses and turns the image upside down to accommodate ceiling-mounted projection. 4 Rear-Ceiling When you may project from... behind a translucent screen. 4 Front-Ceiling When you select this function, the projector turns the image upside down at same time. Edge Mask Choose "On" to mask off a few pixels on each edge of the ...
... degrees) Projection 4 Front-Desktop The factory default setting. 4 Rear-Desktop When you select this function, the projector reverses the image so you select this function, the projector reverses and turns the image upside down to accommodate ceiling-mounted projection. 4 Rear-Ceiling When you may project from... behind a translucent screen. 4 Front-Ceiling When you select this function, the projector turns the image upside down at same time. Edge Mask Choose "On" to mask off a few pixels on each edge of the ...
User Manual
Page 29
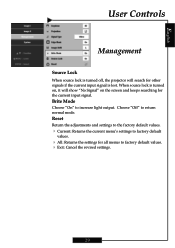
... to increase light output. When source lock is turned on, it will search for other signals if the current input signal is turned off, the projector will show "No Signal" on the screen and keeps searching for the current input signal. Choose "Off" to return normal mode. English User Controls Management...
... to increase light output. When source lock is turned on, it will search for other signals if the current input signal is turned off, the projector will show "No Signal" on the screen and keeps searching for the current input signal. Choose "Off" to return normal mode. English User Controls Management...
User Manual
Page 30
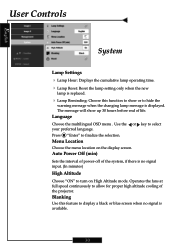
... show up 30 hours before end of life. Use the or your preferred language. Press "Enter" to allow for proper high altitude cooling of the projector. The message will show or to hide the warning message when the changing lamp message is displayed. Menu Location Choose the menu location on High...
... show up 30 hours before end of life. Use the or your preferred language. Press "Enter" to allow for proper high altitude cooling of the projector. The message will show or to hide the warning message when the changing lamp message is displayed. Menu Location Choose the menu location on High...
User Manual
Page 32
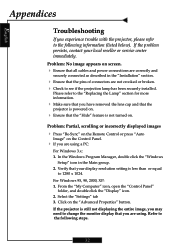
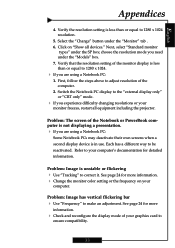
...the projection lamp has been securely installed. For Windows 95, 98, 2000, XP: 1. English Appendices Troubleshooting If you experience trouble with the projector, please refer to the following steps. 32 Select the "Settings" tab 3. In the Windows Program Manager, double click the "Windows Setup" ...icon in the "Installation" section. 4 Ensure that the pins of connectors are using a PC: For Windows 3.x: 1. If the projector is still not displaying the entire image, you may need to change the monitor display that all cables and power connections are using . Problem:...
...the projection lamp has been securely installed. For Windows 95, 98, 2000, XP: 1. English Appendices Troubleshooting If you experience trouble with the projector, please refer to the following steps. 32 Select the "Settings" tab 3. In the Windows Program Manager, double click the "Windows Setup" ...icon in the "Installation" section. 4 Ensure that the pins of connectors are using a PC: For Windows 3.x: 1. If the projector is still not displaying the entire image, you may need to change the monitor display that all cables and power connections are using . Problem:...
User Manual
Page 33
... computer's documentation for detailed information. See page 24 for more information. 4 Change the monitor color setting or the frequency on "Show all equipment including the projector. First, follow the steps above to your monitor freezes, restart all devices." Problem: Image is in use. English Appendices 4. Problem: The screen of the computer...
... computer's documentation for detailed information. See page 24 for more information. 4 Change the monitor color setting or the frequency on "Show all equipment including the projector. First, follow the steps above to your monitor freezes, restart all devices." Problem: Image is in use. English Appendices 4. Problem: The screen of the computer...
User Manual
Page 34
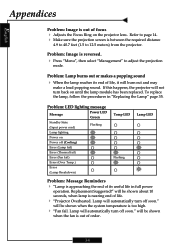
...module has been replaced. Refer to adjust the projection mode. Lamp will not turn off soon." Problem: Image is nearing end of life. 4 "Projector Overheated. will be shown about 10 seconds, when lamp is reversed. 4 Press "Menu", then select "Management" to page 14. 4 Make .... 34 Replacement Suggested!" Problem: LED lighting message Message Power LED Green Standby State (Input power cord) Flashing Lamp lighting Power on the projector lens. To replace the lamp, follow the procedures in full power operation. Problem: Lamp burns out or makes a popping sound 4 When...
...module has been replaced. Refer to adjust the projection mode. Lamp will not turn off soon." Problem: Image is nearing end of life. 4 "Projector Overheated. will be shown about 10 seconds, when lamp is reversed. 4 Press "Menu", then select "Management" to page 14. 4 Make .... 34 Replacement Suggested!" Problem: LED lighting message Message Power LED Green Standby State (Input power cord) Flashing Lamp lighting Power on the projector lens. To replace the lamp, follow the procedures in full power operation. Problem: Lamp burns out or makes a popping sound 4 When...
User Manual
Page 35
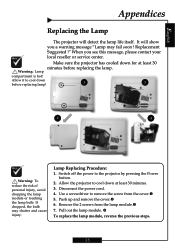
...: To reduce the risk of personal injury, avoid dropping the lamp module or touching the lamp bulb. Warning: Lamp compartment is hot! Allow the projector to the projector by pressing the Power button. 2. q To replace the lamp module, reverse the previous steps. 35 Switch off the power to cool down before ...injury. Remove the 2 screws from the cover.n 5. Pull out the lamp module. It will detect the lamp life itself. English Appendices Replacing the Lamp The projector will show you see this message, please contact your local reseller or service center.
...: To reduce the risk of personal injury, avoid dropping the lamp module or touching the lamp bulb. Warning: Lamp compartment is hot! Allow the projector to the projector by pressing the Power button. 2. q To replace the lamp module, reverse the previous steps. 35 Switch off the power to cool down before ...injury. Remove the 2 screws from the cover.n 5. Pull out the lamp module. It will detect the lamp life itself. English Appendices Replacing the Lamp The projector will show you see this message, please contact your local reseller or service center.


