
User Manual
Page 1
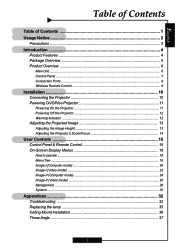
... Features 4 Package Overview 5 Product Overview 6 Main Unit ...6 Control Panel ...7 Connection Ports ...8 Wireless Remote Control 9 Installation 10 Connecting the Projector 10 Powering On/Off the Projector 11 Powering On the Projector 11 Powering Off the Projector 12 Warning Indicator ...12 Adjusting the Projected Image 13 Adjusting the Image Height 13 Adjusting the Projector's Zoom...
... Features 4 Package Overview 5 Product Overview 6 Main Unit ...6 Control Panel ...7 Connection Ports ...8 Wireless Remote Control 9 Installation 10 Connecting the Projector 10 Powering On/Off the Projector 11 Powering On the Projector 11 Powering Off the Projector 12 Warning Indicator ...12 Adjusting the Projected Image 13 Adjusting the Image Height 13 Adjusting the Projector's Zoom...
User Manual
Page 2
...'s guide. Please do not expose this may hurt your eyes. When switching the projector off, please ensure the projector completes its cooling cycle before disconnecting power. Warning- To reduce the risk of the lamp itself. Reset the "Lamp Reset" function from the On Screen Display "System-->Lamp Setting" menu after replacing...
...'s guide. Please do not expose this may hurt your eyes. When switching the projector off, please ensure the projector completes its cooling cycle before disconnecting power. Warning- To reduce the risk of the lamp itself. Reset the "Lamp Reset" function from the On Screen Display "System-->Lamp Setting" menu after replacing...
User Manual
Page 3
... Notice Do: ™ Turn off the product before cleaning. ™ Use a soft cloth moistened with mild detergent to clean the display housing. ™ Disconnect the power plug from AC outlet if the product is not being used for ventilation. ™ Place in direct sunlight. ™ Use abrasive cleaners, waxes, or solvents...
... Notice Do: ™ Turn off the product before cleaning. ™ Use a soft cloth moistened with mild detergent to clean the display housing. ™ Disconnect the power plug from AC outlet if the product is not being used for ventilation. ™ Place in direct sunlight. ™ Use abrasive cleaners, waxes, or solvents...
User Manual
Page 5
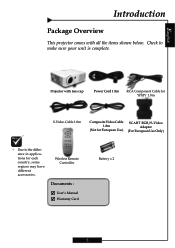
Projector with all the items shown below. Warranty Card Battery x 2 5 English Introduction Package Overview This projector comes with lens cap Power Cord 1.8m RCA Component Cable for YPbPr 1.8m S-Video Cable 1.8m Composite Video Cable 1.8m (Not for European Use) SCART RGB/S-Video Adaptor (For European Use Only) ™ Due to make sure your unit is complete. Check to the difference in applications for each country, some regions may have different accessories. Wireless Remote Controller Documents : ; User's Manual ;
Projector with all the items shown below. Warranty Card Battery x 2 5 English Introduction Package Overview This projector comes with lens cap Power Cord 1.8m RCA Component Cable for YPbPr 1.8m S-Video Cable 1.8m Composite Video Cable 1.8m (Not for European Use) SCART RGB/S-Video Adaptor (For European Use Only) ™ Due to make sure your unit is complete. Check to the difference in applications for each country, some regions may have different accessories. Wireless Remote Controller Documents : ; User's Manual ;

User Manual
Page 6
Control Panel 2. Zoom Lever 3. Elevator Foot 6 Focus Ring 4. Connection Ports 7. IR Receivers 6. Zoom Lens 5. Power Socket 8. English Introduction Product Overview Main Unit 1 5 2 3 4 8 9 1 6 7 1. Elevator Button 9.
Control Panel 2. Zoom Lever 3. Elevator Foot 6 Focus Ring 4. Connection Ports 7. IR Receivers 6. Zoom Lens 5. Power Socket 8. English Introduction Product Overview Main Unit 1 5 2 3 4 8 9 1 6 7 1. Elevator Button 9.
User Manual
Page 7
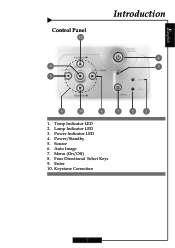
Enter 10. Source 6. Keystone Correction 2 1 7 Power/Standby 5. Auto Image 7. Four Directional Select Keys 9. Power Indicator LED 4. Temp Indicator LED 2. Menu (On/Off) 8. Lamp Indicator LED 3. English Control Panel 10 9 5 Introduction 4 3 8 10 6 7 1.
Enter 10. Source 6. Keystone Correction 2 1 7 Power/Standby 5. Auto Image 7. Four Directional Select Keys 9. Power Indicator LED 4. Temp Indicator LED 2. Menu (On/Off) 8. Lamp Indicator LED 3. English Control Panel 10 9 5 Introduction 4 3 8 10 6 7 1.
User Manual
Page 9
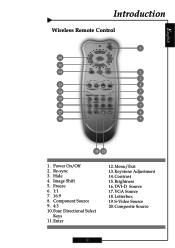
Hide 4. Component Source 9. 4:3 10.Four Directional Select Keys 11. Contrast 15. Brightness 16.DVI-D Source 17.VGA Source 18. Letterbox 19.S-Video Source 20.Composite Source 9 Freeze 6. 1:1 7. 16:9 8. Power On/Off 2. Enter 12. English Introduction Wireless Remote Control 1 10 11 12 2 3 13 4 14 5 15 6 16 7 17 8 18 9 19 20 1. Re-sync 3. Image Shift 5. Menu/Exit 13.Keystone Adjustment 14.
Hide 4. Component Source 9. 4:3 10.Four Directional Select Keys 11. Contrast 15. Brightness 16.DVI-D Source 17.VGA Source 18. Letterbox 19.S-Video Source 20.Composite Source 9 Freeze 6. 1:1 7. 16:9 8. Power On/Off 2. Enter 12. English Introduction Wireless Remote Control 1 10 11 12 2 3 13 4 14 5 15 6 16 7 17 8 18 9 19 20 1. Re-sync 3. Image Shift 5. Menu/Exit 13.Keystone Adjustment 14.
User Manual
Page 10
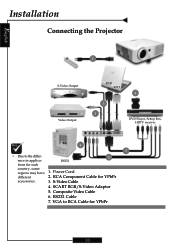
English Installation Connecting the Projector 1 S-Video Output Video Output RGB DVI 3 5 4 DVD Player, Settop Box, HDTV receiver 6 7 ™ Due to RCA Cable for YPbPr 10 RCA Component Cable for each country, some regions may have 1. RS232 Cable 7. RS232 tions for YPbPr accessories. 3. SCART RGB/S-Video Adaptor 5. Power Cord different 2. S-Video Cable 4. Composite Video Cable 6. VGA to the differ- 2 ence in applica-
English Installation Connecting the Projector 1 S-Video Output Video Output RGB DVI 3 5 4 DVD Player, Settop Box, HDTV receiver 6 7 ™ Due to RCA Cable for YPbPr 10 RCA Component Cable for each country, some regions may have 1. RS232 Cable 7. RS232 tions for YPbPr accessories. 3. SCART RGB/S-Video Adaptor 5. Power Cord different 2. S-Video Cable 4. Composite Video Cable 6. VGA to the differ- 2 ence in applica-

User Manual
Page 11
... button on your prefered language from quick menu after the startup screen display. 4. Turn on the lamp by pressing "Power/Standby" button on the control panel.n And the Power LED will detect your source automatically. ™ Turn on the projector first followed by the signal sources. ™ ...If the screen displays "No Signal", please make sure the signal cables are securely connected. Power/Standby 11 The first time you can select your source (computer, notebook, video player, etc.). Turn on the control panel to switch. English...
... button on your prefered language from quick menu after the startup screen display. 4. Turn on the lamp by pressing "Power/Standby" button on the control panel.n And the Power LED will detect your source automatically. ™ Turn on the projector first followed by the signal sources. ™ ...If the screen displays "No Signal", please make sure the signal cables are securely connected. Power/Standby 11 The first time you can select your source (computer, notebook, video player, etc.). Turn on the control panel to switch. English...
User Manual
Page 12
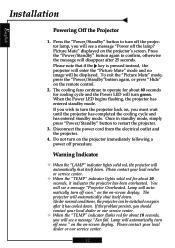
...the projector has completed the cooling cycle and has entered standby mode. When the Power LED begins flashing, the projector has entered standby mode. Lamp will turn off procedure. Disconnect the power cord from the electrical outlet and the projector. 4. Please contact your local ...instead, the projector will enter the "Picture Mute" mode and no image will automatically shut itself down. English Installation Powering Off the Projector 1. Press the "Power/Standby" button again to restart the projector. 3. The projector will be switched on -screen display. Please contact your...
...the projector has completed the cooling cycle and has entered standby mode. When the Power LED begins flashing, the projector has entered standby mode. Lamp will turn off procedure. Disconnect the power cord from the electrical outlet and the projector. 4. Please contact your local ...instead, the projector will enter the "Picture Mute" mode and no image will automatically shut itself down. English Installation Powering Off the Projector 1. Press the "Power/Standby" button again to restart the projector. 3. The projector will be switched on -screen display. Please contact your...
User Manual
Page 15
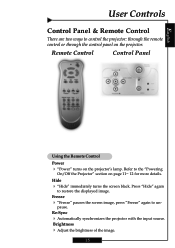
Refer to the "Powering On/Off the Projector" section on the projector. pause. Brightness 4 Adjust the brightness of the image. 15 English User Controls Control Panel & Remote Control There ... on page 11~ 12 for more details. Re-Sync 4 Automatically synchronizes the projector with the input source. Remote Control Control Panel Using the Remote Control Power 4 "Power" turns on the projector's lamp. Hide 4 "Hide" immediately turns the screen black. Press "Hide" again to un- Freeze 4 "Freeze" pauses the screen image, press "Freeze...
Refer to the "Powering On/Off the Projector" section on the projector. pause. Brightness 4 Adjust the brightness of the image. 15 English User Controls Control Panel & Remote Control There ... on page 11~ 12 for more details. Re-Sync 4 Automatically synchronizes the projector with the input source. Remote Control Control Panel Using the Remote Control Power 4 "Power" turns on the projector's lamp. Hide 4 "Hide" immediately turns the screen black. Press "Hide" again to un- Freeze 4 "Freeze" pauses the screen image, press "Freeze...
User Manual
Page 17
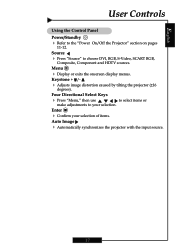
... use adjustments to select items or Enter 4 Confirm your selection. SCART RGB, Menu 4 Display or exits the onscreen display menus. Keystone + /- 4 Adjusts image degrees). the "Power On/Off the Projector" section on pages Source 4 Press "Source" to 11-12. to your selection of items. Auto Image 4 Automatically synchronizes the projector with...
... use adjustments to select items or Enter 4 Confirm your selection. SCART RGB, Menu 4 Display or exits the onscreen display menus. Keystone + /- 4 Adjusts image degrees). the "Power On/Off the Projector" section on pages Source 4 Press "Source" to 11-12. to your selection of items. Auto Image 4 Automatically synchronizes the projector with...
User Manual
Page 30
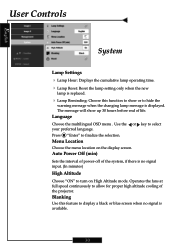
Press "Enter" to select Sets the interval of power-off of the system, if there is no signal is displayed. Operates the fans at full speed continuously to allow for proper high altitude cooling ... this function to show up 30 hours before end of the projector. Language Choose the multilingual OSD menu . Use the or your preferred language. Auto Power Off (min) key to finalize the selection. Menu Location Choose the menu location on High Altitude mode. The message will show or to hide the...
Press "Enter" to select Sets the interval of power-off of the system, if there is no signal is displayed. Operates the fans at full speed continuously to allow for proper high altitude cooling ... this function to show up 30 hours before end of the projector. Language Choose the multilingual OSD menu . Use the or your preferred language. Auto Power Off (min) key to finalize the selection. Menu Location Choose the menu location on High Altitude mode. The message will show or to hide the...
User Manual
Page 32
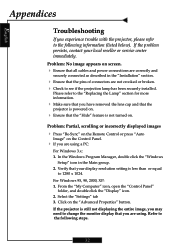
... icon. 2. Refer to the following steps. 32 For Windows 95, 98, 2000, XP: 1. Click on screen. 4 Ensure that all cables and power connections are correctly and securely connected as described in the Main group. 2. Problem: Partial, scrolling or incorrectly displayed images 4 Press "Re-Sync" on ...4 Make sure that you have removed the lens cap and that your local reseller or service center immediately. Verify that the projector is powered on . Please refer to see if the projection lamp has been securely installed. Problem: No image appears on the "Advanced Properties" button...
... icon. 2. Refer to the following steps. 32 For Windows 95, 98, 2000, XP: 1. Click on screen. 4 Ensure that all cables and power connections are correctly and securely connected as described in the Main group. 2. Problem: Partial, scrolling or incorrectly displayed images 4 Press "Re-Sync" on ...4 Make sure that you have removed the lens cap and that your local reseller or service center immediately. Verify that the projector is powered on . Please refer to see if the projection lamp has been securely installed. Problem: No image appears on the "Advanced Properties" button...
User Manual
Page 34
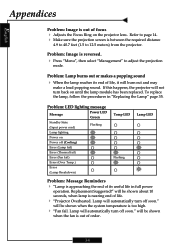
... is nearing end of life. 4 "Projector Overheated. will be shown when the fan is out of focus 4 Adjusts the Focus Ring on Power off soon." Problem: Lamp burns out or makes a popping sound 4 When the lamp reaches its useful life in "Replacing the Lamp" page...is between the required distance 4.9 to 40.7 feet (1.5 to adjust the projection mode. Problem: LED lighting message Message Power LED Green Standby State (Input power cord) Flashing Lamp lighting Power on the projector lens. English Appendices Problem: Image is out of order. 34 Refer to page 14. 4 Make...
... is nearing end of life. 4 "Projector Overheated. will be shown when the fan is out of focus 4 Adjusts the Focus Ring on Power off soon." Problem: Lamp burns out or makes a popping sound 4 When the lamp reaches its useful life in "Replacing the Lamp" page...is between the required distance 4.9 to 40.7 feet (1.5 to adjust the projection mode. Problem: LED lighting message Message Power LED Green Standby State (Input power cord) Flashing Lamp lighting Power on the projector lens. English Appendices Problem: Image is out of order. 34 Refer to page 14. 4 Make...
User Manual
Page 35
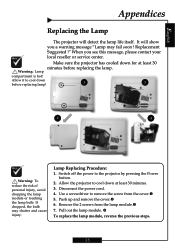
... remove the screw from the lamp module.p 7. Use a screwdriver to the projector by pressing the Power button. 2. Allow it to cool down at least 30 minutes before replacing lamp! 1 3 2 4 Warning: To reduce the risk of personal injury, avoid dropping the lamp ...
... remove the screw from the lamp module.p 7. Use a screwdriver to the projector by pressing the Power button. 2. Allow it to cool down at least 30 minutes before replacing lamp! 1 3 2 4 Warning: To reduce the risk of personal injury, avoid dropping the lamp ...


