User Guide
Page 1
... 19 On-screen Display Menus 21 How to operate 21 Menu Tree 22 IMAGE 24 IMAGE | Advanced 26 DISPLAY 28 DISPLAY | 3D 30 SETUP 31 SETUP | Security 33 SETUP | Signal 35 SETUP | Audio Settings 36 OPTIONS 37 OPTIONS | Advanced 38 OPTIONS | Lamp Settings 39 Appendices 40 Troubleshooting 40 Replacing the lamp 45 Compatibility Modes... 48 3D input Compatibility 49 RS232 Commands and Protocol Function List 50 RS232 Pin Assignments 50 RS232 Protocol Function List 51 Ceiling Mount Installation 54 Optoma Global Offices 55 Regulation & Safety Notices 57 1 English
... 19 On-screen Display Menus 21 How to operate 21 Menu Tree 22 IMAGE 24 IMAGE | Advanced 26 DISPLAY 28 DISPLAY | 3D 30 SETUP 31 SETUP | Security 33 SETUP | Signal 35 SETUP | Audio Settings 36 OPTIONS 37 OPTIONS | Advanced 38 OPTIONS | Lamp Settings 39 Appendices 40 Troubleshooting 40 Replacing the lamp 45 Compatibility Modes... 48 3D input Compatibility 49 RS232 Commands and Protocol Function List 50 RS232 Pin Assignments 50 RS232 Protocol Function List 51 Ceiling Mount Installation 54 Optoma Global Offices 55 Regulation & Safety Notices 57 1 English
User Guide
Page 22
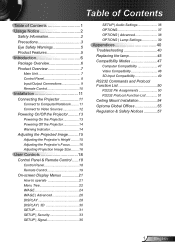
... Controls Menu Tree Main Menu Image Sub Menu Display Mode Brightness Contrast Sharpness #1 Color #1 Tint Advanced Display Format Edge Mask Zoom V Image Shift V Keystone 3D Setup Language Gamma BrilliantColor™ Color Temp.
... Controls Menu Tree Main Menu Image Sub Menu Display Mode Brightness Contrast Sharpness #1 Color #1 Tint Advanced Display Format Edge Mask Zoom V Image Shift V Keystone 3D Setup Language Gamma BrilliantColor™ Color Temp.
User Guide
Page 23
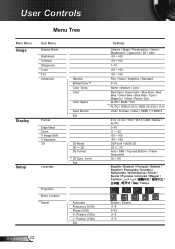
User Controls Main Menu Setup Options Sub Menu Security Projector ID Audio Settings Source Lock High Altitude Information Hide Keypad Lock Background Color Test Pattern Advanced Lamp Settings Reset Security ...
User Controls Main Menu Setup Options Sub Menu Security Projector ID Audio Settings Source Lock High Altitude Information Hide Keypad Lock Background Color Test Pattern Advanced Lamp Settings Reset Security ...
User Guide
Page 26
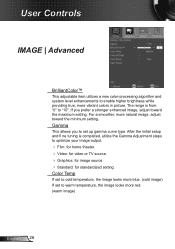
... enhanced image, adjust toward the minimum setting. If you to set to warm temperature, the image looks more vibrant colors in picture. After the initial setup and fi ne tuning is from "0" to "10". Color Temp If set to cold temperature, the image looks more blue. (cold image) If set up...
... enhanced image, adjust toward the minimum setting. If you to set to warm temperature, the image looks more vibrant colors in picture. After the initial setup and fi ne tuning is from "0" to "10". Color Temp If set to cold temperature, the image looks more blue. (cold image) If set up...
User Guide
Page 31
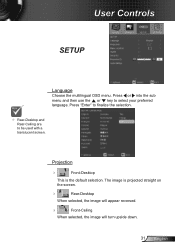
The image is the default selection. Press "Enter" to finalize the selection. Rear-Desktop and Rear-Ceiling are to select your preferred language. Projection Front-Desktop This is projected straight on the screen. Rear-Desktop When selected, the image will appear reversed. Front-Ceiling When selected, the image will turn upside down. 31 English User Controls SETUP Language Choose the multilingual OSD menu. Press or into the sub menu and then use the or key to be used with a translucent screen.
The image is the default selection. Press "Enter" to finalize the selection. Rear-Desktop and Rear-Ceiling are to select your preferred language. Projection Front-Desktop This is projected straight on the screen. Rear-Desktop When selected, the image will appear reversed. Front-Ceiling When selected, the image will turn upside down. 31 English User Controls SETUP Language Choose the multilingual OSD menu. Press or into the sub menu and then use the or key to be used with a translucent screen.

User Guide
Page 33
... on the projector. Off: Choose "Off" to be select the time (Month/Day/Hour) function to enter your password. Change Password: 1. User Controls SETUP | Security Pass-code default value is "1234" (first time).
... on the projector. Off: Choose "Off" to be select the time (Month/Day/Hour) function to enter your password. Change Password: 1. User Controls SETUP | Security Pass-code default value is "1234" (first time).
User Guide
Page 35
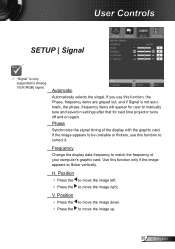
... the image appears to flicker vertically. Frequency Change the display data frequency to match the frequency of the display with the graphic card. User Controls SETUP | Signal "Signal" is not automatic, the phase, frequency items will appear for user to manually tune and saved in Analog VGA (RGB) signal...
... the image appears to flicker vertically. Frequency Change the display data frequency to match the frequency of the display with the graphic card. User Controls SETUP | Signal "Signal" is not automatic, the phase, frequency items will appear for user to manually tune and saved in Analog VGA (RGB) signal...

User Guide
Page 36
Volume Press the to decrease the volume. Press the to the current image source. AUDIO: Audio connector port. HDMI: HDMI connector port. Audio Input The default audio settings are on . Choose the "Off" to turn mute off the internal speaker. Use this option to reassign any of the projector. Mute Choose the "On" to turn mute on the back panel of the Audio Inputs to increase the volume. User Controls SETUP | Audio Settings Internal Speaker Choose the "On" or "Off" to turn on or off . English 36
Volume Press the to decrease the volume. Press the to the current image source. AUDIO: Audio connector port. HDMI: HDMI connector port. Audio Input The default audio settings are on . Choose the "Off" to turn mute off the internal speaker. Use this option to reassign any of the projector. Mute Choose the "On" to turn mute on the back panel of the Audio Inputs to increase the volume. User Controls SETUP | Audio Settings Internal Speaker Choose the "On" or "Off" to turn on or off . English 36

User Guide
Page 42
.... If the image is still stretched, you will also need to adjust the aspect ratio by referring to the following: Please setup the display format as 16:9 (wide) aspect ratio type on the projector panel, until the sides are vertical. Image is reversed Select... "SETUP Projection" from the screen. Press "Menu" button on the projector lens. Make sure the projection screen is between the required ...
.... If the image is still stretched, you will also need to adjust the aspect ratio by referring to the following: Please setup the display format as 16:9 (wide) aspect ratio type on the projector panel, until the sides are vertical. Image is reversed Select... "SETUP Projection" from the screen. Press "Menu" button on the projector lens. Make sure the projection screen is between the required ...
User Guide
Page 51
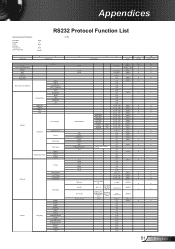
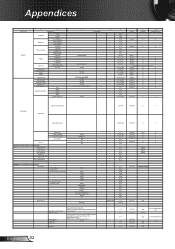
Appendices Optoma Data and HT Projectors Baud Rate Data Bits Parity Stop Bits Flow Control UART16550 FIFO 9600 8 None 1 None ...P P P P P P P P P P P P P P P P P P P P P P P P CR carriage return Fail F F F F F F F F F F F F F F F F F F F F F F F F F F F F 51 English Color Space HDMI 1 HDMI 2 VGA 1 S-Video Video Format Edge masking Zoom H Image Shift V Image Shift V Keystone 3D Settings SETUP Language English German French Italian Spanish Portuguese Polish Dutch Swedish Norwegian/Danish Finnish Greek Traditional Chinese Simplified Chinese Japanese Korean Russian Hungarian Czech X On/Off...
Appendices Optoma Data and HT Projectors Baud Rate Data Bits Parity Stop Bits Flow Control UART16550 FIFO 9600 8 None 1 None ...P P P P P P P P P P P P P P P P P P P P P P P P CR carriage return Fail F F F F F F F F F F F F F F F F F F F F F F F F F F F F 51 English Color Space HDMI 1 HDMI 2 VGA 1 S-Video Video Format Edge masking Zoom H Image Shift V Image Shift V Keystone 3D Settings SETUP Language English German French Italian Spanish Portuguese Polish Dutch Swedish Norwegian/Danish Finnish Greek Traditional Chinese Simplified Chinese Japanese Korean Russian Hungarian Czech X On/Off...
User Guide
Page 52
... e=9 n = 1 a=0/1/2 ~XX150 n Okabbbbccdddde ~XX151 n Oka n=1 ~XX121 n Oka a=0/1/2/3/4/5/6/7/8/9/1 0/11 n=1 ~XX122 n Okdddd n=1 Oka a=0/1/2/5/7/8/9/10/11 ~XX123 n n=1 ~XX124 n Oka n=1 ~XX125 n Oka a=1/0 n=1 ~XX126 n Oka English 52 Position V. Appendices ~ Lead Code SETUP X X Language Projection Menu Location Projector ID Arabic Thai Turkish Farsi Front-Desktop Rear-Desktop Front-Ceiling Rear-Ceiling Top Left Top Right Centre Bottom Left...
... e=9 n = 1 a=0/1/2 ~XX150 n Okabbbbccdddde ~XX151 n Oka n=1 ~XX121 n Oka a=0/1/2/3/4/5/6/7/8/9/1 0/11 n=1 ~XX122 n Okdddd n=1 Oka a=0/1/2/5/7/8/9/10/11 ~XX123 n n=1 ~XX124 n Oka n=1 ~XX125 n Oka a=1/0 n=1 ~XX126 n Oka English 52 Position V. Appendices ~ Lead Code SETUP X X Language Projection Menu Location Projector ID Arabic Thai Turkish Farsi Front-Desktop Rear-Desktop Front-Ceiling Rear-Ceiling Top Left Top Right Centre Bottom Left...

