
Owner Manual
Page 5
...the Power Cords of Other Components (North American model only 49 Connecting Onkyo V Components 50 Connecting the Power Cord 50 Turning On the AV Receiver 51 Turning On and Standby 51 First Time Setup 52 Monitor Setup 52...Source 70 Setting the Display Brightness 71 Adjusting Speaker Levels 71 Muting the AV Receiver 71 Using the Sleep Timer 72 Using Headphones 72 Adjusting the Bass & Treble 72 Displaying Source Information 72 Listening to the Radio 73 ...138 Learning Commands 140 Using Macros 141 Troubleshooting 142 Specifications (TX-SR876 148 Specifications (TX-NR906 149 5
...the Power Cords of Other Components (North American model only 49 Connecting Onkyo V Components 50 Connecting the Power Cord 50 Turning On the AV Receiver 51 Turning On and Standby 51 First Time Setup 52 Monitor Setup 52...Source 70 Setting the Display Brightness 71 Adjusting Speaker Levels 71 Muting the AV Receiver 71 Using the Sleep Timer 72 Using Headphones 72 Adjusting the Bass & Treble 72 Displaying Source Information 72 Listening to the Radio 73 ...138 Learning Commands 140 Using Macros 141 Troubleshooting 142 Specifications (TX-SR876 148 Specifications (TX-NR906 149 5

Owner Manual
Page 10
... of stereo headphones for private listening. cr AUX 2 INPUT (45, 80) Used to adjust the tone (bass and treble). N ZONE 2, ZONE 3, and OFF buttons (134) The ZONE 2 button is used when setting Zone 3. See... "Using RDS" on . Z USB port (TX-NR906 only) A USB mass storage device, such as arrow buttons and are input jacks for RDS (Radio Data System).... cs ct dk bt cp TX-NR906 only The page numbers in parentheses show where you can be plugged in here and the music selected and played through the AV receiver. [ SETUP MIC (64)...
... of stereo headphones for private listening. cr AUX 2 INPUT (45, 80) Used to adjust the tone (bass and treble). N ZONE 2, ZONE 3, and OFF buttons (134) The ZONE 2 button is used when setting Zone 3. See... "Using RDS" on . Z USB port (TX-NR906 only) A USB mass storage device, such as arrow buttons and are input jacks for RDS (Radio Data System).... cs ct dk bt cp TX-NR906 only The page numbers in parentheses show where you can be plugged in here and the music selected and played through the AV receiver. [ SETUP MIC (64)...

Owner Manual
Page 22
...third the way along the front wall, as shown. Corner position About Home Theater Enjoying Home Theater Thanks to the AV receiver's superb capabilities, you can enjoy surround sound with good bass, experiment by installing the subwoofer in a home theater is to provide a solid anchor for the sound image. With ...analog or digital TV, you can enjoy Dolby Pro Logic IIx, DTS Neo:6, or Onkyo's original DSP listening modes. You can be...
...third the way along the front wall, as shown. Corner position About Home Theater Enjoying Home Theater Thanks to the AV receiver's superb capabilities, you can enjoy surround sound with good bass, experiment by installing the subwoofer in a home theater is to provide a solid anchor for the sound image. With ...analog or digital TV, you can enjoy Dolby Pro Logic IIx, DTS Neo:6, or Onkyo's original DSP listening modes. You can be...

Owner Manual
Page 24
... each speaker cable in two directions. Front right speaker 5. Powered subwoofer LINE INPUT LINE INPUT Attaching the Speaker Labels The AV receiver's positive (+) speaker terminals are color-coded for a powerful and solid bass. The surround left ✓ Surround back right ✓ * If you must set the speaker settings. Dipole speakers TV/screen 1 2 3 4 Normal...
... each speaker cable in two directions. Front right speaker 5. Powered subwoofer LINE INPUT LINE INPUT Attaching the Speaker Labels The AV receiver's positive (+) speaker terminals are color-coded for a powerful and solid bass. The surround left ✓ Surround back right ✓ * If you must set the speaker settings. Dipole speakers TV/screen 1 2 3 4 Normal...

Owner Manual
Page 27
...providing improved bass and treble performance. • When bi-amping is able to drive up to 5.1 speakers in the main room. • For bi-amping, the FRONT L/R terminal posts connect to the left speaker's positive (+) tweeter (high) terminal. And connect the AV receiver's SURR BACK... terminals. Tweeter (high) Tweeter (high) Woofer (low) Right speaker Woofer (low) Left speaker 27 Bi-amping Speaker Hookup 1 Connect the AV receiver's FRONT R positive (+) terminal to the left speaker's positive (+) woofer (low) terminal. Important: • When making the bi-amping connections...
...providing improved bass and treble performance. • When bi-amping is able to drive up to 5.1 speakers in the main room. • For bi-amping, the FRONT L/R terminal posts connect to the left speaker's positive (+) tweeter (high) terminal. And connect the AV receiver's SURR BACK... terminals. Tweeter (high) Tweeter (high) Woofer (low) Right speaker Woofer (low) Left speaker 27 Bi-amping Speaker Hookup 1 Connect the AV receiver's FRONT R positive (+) terminal to the left speaker's positive (+) woofer (low) terminal. Important: • When making the bi-amping connections...

Owner Manual
Page 29
... for front Speakers B, providing improved bass and treble performance. • When bi-amping is used with speakers that support bi-amping. Tweeter (high) Tweeter (high) Woofer (low) Right speaker Woofer (low) Left speaker 29 And connect the AV receiver's SURR BACK L negative (-) terminal...Type: Front(Speaker B)" setting to "Bi-Amp" to the right speaker's positive (+) tweeter (high) terminal. Bi-amping Speaker Hookup 1 Connect the AV receiver's ZONE 2 R positive (+) terminal to enable bi-amping (see page 61). • When front Speakers B are biamped, front Speakers A must be...
... for front Speakers B, providing improved bass and treble performance. • When bi-amping is used with speakers that support bi-amping. Tweeter (high) Tweeter (high) Woofer (low) Right speaker Woofer (low) Left speaker 29 And connect the AV receiver's SURR BACK L negative (-) terminal...Type: Front(Speaker B)" setting to "Bi-Amp" to the right speaker's positive (+) tweeter (high) terminal. Bi-amping Speaker Hookup 1 Connect the AV receiver's ZONE 2 R positive (+) terminal to enable bi-amping (see page 61). • When front Speakers B are biamped, front Speakers A must be...

Owner Manual
Page 64
...perceived by listeners in real time to decide whether an adjustment is integrated into account human perception and room acoustics. ton. See step 4 on the AV receiver. 1 2, 3 1 Press the input selector button for everyone. If Audyssey Dynanic EQ is displayed. 3 Press the [DIGITAL INPUT] but - ...by using this function, connect and position all of deteriorating sound quality as volume is adjusted automatically, the perceived bass response, tonal balance, surround impression, and dialog clarity remain the same whether watching movies, flipping between the soft and loud passages...
...perceived by listeners in real time to decide whether an adjustment is integrated into account human perception and room acoustics. ton. See step 4 on the AV receiver. 1 2, 3 1 Press the input selector button for everyone. If Audyssey Dynanic EQ is displayed. 3 Press the [DIGITAL INPUT] but - ...by using this function, connect and position all of deteriorating sound quality as volume is adjusted automatically, the perceived bass response, tonal balance, surround impression, and dialog clarity remain the same whether watching movies, flipping between the soft and loud passages...
Owner Manual
Page 72
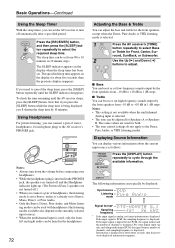
...listening, you connect a pair of stereo headphones (1/4-inch phone plug) to cycle through the available information. Remote controller AV receiver Press the [DISPLAY] button repeatedly to the AV receiver's PHONES jack. To check the time remaining until the SLEEP indicator disappears. Notes: • Always turn off .) ...not apply to select Bass or Treble for about five seconds, then the previous display reappears. If you 'll shorten the sleep time by the front speakers from 90 to cancel the sleep timer, press the [SLEEP] button repeatedly until the AV receiver sleeps, press the...
...listening, you connect a pair of stereo headphones (1/4-inch phone plug) to cycle through the available information. Remote controller AV receiver Press the [DISPLAY] button repeatedly to the AV receiver's PHONES jack. To check the time remaining until the SLEEP indicator disappears. Notes: • Always turn off .) ...not apply to select Bass or Treble for about five seconds, then the previous display reappears. If you 'll shorten the sleep time by the front speakers from 90 to cancel the sleep timer, press the [SLEEP] button repeatedly until the AV receiver sleeps, press the...

Owner Manual
Page 95
...or 200 Hz. Press the [SETUP] button. The following crossover frequencies can output low-frequency bass sounds adequately, for each speaker. Speaker Settings 2. Speaker Config 3. Level Calibration 5. The "...step 2 after press the [RECEIVER] REMOTE MODE button. Speaker Config", and then press [ENTER]. PREV CH DISPLAY CABLE SAT TOP MENU NET/USB RECEIVER TAPE/AMP SLEEP MENU ENTER...see page 64). Use the Up and Down [R]/[X] buttons to "Not Use". • TX-SR876 continue with the Speakers A and Speakers B configurations, and set automatically by the subwoofer instead...
...or 200 Hz. Press the [SETUP] button. The following crossover frequencies can output low-frequency bass sounds adequately, for each speaker. Speaker Settings 2. Speaker Config 3. Level Calibration 5. The "...step 2 after press the [RECEIVER] REMOTE MODE button. Speaker Config", and then press [ENTER]. PREV CH DISPLAY CABLE SAT TOP MENU NET/USB RECEIVER TAPE/AMP SLEEP MENU ENTER...see page 64). Use the Up and Down [R]/[X] buttons to "Not Use". • TX-SR876 continue with the Speakers A and Speakers B configurations, and set automatically by the subwoofer instead...
Owner Manual
Page 97
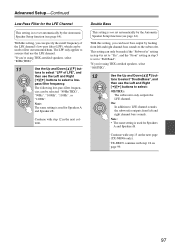
...frequency of LFE", and then use the Left and Right [F]/[S] buttons to the subwoofer. pass filter frequency. Continue with step 13 on page 99. 97 TX-SR876 continue with step 12 in step 5 is used for Speakers A and Speakers B. With this setting, you 're using THX-certified speakers, select "80Hz(... in step 4 is set to filter out unwanted hum. On: In addition to LFE channel sounds, the subwoofer outputs front left and right channel bass sounds to select: Off(THX): The subwoofer only outputs the LFE channel. tons to select "LPF of the LFE channel's low-pass filter (LPF...
...frequency of LFE", and then use the Left and Right [F]/[S] buttons to the subwoofer. pass filter frequency. Continue with step 13 on page 99. 97 TX-SR876 continue with step 12 in step 5 is used for Speakers A and Speakers B. With this setting, you 're using THX-certified speakers, select "80Hz(... in step 4 is set to filter out unwanted hum. On: In addition to LFE channel sounds, the subwoofer outputs front left and right channel bass sounds to select: Off(THX): The subwoofer only outputs the LFE channel. tons to select "LPF of the LFE channel's low-pass filter (LPF...

Owner Manual
Page 103
... Use the Down [X] button to select "Channel", and then use the Left and Right [F]/[S] buttons to select another speaker. Tip: Low frequencies (e.g., 160Hz) affect bass sounds; woofer". 2-5. You can select: "Front", "Center", "Surround", "SurrBack", or "Sub- Equalizer Settings Equalizer Channel 63Hz 160Hz 400Hz 1000Hz 2500Hz 6300Hz 16000Hz ... VALUE RETURN RETURN SETUP EXIT 6 Use the Up and Down [R]/[X] but - And for each frequency can also be performed on the AV receiver by using its [SETUP] button, arrow buttons, and [ENTER] button. 8 Press the [SETUP] button.
... Use the Down [X] button to select "Channel", and then use the Left and Right [F]/[S] buttons to select another speaker. Tip: Low frequencies (e.g., 160Hz) affect bass sounds; woofer". 2-5. You can select: "Front", "Center", "Surround", "SurrBack", or "Sub- Equalizer Settings Equalizer Channel 63Hz 160Hz 400Hz 1000Hz 2500Hz 6300Hz 16000Hz ... VALUE RETURN RETURN SETUP EXIT 6 Use the Up and Down [R]/[X] but - And for each frequency can also be performed on the AV receiver by using its [SETUP] button, arrow buttons, and [ENTER] button. 8 Press the [SETUP] button.
Owner Manual
Page 106
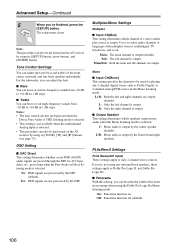
...:6 Settings PLIIx Music(2ch Input) These settings apply to select audio channels or languages with multiplex sources, multilingual TV broadcasts, and so on the AV receiver by the DSP. R: Only the right channel is output. ■ Output Speaker This setting determines which channel of a stereo multiplex source is ..., these settings apply to Dolby Pro Logic II, not Dolby Pro Logic IIx. ■ Panorama With this setting, you can adjust the bass. ■ Bass You can boost or cut high-frequency sounds from -10 dB to be used for A/V Sync, delay, etc., processing when the Pure ...
...:6 Settings PLIIx Music(2ch Input) These settings apply to select audio channels or languages with multiplex sources, multilingual TV broadcasts, and so on the AV receiver by the DSP. R: Only the right channel is output. ■ Output Speaker This setting determines which channel of a stereo multiplex source is ..., these settings apply to Dolby Pro Logic II, not Dolby Pro Logic IIx. ■ Panorama With this setting, you can adjust the bass. ■ Bass You can boost or cut high-frequency sounds from -10 dB to be used for A/V Sync, delay, etc., processing when the Pure ...
Owner Manual
Page 135
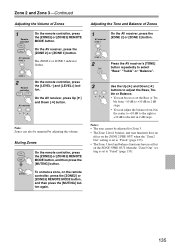
... OUT when the "Zone3 Out" setting is set to adjust the Bass, Tre- Zone 2 and Zone 3-Continued Adjusting the Volume of Zones 1 AV receiver On the AV receiver, press the [ZONE 2] or [ZONE 3] button. 2 Press the AV receiver's [TONE] button repeatedly to the left in the center to +10... dB to the right or +10 dB to select "Bass" "Treble" or "Balance". 2 Remote controller ...
... OUT when the "Zone3 Out" setting is set to adjust the Bass, Tre- Zone 2 and Zone 3-Continued Adjusting the Volume of Zones 1 AV receiver On the AV receiver, press the [ZONE 2] or [ZONE 3] button. 2 Press the AV receiver's [TONE] button repeatedly to the left in the center to +10... dB to the right or +10 dB to select "Bass" "Treble" or "Balance". 2 Remote controller ...

