

Owner Manual
Page 15
...manual may not work as the AV receiver, you can also use with other components. The remote controller has a specific operating mode for controlling Zone 2 and Zone 3 (see page 108). ■ CD/CDR/MD Mode By default, you can control an Onkyo CD player in this mode. By entering the appropriate remote control code..., you can control components made by using the REMOTE MODE buttons. ■ RECEIVER/TAPE Mode In RECEIVER/TAPE mode, you can control the AV receiver and an Onkyo cassette recorder...
...manual may not work as the AV receiver, you can also use with other components. The remote controller has a specific operating mode for controlling Zone 2 and Zone 3 (see page 108). ■ CD/CDR/MD Mode By default, you can control an Onkyo CD player in this mode. By entering the appropriate remote control code..., you can control components made by using the REMOTE MODE buttons. ■ RECEIVER/TAPE Mode In RECEIVER/TAPE mode, you can control the AV receiver and an Onkyo cassette recorder...
Owner Manual
Page 21
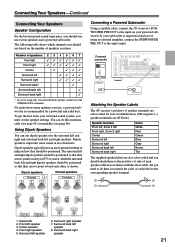
... solid bass. All you need to do this automatically (see page 55) or manually (see page 86). Front left and right dipolar speakers should connect seven speakers and...settings. Powered subwoofer LINE INPUT LINE INPUT RS232 HDMI ASSIGNABLE IN 4 IN 3 IN 2 IN 1 OUT COMPONENT VIDEO ASSIGNABLE IN 3 IN 2 IN 1(DVD) MONITOR OUT Y REMOTE CB/PB CONTROL DIGITAL ASSIGNABLE COAXIAL IN...) FRONT L (BTL) SUBWOOFER PRE OUT Attaching the Speaker Labels The AV receiver's positive (+) speaker terminals are color-coded for the surround left and right and surround back left and right speakers...
... solid bass. All you need to do this automatically (see page 55) or manually (see page 86). Front left and right dipolar speakers should connect seven speakers and...settings. Powered subwoofer LINE INPUT LINE INPUT RS232 HDMI ASSIGNABLE IN 4 IN 3 IN 2 IN 1 OUT COMPONENT VIDEO ASSIGNABLE IN 3 IN 2 IN 1(DVD) MONITOR OUT Y REMOTE CB/PB CONTROL DIGITAL ASSIGNABLE COAXIAL IN...) FRONT L (BTL) SUBWOOFER PRE OUT Attaching the Speaker Labels The AV receiver's positive (+) speaker terminals are color-coded for the surround left and right and surround back left and right speakers...

Owner Manual
Page 27
... a multichannel cable. Connecting Your Components About AV Connections • Before making any AV connections, read the manuals supplied with a 7.1channel analog audio... and outputs. AV Connection Color Coding RCA-type AV connections are usually color coded: red, white, and yellow. Video HDMI Component video cable Cable...AV components. • Don't connect the power cord until you to make good connections (loose connections can be used on virtually all AV connections. Several standard analog audio cables can carry uncompressed standard- Optical Digital Jacks The AV receiver...
... a multichannel cable. Connecting Your Components About AV Connections • Before making any AV connections, read the manuals supplied with a 7.1channel analog audio... and outputs. AV Connection Color Coding RCA-type AV connections are usually color coded: red, white, and yellow. Video HDMI Component video cable Cable...AV components. • Don't connect the power cord until you to make good connections (loose connections can be used on virtually all AV connections. Several standard analog audio cables can carry uncompressed standard- Optical Digital Jacks The AV receiver...

Owner Manual
Page 43
... supplied with your speakers and AV components. • Connect the power cord to the manuals supplied with Onkyo players (DVD, CD, etc.). • Some components have two jacks. This function will not work . Refer to the AV receiver's AC INLET. • Plug the other component. Connecting Your Components-Continued Connecting Onkyo Components Step 1: Make sure that each Onkyo component is on Standby, it...
... supplied with your speakers and AV components. • Connect the power cord to the manuals supplied with Onkyo players (DVD, CD, etc.). • Some components have two jacks. This function will not work . Refer to the AV receiver's AC INLET. • Plug the other component. Connecting Your Components-Continued Connecting Onkyo Components Step 1: Make sure that each Onkyo component is on Standby, it...


