Owner Manual
Page 1
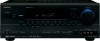
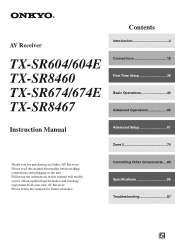
... Receiver TX-SR604/604E TX-SR8460 TX-SR674/674E TX-SR8467 Contents Introduction 2 Connections 18 First Time Setup 38 Basic Operations 49 Advanced Operations 66 Instruction Manual Advanced Setup 67 Zone 2 79 Thank you to obtain optimum performance and listening enjoyment from your new AV Receiver. Following the instructions in the unit. Please read this manual for purchasing an Onkyo...
... Receiver TX-SR604/604E TX-SR8460 TX-SR674/674E TX-SR8467 Contents Introduction 2 Connections 18 First Time Setup 38 Basic Operations 49 Advanced Operations 66 Instruction Manual Advanced Setup 67 Zone 2 79 Thank you to obtain optimum performance and listening enjoyment from your new AV Receiver. Following the instructions in the unit. Please read this manual for purchasing an Onkyo...
Owner Manual
Page 4
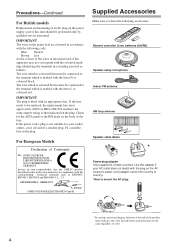
...ASTA or BSI to the terminal which is marked with the plug on the AV receiver's power cord (adapter varies from country to country). *How to be replaced, the... terminal which is marked with the following accessories: Remote controller & two batteries (AA/R6) Speaker setup microphone Indoor FM antenna AM loop antenna 1 2 3 Speaker Cable Speaker cable labels * Power-plug... may not correspond with an appropriate fuse. For European Models Declaration of Conformity We, ONKYO EUROPE ELECTRONICS GmbH LIEGNITZERSTRASSE 6, 82194 GROEBENZELL, GERMANY declare in certain countries. Specifi...
...ASTA or BSI to the terminal which is marked with the plug on the AV receiver's power cord (adapter varies from country to country). *How to be replaced, the... terminal which is marked with the following accessories: Remote controller & two batteries (AA/R6) Speaker setup microphone Indoor FM antenna AM loop antenna 1 2 3 Speaker Cable Speaker cable labels * Power-plug... may not correspond with an appropriate fuse. For European Models Declaration of Conformity We, ONKYO EUROPE ELECTRONICS GmbH LIEGNITZERSTRASSE 6, 82194 GROEBENZELL, GERMANY declare in certain countries. Specifi...

Owner Manual
Page 5
...intellectual property rights. This product incorporates copyright protection technology that is a trademark of Onkyo Corporation. *6. Manufactured under license from Audyssey Laboratories. HDMI, the HDMI logo and...Features Amplifier • 7-channel amplifier • Optimum Gain Volume Circuitry • Zone 2 capability • 24-bit/192 kHz D/A converters • WRAT (Wide Range Ampli&#...intended for use onscreen setup menus • Preprogrammed remote controller for home and other AV components TX-SR674/674E and TX-SR8467 Only • 95 watts per channel into 8 ohms, ...
...intellectual property rights. This product incorporates copyright protection technology that is a trademark of Onkyo Corporation. *6. Manufactured under license from Audyssey Laboratories. HDMI, the HDMI logo and...Features Amplifier • 7-channel amplifier • Optimum Gain Volume Circuitry • Zone 2 capability • 24-bit/192 kHz D/A converters • WRAT (Wide Range Ampli&#...intended for use onscreen setup menus • Preprogrammed remote controller for home and other AV components TX-SR674/674E and TX-SR8467 Only • 95 watts per channel into 8 ohms, ...
Owner Manual
Page 6
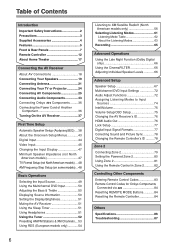
... AV Components 25 Connecting Audio Components 33 Connecting Onkyo Components .........36 Connecting the Power Cord of Another Component 36 Turning On the AV Receiver 37 First Time Setup Automatic Speaker Setup (Audyssey2EQ)....38 About the Onscreen Setup Menus............43 Digital Input 44 Video Input 45 ...50 Displaying Source Information 50 Setting the Display Brightness 51 Muting the AV Receiver 51 Using the Sleep Timer 51 Using Headphones 51 Using the Tuner 52 Presetting AM/FM Stations & XM Channels....53 Using RDS (European models only 54 6 Listening to XM Satellite Radio...
... AV Components 25 Connecting Audio Components 33 Connecting Onkyo Components .........36 Connecting the Power Cord of Another Component 36 Turning On the AV Receiver 37 First Time Setup Automatic Speaker Setup (Audyssey2EQ)....38 About the Onscreen Setup Menus............43 Digital Input 44 Video Input 45 ...50 Displaying Source Information 50 Setting the Display Brightness 51 Muting the AV Receiver 51 Using the Sleep Timer 51 Using Headphones 51 Using the Tuner 52 Presetting AM/FM Stations & XM Channels....53 Using RDS (European models only 54 6 Listening to XM Satellite Radio...
Owner Manual
Page 7
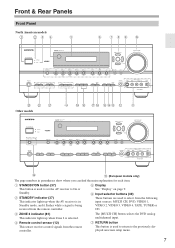
...multichannel input. G RETURN button This button is selected. F Input selector buttons (49) These buttons are used to return to the previously displayed onscreen setup menu. 7 B STANDBY indicator (37) This indicator lights up when Zone 2 is used to select from the following input sources: MULTI CH,... DVD, VIDEO 1, VIDEO 2, VIDEO 3, VIDEO 4, TAPE, TUNER or CD. C ZONE 2 indicator (81) This indicator lights up when the AV receiver is in parentheses show where you can find the main explanation for each item. Front & Rear Panels Front Panel North American models 1 23 4 ...
...multichannel input. G RETURN button This button is selected. F Input selector buttons (49) These buttons are used to return to the previously displayed onscreen setup menu. 7 B STANDBY indicator (37) This indicator lights up when Zone 2 is used to select from the following input sources: MULTI CH,... DVD, VIDEO 1, VIDEO 2, VIDEO 3, VIDEO 4, TAPE, TUNER or CD. C ZONE 2 indicator (81) This indicator lights up when the AV receiver is in parentheses show where you can find the main explanation for each item. Front & Rear Panels Front Panel North American models 1 23 4 ...

Owner Manual
Page 8
... listening. On the European model, this is for Zone 2. 8 The OFF button is used to turn off the output of the AV receiver to adjust the bass and treble. V ZONE 2/OFF button (81) The ZONE 2 button is used to select the input source for connecting...These buttons are used to adjust the volume of Zone 2. T TONE, [-] & [+] buttons (50) These buttons are jacks for automatic speaker setup. L SETUP MIC (38) The included speaker setup microphone is used to select the listening modes. J MASTER VOLUME control (49) This control is connected here for optical digital audio, S-Video, ...
... listening. On the European model, this is for Zone 2. 8 The OFF button is used to turn off the output of the AV receiver to adjust the bass and treble. V ZONE 2/OFF button (81) The ZONE 2 button is used to select the input source for connecting...These buttons are used to adjust the volume of Zone 2. T TONE, [-] & [+] buttons (50) These buttons are jacks for automatic speaker setup. L SETUP MIC (38) The included speaker setup microphone is used to select the listening modes. J MASTER VOLUME control (49) This control is connected here for optical digital audio, S-Video, ...

Owner Manual
Page 13
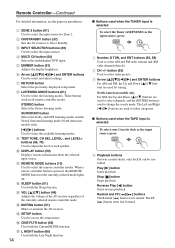
... or components made by other components. By entering the appropriate remote control code, you can control RECEIVER the AV receiver and an Onkyo cassette TAPE recorder connected via . 1 2 3 4 1 5 2 36 7 4 8 9 J ON/STANDBY ZONE2 REMOTE MODE RECEIVER TAPE INPUT SELECTOR 1 2 3 V1 V2 V3 DVD M D/CDR CD HDD 4 5 6 TV V4 MULTI CH DVD 7 ...DIMMER SLEEP TV VOL INPUT GUIDE TOP MENU CH DISC ALBUM VOL PREVIOUS MENU PLAYLIST /CAT ENTER MUTING PLAYLIST /CAT RETURN SETUP RECEIVER TAPE K L M N O LISTENING MODE STEREO SURROUND AUDIO SUBTITLE RANDOM REPEAT TEST TONE CH SEL LEVEL-
... or components made by other components. By entering the appropriate remote control code, you can control RECEIVER the AV receiver and an Onkyo cassette TAPE recorder connected via . 1 2 3 4 1 5 2 36 7 4 8 9 J ON/STANDBY ZONE2 REMOTE MODE RECEIVER TAPE INPUT SELECTOR 1 2 3 V1 V2 V3 DVD M D/CDR CD HDD 4 5 6 TV V4 MULTI CH DVD 7 ...DIMMER SLEEP TV VOL INPUT GUIDE TOP MENU CH DISC ALBUM VOL PREVIOUS MENU PLAYLIST /CAT ENTER MUTING PLAYLIST /CAT RETURN SETUP RECEIVER TAPE K L M N O LISTENING MODE STEREO SURROUND AUDIO SUBTITLE RANDOM REPEAT TEST TONE CH SEL LEVEL-
Owner Manual
Page 14
...listening modes. K REMOTE MODE buttons (13) Used to select and adjust settings. M VOL [ ]/[ ] button (49) Adjusts the volume of the AV receiver regardless of each speaker. P CINE FLTR button (66) Used with the Sleep function. Play [ ] button Starts playback. Rewind and FF [ ]/[ ]...2 button (81) Used to select AM and FM radio stations and XM radio channels directly. 2 CH +/- L SLEEP button (51) Used with the CinemaFILTER function. G RETURN button Selects the previously displayed setup menu. STEREO button Selects the Stereo listening mode. button (53) Used to select...
...listening modes. K REMOTE MODE buttons (13) Used to select and adjust settings. M VOL [ ]/[ ] button (49) Adjusts the volume of the AV receiver regardless of each speaker. P CINE FLTR button (66) Used with the Sleep function. Play [ ] button Starts playback. Rewind and FF [ ]/[ ]...2 button (81) Used to select AM and FM radio stations and XM radio channels directly. 2 CH +/- L SLEEP button (51) Used with the CinemaFILTER function. G RETURN button Selects the previously displayed setup menu. STEREO button Selects the Stereo listening mode. button (53) Used to select...
Owner Manual
Page 15
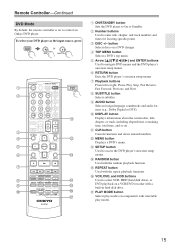
...DISPLAY L NIGHT VCR DVD CINE FLTR HDD RC-651M DVD K L M N O P Q A ON/STANDBY button Sets the DVD player to control an Onkyo DVD player. button Selects discs on components with a built-in hard disk drive. D TOP MENU button Selects a DVD's top menu. I AUDIO button ...RECEIVER TAPE INPUT SELECTOR 1 2 3 V1 V2 V3 DVD M D/CDR C D HDD 4 5 6 TV V4 MULTI CH DVD 7 8 9 VCR TAPE TUNER 10 11 +10 0 C D 12 CABLE CLR SAT D TUN --/--- ENT DIMMER SLEEP TV VOL INPUT GUIDE TOP MENU CH DISC ALBUM VOL PREVIOUS MENU PLAYLIST/CAT ENTER MUTING PLAYLIST/CAT RETURN SETUP...
...DISPLAY L NIGHT VCR DVD CINE FLTR HDD RC-651M DVD K L M N O P Q A ON/STANDBY button Sets the DVD player to control an Onkyo DVD player. button Selects discs on components with a built-in hard disk drive. D TOP MENU button Selects a DVD's top menu. I AUDIO button ...RECEIVER TAPE INPUT SELECTOR 1 2 3 V1 V2 V3 DVD M D/CDR C D HDD 4 5 6 TV V4 MULTI CH DVD 7 8 9 VCR TAPE TUNER 10 11 +10 0 C D 12 CABLE CLR SAT D TUN --/--- ENT DIMMER SLEEP TV VOL INPUT GUIDE TOP MENU CH DISC ALBUM VOL PREVIOUS MENU PLAYLIST/CAT ENTER MUTING PLAYLIST/CAT RETURN SETUP...

Owner Manual
Page 16
...DVD CINE FLTR HDD RC-651M J K L A ON/STANDBY button Sets the component to control an Onkyo CD player. C DISC/ALBUM +/- H MENU button Used to right: Pause, Play, Stop, Fast... GUIDE TOP MENU CH DISC ALBUM VOL PREVIOUS MENU MUTING PLAYLIST/CAT ENTER PLAYLIST/CAT RETURN SETUP M D/CDR C D HDD G 8 9 LISTENING MODE STEREO SURROUND AUDIO SUBTITLE RANDOM REPEAT...CDR, or HDD component, you must change the input display (see page 47). 1 2 3 4 E F ON/STANDBY ZONE2 REMOTE MODE RECEIVER TAPE INPUT SELECTOR 1 2 3 V1 V2 V3 DVD M D/CDR C D HDD 4 5 6 TV V4 MULTI CH DVD 7 8...
...DVD CINE FLTR HDD RC-651M J K L A ON/STANDBY button Sets the component to control an Onkyo CD player. C DISC/ALBUM +/- H MENU button Used to right: Pause, Play, Stop, Fast... GUIDE TOP MENU CH DISC ALBUM VOL PREVIOUS MENU MUTING PLAYLIST/CAT ENTER PLAYLIST/CAT RETURN SETUP M D/CDR C D HDD G 8 9 LISTENING MODE STEREO SURROUND AUDIO SUBTITLE RANDOM REPEAT...CDR, or HDD component, you must change the input display (see page 47). 1 2 3 4 E F ON/STANDBY ZONE2 REMOTE MODE RECEIVER TAPE INPUT SELECTOR 1 2 3 V1 V2 V3 DVD M D/CDR C D HDD 4 5 6 TV V4 MULTI CH DVD 7 8...
Owner Manual
Page 19
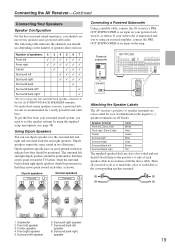
...Front right speaker 5. Surround right speaker 7. The following table indicates the channels you should use depending on the amp. Powered subwoofer LINE INPUT LINE INPUT PRE OUT SUB WOOFER Attaching the Speaker Labels The AV receiver's positive (+) speaker terminals are all you 're using an external ampli...best from your subwoofer is unpowered and you need to set the speaker settings by using the supplied setup microphone (see page 38). Connecting the AV Receiver-Continued Connecting Your Speakers Speaker Configuration For the best surround sound experience, you need to do...
...Front right speaker 5. Surround right speaker 7. The following table indicates the channels you should use depending on the amp. Powered subwoofer LINE INPUT LINE INPUT PRE OUT SUB WOOFER Attaching the Speaker Labels The AV receiver's positive (+) speaker terminals are all you 're using an external ampli...best from your subwoofer is unpowered and you need to set the speaker settings by using the supplied setup microphone (see page 38). Connecting the AV Receiver-Continued Connecting Your Speakers Speaker Configuration For the best surround sound experience, you need to do...
Owner Manual
Page 32
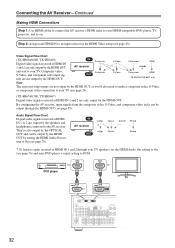
... 2 are only output by the HDMI OUT and sent to the AV receiver. IN AV receiver Composite Composite OUT S-Video S-Video Component HDMI * Component HDMI * TX-SR674/674E/8467 only Note: The onscreen setup menus are not output by the HDMI OUT. IN AV receiver OUT HDMI * HDMI Optical Coaxial Analog Optical Analog * To listen to...
... 2 are only output by the HDMI OUT and sent to the AV receiver. IN AV receiver Composite Composite OUT S-Video S-Video Component HDMI * Component HDMI * TX-SR674/674E/8467 only Note: The onscreen setup menus are not output by the HDMI OUT. IN AV receiver OUT HDMI * HDMI Optical Coaxial Analog Optical Analog * To listen to...
Owner Manual
Page 37
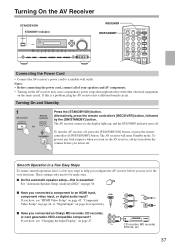
...very first time. To prevent any loud surprises when you use it off. I Do the automatic speaker setup-this is essential! Alternatively, press the remote controller's [RECEIVER] button, followed by the [ON/STANDBY] button. Smooth Operation in a Few Easy Steps To ensure smooth ... page 38. If you connected an Onkyo MD recorder, CD recorder, OUT IN or next generation HDD-compatible component? TAPE CD recorder, MD recorder, RI Dock, etc. 37 See "Automatic Speaker Setup (Audyssey2EQ)" on page 44 respectively. The AV receiver comes on page 47. I Have you...
...very first time. To prevent any loud surprises when you use it off. I Do the automatic speaker setup-this is essential! Alternatively, press the remote controller's [RECEIVER] button, followed by the [ON/STANDBY] button. Smooth Operation in a Few Easy Steps To ensure smooth ... page 38. If you connected an Onkyo MD recorder, CD recorder, OUT IN or next generation HDD-compatible component? TAPE CD recorder, MD recorder, RI Dock, etc. 37 See "Automatic Speaker Setup (Audyssey2EQ)" on page 44 respectively. The AV receiver comes on page 47. I Have you...
Owner Manual
Page 38
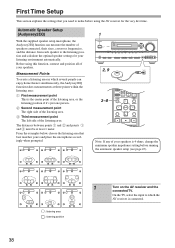
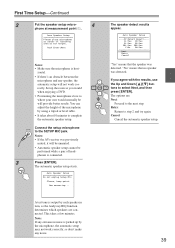
...speakers. From the examples below, choose the listening area that you need to make before running the automatic speaker setup (see page 47). TV TV TV 1 2, 9 3-8 ON/STANDBY ZONE2 REMOTE MODE RECEIVER TAPE INPUT SELECTOR 1 2 3 V1 V2 V3 DVD M D/CDR C D HDD 4 5 6 TV ...TV TV TV TV TV TV : listening area : listening position 1 Turn on the AV receiver and the connected TV. Automatic Speaker Setup (Audyssey2EQ) With the supplied speaker setup microphone, the Audyssey2EQ function can enjoy home theater simultaneously, the Audyssey2EQ function takes measurements at ...
...speakers. From the examples below, choose the listening area that you need to make before running the automatic speaker setup (see page 47). TV TV TV 1 2, 9 3-8 ON/STANDBY ZONE2 REMOTE MODE RECEIVER TAPE INPUT SELECTOR 1 2 3 V1 V2 V3 DVD M D/CDR C D HDD 4 5 6 TV ...TV TV TV TV TV TV : listening area : listening position 1 Turn on the AV receiver and the connected TV. Automatic Speaker Setup (Audyssey2EQ) With the supplied speaker setup microphone, the Audyssey2EQ function can enjoy home theater simultaneously, the Audyssey2EQ function takes measurements at ...
Owner Manual
Page 39
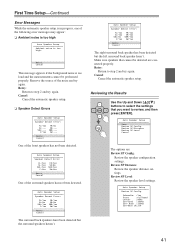
... Set up by the microphone, the automatic setup may not work correctly. Please, keep quiet. Auto Speaker Setup ----SP Detect Result---- First Time Setup-Continued 2 Put the speaker setup micro- 4 phone at ear height. Connect the setup microphone to step 2 and try again. Notes: • If the AV receiver was detected. Now measuring... The options are...
... Set up by the microphone, the automatic setup may not work correctly. Please, keep quiet. Auto Speaker Setup ----SP Detect Result---- First Time Setup-Continued 2 Put the speaker setup micro- 4 phone at ear height. Connect the setup microphone to step 2 and try again. Notes: • If the AV receiver was detected. Now measuring... The options are...

Owner Manual
Page 40
...(see "Reviewing the Results" on page 41). Audyssey2EQ performs more measurements. This takes a few minutes. plete, the following screen appears. Auto Speaker Setup Please place microphone at left end of listening area at ear height. Next[Calculate] Retry Cancel Use the Up and Down [ ]/[ ] buttons to... step 2 and try again. Retry: Return to select an option, and then press [ENTER]. Auto Speaker Setup Save Review SP Config Review SP Distance Review SP Level Cancel Use the Up and Down [ ]/[ ] buttons to measurement point 2 (page 38), then...
...(see "Reviewing the Results" on page 41). Audyssey2EQ performs more measurements. This takes a few minutes. plete, the following screen appears. Auto Speaker Setup Please place microphone at left end of listening area at ear height. Next[Calculate] Retry Cancel Use the Up and Down [ ]/[ ] buttons to... step 2 and try again. Retry: Return to select an option, and then press [ENTER]. Auto Speaker Setup Save Review SP Config Review SP Distance Review SP Level Cancel Use the Up and Down [ ]/[ ] buttons to measurement point 2 (page 38), then...
Owner Manual
Page 41
... not been detected. Make sure speakers that you want to step 2 and try again. SBR:--- Review SP Distance: Review the speaker distance settings. Auto Speaker Setup Speaker Detect Error: FL:Yes FR:Yes SL:Yes SR:Yes SBL:No SBR:Yes C:Yes SW:Yes Retry Cancel The right surround back speaker... background noise is too loud and the measurements cannot be detected are : Review SP Config: Review the speaker configuration settings. Auto Speaker Setup Speaker Detect Error: FL:Yes FR:Yes SL:Yes SR:No SBL:Yes SBR:Yes C:Yes SW:Yes Retry Cancel One of the noise and...
... not been detected. Make sure speakers that you want to step 2 and try again. SBR:--- Review SP Distance: Review the speaker distance settings. Auto Speaker Setup Speaker Detect Error: FL:Yes FR:Yes SL:Yes SR:Yes SBL:No SBR:Yes C:Yes SW:Yes Retry Cancel The right surround back speaker... background noise is too loud and the measurements cannot be detected are : Review SP Config: Review the speaker configuration settings. Auto Speaker Setup Speaker Detect Error: FL:Yes FR:Yes SL:Yes SR:No SBL:Yes SBR:Yes C:Yes SW:Yes Retry Cancel One of the noise and...

Owner Manual
Page 42
...instruction manual for details. 42 If the subwoofer has a low-pass filter switch, set it may not be detected by the automatic speaker setup may not be detected, so use an appropriate volume level. Using a Powered Subwoofer If you 'll have to the previous menu. If running ...button to return to set the speaker settings manually (see pages 67-71). Refer to its highest crossover frequency, and then try running the speaker setup a second time still doesn't provide usable results, you 're using a powered subwoofer, because it outputs very low-frequency sound and its position ...
...instruction manual for details. 42 If the subwoofer has a low-pass filter switch, set it may not be detected by the automatic speaker setup may not be detected, so use an appropriate volume level. Using a Powered Subwoofer If you 'll have to the previous menu. If running ...button to return to set the speaker settings manually (see pages 67-71). Refer to its highest crossover frequency, and then try running the speaker setup a second time still doesn't provide usable results, you 're using a powered subwoofer, because it outputs very low-frequency sound and its position ...
Owner Manual
Page 43
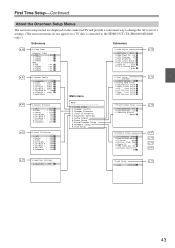
...TV Format :Auto d.AM Freq. Main menu 6.Input Setup --------DVD/MCH--------- First Time Setup-Continued About the Onscreen Setup Menus The onscreen setup menus are displayed on the connected TV and provide a convenient way to change the AV receiver's settings. (The onscreen menus do not appear on a... TV that's connected to the HDMI OUT (TX-SR604/604E/8460...
...TV Format :Auto d.AM Freq. Main menu 6.Input Setup --------DVD/MCH--------- First Time Setup-Continued About the Onscreen Setup Menus The onscreen setup menus are displayed on the connected TV and provide a convenient way to change the AV receiver's settings. (The onscreen menus do not appear on a... TV that's connected to the HDMI OUT (TX-SR604/604E/8460...
Owner Manual
Page 44
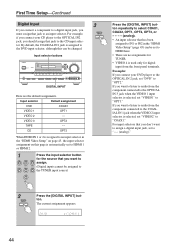
... default, the COAXIAL IN1 jack is assigned to the DVD input selector, although this page is assigned to an input selector in the "HDMI Video Setup" (page 45) can be assigned to VIDEO 3 VIDEO 4 TAPE the TUNER input source) C D Press the [DIGITAL INPUT] button repeatedly to select COAX1, COAX2, ... to the COAXIAL IN 1 jack when the VIDEO 2 input selector is used only for the source that jack to an input selector. First Time Setup-Continued Digital Input If you connect a component to a digital input jack, you must assign that jack to the CD input selector. Examples: If ...
... default, the COAXIAL IN1 jack is assigned to the DVD input selector, although this page is assigned to an input selector in the "HDMI Video Setup" (page 45) can be assigned to VIDEO 3 VIDEO 4 TAPE the TUNER input source) C D Press the [DIGITAL INPUT] button repeatedly to select COAX1, COAX2, ... to the COAXIAL IN 1 jack when the VIDEO 2 input selector is used only for the source that jack to an input selector. First Time Setup-Continued Digital Input If you connect a component to a digital input jack, you must assign that jack to the CD input selector. Examples: If ...


