
Owner Manual
Page 7
...with the Universal Port connector 36 Connecting Onkyo V Components 37 Connecting the Power Cord 37 Turning On & First Time Setup Turning On the AV Receiver 38 Turning On and Standby 38 First Time Setup 39 Using the Onscreen Setup Menus 39 Using the Display to change the settings 39 Video ... Setup 46 Basic Operations Basic Operations 51 Selecting the Input Source 51 Adjusting the Bass & Treble 52 Displaying Source Information 52 Setting the Display Brightness 52 Muting the AV receiver 53 Using the Sleep Timer 53 Using Headphones 53 Listening to the Radio 54 Using the Tuner 54...
...with the Universal Port connector 36 Connecting Onkyo V Components 37 Connecting the Power Cord 37 Turning On & First Time Setup Turning On the AV Receiver 38 Turning On and Standby 38 First Time Setup 39 Using the Onscreen Setup Menus 39 Using the Display to change the settings 39 Video ... Setup 46 Basic Operations Basic Operations 51 Selecting the Input Source 51 Adjusting the Bass & Treble 52 Displaying Source Information 52 Setting the Display Brightness 52 Muting the AV receiver 53 Using the Sleep Timer 53 Using Headphones 53 Listening to the Radio 54 Using the Tuner 54...

Owner Manual
Page 9
...for use with movies and TV. D ZONE 2 indicator (87) This indicator lights up when the AV receiver is used with the onscreen setup menus. TONE button (52) Used to adjust the display brightness. K DIMMER or RT/PTY/TP button (52, 57) This button is in parentheses show ...Input selector buttons (51) These buttons are used to turn off the output of the AV receiver to connect a camcorder, game console, and so on the connected TV. 9 Pressing this mode is used to the previously displayed onscreen setup menu. The [OFF] button is selected. F Remote control sensor (13) ...
...for use with movies and TV. D ZONE 2 indicator (87) This indicator lights up when the AV receiver is used with the onscreen setup menus. TONE button (52) Used to adjust the display brightness. K DIMMER or RT/PTY/TP button (52, 57) This button is in parentheses show ...Input selector buttons (51) These buttons are used to turn off the output of the AV receiver to connect a camcorder, game console, and so on the connected TV. 9 Pressing this mode is used to the previously displayed onscreen setup menu. The [OFF] button is selected. F Remote control sensor (13) ...

Owner Manual
Page 26
...that is connected to the input selector, this will be connected to the MONITOR OUT V, or the COMPONENT VIDEO OUT, use the AV receiver's display when changing settings. And if no component video signal being present. video is assigned to the HDMI OUT. Audio Signal Flow Chart ...be selected automatically in the fol- Connecting the AV Receiver-Continued ■ Signal Selection If signals are present at more than one input, the DVD player, etc. Signal Selection Example lowing order of priority: HDMI, digital, analog. 26 The onscreen setup menus appear only on the "Audio ...
...that is connected to the input selector, this will be connected to the MONITOR OUT V, or the COMPONENT VIDEO OUT, use the AV receiver's display when changing settings. And if no component video signal being present. video is assigned to the HDMI OUT. Audio Signal Flow Chart ...be selected automatically in the fol- Connecting the AV Receiver-Continued ■ Signal Selection If signals are present at more than one input, the DVD player, etc. Signal Selection Example lowing order of priority: HDMI, digital, analog. 26 The onscreen setup menus appear only on the "Audio ...

Owner Manual
Page 27
The onscreen setup menus appear only on page 23 for HDMI connection information. If your TV has no audio outputs, connect an audio output from your TV ( A or B ), and then make the connection. Connecting the AV Receiver-Continued Connecting a TV or Projector See "Connecting Components...TV, projector, etc. Hint! Step 1: Video Connection Choose a video connection that is connected to the MONITOR OUT V, or the COMPONENT VIDEO OUT, use the AV receiver's display when changing settings. • With connection a , you can listen to and record audio from your TV ( a , b , or c ), and ...
The onscreen setup menus appear only on page 23 for HDMI connection information. If your TV has no audio outputs, connect an audio output from your TV ( A or B ), and then make the connection. Connecting the AV Receiver-Continued Connecting a TV or Projector See "Connecting Components...TV, projector, etc. Hint! Step 1: Video Connection Choose a video connection that is connected to the MONITOR OUT V, or the COMPONENT VIDEO OUT, use the AV receiver's display when changing settings. • With connection a , you can listen to and record audio from your TV ( a , b , or c ), and ...

Owner Manual
Page 39
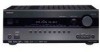
... 8. The onscreen setup menus appear only on a TV that are displayed on the TV screen will appear in the Onscreen Setup Menus is connected to close the menu. Using the Display to select submenu and then press [ENTER]. tons to change the settings RECEIVER The settings of the AV receiver can be displayed one by using the Display. Source...
... 8. The onscreen setup menus appear only on a TV that are displayed on the TV screen will appear in the Onscreen Setup Menus is connected to close the menu. Using the Display to select submenu and then press [ENTER]. tons to change the settings RECEIVER The settings of the AV receiver can be displayed one by using the Display. Source...

Owner Manual
Page 42
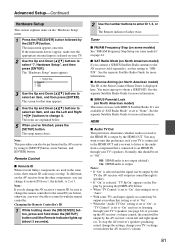
... the component connected to the OPTICAL IN 2 jack when the VCR/DVR input selector is displayed like "COAX1* ". Notes: • If you connect an input component (such as UP... assign that jack to the CD input selector. Here are the default assignments. The main menu appears onscreen. If you connect your TV. 2 Use the Up and Down [R]/[X] but- For example, if ...; When an HDMI IN is automatically set to PORT selector. • This procedure can be performed on the AV receiver by the [SETUP] button. lowed by using its [SETUP] button, arrow buttons, and [ENTER] button. ...
... the component connected to the OPTICAL IN 2 jack when the VCR/DVR input selector is displayed like "COAX1* ". Notes: • If you connect an input component (such as UP... assign that jack to the CD input selector. Here are the default assignments. The main menu appears onscreen. If you connect your TV. 2 Use the Up and Down [R]/[X] but- For example, if ...; When an HDMI IN is automatically set to PORT selector. • This procedure can be performed on the AV receiver by the [SETUP] button. lowed by using its [SETUP] button, arrow buttons, and [ENTER] button. ...

Owner Manual
Page 44
...doesn't appear, make sure the appropriate external input is changed, all radio presets are deleted. 1 Press the [RECEIVER] button, followed by the [SETUP] button. The "Hardware Setup" menu appears. Miscellaneous 1. Remote ID 2. ...Format Setup (not North American models) For the onscreen setup menus to display properly, you must specify the FM/AM frequency step used in your area. 1 Press the [RECEIVER] button fol- tons to select "2. neous", and... Auto: Select this setting is selected on the AV receiver by using its [SETUP] button, arrow buttons, and [ENTER] button.
...doesn't appear, make sure the appropriate external input is changed, all radio presets are deleted. 1 Press the [RECEIVER] button, followed by the [SETUP] button. The "Hardware Setup" menu appears. Miscellaneous 1. Remote ID 2. ...Format Setup (not North American models) For the onscreen setup menus to display properly, you must specify the FM/AM frequency step used in your area. 1 Press the [RECEIVER] button fol- tons to select "2. neous", and... Auto: Select this setting is selected on the AV receiver by using its [SETUP] button, arrow buttons, and [ENTER] button.

Owner Manual
Page 47
...correction and speaker setup, do not stand between the speakers and microphone, and avoid obstacles blocking the path between speakers and microphone. The onscreen setup menus appear only on the number of speakers. • Do not disconnect the speaker setup microphone during the room correction and speaker ... on a TV that is connected to the MONITOR OUT V or the COMPONENT VIDEO OUT, use the AV receiver's display when changing settings. On the TV, select the input to which the AV receiver is connected. • It takes about 15 minutes to complete the room correction and speaker setup for ...
...correction and speaker setup, do not stand between the speakers and microphone, and avoid obstacles blocking the path between speakers and microphone. The onscreen setup menus appear only on the number of speakers. • Do not disconnect the speaker setup microphone during the room correction and speaker ... on a TV that is connected to the MONITOR OUT V or the COMPONENT VIDEO OUT, use the AV receiver's display when changing settings. On the TV, select the input to which the AV receiver is connected. • It takes about 15 minutes to complete the room correction and speaker setup for ...

Owner Manual
Page 78
...external input is noticeably louder than the others , use the Right [S] button to select an input source, and then press the [RECEIVER] button. 2 Press the [SETUP] button. The "Source Setup" menu appears. The setup menu closes. If a component is ...finished, press the [SETUP] button. A/V Sync 0ms Press Enter to the audio signal. The HDMI Lip Sync delay time is displayed in a box. 4. The input level can set the delay. Use the Left and Right [F]/[S] buttons to set individually for Zone...This is useful if one of sync. If it . The main menu appears onscreen.
...external input is noticeably louder than the others , use the Right [S] button to select an input source, and then press the [RECEIVER] button. 2 Press the [SETUP] button. The "Source Setup" menu appears. The setup menu closes. If a component is ...finished, press the [SETUP] button. A/V Sync 0ms Press Enter to the audio signal. The HDMI Lip Sync delay time is displayed in a box. 4. The input level can set the delay. Use the Left and Right [F]/[S] buttons to set individually for Zone...This is useful if one of sync. If it . The main menu appears onscreen.

Owner Manual
Page 80
... to 30. ■ Power On Volume With this preference, you can also be used each time the AV receiver is connected to select "6. The main menu appears onscreen. If the main menu doesn't appear, make sure the appropriate external input is adjusted. Miscellaneous", and then...details are explained below. 5 When you've finished, press the [SETUP] button. OSD Setup ■ Immediate Display This preference determines whether operation details are displayed onscreen when an AV receiver function is selected on . Bottom: Bottom of the screen. ■ TV Format (not North American models)...
... to 30. ■ Power On Volume With this preference, you can also be used each time the AV receiver is connected to select "6. The main menu appears onscreen. If the main menu doesn't appear, make sure the appropriate external input is adjusted. Miscellaneous", and then...details are explained below. 5 When you've finished, press the [SETUP] button. OSD Setup ■ Immediate Display This preference determines whether operation details are displayed onscreen when an AV receiver function is selected on . Bottom: Bottom of the screen. ■ TV Format (not North American models)...
Owner Manual
Page 81
...your TV. 2 Use the Up and Down [R]/[X] buttons to "SIRIUS". Remote Control ■ Remote ID When several Onkyo components are explained below ), otherwise, you turn up the AV receiver's volume control, the sound will output no sound may overlap. You must sign up (about 3 seconds). 2 ...The main menu appears onscreen. The Remote indicator flashes twice. See the separate Satellite Radio Guide for that 's connected to "None". On: HDMI audio is not output (default). Notes: • If "On" is selected, "TV Sp On" appears on the Display by the AV receiver's front left and right...
...your TV. 2 Use the Up and Down [R]/[X] buttons to "SIRIUS". Remote Control ■ Remote ID When several Onkyo components are explained below ), otherwise, you turn up the AV receiver's volume control, the sound will output no sound may overlap. You must sign up (about 3 seconds). 2 ...The main menu appears onscreen. The Remote indicator flashes twice. See the separate Satellite Radio Guide for that 's connected to "None". On: HDMI audio is not output (default). Notes: • If "On" is selected, "TV Sp On" appears on the Display by the AV receiver's front left and right...
Owner Manual
Page 83
... the HDMI outputs and have the AV receiver automatically convert video at resolutions not supported by the [SETUP] button. Locked: Setup menus locked. Note: If the resolution is displayed such as "(1080i)" on page 105 to select "9. The main menu appears onscreen. Lock Setup", and then press ... to select an item. 3 Use the Left and Right [F]/[S] buttons to change any setting. Auto: Select this to have the AV receiver upconvert the picture resolution as necessary to match the resolution supported by your TV. Advanced Setup-Continued Lock Setup With this preference, you...
... the HDMI outputs and have the AV receiver automatically convert video at resolutions not supported by the [SETUP] button. Locked: Setup menus locked. Note: If the resolution is displayed such as "(1080i)" on page 105 to select "9. The main menu appears onscreen. Lock Setup", and then press ... to select an item. 3 Use the Left and Right [F]/[S] buttons to change any setting. Auto: Select this to have the AV receiver upconvert the picture resolution as necessary to match the resolution supported by your TV. Advanced Setup-Continued Lock Setup With this preference, you...

Owner Manual
Page 96
...the appropriate REMOTE MODE button first B H I MUTING button (53) Mutes or unmutes the AV receiver. H DISPLAY button Displays information. K VOL [R]/[X] button (51) Adjusts the volume of the AV receiver. N AUDIO button Selects foreign language soundtracks and audio formats (e.g., Dolby Digital or DTS). ...items. E SETUP button Displays the setup menu. O buttons Play, Pause, Stop, Rewind, Fast forward, Previous, and Next. C GUIDE button Displays the onscreen program guide. Controlling Other Components-Continued Controlling a Satellite Receiver or Cable Receiver By pressing the REMOTE ...
...the appropriate REMOTE MODE button first B H I MUTING button (53) Mutes or unmutes the AV receiver. H DISPLAY button Displays information. K VOL [R]/[X] button (51) Adjusts the volume of the AV receiver. N AUDIO button Selects foreign language soundtracks and audio formats (e.g., Dolby Digital or DTS). ...items. E SETUP button Displays the setup menu. O buttons Play, Pause, Stop, Rewind, Fast forward, Previous, and Next. C GUIDE button Displays the onscreen program guide. Controlling Other Components-Continued Controlling a Satellite Receiver or Cable Receiver By pressing the REMOTE ...

Owner Manual
Page 100
...is connected to its power cord disconnected for 1 hour. To reset the AV receiver to the MONITOR OUT V, or the COMPONENT VIDEO OUT, use all listening modes use the AV receiver's display when changing settings. The onscreen setup menus appear only on and, while holding down the [VCR/DVR]...cord is set the volume to maximum, disconnect the power cord, and contact your Onkyo dealer. Troubleshooting If you can 't resolve the issue yourself, try resetting the AV receiver before contacting your Onkyo dealer. Note that the bare wires are connected properly (pages 24-36). •...
...is connected to its power cord disconnected for 1 hour. To reset the AV receiver to the MONITOR OUT V, or the COMPONENT VIDEO OUT, use all listening modes use the AV receiver's display when changing settings. The onscreen setup menus appear only on and, while holding down the [VCR/DVR]...cord is set the volume to maximum, disconnect the power cord, and contact your Onkyo dealer. Troubleshooting If you can 't resolve the issue yourself, try resetting the AV receiver before contacting your Onkyo dealer. Note that the bare wires are connected properly (pages 24-36). •...
Owner Manual
Page 102
The onscreen menus don't appear • On non-North American models, specify the TV system used in your area in a case, it may not connect properly to select another manufacturer's component, point the remote controller at the AV receiver. The immediate display does not appear • Depending on...control code first (page 92). • To control an Onkyo component that the AV receiver is in the "TV Format Setup" on the AV receiver's display, this indicates that 's connected via V, or another resolution on your TV or the AV receiver. • Some versions of bat- Be sure to the...
The onscreen menus don't appear • On non-North American models, specify the TV system used in your area in a case, it may not connect properly to select another manufacturer's component, point the remote controller at the AV receiver. The immediate display does not appear • Depending on...control code first (page 92). • To control an Onkyo component that the AV receiver is in the "TV Format Setup" on the AV receiver's display, this indicates that 's connected via V, or another resolution on your TV or the AV receiver. • Some versions of bat- Be sure to the...

