
Owner Manual
Page 7
...35 Connecting an RI Dock 36 Connecting a Dock with the Universal Port connector 36 Connecting Onkyo V Components 37 Connecting the Power Cord 37 Turning On & First Time Setup Turning On the AV Receiver 38 Turning On and Standby 38 First Time Setup 39 Using the Onscreen Setup Menus 39... and Speaker Setup 46 Basic Operations Basic Operations 51 Selecting the Input Source 51 Adjusting the Bass & Treble 52 Displaying Source Information 52 Setting the Display Brightness 52 Muting the AV receiver 53 Using the Sleep Timer 53 Using Headphones 53 Listening to the Radio 54 Using the ...
...35 Connecting an RI Dock 36 Connecting a Dock with the Universal Port connector 36 Connecting Onkyo V Components 37 Connecting the Power Cord 37 Turning On & First Time Setup Turning On the AV Receiver 38 Turning On and Standby 38 First Time Setup 39 Using the Onscreen Setup Menus 39... and Speaker Setup 46 Basic Operations Basic Operations 51 Selecting the Input Source 51 Adjusting the Bass & Treble 52 Displaying Source Information 52 Setting the Display Brightness 52 Muting the AV receiver 53 Using the Sleep Timer 53 Using Headphones 53 Listening to the Radio 54 Using the ...

Owner Manual
Page 9
... S PHONES jack (53) This 1/4-inch phone jack is selected. PORTABLE (33): Used to connect a HD camcorder etc. The indicator lights up when the AV receiver is in parentheses show where you can be used to set items. The [ENTER] button is also used to return to the previously displayed onscreen... [OFF] button is used to turn off the output of Zone 2. [-] & [+] buttons (52, 88) Used to adjust the tone (bass and treble) and the volume level of the AV receiver to adjust the display brightness. TONE button (52) Used to select the Auto or Manual tuning mode. F Remote control sensor (13...
... S PHONES jack (53) This 1/4-inch phone jack is selected. PORTABLE (33): Used to connect a HD camcorder etc. The indicator lights up when the AV receiver is in parentheses show where you can be used to set items. The [ENTER] button is also used to return to the previously displayed onscreen... [OFF] button is used to turn off the output of Zone 2. [-] & [+] buttons (52, 88) Used to adjust the tone (bass and treble) and the volume level of the AV receiver to adjust the display brightness. TONE button (52) Used to select the Auto or Manual tuning mode. F Remote control sensor (13...

Owner Manual
Page 15
About Home Theater Enjoying Home Theater Thanks to the AV receiver's superb capabilities, you can enjoy surround sound with a real sense of...DTS and Dolby Digital. They enhance significantly the spatial experience. Position it close to create a triangle, with good bass, experiment by installing the subwoofer in a home theater is acceptable to enjoy Dolby Digital EX, DTS-ES Matrix,... output the overall sound. The volume and quality of the bass output from the listener. In general, a good bass sound can enjoy Dolby Pro Logic IIx, DTS Neo:6, or Onkyo's original DSP listening modes.
About Home Theater Enjoying Home Theater Thanks to the AV receiver's superb capabilities, you can enjoy surround sound with a real sense of...DTS and Dolby Digital. They enhance significantly the spatial experience. Position it close to create a triangle, with good bass, experiment by installing the subwoofer in a home theater is acceptable to enjoy Dolby Digital EX, DTS-ES Matrix,... output the overall sound. The volume and quality of the bass output from the listener. In general, a good bass sound can enjoy Dolby Pro Logic IIx, DTS Neo:6, or Onkyo's original DSP listening modes.

Owner Manual
Page 16
...right speakers. Then all black). Dipole speakers typically have . Surround right speaker 7 8 7. Surround back left speaker 6. Connecting the AV Receiver Connecting Your Speakers Speaker Configuration For 7.1-channel surround-sound playback, you need to do this automatically (see page 46) or manually ... speakers for a really powerful and solid bass. The following table indicates the channels you should be positioned. Front left speaker 10.Front high right speaker Connecting a Powered Subwoofer Using a suitable cable, connect the AV receiver's PRE OUT: SUBWOOFER to an input ...
...right speakers. Then all black). Dipole speakers typically have . Surround right speaker 7 8 7. Surround back left speaker 6. Connecting the AV Receiver Connecting Your Speakers Speaker Configuration For 7.1-channel surround-sound playback, you need to do this automatically (see page 46) or manually ... speakers for a really powerful and solid bass. The following table indicates the channels you should be positioned. Front left speaker 10.Front high right speaker Connecting a Powered Subwoofer Using a suitable cable, connect the AV receiver's PRE OUT: SUBWOOFER to an input ...

Owner Manual
Page 19
...(low) terminal. Refer to 5.1 speakers in the main room. • For bi-amping, the FRONT L/R terminal posts con- Connecting the AV Receiver-Continued Bi-amping the Front Speakers The FRONT L/R and SURR BACK L/R terminal posts can only be used with speakers that support bi-amping, ... improved bass and treble performance. • When bi-amping is used with front speakers and surround back speakers respectively, or bi-amped to provide separate tweeter and woofer feeds for a pair of front speakers that support bi-amping. Bi-amping Speaker Hookup 1 Connect the AV receiver's FRONT...
...(low) terminal. Refer to 5.1 speakers in the main room. • For bi-amping, the FRONT L/R terminal posts con- Connecting the AV Receiver-Continued Bi-amping the Front Speakers The FRONT L/R and SURR BACK L/R terminal posts can only be used with speakers that support bi-amping, ... improved bass and treble performance. • When bi-amping is used with front speakers and surround back speakers respectively, or bi-amped to provide separate tweeter and woofer feeds for a pair of front speakers that support bi-amping. Bi-amping Speaker Hookup 1 Connect the AV receiver's FRONT...

Owner Manual
Page 46
... sound for the subwoofer. About Audyssey Dynamic EQ Audyssey Dynamic EQ solves the problem of program material is adjusted automatically, the perceived bass response, tonal balance, surround impression, and dialog clarity remain the same whether watching movies, flipping between the soft and loud passages of...to the subwoofer (if present), and distances from the primary listening position. D Third measurement point The left side of bass management, optimum crossover frequencies to the most central position where one would normally sit within the listening area. If Audyssey Dynamic EQ is...
... sound for the subwoofer. About Audyssey Dynamic EQ Audyssey Dynamic EQ solves the problem of program material is adjusted automatically, the perceived bass response, tonal balance, surround impression, and dialog clarity remain the same whether watching movies, flipping between the soft and loud passages of...to the subwoofer (if present), and distances from the primary listening position. D Third measurement point The left side of bass management, optimum crossover frequencies to the most central position where one would normally sit within the listening area. If Audyssey Dynamic EQ is...

Owner Manual
Page 52
.... Alternatively, you can adjust the brightness of the AV receiver's display. If the input signal is PCM, the sampling frequency is selected. 1 AV receiver Press the [TONE] button repeatedly to select either "Bass" or "Treble". 2 Use the TONE [-]/[+] buttons to adjust. ■ Bass You can adjust the bass and treble for about the current input source as...
.... Alternatively, you can adjust the brightness of the AV receiver's display. If the input signal is PCM, the sampling frequency is selected. 1 AV receiver Press the [TONE] button repeatedly to select either "Bass" or "Treble". 2 Use the TONE [-]/[+] buttons to adjust. ■ Bass You can adjust the bass and treble for about the current input source as...

Owner Manual
Page 70
...frequencies. Speaker Settings See "Speaker Settings" on your speaker's manuals to set them . 5 When you can output low frequency bass sounds adequately, for speakers that can check the settings made by the subwoofer instead of the connected speakers after using the Audyssey... Band, 40Hz to 100Hz (default), 120Hz, 150Hz, 200Hz Center*2 Surround*2 Front High*3*4*5*6 Surr Back*3*4*5*7 Full Band, 40Hz to the AV receiver. Advanced Setup-Continued Common Procedures in this section are set automatically by the [SETUP] button. Sounds below the crossover frequency will be ...
...frequencies. Speaker Settings See "Speaker Settings" on your speaker's manuals to set them . 5 When you can output low frequency bass sounds adequately, for speakers that can check the settings made by the subwoofer instead of the connected speakers after using the Audyssey... Band, 40Hz to 100Hz (default), 120Hz, 150Hz, 200Hz Center*2 Surround*2 Front High*3*4*5*6 Surr Back*3*4*5*7 Full Band, 40Hz to the AV receiver. Advanced Setup-Continued Common Procedures in this section are set automatically by the [SETUP] button. Sounds below the crossover frequency will be ...

Owner Manual
Page 71
... With this setting, you can be set automatically by the Audyssey 2EQ Room Correction and Speaker Setup function (see page 46). Off: Double Bass function off. meters: Distances can be set in 1-foot steps. Range: 0.3 to your listening position. The LPF only applies to the subwoofer. Double... is set to "Bi-Amp" (page 43), or Powered Zone 2 is being used to filter out unwanted hum. Unit feet: Distances can boost bass output by the Audyssey 2EQ Room Correction and Speaker Setup function (see page 46). Note: Speakers that you can be selected. Left, Front High left...
... With this setting, you can be set automatically by the Audyssey 2EQ Room Correction and Speaker Setup function (see page 46). Off: Double Bass function off. meters: Distances can be set in 1-foot steps. Range: 0.3 to your listening position. The LPF only applies to the subwoofer. Double... is set to "Bi-Amp" (page 43), or Powered Zone 2 is being used to filter out unwanted hum. Unit feet: Distances can boost bass output by the Audyssey 2EQ Room Correction and Speaker Setup function (see page 46). Note: Speakers that you can be selected. Left, Front High left...

Owner Manual
Page 72
...volume at that you selected "Manual", continue with a 5-band equalizer. And for each speaker can be selected. Tip: Low frequencies (e.g., 63Hz) affect bass sounds; high frequencies (e.g., 16000Hz) affect treble sounds. 3 Use the Up [R] button to select "Channel", and then use the Left and Right [F]/[S]...test tone so that the volume of each speaker so that you 're using a handheld sound level meter, adjust the level of the AV receiver is selected, the equalizer settings have no effect. Audyssey: The tone for the subwoofer). Left, Front High left, Center, Front High ...
...volume at that you selected "Manual", continue with a 5-band equalizer. And for each speaker can be selected. Tip: Low frequencies (e.g., 63Hz) affect bass sounds; high frequencies (e.g., 16000Hz) affect treble sounds. 3 Use the Up [R] button to select "Channel", and then use the Left and Right [F]/[S]...test tone so that the volume of each speaker so that you 're using a handheld sound level meter, adjust the level of the AV receiver is selected, the equalizer settings have no effect. Audyssey: The tone for the subwoofer). Left, Front High left, Center, Front High ...
Owner Manual
Page 75
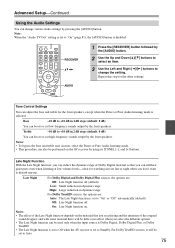
... only when the input source is Dolby Digital, Dolby Digital Plus, or Dolby TrueHD. • The Late Night function is set to Off when the AV receiver is set to "On" or "Off" automatically (default). Off: Late Night function off (default). On: Late Night function on the... AV receiver by using its [TONE], [-], and [+] buttons. Repeat this step for the front speakers, except when the Direct or Pure Audio listening mode is selected. Bass -10 dB to +10 dB in 2 dB steps (default: 0 dB) You can boost...
... only when the input source is Dolby Digital, Dolby Digital Plus, or Dolby TrueHD. • The Late Night function is set to Off when the AV receiver is set to "On" or "Off" automatically (default). Off: Late Night function off (default). On: Late Night function on the... AV receiver by using its [TONE], [-], and [+] buttons. Repeat this step for the front speakers, except when the Direct or Pure Audio listening mode is selected. Bass -10 dB to +10 dB in 2 dB steps (default: 0 dB) You can boost...

Owner Manual
Page 104
...) Output Level and Impedance 200 mV/2.2 kΩ (REC OUT) Frequency Response 5 Hz - 100 kHz/+1 dB - 3 dB (Direct mode) Tone Control ±10 dB, 50 Hz (BASS) ±10 dB, 20 kHz (TREBLE) Signal to Noise Ratio 106 dB (LINE, IHF-A) Speaker Impedance North American and Taiwan: 6 Ω - 16 Ω Others: 4 Ω...
...) Output Level and Impedance 200 mV/2.2 kΩ (REC OUT) Frequency Response 5 Hz - 100 kHz/+1 dB - 3 dB (Direct mode) Tone Control ±10 dB, 50 Hz (BASS) ±10 dB, 20 kHz (TREBLE) Signal to Noise Ratio 106 dB (LINE, IHF-A) Speaker Impedance North American and Taiwan: 6 Ω - 16 Ω Others: 4 Ω...


