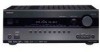

Owner Manual
Page 7
... 35 Connecting an RI Dock 36 Connecting a Dock with the Universal Port connector 36 Connecting Onkyo V Components 37 Connecting the Power Cord 37 Turning On & First Time Setup Turning On the AV Receiver 38 Turning On and Standby 38 First Time Setup 39 Using the Onscreen Setup Menus 39 ... 70 Speaker Setup 70 Audio Adjust 73 Using the Audio Settings 75 Assigning Listening Modes to Input Sources....... 77 Source Setup 78 Miscellaneous (Volume/OSD) Setup 80 Hardware Setup 81 Lock Setup 83 Using the Video Settings 83 Digital Input Signal Formats 84 Zone 2 Zone 2 85 Connecting Zone...
... 35 Connecting an RI Dock 36 Connecting a Dock with the Universal Port connector 36 Connecting Onkyo V Components 37 Connecting the Power Cord 37 Turning On & First Time Setup Turning On the AV Receiver 38 Turning On and Standby 38 First Time Setup 39 Using the Onscreen Setup Menus 39 ... 70 Speaker Setup 70 Audio Adjust 73 Using the Audio Settings 75 Assigning Listening Modes to Input Sources....... 77 Source Setup 78 Miscellaneous (Volume/OSD) Setup 80 Hardware Setup 81 Lock Setup 83 Using the Video Settings 83 Digital Input Signal Formats 84 Zone 2 Zone 2 85 Connecting Zone...

Owner Manual
Page 44
... appropriate external input is changed, all radio presets are deleted. 1 Press the [RECEIVER] button, followed by the [SETUP] button. NTSC: Select if the TV system in your area is PAL. Miscellaneous 1. OSD Setup", Setup", and then press [ENTER]. Tuner 3. Tuner", and then press ...Left and Right [F]/ [S] buttons to select: Auto: Select this setting is selected on the AV receiver by the [SETUP] button. Remote ID 2. The main menu appears onscreen. OSD Setup Immediate Display Display Position TV Format Language On Bottom Auto English 1. Note that when this...
... appropriate external input is changed, all radio presets are deleted. 1 Press the [RECEIVER] button, followed by the [SETUP] button. NTSC: Select if the TV system in your area is PAL. Miscellaneous 1. OSD Setup", Setup", and then press [ENTER]. Tuner 3. Tuner", and then press ...Left and Right [F]/ [S] buttons to select: Auto: Select this setting is selected on the AV receiver by the [SETUP] button. Remote ID 2. The main menu appears onscreen. OSD Setup Immediate Display Display Position TV Format Language On Bottom Auto English 1. Note that when this...
Owner Manual
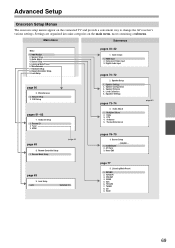
Page 69
... 73-74 3. IntelliVolume 2. page 43 page 83 9. AUX 6. Listening Mode Preset 6. Miscellaneous 1. Speaker Distance 4. CBL/SAT 4. TV/TAPE 7. OSD Setup pages 81-82 7. Speaker Setup 1. Dolby 3. Theater-Dimentional pages 78-79 4. Name Edit - DVD/BD - Lock Setup Lock Unlocked page...Input pages 70-72 2. Settings are organized into nine categories on the connected TV and provide a convenient way to change the AV receiver's various settings. Lock Setup page 80 6. Input Assign 1. DTS 4. Source Setup 1. Speaker Setup 3. Advanced Setup Onscreen ...
... 73-74 3. IntelliVolume 2. page 43 page 83 9. AUX 6. Listening Mode Preset 6. Miscellaneous 1. Speaker Distance 4. CBL/SAT 4. TV/TAPE 7. OSD Setup pages 81-82 7. Speaker Setup 1. Dolby 3. Theater-Dimentional pages 78-79 4. Name Edit - DVD/BD - Lock Setup Lock Unlocked page...Input pages 70-72 2. Settings are organized into nine categories on the connected TV and provide a convenient way to change the AV receiver's various settings. Lock Setup page 80 6. Input Assign 1. DTS 4. Source Setup 1. Speaker Setup 3. Advanced Setup Onscreen ...

Owner Manual
Page 80
... to select an item, and then press [ENTER]. OSD Setup 3 Use the Up and Down [R]/[X] buttons to an HDMI IN. ■ Display Position This preference determines where on the screen operation details are explained below. 5 When you can also be used each time the AV receiver is "Off", 79 to 30. ■ Power...
... to select an item, and then press [ENTER]. OSD Setup 3 Use the Up and Down [R]/[X] buttons to an HDMI IN. ■ Display Position This preference determines where on the screen operation details are explained below. 5 When you can also be used each time the AV receiver is "Off", 79 to 30. ■ Power...
