
Owner Manual
Page 5
..., LLC. *4. All other intellectual property rights. SIRIUS subscription sold separately) to receive the SIRIUS service. and foreign patents pending. This product incorporates copyright protection technology that... 2EQ™*7 to 100 ms) • On-Screen Display via HDMI • Aluminum Front Panel • Preprogrammed (with On-Screen Display Set-up) V-Compatible Remote *1. Reverse engineering or disassembly ...tuner required (sold separately. The HD Radio Ready logo is a trademark of Onkyo Corporation. * Apple and iPod are the property of this copyright protection technology must...
..., LLC. *4. All other intellectual property rights. SIRIUS subscription sold separately) to receive the SIRIUS service. and foreign patents pending. This product incorporates copyright protection technology that... 2EQ™*7 to 100 ms) • On-Screen Display via HDMI • Aluminum Front Panel • Preprogrammed (with On-Screen Display Set-up) V-Compatible Remote *1. Reverse engineering or disassembly ...tuner required (sold separately. The HD Radio Ready logo is a trademark of Onkyo Corporation. * Apple and iPod are the property of this copyright protection technology must...

Owner Manual
Page 7
...with the Universal Port connector 36 Connecting Onkyo V Components 37 Connecting the Power Cord 37 Turning On & First Time Setup Turning On the AV Receiver 38 Turning On and Standby 38 First Time Setup 39 Using the Onscreen Setup Menus 39 Using the Display to change the settings 39 Video ... Setup 46 Basic Operations Basic Operations 51 Selecting the Input Source 51 Adjusting the Bass & Treble 52 Displaying Source Information 52 Setting the Display Brightness 52 Muting the AV receiver 53 Using the Sleep Timer 53 Using Headphones 53 Listening to the Radio 54 Using the Tuner 54 ...
...with the Universal Port connector 36 Connecting Onkyo V Components 37 Connecting the Power Cord 37 Turning On & First Time Setup Turning On the AV Receiver 38 Turning On and Standby 38 First Time Setup 39 Using the Onscreen Setup Menus 39 Using the Display to change the settings 39 Video ... Setup 46 Basic Operations Basic Operations 51 Selecting the Input Source 51 Adjusting the Bass & Treble 52 Displaying Source Information 52 Setting the Display Brightness 52 Muting the AV receiver 53 Using the Sleep Timer 53 Using Headphones 53 Listening to the Radio 54 Using the Tuner 54 ...

Owner Manual
Page 9
...MOVIE/TV button (62) Selects the listening modes intended for Zone 2. When the onscreen setup menus are used to select and set the AV receiver to select the input source for use with movies and TV. S PHONES jack (53) This 1/4-inch phone jack is used with ... remote controller. PORTABLE (33): Used to set items. The [ENTER] button is used to the previously displayed onscreen setup menu. C STANDBY indicator (38) This indicator lights up when the AV receiver is selected. I MUSIC button (62) Selects the listening modes intended for private listening. D ZONE 2 ...
...MOVIE/TV button (62) Selects the listening modes intended for Zone 2. When the onscreen setup menus are used to select and set the AV receiver to select the input source for use with movies and TV. S PHONES jack (53) This 1/4-inch phone jack is used with ... remote controller. PORTABLE (33): Used to set items. The [ENTER] button is used to the previously displayed onscreen setup menu. C STANDBY indicator (38) This indicator lights up when the AV receiver is selected. I MUSIC button (62) Selects the listening modes intended for private listening. D ZONE 2 ...

Owner Manual
Page 10
... G Audio input indicators Indicate the type of audio input that supports RDS (Radio Data System). C MUTING indicator (53) Flashes while the AV receiver is selected. FM STEREO (54): Lights up when the "Equalizer Settings" is selected for AM or FM radio. Goes off when Manual ...Tuning mode is muted. D Listening mode and format indicators (62) Show the selected listening mode and audio input signal format. F Message area Displays various information. H Audyssey indicator (46, 72) Flashes during Audyssey 2EQ™ Room Correction and Speaker Setup. B SLEEP indicator (53) Lights...
... G Audio input indicators Indicate the type of audio input that supports RDS (Radio Data System). C MUTING indicator (53) Flashes while the AV receiver is selected. FM STEREO (54): Lights up when the "Equalizer Settings" is selected for AM or FM radio. Goes off when Manual ...Tuning mode is muted. D Listening mode and format indicators (62) Show the selected listening mode and audio input signal format. F Message area Displays various information. H Audyssey indicator (46, 72) Flashes during Audyssey 2EQ™ Room Correction and Speaker Setup. B SLEEP indicator (53) Lights...

Owner Manual
Page 14
...B C 1D E F 2G H3 I MUTING button (53) Mutes or unmutes the AV receiver. G DIMMER button (52) Adjusts the display brightness. J VOL [R]/[X] button (51) Adjusts the volume of the AV receiver regardless of the currently selected remote controller mode. M AUDIO button (75) Used to change... directly in parentheses. Note: An Onkyo cassette recorder connected via V can select a preset directly. K VIDEO button (83) Used to select Receiver mode. Remote Controller-Continued Controlling the AV Receiver To control the AV receiver, press the [RECEIVER] button to change video settings. ...
...B C 1D E F 2G H3 I MUTING button (53) Mutes or unmutes the AV receiver. G DIMMER button (52) Adjusts the display brightness. J VOL [R]/[X] button (51) Adjusts the volume of the AV receiver regardless of the currently selected remote controller mode. M AUDIO button (75) Used to change... directly in parentheses. Note: An Onkyo cassette recorder connected via V can select a preset directly. K VIDEO button (83) Used to select Receiver mode. Remote Controller-Continued Controlling the AV Receiver To control the AV receiver, press the [RECEIVER] button to change video settings. ...

Owner Manual
Page 23
... so TVs and displays with a DVI input can be used to connect the AV receiver's HDMI OUT to the HDMI input on your TV or projector. ■ Onkyo for System Control , which allows system control over HDMI, is based on Onkyo components. The AV receiver can be connected by...components. It's designed to protect video content and requires a HDCP-compatible device to display the encrypted video. *3 DDWG (Digital Display Working Group): Lead by the DDWG*3 in no picture.) The AV receiver uses HDCP (High-bandwidth Digital Content Protection)*2, so only HDCP-compatible components can carry...
... so TVs and displays with a DVI input can be used to connect the AV receiver's HDMI OUT to the HDMI input on your TV or projector. ■ Onkyo for System Control , which allows system control over HDMI, is based on Onkyo components. The AV receiver can be connected by...components. It's designed to protect video content and requires a HDCP-compatible device to display the encrypted video. *3 DDWG (Digital Display Working Group): Lead by the DDWG*3 in no picture.) The AV receiver uses HDCP (High-bandwidth Digital Content Protection)*2, so only HDCP-compatible components can carry...

Owner Manual
Page 24
... camcorder, etc Notes: • The HDMI video stream is compatible with DVI (Digital Visual Interface), so TVs and displays with such an adapter is not guaranteed. To stop the AV receiver's speakers producing sound, change the settings, change your TV. Normally, they are not supported. • When listening ...be output by the HDMI OUT, unless the "Audio TV Out" setting is set to make a separate connection for display on your TV's settings, or turn up the AV receiver volume control, the sound will be connected by the speakers and headphones connected to your TV's speakers, if you ...
... camcorder, etc Notes: • The HDMI video stream is compatible with DVI (Digital Visual Interface), so TVs and displays with such an adapter is not guaranteed. To stop the AV receiver's speakers producing sound, change the settings, change your TV. Normally, they are not supported. • When listening ...be output by the HDMI OUT, unless the "Audio TV Out" setting is set to make a separate connection for display on your TV's settings, or turn up the AV receiver volume control, the sound will be connected by the speakers and headphones connected to your TV's speakers, if you ...

Owner Manual
Page 26
... example, audio signals connected to the MONITOR OUT V, or the COMPONENT VIDEO OUT, use the AV receiver's display when changing settings. receiver by using any of the following order of priority: HDMI, component video, composite video. Connecting the AV Receiver-Continued ■ Signal Selection If signals are present at more than one input, the DVD player...
... example, audio signals connected to the MONITOR OUT V, or the COMPONENT VIDEO OUT, use the AV receiver's display when changing settings. receiver by using any of the following order of priority: HDMI, component video, composite video. Connecting the AV Receiver-Continued ■ Signal Selection If signals are present at more than one input, the DVD player...

Owner Manual
Page 27
... Connection Choose an audio connection that matches your TV ( a , b , or c ), and then make the connection. If your VCR or cable or satellite receiver to the AV receiver and use the AV receiver's display when changing settings. • With connection a , you can listen to and record audio from your TV is connected to TV programs through the...
... Connection Choose an audio connection that matches your TV ( a , b , or c ), and then make the connection. If your VCR or cable or satellite receiver to the AV receiver and use the AV receiver's display when changing settings. • With connection a , you can listen to and record audio from your TV is connected to TV programs through the...
Owner Manual
Page 36
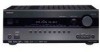
.../DVR Connect one or the other ■ If Your iPod Doesn't Support Video: Connect your RI Dock's analog audio output jacks to the AV receiver's TV/TAPE IN L/R jacks. (Onkyo DS-A2 hookup shown below.) IN L R TV/TAPE Notes: • Enter the appropriate remote control code before using the...an V cable (see page 37). • Set the RI Dock's RI MODE switch to "HDD" or "HDD/DOCK". • Set the AV receiver's Input Display to the AV receiver with the Universal Port connector Note: When UP-A1 series Dock that seated iPod is connected, the power consumption on standby mode slightly increases...
.../DVR Connect one or the other ■ If Your iPod Doesn't Support Video: Connect your RI Dock's analog audio output jacks to the AV receiver's TV/TAPE IN L/R jacks. (Onkyo DS-A2 hookup shown below.) IN L R TV/TAPE Notes: • Enter the appropriate remote control code before using the...an V cable (see page 37). • Set the RI Dock's RI MODE switch to "HDD" or "HDD/DOCK". • Set the AV receiver's Input Display to the AV receiver with the Universal Port connector Note: When UP-A1 series Dock that seated iPod is connected, the power consumption on standby mode slightly increases...

Owner Manual
Page 37
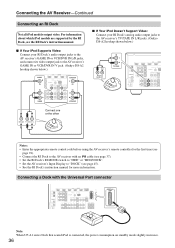
...re using an MD, CDR, or RI Dock, change the Input Display (see illustration below). The other jack is for connecting additional V-capable components. • Connect only Onkyo components to the AV receiver's AC INLET. The supplied power cord is designed exclusively for V ...Step 1 (On some model): Connect the supplied power cord to V jacks. Connecting the AV Receiver-Continued Connecting Onkyo V Components Step 1: Make sure that each Onkyo component is connected to the AV receiver with other electrical equipment on the same circuit. With V (Remote Interactive), you can con-...
...re using an MD, CDR, or RI Dock, change the Input Display (see illustration below). The other jack is for connecting additional V-capable components. • Connect only Onkyo components to the AV receiver's AC INLET. The supplied power cord is designed exclusively for V ...Step 1 (On some model): Connect the supplied power cord to V jacks. Connecting the AV Receiver-Continued Connecting Onkyo V Components Step 1: Make sure that each Onkyo component is connected to the AV receiver with other electrical equipment on the same circuit. With V (Remote Interactive), you can con-...

Owner Manual
Page 38
...the 2EQ Room Correction and Speaker Setup-this is essential! If you have , see "Changing the Input Display" on , the display lights up, and the STANDBY indicator goes off. If you turn the AV receiver off . OUT IN TV/TAPE CD recorder, MD recorder, RI Dock 38 Smooth Operation in a Few...steps to help you configure the AV receiver before you have , see "HDMI Input Setup" on page 40, "Component Video Setup" on page 41, or "Digital Input Setup" on page 46. ■ Have you connected an Onkyo MD recorder, CD recorder, or RI Dock? The AV receiver comes on page 45. Alternatively...
...the 2EQ Room Correction and Speaker Setup-this is essential! If you have , see "Changing the Input Display" on , the display lights up, and the STANDBY indicator goes off. If you turn the AV receiver off . OUT IN TV/TAPE CD recorder, MD recorder, RI Dock 38 Smooth Operation in a Few...steps to help you configure the AV receiver before you have , see "HDMI Input Setup" on page 40, "Component Video Setup" on page 41, or "Digital Input Setup" on page 46. ■ Have you connected an Onkyo MD recorder, CD recorder, or RI Dock? The AV receiver comes on page 45. Alternatively...

Owner Manual
Page 39
... to the composite video MONITOR OUT, or the COMPONENT VIDEO OUT, use the AV receiver's display when changing settings. 1 Press the [RECEIVER] button fol- Source Setup 5. Miscellaneous 7. Input Assign 2. Press the [SETUP] button to change the settings RECEIVER The settings of the AV receiver can be displayed under the screen. 2 Use the Up and Down [R]/[X] but - Using the...
... to the composite video MONITOR OUT, or the COMPONENT VIDEO OUT, use the AV receiver's display when changing settings. 1 Press the [RECEIVER] button fol- Source Setup 5. Miscellaneous 7. Input Assign 2. Press the [SETUP] button to change the settings RECEIVER The settings of the AV receiver can be displayed under the screen. 2 Use the Up and Down [R]/[X] but - Using the...

Owner Manual
Page 42
...assign that jack to select "1. If the main menu doesn't appear, make sure the appropriate external input is selected on the AV receiver by the [SETUP] button. Component Video Input 3. Press the [SETUP] button. COAX 2 OPT 1 OPT 2 - .../BD VCR/DVR CBL/SAT GAME AUX TV/TAPE TUNER CD PORT Default assignment COAX1 ----COAX2 OPT1 Fixed) OPT2 ----- 1 Press the [RECEIVER] button fol- The "Input Assign" menu appears. 1. Digital Audio Input DVD/BD VCR/DVR CBL/SAT GAME AUX TV/TAPE TUNER... DVD/ BD input selector, although this input assignment is displayed like "COAX1* ".
...assign that jack to select "1. If the main menu doesn't appear, make sure the appropriate external input is selected on the AV receiver by the [SETUP] button. Component Video Input 3. Press the [SETUP] button. COAX 2 OPT 1 OPT 2 - .../BD VCR/DVR CBL/SAT GAME AUX TV/TAPE TUNER CD PORT Default assignment COAX1 ----COAX2 OPT1 Fixed) OPT2 ----- 1 Press the [RECEIVER] button fol- The "Input Assign" menu appears. 1. Digital Audio Input DVD/BD VCR/DVR CBL/SAT GAME AUX TV/TAPE TUNER... DVD/ BD input selector, although this input assignment is displayed like "COAX1* ".

Owner Manual
Page 44
...Down [R]/[X] but - The main menu appears onscreen. If the main menu doesn't appear, make sure the appropriate external input is selected on the AV receiver by the [SETUP] button. and then press [ENTER]. Tuner FM/AM Frequency Step SAT Radio Mode 200kHz/10kHz None (Asian models) 7-2. ...Note that when this to select "2. Tuner", and then press [ENTER]. OSD Setup Immediate Display Display Position TV Format Language On Bottom Auto English 1. tons to work properly, you must specify the TV system used in your area. Use ...
...Down [R]/[X] but - The main menu appears onscreen. If the main menu doesn't appear, make sure the appropriate external input is selected on the AV receiver by the [SETUP] button. and then press [ENTER]. Tuner FM/AM Frequency Step SAT Radio Mode 200kHz/10kHz None (Asian models) 7-2. ...Note that when this to select "2. Tuner", and then press [ENTER]. OSD Setup Immediate Display Display Position TV Format Language On Bottom Auto English 1. tons to work properly, you must specify the TV system used in your area. Use ...

Owner Manual
Page 45
... area. Press the [TV/TAPE], [GAME] or [VCR/DVR] input selector button so that "TV/TAPE", "GAME" or "VCR/DVR" appears on the AV receiver by using the AV receiver's remote controller for V to work properly, you must change the setting. or The setup menu closes. This setting can be selected for the TV... kHz steps are used in your area. 50kHz/9kHz: Select if 50 kHz/9 kHz steps are used in your area. Changing the Input Display If you connect an V-capable Onkyo MiniDisc recorder, CD recorder, or RI Dock to the TV/TAPE IN/ OUT jacks, or connect an RI Dock to select MD...
... area. Press the [TV/TAPE], [GAME] or [VCR/DVR] input selector button so that "TV/TAPE", "GAME" or "VCR/DVR" appears on the AV receiver by using the AV receiver's remote controller for V to work properly, you must change the setting. or The setup menu closes. This setting can be selected for the TV... kHz steps are used in your area. 50kHz/9kHz: Select if 50 kHz/9 kHz steps are used in your area. Changing the Input Display If you connect an V-capable Onkyo MiniDisc recorder, CD recorder, or RI Dock to the TV/TAPE IN/ OUT jacks, or connect an RI Dock to select MD...

Owner Manual
Page 47
... change the "Speaker Impedance" setting before running the Audyssey 2EQ Room Correction and Speaker Setup (see page 43). • If the AV receiver is muted, it to which the AV receiver is connected to the MONITOR OUT V or the COMPONENT VIDEO OUT, use the AV receiver's display when changing settings. Total measurement time varies depending on the...
... change the "Speaker Impedance" setting before running the Audyssey 2EQ Room Correction and Speaker Setup (see page 43). • If the AV receiver is muted, it to which the AV receiver is connected to the MONITOR OUT V or the COMPONENT VIDEO OUT, use the AV receiver's display when changing settings. Total measurement time varies depending on the...

Owner Manual
Page 52
...If the input signal is digital but not PCM, the signal format is displayed. Information is displayed for about the current input source as follows. Alternatively, you can adjust the brightness of the AV receiver's display. Input source & volume*1 Signal format*2 or sampling frequency Input source ...radio is used, the band, preset number, and frequency are displayed. *2 If the input signal is analog, no format information is displayed. If the input signal is PCM, the sampling frequency is selected. 1 AV receiver Press the [TONE] button repeatedly to select either "Bass" or...
...If the input signal is digital but not PCM, the signal format is displayed. Information is displayed for about the current input source as follows. Alternatively, you can adjust the brightness of the AV receiver's display. Input source & volume*1 Signal format*2 or sampling frequency Input source ...radio is used, the band, preset number, and frequency are displayed. *2 If the input signal is analog, no format information is displayed. If the input signal is PCM, the sampling frequency is selected. 1 AV receiver Press the [TONE] button repeatedly to select either "Bass" or...

Owner Manual
Page 53
...8226; While the headphones plug is inserted in 10 minute steps. To unmute the AV receiver, press the [MUTING] button again, or adjust the volume. The Mute function is cancelled when the AV receiver is being displayed, you connect a pair of headphones, the listening mode is set to Stereo, unless...time is set from 90 to cancel the sleep timer, press the [SLEEP] button repeatedly until the AV receiver sleeps, press the [SLEEP] button. The SLEEP indicator appears on the display for North American/Taiwan models. • Only the Stereo, Direct, Pure Audio, and Mono listening...
...8226; While the headphones plug is inserted in 10 minute steps. To unmute the AV receiver, press the [MUTING] button again, or adjust the volume. The Mute function is cancelled when the AV receiver is being displayed, you connect a pair of headphones, the listening mode is set to Stereo, unless...time is set from 90 to cancel the sleep timer, press the [SLEEP] button repeatedly until the AV receiver sleeps, press the [SLEEP] button. The SLEEP indicator appears on the display for North American/Taiwan models. • Only the Stereo, Direct, Pure Audio, and Mono listening...

Owner Manual
Page 54
...stations. TUNING MODE FM STEREO AUTO ■ Manual Tuning Mode TUNED 1 Press the [TUNING MODE] but - Band Frequency (Actual display depends on the display, as presets for quick selection. The frequency stops changing when you press the [TUNER] button, the input source changes between AM ..., use the number buttons to select AM or FM, followed by Frequency You can store your favorite stations as shown. (Actual display depends on the display. 2 Press and hold the TUNING Up or Down [R]/[X] buttons. In this example, FM has been selected. Press the buttons repeatedly...
...stations. TUNING MODE FM STEREO AUTO ■ Manual Tuning Mode TUNED 1 Press the [TUNING MODE] but - Band Frequency (Actual display depends on the display, as presets for quick selection. The frequency stops changing when you press the [TUNER] button, the input source changes between AM ..., use the number buttons to select AM or FM, followed by Frequency You can store your favorite stations as shown. (Actual display depends on the display. 2 Press and hold the TUNING Up or Down [R]/[X] buttons. In this example, FM has been selected. Press the buttons repeatedly...

