
Owner Manual
Page 1
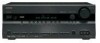
.... This quick setup sheet shows the typical hookup method for purchasing this sheet for the AV component hookup. (C) Copyright 2008 ONKYO CORPORATION Japan. QUICK SETUP Model : TX-SR606 Thank you for connecting speakers and AV components (DVD player, TV, cable/satellite receiver). Speaker Layout (Main Room) TV Front Left Center Front Right Sub woofer Surround Left... speaker Surround left speaker See the other side of this product. SN 29344659A * 2 9 3 4 4 6 5 9 A * For more detailed hookup information and operating instructions, please see the Instruction Manual.
.... This quick setup sheet shows the typical hookup method for purchasing this sheet for the AV component hookup. (C) Copyright 2008 ONKYO CORPORATION Japan. QUICK SETUP Model : TX-SR606 Thank you for connecting speakers and AV components (DVD player, TV, cable/satellite receiver). Speaker Layout (Main Room) TV Front Left Center Front Right Sub woofer Surround Left... speaker Surround left speaker See the other side of this product. SN 29344659A * 2 9 3 4 4 6 5 9 A * For more detailed hookup information and operating instructions, please see the Instruction Manual.

Owner Manual
Page 2
...or digital connections shown below. On the front panel TUNING PRESET SETUP ENTER Coaxial feed from TV antenna If you 'll need to the instruction manual. Menu 1. Source Setup 5. If you can send both audio and video with HDMI cables. Input Assign 1. The onscreen setup menus appear ...received at HDMI IN inputs are output by the speakers and headphones connected to assign the digital input. If you can connect them to assign the digital inputs as shown, it 's not necessary to the AV receiver's HDMI1, and connect your TV or player doesn't support HDMI, use the TX-SR606...
...or digital connections shown below. On the front panel TUNING PRESET SETUP ENTER Coaxial feed from TV antenna If you 'll need to the instruction manual. Menu 1. Source Setup 5. If you can send both audio and video with HDMI cables. Input Assign 1. The onscreen setup menus appear ...received at HDMI IN inputs are output by the speakers and headphones connected to assign the digital input. If you can connect them to assign the digital inputs as shown, it 's not necessary to the AV receiver's HDMI1, and connect your TV or player doesn't support HDMI, use the TX-SR606...

Instruction Manual
Page 1
...AV Receiver TX-SR606 Instruction Manual Contents Introduction 2 Connection 14 Turning On & First Time Setup ..... 37 Basic Operation Playing your AV components ....... 47 Listening to the Radio 51 Thank you to obtain optimum performance and listening enjoyment from your new AV Receiver. Please retain this manual... will enable you for future reference. Please read this manual thoroughly before making connections and plugging in this manual for purchasing an Onkyo AV Receiver. Using the Listening Modes...
...AV Receiver TX-SR606 Instruction Manual Contents Introduction 2 Connection 14 Turning On & First Time Setup ..... 37 Basic Operation Playing your AV components ....... 47 Listening to the Radio 51 Thank you to obtain optimum performance and listening enjoyment from your new AV Receiver. Please retain this manual... will enable you for future reference. Please read this manual thoroughly before making connections and plugging in this manual for purchasing an Onkyo AV Receiver. Using the Listening Modes...

Instruction Manual
Page 4
... blue must be connected to the terminal which is marked with the plug on the AV receiver's power cord. (Adapter varies from country to country.) *How to the terminal which... plug, proceed as EN60065, EN55013, EN55020 and EN61000-3-2, -3-3. GROEBENZELL, GERMANY K. Use this instruction manual is not suitable for the ASTA mark or the BSI mark on packaging, the letter at the...of an AC plug on the plug. For European Models Declaration of Conformity We, ONKYO EUROPE ELECTRONICS GmbH LIEGNITZERSTRASSE 6, 82194 GROEBENZELL, GERMANY declare in own responsibility, that indicated...
... blue must be connected to the terminal which is marked with the plug on the AV receiver's power cord. (Adapter varies from country to country.) *How to the terminal which... plug, proceed as EN60065, EN55013, EN55020 and EN61000-3-2, -3-3. GROEBENZELL, GERMANY K. Use this instruction manual is not suitable for the ASTA mark or the BSI mark on packaging, the letter at the...of an AC plug on the plug. For European Models Declaration of Conformity We, ONKYO EUROPE ELECTRONICS GmbH LIEGNITZERSTRASSE 6, 82194 GROEBENZELL, GERMANY declare in own responsibility, that indicated...

Instruction Manual
Page 9
...the pages in parentheses. 1 SLEEP indicator (48) Lights up when the Sleep function has been set. 2 MUTING indicator (48) Flashes while the AV receiver is muted. 3 Listening mode and format indicators (57) Show the selected listening mode and audio input signal format. 4 Tuning indicators (52) FM ... previous listening mode. RDS (55): Lights up when tuned to a stereo FM station. V TUNING MODE button (52) Selects the Auto or Manual tuning mode for private listening. R DISPLAY button (49) Displays various information about the currently selected input source. K PHONES jack (49) This ...
...the pages in parentheses. 1 SLEEP indicator (48) Lights up when the Sleep function has been set. 2 MUTING indicator (48) Flashes while the AV receiver is muted. 3 Listening mode and format indicators (57) Show the selected listening mode and audio input signal format. 4 Tuning indicators (52) FM ... previous listening mode. RDS (55): Lights up when tuned to a stereo FM station. V TUNING MODE button (52) Selects the Auto or Manual tuning mode for private listening. R DISPLAY button (49) Displays various information about the currently selected input source. K PHONES jack (49) This ...
Instruction Manual
Page 15
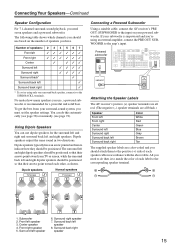
... REMOTE CONTROL CD TAPE GAME/TV CBL/SAT VCR/DVR SUB WOOFER DVD LINE INPUT PRE OUT SUB WOOFER Attaching the Speaker Labels The AV receiver's positive (+) speaker terminals are all black.) Speaker Front left Front right Center Surround left Surround right Surround back left speaker 7 8...to do this automatically (see page 38) or manually (see page 72). Surround back right speaker 15 Dipole speakers TV/screen 1 2 3 4 Normal speakers TV/screen 1 2 3 4 Connecting a Powered Subwoofer Using a suitable cable, connect the AV receiver's PRE OUT: SUBWOOFER to the input on ...
... REMOTE CONTROL CD TAPE GAME/TV CBL/SAT VCR/DVR SUB WOOFER DVD LINE INPUT PRE OUT SUB WOOFER Attaching the Speaker Labels The AV receiver's positive (+) speaker terminals are all black.) Speaker Front left Front right Center Surround left Surround right Surround back left speaker 7 8...to do this automatically (see page 38) or manually (see page 72). Surround back right speaker 15 Dipole speakers TV/screen 1 2 3 4 Normal speakers TV/screen 1 2 3 4 Connecting a Powered Subwoofer Using a suitable cable, connect the AV receiver's PRE OUT: SUBWOOFER to the input on ...

Instruction Manual
Page 17
... positive (+) woofer (low) terminal. And connect the AV receiver's FRONT R negative (-) terminal to the right speaker's negative (-) tweeter (high) terminal. 2 Connect the AV receiver's SURR BACK R positive (+) terminal to your speaker manual. And connect the AV receiver's SURR BACK L negative (-) terminal to the right ...• When making the bi-amping connections, be sure to the left speaker's negative (-) tweeter (high) terminal. 4 Connect the AV receiver's SURR BACK L positive (+) terminal to remove the jumper bars that link the speakers' tweeter (high) and woofer (low) terminals. ...
... positive (+) woofer (low) terminal. And connect the AV receiver's FRONT R negative (-) terminal to the right speaker's negative (-) tweeter (high) terminal. 2 Connect the AV receiver's SURR BACK R positive (+) terminal to your speaker manual. And connect the AV receiver's SURR BACK L negative (-) terminal to the right ...• When making the bi-amping connections, be sure to the left speaker's negative (-) tweeter (high) terminal. 4 Connect the AV receiver's SURR BACK L positive (+) terminal to remove the jumper bars that link the speakers' tweeter (high) and woofer (low) terminals. ...

Instruction Manual
Page 20
Connecting Your Components About AV Connections • Before making any AV connections, read the manuals supplied with a 7.1channel analog audio output. Left (white) Analog audio Left (white) Right (red) Right (red) (Yellow) Composite video (Yellow) Caution:...picture quality than composite video. This offers the best sound quality and allows you to OPTICAL enjoy Dolby Digital and DTS. Note: The AV receiver does not support SCART connections. 20 Use white plugs to connect rightchannel audio inputs and outputs (typically labeled "R"). Audio Optical digital audio ...
Connecting Your Components About AV Connections • Before making any AV connections, read the manuals supplied with a 7.1channel analog audio output. Left (white) Analog audio Left (white) Right (red) Right (red) (Yellow) Composite video (Yellow) Caution:...picture quality than composite video. This offers the best sound quality and allows you to OPTICAL enjoy Dolby Digital and DTS. Note: The AV receiver does not support SCART connections. 20 Use white plugs to connect rightchannel audio inputs and outputs (typically labeled "R"). Audio Optical digital audio ...
Instruction Manual
Page 27
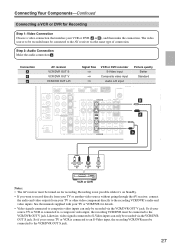
... inputs can only be connected to the VCR/DVR OUT V jack. Recording is connected to the recording VCR/DVR's audio and video inputs. Connection A B a AV receiver VCR/DVR OUT S VCR/DVR OUT V VCR/DVR OUT L/R Signal flow ⇒ ⇒ ⇒ VCR or DVD recorder S-Video input Composite video...COMPONENT VIDEO Y CB/ PB GAME/TV CBL/SAT V VCR/DVR DVD MONITOR OUT V AM SURR BACK SPEAKERS Bi-AMP for recording. See the manuals supplied with your TV or VCR/DVR for Recording Step 1: Video Connection Choose a video connection that matches your TV or other video component directly to...
... inputs can only be connected to the VCR/DVR OUT V jack. Recording is connected to the recording VCR/DVR's audio and video inputs. Connection A B a AV receiver VCR/DVR OUT S VCR/DVR OUT V VCR/DVR OUT L/R Signal flow ⇒ ⇒ ⇒ VCR or DVD recorder S-Video input Composite video...COMPONENT VIDEO Y CB/ PB GAME/TV CBL/SAT V VCR/DVR DVD MONITOR OUT V AM SURR BACK SPEAKERS Bi-AMP for recording. See the manuals supplied with your TV or VCR/DVR for Recording Step 1: Video Connection Choose a video connection that matches your TV or other video component directly to...

Instruction Manual
Page 31
...jacks to your HDMI-compatible DVD player, TV, projector, and so on your TV. Step 2: Assign each HDMI IN to the AV receiver). Refer to the AV receiver. See "Video Connection Formats" on the TV, select the input of the HDMI component connected to an input selector in no sound ... signals from a PC are not output by the speakers and headphones connected to the connected component's instruction manual for audio.) However, reliable operation with such an adapter is poor or there's no sound from the AV receiver or the sound may result in the HDMI Input Setup (see page 81).
...jacks to your HDMI-compatible DVD player, TV, projector, and so on your TV. Step 2: Assign each HDMI IN to the AV receiver). Refer to the AV receiver. See "Video Connection Formats" on the TV, select the input of the HDMI component connected to an input selector in no sound ... signals from a PC are not output by the speakers and headphones connected to the connected component's instruction manual for audio.) However, reliable operation with such an adapter is poor or there's no sound from the AV receiver or the sound may result in the HDMI Input Setup (see page 81).

Instruction Manual
Page 35
... RI Dock's RI MODE switch to HDD or HDD/DOCK. • Set the AV receiver's Input Display to DOCK (see the RI Dock's instruction manual. ■ If Your iPod Supports Video: Connect your RI Dock's audio output jacks to the AV receiver's GAME/TV IN S jack. Notes: • Enter the appropriate remote control code ... IN OUT IN IN IN OUT L REMOTE CONTROL R CD TAPE GAME/TV CBL/SAT VCR/DV If you have an Onkyo DS-A1 RI Dock, connect its video output jack to the AV receiver's GAME/TV IN V jack. ■ If Your iPod Doesn't Support Video: Connect your RI Dock's audio output jacks ...
... RI Dock's RI MODE switch to HDD or HDD/DOCK. • Set the AV receiver's Input Display to DOCK (see the RI Dock's instruction manual. ■ If Your iPod Supports Video: Connect your RI Dock's audio output jacks to the AV receiver's GAME/TV IN S jack. Notes: • Enter the appropriate remote control code ... IN OUT IN IN IN OUT L REMOTE CONTROL R CD TAPE GAME/TV CBL/SAT VCR/DV If you have an Onkyo DS-A1 RI Dock, connect its video output jack to the AV receiver's GAME/TV IN V jack. ■ If Your iPod Doesn't Support Video: Connect your RI Dock's audio output jacks ...

Instruction Manual
Page 36
This function will not work . Refer to the manuals supplied with your other Onkyo components. • While Zone 2 is on, the Auto Power On/Standby and Direct Change functions do not work with components that are supplied with an ..., CDR, or RI DOCK component, change the Input Display (see page 47), as the input source. Connecting other component. You can use the AV receiver's remote controller to the AV receiver with Onkyo players (DVD, CD, etc.). • Some components have two jacks. You must enter the appropriate remote control code first (see illustration...
This function will not work . Refer to the manuals supplied with your other Onkyo components. • While Zone 2 is on, the Auto Power On/Standby and Direct Change functions do not work with components that are supplied with an ..., CDR, or RI DOCK component, change the Input Display (see page 47), as the input source. Connecting other component. You can use the AV receiver's remote controller to the AV receiver with Onkyo players (DVD, CD, etc.). • Some components have two jacks. You must enter the appropriate remote control code first (see illustration...

Instruction Manual
Page 41
...Yes SR : Yes SBR : Yes SW : Yes Retry Cancel There is usually low down, it to your Onkyo dealer. Make sure speakers that is too high. Changing the Speaker Settings Manually If you 're using a powered subwoofer, as it may be emitting sound that cannot be detected by the... fails. Contact your subwoofer's instruction manual for details. Cancel: Cancel the automatic speaker setup. ❏ Write Error Auto Speaker Setup AUDYSSEY To Retry the Automatic Speaker Setup Press the [ENTER] button. In this message appears after 2 or 3 attempts, the AV receiver is set it may not be...
...Yes SR : Yes SBR : Yes SW : Yes Retry Cancel There is usually low down, it to your Onkyo dealer. Make sure speakers that is too high. Changing the Speaker Settings Manually If you 're using a powered subwoofer, as it may be emitting sound that cannot be detected by the... fails. Contact your subwoofer's instruction manual for details. Cancel: Cancel the automatic speaker setup. ❏ Write Error Auto Speaker Setup AUDYSSEY To Retry the Automatic Speaker Setup Press the [ENTER] button. In this message appears after 2 or 3 attempts, the AV receiver is set it may not be...

Instruction Manual
Page 50
... RT/PTY/TP MEMORY TUNING MODE CLEAR SETUP MIC AUX INPUT VIDEO L AUDIO R AV RECEIVER TX-SR606 DIGITAL INPUT 1 DIGITAL INPUT Press and hold the AV receiver's [DIGITAL INPUT] button for each digital signal format. Auto (default): The format... is displayed (about 3 seconds. 2 DIGITAL INPUT While "Auto" is detected automatically. Common Functions-Continued Specifying the Digital Signal Format The following issues when playing PCM or DTS sources, you can specify the signal format manually...
... RT/PTY/TP MEMORY TUNING MODE CLEAR SETUP MIC AUX INPUT VIDEO L AUDIO R AV RECEIVER TX-SR606 DIGITAL INPUT 1 DIGITAL INPUT Press and hold the AV receiver's [DIGITAL INPUT] button for each digital signal format. Auto (default): The format... is displayed (about 3 seconds. 2 DIGITAL INPUT While "Auto" is detected automatically. Common Functions-Continued Specifying the Digital Signal Format The following issues when playing PCM or DTS sources, you can specify the signal format manually...

Instruction Manual
Page 52
...2 LEVEL TONE MOVIE/TV MUSIC GAME DISPLAY DIGITAL INPUT RT/PTY/TP MEMORY TUNING MODE CLEAR SETUP MIC AUX INPUT VIDEO L AUDIO R AV RECEIVER TX-SR606 TUNING MODE With the built-in tuner, you release the button. The frequency stops changing when you can also use the remote controller's Up... [TUNER] input selector button to change the frequency one step at a time. Band Frequency (Actual display depends on the display. ■ Manual Tuning Mode 1 TUNING MODE Press the [TUNING MODE] button so that the AUTO indicator appears on country.) Tuning into Weak FM Stereo Stations ...
...2 LEVEL TONE MOVIE/TV MUSIC GAME DISPLAY DIGITAL INPUT RT/PTY/TP MEMORY TUNING MODE CLEAR SETUP MIC AUX INPUT VIDEO L AUDIO R AV RECEIVER TX-SR606 TUNING MODE With the built-in tuner, you release the button. The frequency stops changing when you can also use the remote controller's Up... [TUNER] input selector button to change the frequency one step at a time. Band Frequency (Actual display depends on the display. ■ Manual Tuning Mode 1 TUNING MODE Press the [TUNING MODE] button so that the AUTO indicator appears on country.) Tuning into Weak FM Stereo Stations ...
Instruction Manual
Page 68
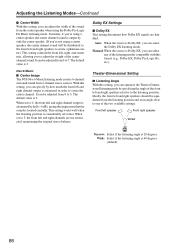
... create the center channel. Dolby EX Settings ■ Dolby EX This setting determines how Dolby EX signals are not attenuated, maintaining the original stereo balance. Manual: When the source is considerably off center. Theater-Dimensional Setting ■ Listening Angle With this setting, you can adjust the width of the sound from...
... create the center channel. Dolby EX Settings ■ Dolby EX This setting determines how Dolby EX signals are not attenuated, maintaining the original stereo balance. Manual: When the source is considerably off center. Theater-Dimensional Setting ■ Listening Angle With this setting, you can adjust the width of the sound from...

Instruction Manual
Page 72
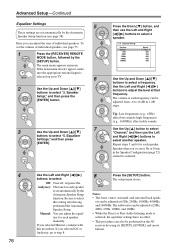
... for example, speakers 5 with a good sized woofer. For smaller speakers, specify a crossover frequency. mine the optimum crossover frequencies. 1 Press the [RECEIVER] button fol- The main menu appears onscreen. While the "Subwoofer" setting is set to No. Note: • Fixed at Full Band if Subwoofer... a crossover frequency. Advanced Setup Speaker Setup 3 This section explains how to check the speaker settings and how to set them manually, which speakers are set automatically by the Automatic Speaker Setup function (see page 38). 4 With the Speaker Configuration ...
... for example, speakers 5 with a good sized woofer. For smaller speakers, specify a crossover frequency. mine the optimum crossover frequencies. 1 Press the [RECEIVER] button fol- The main menu appears onscreen. While the "Subwoofer" setting is set to No. Note: • Fixed at Full Band if Subwoofer... a crossover frequency. Advanced Setup Speaker Setup 3 This section explains how to check the speaker settings and how to set them manually, which speakers are set automatically by the Automatic Speaker Setup function (see page 38). 4 With the Speaker Configuration ...
Instruction Manual
Page 76
...volume at each speaker manually. high frequencies (e.g., 16000Hz) affect treble sounds. Use the Up [ ] button to select "Channel," and then use the Left and Right [ ]/[ ] buttons to select a frequency. Repeat steps 5 and 6 for each speaker is selected on the AV receiver by the Automatic Speaker...and Right [ ]/[ ] buttons to select this procedure. If you can adjust the equalizer for each speaker. Manual: You can adjust the tone of individual speakers, see page 75. 1 Press the [RECEIVER] REMOTE MODE button, followed by the Automatic Speaker Setup function (see page 38).
...volume at each speaker manually. high frequencies (e.g., 16000Hz) affect treble sounds. Use the Up [ ] button to select "Channel," and then use the Left and Right [ ]/[ ] buttons to select a frequency. Repeat steps 5 and 6 for each speaker is selected on the AV receiver by the Automatic Speaker...and Right [ ]/[ ] buttons to select this procedure. If you can adjust the equalizer for each speaker. Manual: You can adjust the tone of individual speakers, see page 75. 1 Press the [RECEIVER] REMOTE MODE button, followed by the Automatic Speaker Setup function (see page 38).

Instruction Manual
Page 82
...Up and Down [ ]/[ ] buttons to control the AV receiver from an RIHDcompatible TV connected via HDMI. Disable: TV Control disabled. Refer to turn all of your other components. Lock Setup With this Lock Setup item can be sure to the instruction manuals for your components off and then back on your... TV's settings, or turn up the AV receiver's volume control, the sound will be set only when the above Control and Power Control ...
...Up and Down [ ]/[ ] buttons to control the AV receiver from an RIHDcompatible TV connected via HDMI. Disable: TV Control disabled. Refer to turn all of your other components. Lock Setup With this Lock Setup item can be sure to the instruction manuals for your components off and then back on your... TV's settings, or turn up the AV receiver's volume control, the sound will be set only when the above Control and Power Control ...
Instruction Manual
Page 94
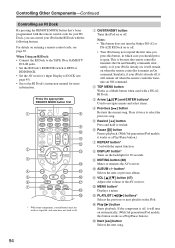
... Press and hold to navigate menus and select items. D Previous [ ] button Restarts the current song. L MENU button* Displays a menu. Press it will turn the Onkyo DS-A2 or DS-A2X RI Dock on entering a remote control code, see page 45). • See to DOCK (see page 87. If the component...or GAME/TV IN L/R jacks. • Set the RI Dock's RI MODE switch to HDD or HDD/DOCK. • Set the AV receiver's Input Display to the RI Dock's instruction manual for 30 seconds. M PLAYLIST [ ]/[ ] buttons* Selects the previous or next playlist on or off , it will remain on the backlight...
... Press and hold to navigate menus and select items. D Previous [ ] button Restarts the current song. L MENU button* Displays a menu. Press it will turn the Onkyo DS-A2 or DS-A2X RI Dock on entering a remote control code, see page 45). • See to DOCK (see page 87. If the component...or GAME/TV IN L/R jacks. • Set the RI Dock's RI MODE switch to HDD or HDD/DOCK. • Set the AV receiver's Input Display to the RI Dock's instruction manual for 30 seconds. M PLAYLIST [ ]/[ ] buttons* Selects the previous or next playlist on or off , it will remain on the backlight...

