
Owner Manual
Page 2
... as necessary using the setup menus on your TV, you connect your DVD player to the AV receiver's HDMI1, and connect your TV or player doesn't support HDMI, use the TX-SR606's display when changing settings. Source Setup 5. Lock Setup 1. HDMI Input 2. On the front panel TUNING PRESET SETUP ... and video with HDMI cables. Menu 1. Audio Adjust 4. AV Component Hookup See the other side of this sheet for the Speaker hookup. With an HDMI cable you are not using Cable/satellite box, please refer to the AV receiver with a single cable, making connecting simple and keeping wires ...
... as necessary using the setup menus on your TV, you connect your DVD player to the AV receiver's HDMI1, and connect your TV or player doesn't support HDMI, use the TX-SR606's display when changing settings. Source Setup 5. Lock Setup 1. HDMI Input 2. On the front panel TUNING PRESET SETUP ... and video with HDMI cables. Menu 1. Audio Adjust 4. AV Component Hookup See the other side of this sheet for the Speaker hookup. With an HDMI cable you are not using Cable/satellite box, please refer to the AV receiver with a single cable, making connecting simple and keeping wires ...

Instruction Manual
Page 3
...on, so be determined by one or more of the following measures: • Reorient or relocate the receiving antenna. • Increase the separation between 220 and 240 volts, set to the correct voltage for FRONT SPEAKERS L SURR SPEAKERS ANTENNA FM 75 R CR/ PR S IN 2 IN 1(DVD) OUT ASSIGNABLE IN IN OUT IN IN...BORNE CORRESPONDANTE DE LA PRISE ET POUSSER JUSQU'AU FOND. 3 AC Fuse-The AC fuse inside this unit or its power cord while your Onkyo dealer. 3. For stubborn stains, use the unit for help. Never Touch this Unit with power systems around the world. ferent from country to...
...on, so be determined by one or more of the following measures: • Reorient or relocate the receiving antenna. • Increase the separation between 220 and 240 volts, set to the correct voltage for FRONT SPEAKERS L SURR SPEAKERS ANTENNA FM 75 R CR/ PR S IN 2 IN 1(DVD) OUT ASSIGNABLE IN IN OUT IN IN...BORNE CORRESPONDANTE DE LA PRISE ET POUSSER JUSQU'AU FOND. 3 AC Fuse-The AC fuse inside this unit or its power cord while your Onkyo dealer. 3. For stubborn stains, use the unit for help. Never Touch this Unit with power systems around the world. ferent from country to...

Instruction Manual
Page 5
... a Cassette, CDR, MiniDisc, or DAT Recorder 34 Connecting an RI Dock 35 Connecting Onkyo Components 36 Turning On the AV Receiver 37 Connecting the Power Cord 37 Turning On and Standby 37 First Time Setup 38 Automatic Speaker Setup 38 Speaker Settings 42 HDMI Input Setup 43 Component Video Input Setup 44 Digital Input Setup 44...
... a Cassette, CDR, MiniDisc, or DAT Recorder 34 Connecting an RI Dock 35 Connecting Onkyo Components 36 Turning On the AV Receiver 37 Connecting the Power Cord 37 Turning On and Standby 37 First Time Setup 38 Automatic Speaker Setup 38 Speaker Settings 42 HDMI Input Setup 43 Component Video Input Setup 44 Digital Input Setup 44...

Instruction Manual
Page 9
... or Manual tuning mode for AM or FM radio. W SETUP MIC (38) The automatic speaker setup microphone connects here. J MASTER VOLUME control (47) Sets the volume of stereo headphones for use with movies and TV. Getting to Know the AV Receiver-Continued For detailed information, see the pages in parentheses. K PHONES jack (49) This...
... or Manual tuning mode for AM or FM radio. W SETUP MIC (38) The automatic speaker setup microphone connects here. J MASTER VOLUME control (47) Sets the volume of stereo headphones for use with movies and TV. Getting to Know the AV Receiver-Continued For detailed information, see the pages in parentheses. K PHONES jack (49) This...
Instruction Manual
Page 15
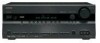
...OUT SUB WOOFER Attaching the Speaker Labels The AV receiver's positive (+) speaker terminals are all red. (The negative (-) speaker terminals are color-coded and you should use based on the number of speakers: 2 3 4 5 ...speakers should be positioned so that their arrows point toward each speaker cable in two directions. Connecting Your Speakers-Continued Speaker Configuration For 7.1-channel surround-sound playback, you need to do this automatically (see page 38) or manually (see page 72). Center speaker 4. If your surround-sound system, you must set the speaker settings...
...OUT SUB WOOFER Attaching the Speaker Labels The AV receiver's positive (+) speaker terminals are all red. (The negative (-) speaker terminals are color-coded and you should use based on the number of speakers: 2 3 4 5 ...speakers should be positioned so that their arrows point toward each speaker cable in two directions. Connecting Your Speakers-Continued Speaker Configuration For 7.1-channel surround-sound playback, you need to do this automatically (see page 38) or manually (see page 72). Center speaker 4. If your surround-sound system, you must set the speaker settings...

Instruction Manual
Page 16
... may damage the AV receiver. • Don't connect a speaker to several terminals. If you get them the wrong way around, the sound will be out of phase and will sound unnatural. • Unnecessarily long or very thin speaker cables may affect the sound quality and should be sure to set the minimum speaker impedance to "4 ohms...
... may damage the AV receiver. • Don't connect a speaker to several terminals. If you get them the wrong way around, the sound will be out of phase and will sound unnatural. • Unnecessarily long or very thin speaker cables may affect the sound quality and should be sure to set the minimum speaker impedance to "4 ohms...

Instruction Manual
Page 17
... (low) terminal. 3 Connect the AV receiver's FRONT L positive (+) terminal to the left speaker's positive (+) tweeter (high) terminal. And the SURR BACK L/R terminal posts connect to the front speakers' woofer terminals. • Once you've completed the bi-amping connections shown below and turned on the AV receiver, you must set the Speaker Type setting to Bi-Amp to the...
... (low) terminal. 3 Connect the AV receiver's FRONT L positive (+) terminal to the left speaker's positive (+) tweeter (high) terminal. And the SURR BACK L/R terminal posts connect to the front speakers' woofer terminals. • Once you've completed the bi-amping connections shown below and turned on the AV receiver, you must set the Speaker Type setting to Bi-Amp to the...

Instruction Manual
Page 28
... PB PR COMPONENT VIDEO OUT L R AUDIO OUT S VIDEO OUT VIDEO OUT Satellite, cable, set-top box, etc. 28 Step 1: Video Connection Choose a video connection that matches the video...or listen in Zone 2 as well, use a and b , or a and c .) Connection A B C a b c AV receiver COMPONENT VIDEO IN 2 CBL/SAT IN S CBL/SAT IN V CBL/SAT IN L/R DIGITAL IN COAXIAL 2 DIGITAL IN OPTICAL 1 ...(CBL/SAT) IN 2 HDMI ASSIGNABLE (VCR/DVR) IN 1 (DVD) OUT SIRIUS AM SURR BACK SPEAKERS Bi-AMP for FRONT SPEAKERS DIGITAL IN COMPONENT VIDEO L Y 1 (DVD) b COAXIAL CB/ PB GAME/TV CBL/SAT VCR/...
... PB PR COMPONENT VIDEO OUT L R AUDIO OUT S VIDEO OUT VIDEO OUT Satellite, cable, set-top box, etc. 28 Step 1: Video Connection Choose a video connection that matches the video...or listen in Zone 2 as well, use a and b , or a and c .) Connection A B C a b c AV receiver COMPONENT VIDEO IN 2 CBL/SAT IN S CBL/SAT IN V CBL/SAT IN L/R DIGITAL IN COAXIAL 2 DIGITAL IN OPTICAL 1 ...(CBL/SAT) IN 2 HDMI ASSIGNABLE (VCR/DVR) IN 1 (DVD) OUT SIRIUS AM SURR BACK SPEAKERS Bi-AMP for FRONT SPEAKERS DIGITAL IN COMPONENT VIDEO L Y 1 (DVD) b COAXIAL CB/ PB GAME/TV CBL/SAT VCR/...

Instruction Manual
Page 31
.... Normally, they are normally output by the HDMI IN jacks through the AV receiver, set the HDMI component so that DVI connections only carry video, so you'll need to make a separate connection for FRONT SPEAKERS L SURR SPEAKERS ANTENNA FM 75 R IN 2 IN 1(DVD) OUT ASSIGNABLE IN IN ...component through your TV's speakers, set the Audio TV Out setting to On (see page 81). In addition, video signals from a PC are output by the connected source component. Connecting Your Components-Continued Making HDMI Connections Step 1: Use HDMI cables to connect the AV receiver's HDMI jacks to your...
.... Normally, they are normally output by the HDMI IN jacks through the AV receiver, set the HDMI component so that DVI connections only carry video, so you'll need to make a separate connection for FRONT SPEAKERS L SURR SPEAKERS ANTENNA FM 75 R IN 2 IN 1(DVD) OUT ASSIGNABLE IN IN ...component through your TV's speakers, set the Audio TV Out setting to On (see page 81). In addition, video signals from a PC are output by the connected source component. Connecting Your Components-Continued Making HDMI Connections Step 1: Use HDMI cables to connect the AV receiver's HDMI jacks to your...

Instruction Manual
Page 37
...AV receiver ON/STANDBY Remote controller or On the AV receiver, press the [ON/STANDBY] button. To turn the AV receiver off . These settings only need to help you configure the AV receiver...speaker setup-this is essential! PR tively. To prevent any loud surprises the next time you use it off. Y HDMI If you did , see "HDMI Input Setup" on page 43, "Component Video PB Input Setup" on page 44, or "Digital Input Setup" on page 38. ■ Did you connect an Onkyo... AUX INPUT VIDEO L AUDIO R AV RECEIVER TX-SR606 ON/STANDBY RECEIVER Connecting the Power Cord • ...
...AV receiver ON/STANDBY Remote controller or On the AV receiver, press the [ON/STANDBY] button. To turn the AV receiver off . These settings only need to help you configure the AV receiver...speaker setup-this is essential! PR tively. To prevent any loud surprises the next time you use it off. Y HDMI If you did , see "HDMI Input Setup" on page 43, "Component Video PB Input Setup" on page 44, or "Digital Input Setup" on page 38. ■ Did you connect an Onkyo... AUX INPUT VIDEO L AUDIO R AV RECEIVER TX-SR606 ON/STANDBY RECEIVER Connecting the Power Cord • ...
Instruction Manual
Page 38
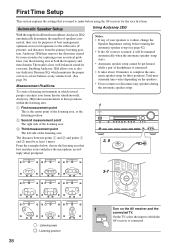
... from the primary listening position. First Time Setup This section explains the settings that best matches yours and place the microphone accordingly when prompted. Notes: • If any speakers during the automatic speaker setup. 1 ON/STANDBY STANDBY ZONE 2 TUNING PRESET MASTER VOLUME PURE ...TP MEMORY TUNING MODE CLEAR SETUP MIC AUX INPUT VIDEO L AUDIO R AV RECEIVER TX-SR606 2, 8 TV TV TV TV TV TV 3-7 TV TV TV : Listening area : Listening position 38 1 ON/STANDBY Turn on the speakers. • Do not connect or disconnect any of the listening area....
... from the primary listening position. First Time Setup This section explains the settings that best matches yours and place the microphone accordingly when prompted. Notes: • If any speakers during the automatic speaker setup. 1 ON/STANDBY STANDBY ZONE 2 TUNING PRESET MASTER VOLUME PURE ...TP MEMORY TUNING MODE CLEAR SETUP MIC AUX INPUT VIDEO L AUDIO R AV RECEIVER TX-SR606 2, 8 TV TV TV TV TV TV 3-7 TV TV TV : Listening area : Listening position 38 1 ON/STANDBY Turn on the speakers. • Do not connect or disconnect any of the listening area....

Instruction Manual
Page 39
... end of listening area at the ceiling. • If there's an obstacle between the 5 microphone and any speaker, the automatic setup will provide better results. Set up the room as the Audyssey 2EQ function determines which speakers are complete, the following screen appears. The following screen appears. Now Measuring. . . A test tone is output...
... end of listening area at the ceiling. • If there's an obstacle between the 5 microphone and any speaker, the automatic setup will provide better results. Set up the room as the Audyssey 2EQ function determines which speakers are complete, the following screen appears. The following screen appears. Now Measuring. . . A test tone is output...

Instruction Manual
Page 40
... : 40Hz Center : 40Hz Surround : 40Hz Surr Back : 40Hz Surr Back Ch : 1ch Save Cancel ❏ Ambient noise is too high Auto Speaker Setup AUDYSSEY Ambient noise is complete, the Equalizer Settings (page 76) will be performed properly. Retry: Return to select an option, and then press [ENTER]. FL : Yes SL : --SBL : --C : Yes...
... : 40Hz Center : 40Hz Surround : 40Hz Surr Back : 40Hz Surr Back Ch : 1ch Save Cancel ❏ Ambient noise is too high Auto Speaker Setup AUDYSSEY Ambient noise is complete, the Equalizer Settings (page 76) will be performed properly. Retry: Return to select an option, and then press [ENTER]. FL : Yes SL : --SBL : --C : Yes...

Instruction Manual
Page 41
...again. First Time Setup-Continued Auto Speaker Setup AUDYSSEY - - - - - Speaker Detect Error - - - - - Retry: Return to step 2 and try again. In this message appears after 2 or 3 attempts, the AV receiver is usually low down, it to the settings found during the automatic speaker setup, follow the directions on pages ... properly. Refer to the number detected on the second or third measurement was different to your Onkyo dealer. Contact your subwoofer's instruction manual for details. Make sure speakers that if the volume is set it may not be detected by the automatic...
...again. First Time Setup-Continued Auto Speaker Setup AUDYSSEY - - - - - Speaker Detect Error - - - - - Retry: Return to step 2 and try again. In this message appears after 2 or 3 attempts, the AV receiver is usually low down, it to the settings found during the automatic speaker setup, follow the directions on pages ... properly. Refer to the number detected on the second or third measurement was different to your Onkyo dealer. Contact your subwoofer's instruction manual for details. Make sure speakers that if the volume is set it may not be detected by the automatic...

Instruction Manual
Page 42
... if you 've con- Setup closes. For hookup information, see page 38). Notes: • When bi-amping is used, the AV receiver is 4 ohms or more but less than 6, set the Speaker Impedance to 4 ohms. North American models do not support speakers with an impedance of less than 6. 6 ohms: Select if the impedances of all...
... if you 've con- Setup closes. For hookup information, see page 38). Notes: • When bi-amping is used, the AV receiver is 4 ohms or more but less than 6, set the Speaker Impedance to 4 ohms. North American models do not support speakers with an impedance of less than 6. 6 ohms: Select if the impedances of all...

Instruction Manual
Page 47
... INPUT RT/PTY/TP MEMORY TUNING MODE CLEAR SETUP MIC 1 AUX INPUT VIDEO L AUDIO R AV RECEIVER TX-SR606 1 3 1 AV receiver DVD VCR/DVR CBL/SAT GAME/TV AUX TAPE TUNER CD Remote controller Use the AV receiver's input selector buttons to Min, 1 through 79, or Max. 4 Select a listening mode ...page 57. 47 To select an input source with the remote controller, press its INPUT SELECTOR buttons. Since the AV receiver is selected, the Speaker Configuration settings on the source component. Note: • While the multichannel DVD input is designed for home theaters, it ...
... INPUT RT/PTY/TP MEMORY TUNING MODE CLEAR SETUP MIC 1 AUX INPUT VIDEO L AUDIO R AV RECEIVER TX-SR606 1 3 1 AV receiver DVD VCR/DVR CBL/SAT GAME/TV AUX TAPE TUNER CD Remote controller Use the AV receiver's input selector buttons to Min, 1 through 79, or Max. 4 Select a listening mode ...page 57. 47 To select an input source with the remote controller, press its INPUT SELECTOR buttons. Since the AV receiver is selected, the Speaker Configuration settings on the source component. Note: • While the multichannel DVD input is designed for home theaters, it ...

Instruction Manual
Page 49
Common Functions-Continued 7Using Headphones For private listening, you can connect a pair of headphones, the listening mode is set to Stereo, unless it was already set to Pure Audio, Mono, Stereo, or Direct, in which case it stays the same. • When the multichannel DVD input is selected, ...are not turned off . (The Powered Zone 2 speakers are displayed. *2 If the input signal is analog, or AM or FM radio is selected, no format information is inserted in the headphones. Note: • This procedure can typically be performed on the AV receiver by using its [DISPLAY] button. If the ...
Common Functions-Continued 7Using Headphones For private listening, you can connect a pair of headphones, the listening mode is set to Stereo, unless it was already set to Pure Audio, Mono, Stereo, or Direct, in which case it stays the same. • When the multichannel DVD input is selected, ...are not turned off . (The Powered Zone 2 speakers are displayed. *2 If the input signal is analog, or AM or FM radio is selected, no format information is inserted in the headphones. Note: • This procedure can typically be performed on the AV receiver by using its [DISPLAY] button. If the ...

Instruction Manual
Page 72
... a crossover frequency. The main menu appears onscreen. No: Select if no center speaker is useful if you can output low-fre- Note: • Cannot select Full Band if Front (step 5) is set to deter- mine the optimum crossover frequencies. 1 Press the [RECEIVER] button fol- Note: • Fixed at Full Band if Subwoofer (step...
... a crossover frequency. The main menu appears onscreen. No: Select if no center speaker is useful if you can output low-fre- Note: • Cannot select Full Band if Front (step 5) is set to deter- mine the optimum crossover frequencies. 1 Press the [RECEIVER] button fol- Note: • Fixed at Full Band if Subwoofer (step...

Instruction Manual
Page 96
... is assigned to minimum, disconnect the power cord, and reconnect your radio presets and custom settings. If the AV receiver turns off when you set it on your DVD player's remote controller. • If your Onkyo dealer. Only the front speakers produce sound • When the Stereo or Mono listening mode is being used with a mono...
... is assigned to minimum, disconnect the power cord, and reconnect your radio presets and custom settings. If the AV receiver turns off when you set it on your DVD player's remote controller. • If your Onkyo dealer. Only the front speakers produce sound • When the Stereo or Mono listening mode is being used with a mono...

Instruction Manual
Page 103
... 5. PL x/Neo:6 3. Theater-Dimensional ☞ pages 77 4. TAPE 7. Menu 1. Source Setup 5. Hardware Setup 8. Use the page numbers to change the AV receiver's various settings. Input Assign 2. Hardware Setup 8. Hardware Setup 1. Tuner 4. HDMI Input 2. Speaker Setup 1. IntelliVolume 2. VCR/DVR 3. AUX 6. TUNER 8. Source Setup 5. Dolby EX 4. A/V Sync page 42 ☞ page 71 5. Listening Mode Preset 1. Lock...
... 5. PL x/Neo:6 3. Theater-Dimensional ☞ pages 77 4. TAPE 7. Menu 1. Source Setup 5. Hardware Setup 8. Use the page numbers to change the AV receiver's various settings. Input Assign 2. Hardware Setup 8. Hardware Setup 1. Tuner 4. HDMI Input 2. Speaker Setup 1. IntelliVolume 2. VCR/DVR 3. AUX 6. TUNER 8. Source Setup 5. Dolby EX 4. A/V Sync page 42 ☞ page 71 5. Listening Mode Preset 1. Lock...


