
Instruction Manual
Page 4
... only by ASTA or BSI to BS1362 and have the following code: Blue: Neutral Brown: Live As the colours of the wires...64257;ed service personnel. For European Models Declaration of Conformity We, ONKYO EUROPE ELECTRONICS GmbH LIEGNITZERSTRASSE 6, 82194 GROEBENZELL, GERMANY declare in own... or coloured black. Use this instruction manual is marked with the following accessories: Remote controller and two batteries (AA/R6) Speaker setup microphone Indoor FM antenna AM ...outlet does not match with the plug on the AV receiver's power cord. (Adapter varies from country to country.) *How to ...
... only by ASTA or BSI to BS1362 and have the following code: Blue: Neutral Brown: Live As the colours of the wires...64257;ed service personnel. For European Models Declaration of Conformity We, ONKYO EUROPE ELECTRONICS GmbH LIEGNITZERSTRASSE 6, 82194 GROEBENZELL, GERMANY declare in own... or coloured black. Use this instruction manual is marked with the following accessories: Remote controller and two batteries (AA/R6) Speaker setup microphone Indoor FM antenna AM ...outlet does not match with the plug on the AV receiver's power cord. (Adapter varies from country to country.) *How to ...

Instruction Manual
Page 5
...Getting to Know the AV Receiver 8 Front Panel 8 Display 9 Rear Panel 10 Remote Controller 12 Controlling the AV Receiver 12 Installing the Batteries 13 Using the Remote Controller 13 Connecting Your... Recorder 34 Connecting an RI Dock 35 Connecting Onkyo Components 36 Turning On the AV Receiver 37 Connecting the Power Cord 37 Turning On and...Remote Control Codes 87 Entering Remote Control Codes 87 Resetting the Remote Controller 88 Controlling a TV 89 Controlling a DVD Player, or DVD Recorder ..... 90 Controlling a VCR or PVR 91 Controlling a Satellite Receiver or Cable Receiver...
...Getting to Know the AV Receiver 8 Front Panel 8 Display 9 Rear Panel 10 Remote Controller 12 Controlling the AV Receiver 12 Installing the Batteries 13 Using the Remote Controller 13 Connecting Your... Recorder 34 Connecting an RI Dock 35 Connecting Onkyo Components 36 Turning On the AV Receiver 37 Connecting the Power Cord 37 Turning On and...Remote Control Codes 87 Entering Remote Control Codes 87 Resetting the Remote Controller 88 Controlling a TV 89 Controlling a DVD Player, or DVD Recorder ..... 90 Controlling a VCR or PVR 91 Controlling a Satellite Receiver or Cable Receiver...

Instruction Manual
Page 6
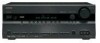
...24-bit/192kHz D/A Converters • Powerful and Highly Accurate 32-bit DSP Processing Connections • 4 HDMI*4 Inputs and 1 Output • Onkyo RIHD for System Control • HDTV-Ready Component Video Switching (2 Inputs/1 Output) • 4 Digital Inputs (2 Optical/2 Coaxial/4 Assignable) ... • Color-Coded 7.1 Multichannel Inputs • Bi-Amp Connectable for Front L/R with RI Dock for the iPod • Aluminum Front Panel • Preprogrammed -Compatible Remote *1. DTS is intended for home and other countries. * "x.v.Color" is a trademark of Onkyo Corporation. *4 HDMI,...
...24-bit/192kHz D/A Converters • Powerful and Highly Accurate 32-bit DSP Processing Connections • 4 HDMI*4 Inputs and 1 Output • Onkyo RIHD for System Control • HDTV-Ready Component Video Switching (2 Inputs/1 Output) • 4 Digital Inputs (2 Optical/2 Coaxial/4 Assignable) ... • Color-Coded 7.1 Multichannel Inputs • Bi-Amp Connectable for Front L/R with RI Dock for the iPod • Aluminum Front Panel • Preprogrammed -Compatible Remote *1. DTS is intended for home and other countries. * "x.v.Color" is a trademark of Onkyo Corporation. *4 HDMI,...
Instruction Manual
Page 15
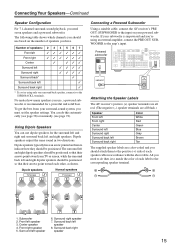
...WOOFER R R R R REMOTE CONTROL CD TAPE GAME/TV CBL/SAT VCR/DVR SUB WOOFER DVD LINE INPUT PRE OUT SUB WOOFER Attaching the Speaker Labels The AV receiver's positive (+) speaker terminals are all red. (The negative (-) speaker terminals are color-coded and you have an arrow...subwoofer. Dipole speakers TV/screen 1 2 3 4 Normal speakers TV/screen 1 2 3 4 Connecting a Powered Subwoofer Using a suitable cable, connect the AV receiver's PRE OUT: SUBWOOFER to the corresponding speaker terminal. 5 65 6 7 8 1. If your TV or screen, while the surround back left and right...
...WOOFER R R R R REMOTE CONTROL CD TAPE GAME/TV CBL/SAT VCR/DVR SUB WOOFER DVD LINE INPUT PRE OUT SUB WOOFER Attaching the Speaker Labels The AV receiver's positive (+) speaker terminals are all red. (The negative (-) speaker terminals are color-coded and you have an arrow...subwoofer. Dipole speakers TV/screen 1 2 3 4 Normal speakers TV/screen 1 2 3 4 Connecting a Powered Subwoofer Using a suitable cable, connect the AV receiver's PRE OUT: SUBWOOFER to the corresponding speaker terminal. 5 65 6 7 8 1. If your TV or screen, while the surround back left and right...

Instruction Manual
Page 35
... 1(DVD) OUT ASSIGNABLE IN IN OUT IN OUT IN IN IN OUT L REMOTE CONTROL R CD TAPE GAME/TV CBL/SAT VCR/DV If you have an Onkyo DS-A1 RI Dock, connect its video output jack to the AV receiver's GAME/TV IN V jack. ■ If Your iPod Doesn't Support Video...: Connect your RI Dock's audio output jacks to the AV receiver's TAPE IN L/R jacks. Notes: • Enter the appropriate remote control code before using the AV receiver's remote controller ...
... 1(DVD) OUT ASSIGNABLE IN IN OUT IN OUT IN IN IN OUT L REMOTE CONTROL R CD TAPE GAME/TV CBL/SAT VCR/DV If you have an Onkyo DS-A1 RI Dock, connect its video output jack to the AV receiver's GAME/TV IN V jack. ■ If Your iPod Doesn't Support Video...: Connect your RI Dock's audio output jacks to the AV receiver's TAPE IN L/R jacks. Notes: • Enter the appropriate remote control code before using the AV receiver's remote controller ...

Instruction Manual
Page 36
... (see page 88). You must enter the appropriate remote control code first (see page 45). The other jack is for connections. Step 3: If you start playback on a component connected via , if the AV receiver is started on a component connected via will automatically turn... player R L ANALOG AUDIO OUT R L ANALOG AUDIO OUT 36 Connecting Your Components-Continued Connecting Onkyo Components Step 1: Make sure that each Onkyo component is connected to an AC OUTLET on the AV receiver. This function will not work . Direct Change When playback is on Standby, it will also ...
... (see page 88). You must enter the appropriate remote control code first (see page 45). The other jack is for connections. Step 3: If you start playback on a component connected via , if the AV receiver is started on a component connected via will automatically turn... player R L ANALOG AUDIO OUT R L ANALOG AUDIO OUT 36 Connecting Your Components-Continued Connecting Onkyo Components Step 1: Make sure that each Onkyo component is connected to an AC OUTLET on the AV receiver. This function will not work . Direct Change When playback is on Standby, it will also ...

Instruction Manual
Page 79
The items are used in the same room, their remote ID codes may overlap. Remote Control The main menu appears onscreen. to change the AV receiver's remote ID, be able to control it . ENTER SETUP Number buttons 4 Use the Up and Down [ ]/[ ] buttons to select an item, ... menu doesn't appear, make sure the appropriate external input is selected on your TV. ■ Remote ID When several Onkyo components are explained below ), otherwise, you can also be performed on the Hardware menu. To differentiate the AV receiver from 1, the default, to 2 or 3. 2 Use the Up and Down [ ]/[ ] Note...
The items are used in the same room, their remote ID codes may overlap. Remote Control The main menu appears onscreen. to change the AV receiver's remote ID, be able to control it . ENTER SETUP Number buttons 4 Use the Up and Down [ ]/[ ] buttons to select an item, ... menu doesn't appear, make sure the appropriate external input is selected on your TV. ■ Remote ID When several Onkyo components are explained below ), otherwise, you can also be performed on the Hardware menu. To differentiate the AV receiver from 1, the default, to 2 or 3. 2 Use the Up and Down [ ]/[ ] Note...

Instruction Manual
Page 87
.... Number buttons Note: • The remote control codes provided are correct at the time of printing but subject to control your other components with (page 95) Entering Remote Control Codes You'll need to enter a remote control code to enter the 5-digit remote control code. Onkyo DVD player (page 90) Onkyo CD player (page 93) Onkyo cassette recorder with the AV receiver's remote controller.
.... Number buttons Note: • The remote control codes provided are correct at the time of printing but subject to control your other components with (page 95) Entering Remote Control Codes You'll need to enter a remote control code to enter the 5-digit remote control code. Onkyo DVD player (page 90) Onkyo CD player (page 93) Onkyo cassette recorder with the AV receiver's remote controller.

Instruction Manual
Page 88
... page for how to enter remote control codes. 3 Press the REMOTE MODE button, point the remote controller at the AV receiver, not the component. onds). (3 seconds) 2 Within 30 seconds, press the REMOTE MODE button again. onds). (3 seconds) 2 Within 30 seconds, press the [RECEIVER] REMOTE MODE but - Controlling Other Components-Continued Remote Control Codes for Onkyo Components Connected via Onkyo components that are controlled...
... page for how to enter remote control codes. 3 Press the REMOTE MODE button, point the remote controller at the AV receiver, not the component. onds). (3 seconds) 2 Within 30 seconds, press the REMOTE MODE button again. onds). (3 seconds) 2 Within 30 seconds, press the [RECEIVER] REMOTE MODE but - Controlling Other Components-Continued Remote Control Codes for Onkyo Components Connected via Onkyo components that are controlled...

Instruction Manual
Page 89
.... * With some may not work very well, program your TV's remote control code into the [TV] REMOTE MODE button and use the TV remote mode to On or Standby. The TV must be able to receive remote control commands via RIHD and be connected to the AV receiver via RIHD doesn't work as "-.--" button or +10. These buttons...
.... * With some may not work very well, program your TV's remote control code into the [TV] REMOTE MODE button and use the TV remote mode to On or Standby. The TV must be able to receive remote control commands via RIHD and be connected to the AV receiver via RIHD doesn't work as "-.--" button or +10. These buttons...

Instruction Manual
Page 90
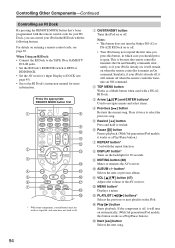
... Used to search title, chapter, and track numbers, and to search times for locating specific points. M MUTING button (48) Mutes or unmutes the AV receiver. Press the appropriate REMOTE MODE button first A L DVD M N B C O D E P F G Q R H I REPEAT button Used with the following buttons. P MENU button ... and some may not work as a +10 button or "-.--" button. The [DVD] REMOTE MODE button is preprogrammed with the remote control code for controlling an Onkyo DVD player. H Playback buttons From left to enter times for locating specific points...
... Used to search title, chapter, and track numbers, and to search times for locating specific points. M MUTING button (48) Mutes or unmutes the AV receiver. Press the appropriate REMOTE MODE button first A L DVD M N B C O D E P F G Q R H I REPEAT button Used with the following buttons. P MENU button ... and some may not work as a +10 button or "-.--" button. The [DVD] REMOTE MODE button is preprogrammed with the remote control code for controlling an Onkyo DVD player. H Playback buttons From left to enter times for locating specific points...

Instruction Manual
Page 91
...remote control code for a different component, see page 87. B TV [ ] buttons Set the TV to right: Previous, Next, Rewind, Play, Fast Forward, Pause, and Stop. E GUIDE button Displays the program guide or navigation list. K MUTING button (48) Mutes or unmutes the AV receiver. M VOL [ ]/[ ] button (47) Adjusts the volume of the AV receiver...and [PLAY MODE] buttons will work as a +10 button or "-.--" button. The [0] button enters 11 on entering a remote control code for your VCR (TV/VCR, PVR, DBS/PVR combination or cable/PVR combination), you can control your video recorder with ...
...remote control code for a different component, see page 87. B TV [ ] buttons Set the TV to right: Previous, Next, Rewind, Play, Fast Forward, Pause, and Stop. E GUIDE button Displays the program guide or navigation list. K MUTING button (48) Mutes or unmutes the AV receiver. M VOL [ ]/[ ] button (47) Adjusts the volume of the AV receiver...and [PLAY MODE] buttons will work as a +10 button or "-.--" button. The [0] button enters 11 on entering a remote control code for your VCR (TV/VCR, PVR, DBS/PVR combination or cable/PVR combination), you can control your video recorder with ...

Instruction Manual
Page 92
... as the blue (C) button. K VOL [ ]/[ ] button (47) Adjusts the volume of the AV receiver. I J K B L C D M N O E P F Q G R A ON/STANDBY button Set the component to On or Standby. Controlling Other Components-Continued Controlling a Satellite Receiver or Cable Receiver By pressing the REMOTE MODE button that's been programmed with the remote control code for a different component, see page 87. Press the appropriate...
... as the blue (C) button. K VOL [ ]/[ ] button (47) Adjusts the volume of the AV receiver. I J K B L C D M N O E P F Q G R A ON/STANDBY button Set the component to On or Standby. Controlling Other Components-Continued Controlling a Satellite Receiver or Cable Receiver By pressing the REMOTE MODE button that's been programmed with the remote control code for a different component, see page 87. Press the appropriate...

Instruction Manual
Page 93
... a CD Player, CD Recorder, or MD Player By pressing the REMOTE MODE button that's been programmed with the remote control code for controlling an Onkyo CD player. H Number buttons Used to On or Standby. K DISC...Onkyo CD player's settings. The [+10] button works as expected, and some components, certain buttons may not work as a +10 button or "-.--" button. L VOL [ ]/[ ] button (47) Adjusts the volume of the AV receiver. M RETURN button Exits the menu. O PLAY MODE button Selects play modes. The [CD] REMOTE MODE button is preprogrammed with the remote control code...
... a CD Player, CD Recorder, or MD Player By pressing the REMOTE MODE button that's been programmed with the remote control code for controlling an Onkyo CD player. H Number buttons Used to On or Standby. K DISC...Onkyo CD player's settings. The [+10] button works as expected, and some components, certain buttons may not work as a +10 button or "-.--" button. L VOL [ ]/[ ] button (47) Adjusts the volume of the AV receiver. M RETURN button Exits the menu. O PLAY MODE button Selects play modes. The [CD] REMOTE MODE button is preprogrammed with the remote control code...
Instruction Manual
Page 94
... Set the RI Dock's RI MODE switch to HDD or HDD/DOCK. • Set the AV receiver's Input Display to DOCK (see page 87. Notes: • This button does not turn the Onkyo DS-A2 or DS-A2X RI Dock on or off , it will remain on automatically. (... ] buttons* Selects the previous or next playlist on entering a remote control code, see page 45). • See to select the previous song. N Play [ ] button Starts playback. Press the appropriate REMOTE MODE button first A 8 I MUTING button (48) Mutes or unmutes the AV receiver. E Rewind [ ] button Press and hold to navigate menus ...
... Set the RI Dock's RI MODE switch to HDD or HDD/DOCK. • Set the AV receiver's Input Display to DOCK (see page 87. Notes: • This button does not turn the Onkyo DS-A2 or DS-A2X RI Dock on or off , it will remain on automatically. (... ] buttons* Selects the previous or next playlist on entering a remote control code, see page 45). • See to select the previous song. N Play [ ] button Starts playback. Press the appropriate REMOTE MODE button first A 8 I MUTING button (48) Mutes or unmutes the AV receiver. E Rewind [ ] button Press and hold to navigate menus ...

Instruction Manual
Page 95
...AV receiver. H Stop [ ] button Stops playback. B Previous and Next [ ]/[ ] buttons The Previous [ ] button selects the previous track. S RANDOM button* Used with the shuffle function. * Buttons marked with a DS-A2 RI Dock. A ON/STANDBY button Turns the cassette recorder on components with the remote control code... VOL [ ]/[ ] button (47) Adjusts the volume of the current track. Depending on entering a remote control code for controlling an Onkyo cassette recorder when used with an asterisk (*) are not supported by 3rd generation iPod models. Controlling Other ...
...AV receiver. H Stop [ ] button Stops playback. B Previous and Next [ ]/[ ] buttons The Previous [ ] button selects the previous track. S RANDOM button* Used with the shuffle function. * Buttons marked with a DS-A2 RI Dock. A ON/STANDBY button Turns the cassette recorder on components with the remote control code... VOL [ ]/[ ] button (47) Adjusts the volume of the current track. Depending on entering a remote control code for controlling an Onkyo cassette recorder when used with an asterisk (*) are not supported by 3rd generation iPod models. Controlling Other ...

Instruction Manual
Page 98
..." setting to enter the appropriate remote control code first (page 88). • To control an Onkyo component that's not connected via , point the remote controller at that component. Troubleshooting-Continued There's no video signals are not supported (page 31). • If the message "Resolution Error" appears on the AV receiver's display, this indicates that your...
..." setting to enter the appropriate remote control code first (page 88). • To control an Onkyo component that's not connected via , point the remote controller at that component. Troubleshooting-Continued There's no video signals are not supported (page 31). • If the message "Resolution Error" appears on the AV receiver's display, this indicates that your...


