
Owner Manual
Page 1
... detailed hookup information and operating instructions, please see the Instruction Manual. All rights reserved. This quick setup sheet shows the typical hookup method for connecting speakers and AV components (DVD player, TV, cable/satellite receiver). SN 29344659A * 2 9 3 4 4 6 5 9 A * QUICK SETUP Model : TX-SR606 Thank you for purchasing this sheet for the AV component hookup. (C) Copyright 2008 ONKYO CORPORATION Japan.
... detailed hookup information and operating instructions, please see the Instruction Manual. All rights reserved. This quick setup sheet shows the typical hookup method for connecting speakers and AV components (DVD player, TV, cable/satellite receiver). SN 29344659A * 2 9 3 4 4 6 5 9 A * QUICK SETUP Model : TX-SR606 Thank you for purchasing this sheet for the AV component hookup. (C) Copyright 2008 ONKYO CORPORATION Japan.

Owner Manual
Page 2
... 6. Digital Audio Input 1-1. If your TV or player doesn't support HDMI, use the TX-SR606's display when changing settings. Digital audio signals received at HDMI IN inputs are not using the setup menus on a TV that is connected to the AV receiver with a single cable, making connecting simple and keeping wires neat. On the front panel...
... 6. Digital Audio Input 1-1. If your TV or player doesn't support HDMI, use the TX-SR606's display when changing settings. Digital audio signals received at HDMI IN inputs are not using the setup menus on a TV that is connected to the AV receiver with a single cable, making connecting simple and keeping wires neat. On the front panel...

Instruction Manual
Page 1
... this manual will enable you for future reference. AV Receiver TX-SR606 Instruction Manual Contents Introduction 2 Connection 14 Turning On & First Time Setup ..... 37 Basic Operation Playing your AV components ....... 47 Listening to the Radio 51 Thank you to obtain optimum performance and listening enjoyment from your new AV Receiver. Using the Listening Modes........... 57 Advanced Operation 67...
... this manual will enable you for future reference. AV Receiver TX-SR606 Instruction Manual Contents Introduction 2 Connection 14 Turning On & First Time Setup ..... 37 Basic Operation Playing your AV components ....... 47 Listening to the Radio 51 Thank you to obtain optimum performance and listening enjoyment from your new AV Receiver. Using the Listening Modes........... 57 Advanced Operation 67...

Instruction Manual
Page 4
... EN55013, EN55020 and EN61000-3-2, -3-3. IMPORTANT The plug is marked with the letter N or coloured black. MIYAGI ONKYO EUROPE ELECTRONICS GmbH Front Left Front Left SP-B / Zone 2 Left SP-B / Zone 2 Left Front Right...coloured in accordance with the following accessories: Remote controller and two batteries (AA/R6) Speaker setup microphone Indoor FM antenna AM loop antenna 1 2 3 Speaker Cable Speaker cable labels * ..., GERMANY K. Check for your AC outlet does not match with the plug on the AV receiver's power cord. (Adapter varies from country to country.) *How to mount the AC plug...
... EN55013, EN55020 and EN61000-3-2, -3-3. IMPORTANT The plug is marked with the letter N or coloured black. MIYAGI ONKYO EUROPE ELECTRONICS GmbH Front Left Front Left SP-B / Zone 2 Left SP-B / Zone 2 Left Front Right...coloured in accordance with the following accessories: Remote controller and two batteries (AA/R6) Speaker setup microphone Indoor FM antenna AM loop antenna 1 2 3 Speaker Cable Speaker cable labels * ..., GERMANY K. Check for your AC outlet does not match with the plug on the AV receiver's power cord. (Adapter varies from country to country.) *How to mount the AC plug...

Instruction Manual
Page 5
...an RI Dock 35 Connecting Onkyo Components 36 Turning On the AV Receiver 37 Connecting the Power Cord 37 Turning On and Standby 37 First Time Setup 38 Automatic Speaker Setup 38 Speaker Settings 42 HDMI Input Setup 43 Component Video Input Setup 44 Digital Input Setup 44 Changing the Input ... Player 93 Controlling an RI Dock 94 Controlling a Cassette Recorder 95 Troubleshooting 96 Specifications 101 Video Resolution Chart 102 Onscreen Setup Menus 103 * To reset the AV receiver to its factory defaults, turn it on and, while holding down the [VCR/DVR] button, press the [ON/STANDBY...
...an RI Dock 35 Connecting Onkyo Components 36 Turning On the AV Receiver 37 Connecting the Power Cord 37 Turning On and Standby 37 First Time Setup 38 Automatic Speaker Setup 38 Speaker Settings 42 HDMI Input Setup 43 Component Video Input Setup 44 Digital Input Setup 44 Changing the Input ... Player 93 Controlling an RI Dock 94 Controlling a Cassette Recorder 95 Troubleshooting 96 Specifications 101 Video Resolution Chart 102 Onscreen Setup Menus 103 * To reset the AV receiver to its factory defaults, turn it on and, while holding down the [VCR/DVR] button, press the [ON/STANDBY...

Instruction Manual
Page 8
... PHONES ZONE 2 OFF ZONE 2 LEVEL TONE MOVIE/TV MUSIC GAME DISPLAY DIGITAL INPUT DIMMER MEMORY TUNING MODE CLEAR SETUP MIC AUX INPUT VIDEO L AUDIO R AV RECEIVER TX-SR606 KL M Other models N OPQ RS TUV W ON/STANDBY STANDBY ZONE 2 TUNING PRESET X MASTER VOLUME PURE ... RETURN PHONES ZONE 2 OFF ZONE 2 LEVEL TONE MOVIE/TV MUSIC GAME DISPLAY DIGITAL INPUT RT/PTY/TP MEMORY TUNING MODE CLEAR SETUP MIC AUX INPUT VIDEO L AUDIO R AV RECEIVER TX-SR606 Y T The actual front panel has various logos printed on . C ZONE 2 indicator (85) Flashes when Zone 2 is selected, ...
... PHONES ZONE 2 OFF ZONE 2 LEVEL TONE MOVIE/TV MUSIC GAME DISPLAY DIGITAL INPUT DIMMER MEMORY TUNING MODE CLEAR SETUP MIC AUX INPUT VIDEO L AUDIO R AV RECEIVER TX-SR606 KL M Other models N OPQ RS TUV W ON/STANDBY STANDBY ZONE 2 TUNING PRESET X MASTER VOLUME PURE ... RETURN PHONES ZONE 2 OFF ZONE 2 LEVEL TONE MOVIE/TV MUSIC GAME DISPLAY DIGITAL INPUT RT/PTY/TP MEMORY TUNING MODE CLEAR SETUP MIC AUX INPUT VIDEO L AUDIO R AV RECEIVER TX-SR606 Y T The actual front panel has various logos printed on . C ZONE 2 indicator (85) Flashes when Zone 2 is selected, ...

Instruction Manual
Page 9
...function has been set. 2 MUTING indicator (48) Flashes while the AV receiver is selected. I RETURN button Selects the previously displayed setup menu. M ZONE 2 LEVEL button (86) Used when adjusting the volume level of the AV receiver to Min, 1 through 79, or Max. P MUSIC button (57... that 's selected as the audio source: PCM, MULTI CH, or HDMI. 7 Audyssey indicator Flashes during automatic speaker setup. 9 Getting to Know the AV Receiver-Continued For detailed information, see the pages in parentheses. On the European modes, this button again selects the previous listening...
...function has been set. 2 MUTING indicator (48) Flashes while the AV receiver is selected. I RETURN button Selects the previously displayed setup menu. M ZONE 2 LEVEL button (86) Used when adjusting the volume level of the AV receiver to Min, 1 through 79, or Max. P MUSIC button (57... that 's selected as the audio source: PCM, MULTI CH, or HDMI. 7 Audyssey indicator Flashes during automatic speaker setup. 9 Getting to Know the AV Receiver-Continued For detailed information, see the pages in parentheses. On the European modes, this button again selects the previous listening...

Instruction Manual
Page 10
...selector to a video input on another -capable Onkyo component for connecting a SIRIUS digital antenna, sold separately (see the separate SIRIUS instructions). Getting to suit your setup. G SIRIUS antenna (on page 17. The... HDMI inputs are for connecting the front speakers, center, surround, and surround back speakers. B DIGITAL IN COAXIAL 1 and 2 These coaxial digital audio inputs are connected digitally. They're assignable, which means you must make an analog audio connection (RCA) between the AV receiver...
...selector to a video input on another -capable Onkyo component for connecting a SIRIUS digital antenna, sold separately (see the separate SIRIUS instructions). Getting to suit your setup. G SIRIUS antenna (on page 17. The... HDMI inputs are for connecting the front speakers, center, surround, and surround back speakers. B DIGITAL IN COAXIAL 1 and 2 These coaxial digital audio inputs are connected digitally. They're assignable, which means you must make an analog audio connection (RCA) between the AV receiver...

Instruction Manual
Page 12
...button (37) Sets the AV receiver to select the listening modes. E SETUP button Used to change audio settings. You can select AM or FM by pressing the [TUNER] button repeatedly. 1 Arrow [ ]/[ ] buttons Used to tune into radio stations. 2 Number buttons (53) Used to change settings. A 2 3 RECEIVER 14 * 5 6 2 ...MULTI CH button (47) Selects the multichannel DVD input. I MUTING button (48) Mutes or unmutes the AV receiver. button (54) Selects radio presets. Note: • An Onkyo cassette recorder connected via can also use the remote controller to select and adjust settings. J VOL [ ...
...button (37) Sets the AV receiver to select the listening modes. E SETUP button Used to change audio settings. You can select AM or FM by pressing the [TUNER] button repeatedly. 1 Arrow [ ]/[ ] buttons Used to tune into radio stations. 2 Number buttons (53) Used to change settings. A 2 3 RECEIVER 14 * 5 6 2 ...MULTI CH button (47) Selects the multichannel DVD input. I MUTING button (48) Mutes or unmutes the AV receiver. button (54) Selects radio presets. Note: • An Onkyo cassette recorder connected via can also use the remote controller to select and adjust settings. J VOL [ ...

Instruction Manual
Page 21
... connection. Speakers (see pages 44). When you connect audio equipment to an HDMI, OPTICAL, or COAXIAL input, you must assign that the AV receiver does not convert digital input signals for hookup details) Which Connections Should I Use? For example, audio signals connected to an input selector (... outputs and vice versa. MD recorder, etc. Use the following order of a signal in the "Automatic Audio Input Selection Setup" on the formats supported by your DVD player and other components. The format you choose will be connected to the AV receiver by the analog TAPE OUT.
... connection. Speakers (see pages 44). When you connect audio equipment to an HDMI, OPTICAL, or COAXIAL input, you must assign that the AV receiver does not convert digital input signals for hookup details) Which Connections Should I Use? For example, audio signals connected to an input selector (... outputs and vice versa. MD recorder, etc. Use the following order of a signal in the "Automatic Audio Input Selection Setup" on the formats supported by your DVD player and other components. The format you choose will be connected to the AV receiver by the analog TAPE OUT.

Instruction Manual
Page 25
.../DVR DVD MONITOR OUT V AM SURR BACK SPEAKERS Bi-AMP for the multichannel input, see "Basic AV Receiver Operation" on page 79. To select the multichannel input, see "Hardware Setup" on page 47. Use a multichannel analog audio cable, or several normal audio cables, to connect the... AV receiver's DVD IN FRONT L/R, CENTER, SURR L/R, SURR BACK L/R, and SUBWOOFER jacks to the AV receiver's SURR BACK L/R jacks. Connecting Your Components-...
.../DVR DVD MONITOR OUT V AM SURR BACK SPEAKERS Bi-AMP for the multichannel input, see "Basic AV Receiver Operation" on page 79. To select the multichannel input, see "Hardware Setup" on page 47. Use a multichannel analog audio cable, or several normal audio cables, to connect the... AV receiver's DVD IN FRONT L/R, CENTER, SURR L/R, SURR BACK L/R, and SUBWOOFER jacks to the AV receiver's SURR BACK L/R jacks. Connecting Your Components-...

Instruction Manual
Page 31
...Setup (see page 43). ■ Video Signals Digital video signals received by the HDMI IN jacks are normally output by the HDMI OUT for display on page 22 for more information. ■ Audio Signals Digital audio signals received by the HDMI IN jacks are not output by the HDMI IN jacks through the AV receiver... make a separate connection for details. 31 Connecting Your Components-Continued Making HDMI Connections Step 1: Use HDMI cables to connect the AV receiver's HDMI jacks to your DVD player's HDMI audio output setting to PCM. Composite video, S-Video, and component video sources can...
...Setup (see page 43). ■ Video Signals Digital video signals received by the HDMI IN jacks are normally output by the HDMI OUT for display on page 22 for more information. ■ Audio Signals Digital audio signals received by the HDMI IN jacks are not output by the HDMI IN jacks through the AV receiver... make a separate connection for details. 31 Connecting Your Components-Continued Making HDMI Connections Step 1: Use HDMI cables to connect the AV receiver's HDMI jacks to your DVD player's HDMI audio output setting to PCM. Composite video, S-Video, and component video sources can...

Instruction Manual
Page 32
TUNING PRESET MASTER VOLUME a AUX INPUT L AUDIO R SETUP ENTER RETURN TUNING MODE SETUP MIC AUX INPUT VIDEO L AUDIO R AV RECEIVER TX-SR606 A AUX INPUT VIDEO L AUDIO R OUT VIDEO OUT Camcorder, etc. Connection A a AV receiver AUX INPUT VIDEO AUX INPUT L-AUDIO-R Signal flow ⇐ ⇐ Camcorder or console Composite video output Analog audio L/R output 32 Step 2: Make the audio connection a . Connecting Your Components-Continued Connecting a Camcorder or Other Device Step 1: Make the video connection A .
TUNING PRESET MASTER VOLUME a AUX INPUT L AUDIO R SETUP ENTER RETURN TUNING MODE SETUP MIC AUX INPUT VIDEO L AUDIO R AV RECEIVER TX-SR606 A AUX INPUT VIDEO L AUDIO R OUT VIDEO OUT Camcorder, etc. Connection A a AV receiver AUX INPUT VIDEO AUX INPUT L-AUDIO-R Signal flow ⇐ ⇐ Camcorder or console Composite video output Analog audio L/R output 32 Step 2: Make the audio connection a . Connecting Your Components-Continued Connecting a Camcorder or Other Device Step 1: Make the video connection A .

Instruction Manual
Page 37
... to help you configure the AV receiver before you connect an Onkyo MD recorder, CD recorder, or RI Dock? If this is a problem, plug the AV receiver into a suitable wall outlet. • Turning on page 45. Turning On the AV Receiver ON/STANDBY STANDBY indicator ON/STANDBY STANDBY...2 OFF ZONE 2 LEVEL TONE MOVIE/TV MUSIC GAME DISPLAY DIGITAL INPUT RT/PTY/TP MEMORY TUNING MODE CLEAR SETUP MIC AUX INPUT VIDEO L AUDIO R AV RECEIVER TX-SR606 ON/STANDBY RECEIVER Connecting the Power Cord • Before connecting the power cord, connect all your system up , and the ...
... to help you configure the AV receiver before you connect an Onkyo MD recorder, CD recorder, or RI Dock? If this is a problem, plug the AV receiver into a suitable wall outlet. • Turning on page 45. Turning On the AV Receiver ON/STANDBY STANDBY indicator ON/STANDBY STANDBY...2 OFF ZONE 2 LEVEL TONE MOVIE/TV MUSIC GAME DISPLAY DIGITAL INPUT RT/PTY/TP MEMORY TUNING MODE CLEAR SETUP MIC AUX INPUT VIDEO L AUDIO R AV RECEIVER TX-SR606 ON/STANDBY RECEIVER Connecting the Power Cord • Before connecting the power cord, connect all your system up , and the ...
Instruction Manual
Page 38
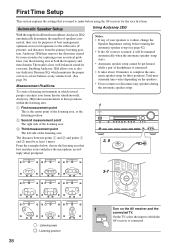
... PHONES ZONE 2 OFF ZONE 2 LEVEL TONE MOVIE/TV MUSIC GAME DISPLAY DIGITAL INPUT RT/PTY/TP MEMORY TUNING MODE CLEAR SETUP MIC AUX INPUT VIDEO L AUDIO R AV RECEIVER TX-SR606 2, 8 TV TV TV TV TV TV 3-7 TV TV TV : Listening area : Listening position 38 1 ON/STANDBY Turn...distances from the primary listening position. Total measurement time varies depending on the AV receiver and the connected TV. C Third measurement point The left side of the listening area. First Time Setup This section explains the settings that best matches yours and place the microphone ...
... PHONES ZONE 2 OFF ZONE 2 LEVEL TONE MOVIE/TV MUSIC GAME DISPLAY DIGITAL INPUT RT/PTY/TP MEMORY TUNING MODE CLEAR SETUP MIC AUX INPUT VIDEO L AUDIO R AV RECEIVER TX-SR606 2, 8 TV TV TV TV TV TV 3-7 TV TV TV : Listening area : Listening position 38 1 ON/STANDBY Turn...distances from the primary listening position. Total measurement time varies depending on the AV receiver and the connected TV. C Third measurement point The left side of the listening area. First Time Setup This section explains the settings that best matches yours and place the microphone ...

Instruction Manual
Page 39
..., radios, air conditioners, fluorescent lights, home appliances, light dimmers, or other devices, and refrain from talking. Auto Speaker Setup AUDYSSEY Please place microphone at right end of listening area at ear height. The following screen appears. This takes a few minutes. When... screen appears. ments as possible. Audyssey 2EQ performs more measurements. Audyssey 2EQ performs more measurements. Push Enter : Next Move the speaker setup microphone to measurement point 2 (page 38), then press [ENTER]. phone capsule should point directly at the ceiling. • If there...
..., radios, air conditioners, fluorescent lights, home appliances, light dimmers, or other devices, and refrain from talking. Auto Speaker Setup AUDYSSEY Please place microphone at right end of listening area at ear height. The following screen appears. This takes a few minutes. When... screen appears. ments as possible. Audyssey 2EQ performs more measurements. Audyssey 2EQ performs more measurements. Push Enter : Next Move the speaker setup microphone to measurement point 2 (page 38), then press [ENTER]. phone capsule should point directly at the ceiling. • If there...

Instruction Manual
Page 40
...SR : --SBR : --SW : --- FL : Yes SL : --SBL : --C : Yes FR : Yes SR : No SBR : Yes SW : --- Cancel: Cancel the automatic speaker setup. Note: • You can view the calculated settings for the speaker configuration, speaker distances, and speaker levels by using the Left and Right... are : This message appears if the background noise is too high. Error Messages plete, the following error messages may appear: Auto Speaker Setup AUDYSSEY Review Speaker configuration Subwoofer : No Front : 40Hz Center : 40Hz Surround : 40Hz Surr Back : 40Hz Surr Back Ch : 1ch...
...SR : --SBR : --SW : --- FL : Yes SL : --SBL : --C : Yes FR : Yes SR : No SBR : Yes SW : --- Cancel: Cancel the automatic speaker setup. Note: • You can view the calculated settings for the speaker configuration, speaker distances, and speaker levels by using the Left and Right... are : This message appears if the background noise is too high. Error Messages plete, the following error messages may appear: Auto Speaker Setup AUDYSSEY Review Speaker configuration Subwoofer : No Front : 40Hz Center : 40Hz Surround : 40Hz Surr Back : 40Hz Surr Back Ch : 1ch...

Instruction Manual
Page 41
...: Cancel the automatic speaker setup. 41 Auto Speaker Setup AUDYSSEY - - - - - Using a Powered Subwoofer If you wish to make changes to the number detected on pages 72-76. Writing Error! Retry: Return to your Onkyo dealer. FL : Yes SL : --SBL : No C : Yes FR ... fails. In this message appears after 2 or 3 attempts, the AV receiver is a problem with a speaker. If this case, increase the subwoofer's volume, select its position is too high. Speaker Detect Error - - - - - First Time Setup-Continued Auto Speaker Setup AUDYSSEY - - - - - FL : Error SL : Yes ...
...: Cancel the automatic speaker setup. 41 Auto Speaker Setup AUDYSSEY - - - - - Using a Powered Subwoofer If you wish to make changes to the number detected on pages 72-76. Writing Error! Retry: Return to your Onkyo dealer. FL : Yes SL : --SBL : No C : Yes FR ... fails. In this message appears after 2 or 3 attempts, the AV receiver is a problem with a speaker. If this case, increase the subwoofer's volume, select its position is too high. Speaker Detect Error - - - - - First Time Setup-Continued Auto Speaker Setup AUDYSSEY - - - - - FL : Error SL : Yes ...

Instruction Manual
Page 42
..., make sure the appropriate external input is selected on the AV receiver by the [SETUP] button. The main menu appears onscreen. Bi-Amp:Select this if you've con- Speaker Setup," and then press [ENTER]. ENTER SETUP RECEIVER 3 Use the Up and Down [ ]/[ ] buttons to...select "2. nected your front speakers for bi-amped operation. 6 Press the [SETUP] button. Setup closes. Speaker Settings," and then press [ENTER]. nected your front speakers normally. Notes: • When bi-amping is used, the AV receiver is 4 ohms or more but less than 6 ohms. To use the ...
..., make sure the appropriate external input is selected on the AV receiver by the [SETUP] button. The main menu appears onscreen. Bi-Amp:Select this if you've con- Speaker Setup," and then press [ENTER]. ENTER SETUP RECEIVER 3 Use the Up and Down [ ]/[ ] buttons to...select "2. nected your front speakers for bi-amped operation. 6 Press the [SETUP] button. Setup closes. Speaker Settings," and then press [ENTER]. nected your front speakers normally. Notes: • When bi-amping is used, the AV receiver is 4 ohms or more but less than 6 ohms. To use the ...

Instruction Manual
Page 43
... IN 1 to select an input selec- If the main menu doesn't appear, make sure the appropriate external input is selected on the AV receiver by the [SETUP] button. nent is assigned to an input selector as explained here, the digital audio input for that input to select "1. See "Digital... connected to select "1. Input selector DVD VCR/DVR CBL/SAT GAME/TV AUX TAPE CD Audio input HDMI1 HDMI2 HDMI3 HDMI4 1 Press the [RECEIVER] button, followed by using its [SETUP], [ENTER], and arrow buttons. 3 Use the Up and Down [ ]/[ ] buttons to HDMI IN 4. - - - - -: Select if you're not...
... IN 1 to select an input selec- If the main menu doesn't appear, make sure the appropriate external input is selected on the AV receiver by the [SETUP] button. nent is assigned to an input selector as explained here, the digital audio input for that input to select "1. See "Digital... connected to select "1. Input selector DVD VCR/DVR CBL/SAT GAME/TV AUX TAPE CD Audio input HDMI1 HDMI2 HDMI3 HDMI4 1 Press the [RECEIVER] button, followed by using its [SETUP], [ENTER], and arrow buttons. 3 Use the Up and Down [ ]/[ ] buttons to HDMI IN 4. - - - - -: Select if you're not...


