Owner Manual
Page 6
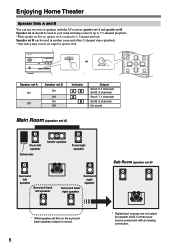
...CAT SETUP RETURN Speaker set A On Off Speaker set B On Off On Off Indicator AB A B Output Set A: 5.1 channels Set B: 2 channels Set A: 7.1 channels Set B: 2 channels No sound Main Room (speaker set A) Front left speaker Subwoofer Center speaker Front right speaker Surround left speaker Surround back left ...set B. Enjoying Home Theater Speaker Sets A and B You can be used in your source component with the AV receiver: speaker set A and speaker set A is reduced to 7.1-channel playback. *While speaker set B is on , the surround back speakers output no sound. 6 * Digital...
...CAT SETUP RETURN Speaker set A On Off Speaker set B On Off On Off Indicator AB A B Output Set A: 5.1 channels Set B: 2 channels Set A: 7.1 channels Set B: 2 channels No sound Main Room (speaker set A) Front left speaker Subwoofer Center speaker Front right speaker Surround left speaker Surround back left ...set B. Enjoying Home Theater Speaker Sets A and B You can be used in your source component with the AV receiver: speaker set A and speaker set A is reduced to 7.1-channel playback. *While speaker set B is on , the surround back speakers output no sound. 6 * Digital...

Owner Manual
Page 17
...10003;✓✓✓ Surround back* ✓ * If you're using the AV receiver, you should use , a powered subwoofer is recommended for your listening position. You can enjoy Dolby Pro Logic IIx and Onkyo's own DSP surround listening modes. With analog and digital TV, you should connect... Matrix, DTS-ES Discrete. ization behind the listener about ear enhance the realism of the LFE (Low-Frequency Effects) channel. The following table shows which channels you must do the automatic speaker setup (see page 35). Their role in a front cor- Posi- Position them ...
...10003;✓✓✓ Surround back* ✓ * If you're using the AV receiver, you should use , a powered subwoofer is recommended for your listening position. You can enjoy Dolby Pro Logic IIx and Onkyo's own DSP surround listening modes. With analog and digital TV, you should connect... Matrix, DTS-ES Discrete. ization behind the listener about ear enhance the realism of the LFE (Low-Frequency Effects) channel. The following table shows which channels you must do the automatic speaker setup (see page 35). Their role in a front cor- Posi- Position them ...

Owner Manual
Page 19
...and twist the bare wires tightly, as shown. 5/8" (15 mm) 2 Unscrew the terminal. Connecting a Powered Subwoofer Using a suitable cable, connect the AV receiver's SUBWOOFER PRE OUT to the input on , speaker set B is on your subwoofer is reduced to it to each pair of terminals. Note: Make... mm) Note: While speaker set A is unpowered and you 're using an external amplifier, connect the SUBWOOFER PRE OUT to 5.1-channel playback. Front right speaker Speaker Set A Front left speaker The following illustration shows which speaker should be connected to the left speaker 19 If...
...and twist the bare wires tightly, as shown. 5/8" (15 mm) 2 Unscrew the terminal. Connecting a Powered Subwoofer Using a suitable cable, connect the AV receiver's SUBWOOFER PRE OUT to the input on , speaker set B is on your subwoofer is reduced to it to each pair of terminals. Note: Make... mm) Note: While speaker set A is unpowered and you 're using an external amplifier, connect the SUBWOOFER PRE OUT to 5.1-channel playback. Front right speaker Speaker Set A Front left speaker The following illustration shows which speaker should be connected to the left speaker 19 If...
Owner Manual
Page 22
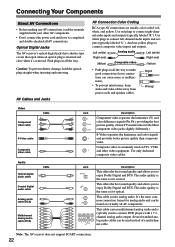
.... • Don't connect the power cord until you've completed and double-checked all the way. Note: The AV receiver does not support SCART connections. 22 Wrong! This cable carries multichannel analog audio and is commonly used on virtually all the way to make good... are usually color coded: red, white, and yellow. And use yellow plugs to connect left-channel audio inputs and outputs (typically labeled "L"). Optical Digital Jacks The AV receiver's optical digital jacks have shutter-type covers that open when an optical plug is the same as for coaxial. Use red plugs to enjoy ...
.... • Don't connect the power cord until you've completed and double-checked all the way. Note: The AV receiver does not support SCART connections. 22 Wrong! This cable carries multichannel analog audio and is commonly used on virtually all the way to make good... are usually color coded: red, white, and yellow. And use yellow plugs to connect left-channel audio inputs and outputs (typically labeled "L"). Optical Digital Jacks The AV receiver's optical digital jacks have shutter-type covers that open when an optical plug is the same as for coaxial. Use red plugs to enjoy ...
Owner Manual
Page 26
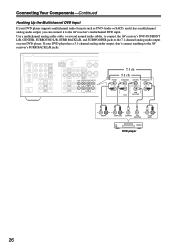
...DVD player supports multichannel audio formats such as DVD-Audio or SACD, and it has a multichannel analog audio output, you can connect it to the AV receiver's multichannel DVD input. DIGITAL IN ASSIGNABLE COAX- IAL 1 Y (DVD) 2 (CBL/SAT) OPTICAL 1 (VCR/DVR) 2 (CD) CB/PB... Up the Multichannel DVD Input If your DVD player has a 5.1-channel analog audio output, don't connect anything to the AV receiver's SURR BACK L/R jacks. Use a multichannel analog audio cable, or several normal audio cables, to connect the AV receiver's DVD IN FRONT L/R, CENTER, SURROUND L/R, SURR BACK L/R, and...
...DVD player supports multichannel audio formats such as DVD-Audio or SACD, and it has a multichannel analog audio output, you can connect it to the AV receiver's multichannel DVD input. DIGITAL IN ASSIGNABLE COAX- IAL 1 Y (DVD) 2 (CBL/SAT) OPTICAL 1 (VCR/DVR) 2 (CD) CB/PB... Up the Multichannel DVD Input If your DVD player has a 5.1-channel analog audio output, don't connect anything to the AV receiver's SURR BACK L/R jacks. Use a multichannel analog audio cable, or several normal audio cables, to connect the AV receiver's DVD IN FRONT L/R, CENTER, SURROUND L/R, SURR BACK L/R, and...

Owner Manual
Page 33
...(page 63). If your DVD player is connected to the AV receiver with other -capable Onkyo components, pointing the remote controller at the AV receiver's remote control sensor instead of your other jack is a problem, plug the AV receiver into a different branch circuit. 33 You can use the ... on Standby. Notes: • Before connecting the power cord, connect all channels (see page 39). cables are supplied with your speakers and AV components. • Turning on the AV receiver may not support all components connected via will not work on components connected to...
...(page 63). If your DVD player is connected to the AV receiver with other -capable Onkyo components, pointing the remote controller at the AV receiver's remote control sensor instead of your other jack is a problem, plug the AV receiver into a different branch circuit. 33 You can use the ... on Standby. Notes: • Before connecting the power cord, connect all channels (see page 39). cables are supplied with your speakers and AV components. • Turning on the AV receiver may not support all components connected via will not work on components connected to...

Owner Manual
Page 40
... TUNER 10 11 +10 0 C D 12 CABLE CLR SAT D TUN --/--- Note that 's connected to the AV receiver's MONITOR OUT jack. TX-SR505 North American model/TX-SR505E/TX-SR575 only: If your TV, select the video input that while speaker set B is connected to MIN, 1 through the... PLAYLIST/CAT ENTER MUTING PLAYLIST/CAT 1 4 1 AV receiver Remote controller RECEIVER DVD VCR/DVR CBL/SAT AUX C D TAPE TUNER 1 2 VCR/DVR CBL/SAT 4 AUX 7 8 TAPE TUNER 6 DVD 9 C D Use the AV receiver's input selector buttons to 5.1-channel Indicators playback. To adjust the volume, use the ...
... TUNER 10 11 +10 0 C D 12 CABLE CLR SAT D TUN --/--- Note that 's connected to the AV receiver's MONITOR OUT jack. TX-SR505 North American model/TX-SR505E/TX-SR575 only: If your TV, select the video input that while speaker set B is connected to MIN, 1 through the... PLAYLIST/CAT ENTER MUTING PLAYLIST/CAT 1 4 1 AV receiver Remote controller RECEIVER DVD VCR/DVR CBL/SAT AUX C D TAPE TUNER 1 2 VCR/DVR CBL/SAT 4 AUX 7 8 TAPE TUNER 6 DVD 9 C D Use the AV receiver's input selector buttons to 5.1-channel Indicators playback. To adjust the volume, use the ...

Owner Manual
Page 41
...channels (surround left , front right, and center). DISPLAY mation. LEVEL+ PLAY MODE DISPLAY L NIGHT VCR DVD CINE FLTR HDD RC-681M Using the Multichannel DVD Input The multichannel DVD input is displayed for subwoofer (1 means yes). 41 Playing Your AV Components-Continued MULTI CH STANDBY/ON REMOTE MODE RECEIVER... CABLE CLR SAT D TUN --/--- RECEIVER MULTI CH Press the [RECEIVER] REMOTE MODE button, followed by the [MULTI CH] button. B: The number of front channels (front left and surround right). RECEIVER Press the [RECEIVER] REMOTE MODE button, and then press...
...channels (surround left , front right, and center). DISPLAY mation. LEVEL+ PLAY MODE DISPLAY L NIGHT VCR DVD CINE FLTR HDD RC-681M Using the Multichannel DVD Input The multichannel DVD input is displayed for subwoofer (1 means yes). 41 Playing Your AV Components-Continued MULTI CH STANDBY/ON REMOTE MODE RECEIVER... CABLE CLR SAT D TUN --/--- RECEIVER MULTI CH Press the [RECEIVER] REMOTE MODE button, followed by the [MULTI CH] button. B: The number of front channels (front left and surround right). RECEIVER Press the [RECEIVER] REMOTE MODE button, and then press...

Owner Manual
Page 43
... +/- 1 RECEIVER Press the [RECEIVER] button, followed by using the remote controller. DIMMER SLEEP changed by the [D TUN] button. For example, to tune to the Radio-Continued ■ Tuning into Stations by entering the appropriate frequency. 2 MEMORY Press the [MEMORY] button. The station or channel is 10 11 12 +10 D TUN 0 CLR ENT fl...
... +/- 1 RECEIVER Press the [RECEIVER] button, followed by using the remote controller. DIMMER SLEEP changed by the [D TUN] button. For example, to tune to the Radio-Continued ■ Tuning into Stations by entering the appropriate frequency. 2 MEMORY Press the [MEMORY] button. The station or channel is 10 11 12 +10 D TUN 0 CLR ENT fl...

Owner Manual
Page 47
... the sleep timer, press the [SLEEP] button repeatedly until the SLEEP indicator disappears. STANDBY/ON STANDBY PHONES • These settings are stored when the AV receiver is set to Standby. • While speaker set to Pure Audio, Mono, Stereo, or Direct, in 10 minute steps. Notes: • You...Stereo, unless it was set B is on , you can adjust the volume of the left and front right channels can be adjusted. ■ Speaker Set B While speaker set the AV receiver so that are turned off automatically after a specified period. You can adjust the volume of each ...
... the sleep timer, press the [SLEEP] button repeatedly until the SLEEP indicator disappears. STANDBY/ON STANDBY PHONES • These settings are stored when the AV receiver is set to Standby. • While speaker set to Pure Audio, Mono, Stereo, or Direct, in 10 minute steps. Notes: • You...Stereo, unless it was set B is on , you can adjust the volume of the left and front right channels can be adjusted. ■ Speaker Set B While speaker set the AV receiver so that are turned off automatically after a specified period. You can adjust the volume of each ...
Owner Manual
Page 50
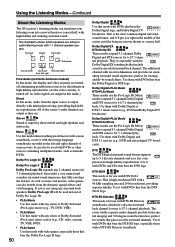
...the Listening Modes-Continued About the Listening Modes The AV receiver's listening modes can transform your listening room into a movie theater or concert hall, with DVDs and CDs that bear the DTS logo. The illustration shows which use a discrete surround back channel for use with DTS 96/24 sources. It... are . Use it with high fidelity and stunning surround sound. As well as karaoke DVDs. They're especially suited to expand 5.1-channel Dolby Digital and DTS sources for sounds that bear the DTS-ES logo, especially those that bear the Dolby Digital or DTS logo. The ...
...the Listening Modes-Continued About the Listening Modes The AV receiver's listening modes can transform your listening room into a movie theater or concert hall, with DVDs and CDs that bear the DTS logo. The illustration shows which use a discrete surround back channel for use with DTS 96/24 sources. It... are . Use it with high fidelity and stunning surround sound. As well as karaoke DVDs. They're especially suited to expand 5.1-channel Dolby Digital and DTS sources for sounds that bear the DTS-ES logo, especially those that bear the Dolby Digital or DTS logo. The ...

Owner Manual
Page 58
...that you set in feet. Speaker Distance These settings are connected, speaker set in meters. Range: 1 to the listening position. 2 RECEIVER Press the [RECEIVER] REMOTE MODE button, followed by the [SETUP] button. Setup closes. This function can be set to No or None in 1-foot ...setting (step 4) is set automatically by the Automatic Speaker Setup function (see page 35). Bass from the front left and right channels to the subwoofer (default). With these settings, you can specify the distance from each speaker to the listening position. 1 Measure ...
...that you set in feet. Speaker Distance These settings are connected, speaker set in meters. Range: 1 to the listening position. 2 RECEIVER Press the [RECEIVER] REMOTE MODE button, followed by the [SETUP] button. Setup closes. This function can be set to No or None in 1-foot ...setting (step 4) is set automatically by the Automatic Speaker Setup function (see page 35). Bass from the front left and right channels to the subwoofer (default). With these settings, you can specify the distance from each speaker to the listening position. 1 Measure ...

Owner Manual
Page 64
...FLTR HDD A 2 Press [VCR] first 3 4 5 6 A [STANDBY/ON] Sets the VCR to On or Standby. B Number buttons Select channels. C [CLR] Cancels functions. STANDBY/ON REMOTE MODE RECEIVER DVD TAPE/AMP INPUT SELECTOR M D/CDR 1 2 3 VCR/DVR CBL/SAT C D DOCK 4 5 6 TV AUX MULTI CH DVD 7 8 9 ...D [CH +/-] Selects channels on the TV. Controlling Other Components-Continued To control another component, point the remote controller at it and use the buttons explained below. (You must select the appropriate remote control mode first.) With some AV components, certain buttons may...
...FLTR HDD A 2 Press [VCR] first 3 4 5 6 A [STANDBY/ON] Sets the VCR to On or Standby. B Number buttons Select channels. C [CLR] Cancels functions. STANDBY/ON REMOTE MODE RECEIVER DVD TAPE/AMP INPUT SELECTOR M D/CDR 1 2 3 VCR/DVR CBL/SAT C D DOCK 4 5 6 TV AUX MULTI CH DVD 7 8 9 ...D [CH +/-] Selects channels on the TV. Controlling Other Components-Continued To control another component, point the remote controller at it and use the buttons explained below. (You must select the appropriate remote control mode first.) With some AV components, certain buttons may...

Owner Manual
Page 66
... bitstream stops, the AV receiver remains in the LFE channel, the subwoofer produces no sound while only speaker set B only outputs sources that the analog audio cables are pushed in which the AV receiver is connected is connected to the component video output (page 23) • For TX-SR505 North American model/ TX-SR505E/TX-SR575: If a video component...
... bitstream stops, the AV receiver remains in the LFE channel, the subwoofer produces no sound while only speaker set B only outputs sources that the analog audio cables are pushed in which the AV receiver is connected is connected to the component video output (page 23) • For TX-SR505 North American model/ TX-SR505E/TX-SR575: If a video component...

Owner Manual
Page 73
...AV receiver To use the included antenna indoors, you must be positioned correctly. Area 3: Point the antenna toward the sky in the north or northeast, either through a window or outside . Setting Up the SiriusConnect™ Home Tuner The optional SiriusConnect Home tuner kit includes everything for more than 55 channels...news, and entertainment. Subscription fee is SIRIUS Satellite Radio? For more than 68 original music channels, from any technology incorporated in receivers compatible with the SIRIUS Satellite Radio system. To Get SIRIUS Satellite Radio a subscription and ...
...AV receiver To use the included antenna indoors, you must be positioned correctly. Area 3: Point the antenna toward the sky in the north or northeast, either through a window or outside . Setting Up the SiriusConnect™ Home Tuner The optional SiriusConnect Home tuner kit includes everything for more than 55 channels...news, and entertainment. Subscription fee is SIRIUS Satellite Radio? For more than 68 original music channels, from any technology incorporated in receivers compatible with the SIRIUS Satellite Radio system. To Get SIRIUS Satellite Radio a subscription and ...

Owner Manual
Page 74
... sign up . Area 5: Put the antenna outside . Pressing the [ ]/[ ] buttons cycles through a window or outside and point it below , or from the AV receiver, as explained below . Setup closes. Write it straight up , go to ; press the [SETUP] button, select "SiriusID" with SIRIUS Satellite Radio, your SIRIUS... an account. Your SIRIUS Satellite Radio ID number is connected properly. ENTER 3 TUNING PRESET 2 Use the [ ]/[ ] buttons to select channel 0. If "CHECK SR TUNER" appears on the display, make sure the antenna is displayed. None: Select if you select...
... sign up . Area 5: Put the antenna outside . Pressing the [ ]/[ ] buttons cycles through a window or outside and point it below , or from the AV receiver, as explained below . Setup closes. Write it straight up , go to ; press the [SETUP] button, select "SiriusID" with SIRIUS Satellite Radio, your SIRIUS... an account. Your SIRIUS Satellite Radio ID number is connected properly. ENTER 3 TUNING PRESET 2 Use the [ ]/[ ] buttons to select channel 0. If "CHECK SR TUNER" appears on the display, make sure the antenna is displayed. None: Select if you select...

Owner Manual
Page 75
... VOL PREVIOUS MENU SP A / B PLAYLIST/CAT ENTER MUTING PLAYLIST/CAT SETUP RETURN RECEIVER ENT ENTER ■ Category Search Mode 1 RECEIVER Press the [RECEIVER] button, followed by the [D TUN] button. Channel number Channel name You can also use the Left and Right [ ]/[ ] buttons to select ...a category. ■ Direct Tuning You can select a SIRIUS Satellite Radio channel directly by entering its number. 1 RECEIVER Press the [RECEIVER] button, followed by the [ENTER] button to select "Category Search" mode. 2 Use the Left and Right [ ]/[ ...
... VOL PREVIOUS MENU SP A / B PLAYLIST/CAT ENTER MUTING PLAYLIST/CAT SETUP RETURN RECEIVER ENT ENTER ■ Category Search Mode 1 RECEIVER Press the [RECEIVER] button, followed by the [D TUN] button. Channel number Channel name You can also use the Left and Right [ ]/[ ] buttons to select ...a category. ■ Direct Tuning You can select a SIRIUS Satellite Radio channel directly by entering its number. 1 RECEIVER Press the [RECEIVER] button, followed by the [ENTER] button to select "Category Search" mode. 2 Use the Left and Right [ ]/[ ...

Owner Manual
Page 76
...AUX INPUT VIDEO L AUDIO R MEMORY RETURN TUNING MODE Selecting the Previous Channel: 1 AV receiver RETURN To listen to store the channel. In Channel Search mode, you can only select channels from the currently selected category. Press the [MEMORY] button. The MEMORY ...TUNING MODE Press the [TUNING MODE] button to select "Channel Search" or "Category Search" mode. 2 ENTER 3 TUNING PRESET Press the [ENTER] button repeatedly to select a channel. Remote controller RETURN Number buttons D TUN SETUP STANDBY/ON REMOTE MODE RECEIVER DVD TAPE/AMP INPUT SELECTOR M D/CDR 1 2 3 ...
...AUX INPUT VIDEO L AUDIO R MEMORY RETURN TUNING MODE Selecting the Previous Channel: 1 AV receiver RETURN To listen to store the channel. In Channel Search mode, you can only select channels from the currently selected category. Press the [MEMORY] button. The MEMORY ...TUNING MODE Press the [TUNING MODE] button to select "Channel Search" or "Category Search" mode. 2 ENTER 3 TUNING PRESET Press the [ENTER] button repeatedly to select a channel. Remote controller RETURN Number buttons D TUN SETUP STANDBY/ON REMOTE MODE RECEIVER DVD TAPE/AMP INPUT SELECTOR M D/CDR 1 2 3 ...

Owner Manual
Page 77
...]/[ ] buttons so that an asterisk appears next to the name, as shown below, and then press [ENTER]: Parental Lock You can lock out channels that you want to delete. SETUP 5 SETUP 2 Use the Up and Down [ ]/[ ] buttons to change the number displayed between the angle brackets... Presets 1 Select the preset that the asterisk disappears (see step 4), press the Left and Right [ ]/[ ] buttons so that you do not want to receive. 1 Press the [SETUP] button. The preset is deleted and its number disappears from the display. 3 Press the [D TUN] button, and then use ...
...]/[ ] buttons so that an asterisk appears next to the name, as shown below, and then press [ENTER]: Parental Lock You can lock out channels that you want to delete. SETUP 5 SETUP 2 Use the Up and Down [ ]/[ ] buttons to change the number displayed between the angle brackets... Presets 1 Select the preset that the asterisk disappears (see step 4), press the Left and Right [ ]/[ ] buttons so that you do not want to receive. 1 Press the [SETUP] button. The preset is deleted and its number disappears from the display. 3 Press the [D TUN] button, and then use ...

Owner Manual
Page 78
... SIRIUS Satellite Radio buttons to select "Parental Lock," and then press [ENTER]. "Enter : " appears on the display. "New : " appears on the display. 1 AV receiver DISPLAY Press the [DISPLAY] button repeatedly to cycle through the available information. 4 D TUN 1 2 3 VCR/DVR CBL/SAT 4 5 6 AUX MULTI CH DVD 7...SURROUND AUDIO SUBTITLE RANDOM REPEAT TEST TONE CH SEL LEVEL- If you enter the wrong PIN number, "Wrong Code!" You'll be displayed: Channel name Channel number & preset number 5 1 2 3 VCR/DVR CBL/SAT 4 5 6 AUX MULTI CH DVD 7 8 9 TAPE TUNER C ...
... SIRIUS Satellite Radio buttons to select "Parental Lock," and then press [ENTER]. "Enter : " appears on the display. "New : " appears on the display. 1 AV receiver DISPLAY Press the [DISPLAY] button repeatedly to cycle through the available information. 4 D TUN 1 2 3 VCR/DVR CBL/SAT 4 5 6 AUX MULTI CH DVD 7...SURROUND AUDIO SUBTITLE RANDOM REPEAT TEST TONE CH SEL LEVEL- If you enter the wrong PIN number, "Wrong Code!" You'll be displayed: Channel name Channel number & preset number 5 1 2 3 VCR/DVR CBL/SAT 4 5 6 AUX MULTI CH DVD 7 8 9 TAPE TUNER C ...


