Owner Manual
Page 3
...a particular installation. DIGITAL IN COA XIAL OPTICAL 1 COMPONENT VIDEO VIDEO 2 IN VIDEO 1 IN DVD IN OUT Y PB 2 PR 3 REMOTE CONTROL IN OUT IN L L R CD R TAPE ANTENNA AM FM 75 SURROUND BACK SPEAKERS L SURROUND SPEAKERS FRONT SPEAKERS A L CENTER SPEAKER VIDEO 2 V VOLTAGE VIDEO 1 DVD MONITOR OUT R S IN IN SELECTOR OUT OUT IN IN IN FRONT SURROUND CENTER SURR BACK PRE OUT L 120V SUB WOOFER R VIDEO 2 VIDEO 1 SUB WOOFER DVD R FRONT SPEAKERS B L R VOLTAGE SELECTOR 120V AC OUTLET SWITCHED 100W MAX. For Canadian Models NOTE: THIS CLASS B DIGITAL APPARATUS...
...a particular installation. DIGITAL IN COA XIAL OPTICAL 1 COMPONENT VIDEO VIDEO 2 IN VIDEO 1 IN DVD IN OUT Y PB 2 PR 3 REMOTE CONTROL IN OUT IN L L R CD R TAPE ANTENNA AM FM 75 SURROUND BACK SPEAKERS L SURROUND SPEAKERS FRONT SPEAKERS A L CENTER SPEAKER VIDEO 2 V VOLTAGE VIDEO 1 DVD MONITOR OUT R S IN IN SELECTOR OUT OUT IN IN IN FRONT SURROUND CENTER SURR BACK PRE OUT L 120V SUB WOOFER R VIDEO 2 VIDEO 1 SUB WOOFER DVD R FRONT SPEAKERS B L R VOLTAGE SELECTOR 120V AC OUTLET SWITCHED 100W MAX. For Canadian Models NOTE: THIS CLASS B DIGITAL APPARATUS...

Owner Manual
Page 7
... the Display Brightness 46 Adjusting the Bass and Treble 46 Muting the AV Receiver 46 Using the Sleep Timer 47 Using Headphones 47 Adjusting Speaker Levels 47 Enjoying the Listening Modes Using the Listening Modes 48 Selecting Listening Modes 48 About the Listening Modes 50 Using the Late Night Function 52 Using the CinemaFILTER 52 Using the Audio Adjust Settings 52 Advanced Operation Recording 54 Advanced Setup 55 Advanced Speaker Settings 55 Digital Input Signal Formats 57 Correcting Sound and Picture Sync 58 Controlling Other Components 59 Entering Remote Control Codes 59...
... the Display Brightness 46 Adjusting the Bass and Treble 46 Muting the AV Receiver 46 Using the Sleep Timer 47 Using Headphones 47 Adjusting Speaker Levels 47 Enjoying the Listening Modes Using the Listening Modes 48 Selecting Listening Modes 48 About the Listening Modes 50 Using the Late Night Function 52 Using the CinemaFILTER 52 Using the Audio Adjust Settings 52 Advanced Operation Recording 54 Advanced Setup 55 Advanced Speaker Settings 55 Digital Input Signal Formats 57 Correcting Sound and Picture Sync 58 Controlling Other Components 59 Entering Remote Control Codes 59...

Owner Manual
Page 8
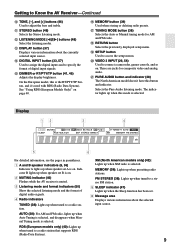
... VIDEO L AUDIO R 8 9 J K L MN OPQ R S T Other Models STANDBY/ON STANDBY PURE AUDIO PHONES TUNING PRESET MULTI CH DVD VIDEO 1 VIDEO 2 VIDEO 3 TAPE TUNER C D ENTER RETURN SETUP SPEAKERS A B VCR TONE STEREO LISTENING MODE DIGITAL DISPLAY INPUT TUNING RT/PTY/TP MEMORY MODE CLEAR MASTER VOLUME VIDEO 3 INPUT VIDEO L AUDIO R U For detailed information, see page 39). C Remote-control sensor (11) Receives control signals from the remote controller. The [MULTI CH] button selects the multichannel DVD input. E Input selector buttons (36) Select the input sources...
... VIDEO L AUDIO R 8 9 J K L MN OPQ R S T Other Models STANDBY/ON STANDBY PURE AUDIO PHONES TUNING PRESET MULTI CH DVD VIDEO 1 VIDEO 2 VIDEO 3 TAPE TUNER C D ENTER RETURN SETUP SPEAKERS A B VCR TONE STEREO LISTENING MODE DIGITAL DISPLAY INPUT TUNING RT/PTY/TP MEMORY MODE CLEAR MASTER VOLUME VIDEO 3 INPUT VIDEO L AUDIO R U For detailed information, see page 39). C Remote-control sensor (11) Receives control signals from the remote controller. The [MULTI CH] button selects the multichannel DVD input. E Input selector buttons (36) Select the input sources...
Owner Manual
Page 9
... radio station. M DISPLAY button (37) Displays various information about the selected input source. 9 S SETUP button Used to specify the format of digital audio signals. 4 Radio indicators TUNED (38): Lights up when this mode is selected. MEMORY (39): Lights up when tuned to adjust the bass and treble. Getting to Know the AV Receiver-Continued J TONE, [-], and [+] buttons (46) Used to a radio station that supports RDS (Radio Data System). See "Using RDS (European Models Only)" on . Q TUNING MODE button (38) Selects the Auto or Manual tuning mode for composite video and analog...
... radio station. M DISPLAY button (37) Displays various information about the selected input source. 9 S SETUP button Used to specify the format of digital audio signals. 4 Radio indicators TUNED (38): Lights up when this mode is selected. MEMORY (39): Lights up when tuned to adjust the bass and treble. Getting to Know the AV Receiver-Continued J TONE, [-], and [+] buttons (46) Used to a radio station that supports RDS (Radio Data System). See "Using RDS (European Models Only)" on . Q TUNING MODE button (38) Selects the Auto or Manual tuning mode for composite video and analog...
Owner Manual
Page 10
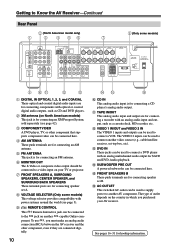
... Onkyo com- M DVD IN These jacks can be connected here. See pages 16-31 for connecting an AM antenna. G FRONT SPEAKERS A, SURROUND SPEAKERS, CENTER SPEAKER, and SURROUND BACK SPEAKERS These terminal posts are for connecting components with optical or coaxial digital audio outputs, such as a cassette deck, MD recorder, etc. The VIDEO 2 inputs can be used to connect a DVD player with power systems around the world (see page 42). I REMOTE CONTROL This Remote Interactive jack can be used to another video source (e.g., cable/satellite receiver, set-top...
... Onkyo com- M DVD IN These jacks can be connected here. See pages 16-31 for connecting an AM antenna. G FRONT SPEAKERS A, SURROUND SPEAKERS, CENTER SPEAKER, and SURROUND BACK SPEAKERS These terminal posts are for connecting components with optical or coaxial digital audio outputs, such as a cassette deck, MD recorder, etc. The VIDEO 2 inputs can be used to connect a DVD player with power systems around the world (see page 42). I REMOTE CONTROL This Remote Interactive jack can be used to another video source (e.g., cable/satellite receiver, set-top...
Owner Manual
Page 12
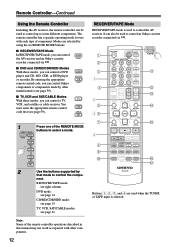
... 1 2 3 V1 V2 V3 M D/CDR C D HDD 4 5 6 TV MULTI CH DVD 7 8 9 VCR TAPE TUNER 10 11 +10 0 C D 12 CABLE CLR SAT D TUN --/--- The remote controller has a specific operating mode for use with other manufacturers (see page 59). ENT DIMMER SLEEP TV VOL INPUT GUIDE TOP MENU CH DISC ALBUM VOL PREVIOUS MENU SP A / B PLAYLIST/CAT ENTER MUTING PLAYLIST/CAT RETURN SETUP RECEIVER TAPE K L M N O LISTENING MODE STEREO SURROUND AUDIO SUBTITLE RANDOM REPEAT TEST TONE CH SEL LEVEL-
... 1 2 3 V1 V2 V3 M D/CDR C D HDD 4 5 6 TV MULTI CH DVD 7 8 9 VCR TAPE TUNER 10 11 +10 0 C D 12 CABLE CLR SAT D TUN --/--- The remote controller has a specific operating mode for use with other manufacturers (see page 59). ENT DIMMER SLEEP TV VOL INPUT GUIDE TOP MENU CH DISC ALBUM VOL PREVIOUS MENU SP A / B PLAYLIST/CAT ENTER MUTING PLAYLIST/CAT RETURN SETUP RECEIVER TAPE K L M N O LISTENING MODE STEREO SURROUND AUDIO SUBTITLE RANDOM REPEAT TEST TONE CH SEL LEVEL-

Owner Manual
Page 13
... the TAPE input is selected To select the Tuner (AM/FM/XM) as the input source, press: RECEIVER 7 TAPE 4 Playback buttons On twin cassette decks, only deck B can be controlled. Remote Controller-Continued For detailed information, see the pages in all remote controller modes. E SP A/B button (6, 36) Used to select the listening modes. H LISTENING MODE buttons (48) Used to turn speaker sets A and B on or off. I TEST TONE, CH SEL, LEVEL-, and LEVEL+ buttons (35, 47, 57) Used to select AM and FM radio stations and XM radio channels directly...
... the TAPE input is selected To select the Tuner (AM/FM/XM) as the input source, press: RECEIVER 7 TAPE 4 Playback buttons On twin cassette decks, only deck B can be controlled. Remote Controller-Continued For detailed information, see the pages in all remote controller modes. E SP A/B button (6, 36) Used to select the listening modes. H LISTENING MODE buttons (48) Used to turn speaker sets A and B on or off. I TEST TONE, CH SEL, LEVEL-, and LEVEL+ buttons (35, 47, 57) Used to select AM and FM radio stations and XM radio channels directly...

Owner Manual
Page 28
...R TAPE ANTENNA AM FM 75 SURROUND BACK SPEAKERS L VIDEO 2 V VIDEO 1 DVD MONITOR OUT R S IN IN L OUT OUT IN IN IN FRONT SURROUND CENTER SURR BACK R VIDEO 2 VIDEO 1 SUB WOOFER DVD IN L R CD AUDIO OUTPUT L R Phono preamp AUDIO OUTPUT L R AUDIO INPUT L R ■ Turntable with an MC (Moving Coil) Cartridge An MC head amp and phono preamp are necessary to connect a turntable that matches your CD player ( a , b , or c ). Connect one or the other Connection b must be assigned (see page 33) b DIGITAL IN COAXIAL c OPTICAL 3 COAXIAL OUT L IN L R CD a XM DIGITAL...
...R TAPE ANTENNA AM FM 75 SURROUND BACK SPEAKERS L VIDEO 2 V VIDEO 1 DVD MONITOR OUT R S IN IN L OUT OUT IN IN IN FRONT SURROUND CENTER SURR BACK R VIDEO 2 VIDEO 1 SUB WOOFER DVD IN L R CD AUDIO OUTPUT L R Phono preamp AUDIO OUTPUT L R AUDIO INPUT L R ■ Turntable with an MC (Moving Coil) Cartridge An MC head amp and phono preamp are necessary to connect a turntable that matches your CD player ( a , b , or c ). Connect one or the other Connection b must be assigned (see page 33) b DIGITAL IN COAXIAL c OPTICAL 3 COAXIAL OUT L IN L R CD a XM DIGITAL...
Owner Manual
Page 31
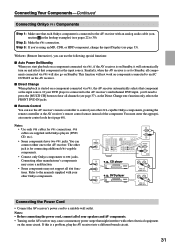
...L L R CD R TAPE ANTENNA AM FM 75 SURROUND BACK SPEAKERS L VIDEO 2 V VIDEO 1 DVD MONITOR OUT R S IN IN L OUT OUT IN IN IN FRONT SURROUND CENTER SURR BACK R VIDEO 2 VIDEO 1 SUB WOOFER DVD IN L R CD FRONT L R DVD e.g., CD player e.g., DVD player R L ANALOG AUDIO OUT R L ANALOG AUDIO OUT Connecting the Power Cord • Connect the AV receiver's power cord to the manuals supplied with your other Onkyo components. If your DVD player is connected to the AV receiver's multichannel DVD input, you 're using an MD, CDR, or HDD component, change the input Display (see...
...L L R CD R TAPE ANTENNA AM FM 75 SURROUND BACK SPEAKERS L VIDEO 2 V VIDEO 1 DVD MONITOR OUT R S IN IN L OUT OUT IN IN IN FRONT SURROUND CENTER SURR BACK R VIDEO 2 VIDEO 1 SUB WOOFER DVD IN L R CD FRONT L R DVD e.g., CD player e.g., DVD player R L ANALOG AUDIO OUT R L ANALOG AUDIO OUT Connecting the Power Cord • Connect the AV receiver's power cord to the manuals supplied with your other Onkyo components. If your DVD player is connected to the AV receiver's multichannel DVD input, you 're using an MD, CDR, or HDD component, change the input Display (see...
Owner Manual
Page 32
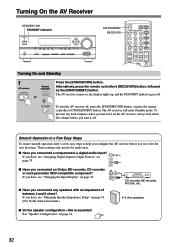
... see "Assigning Digital Inputs to Input Sources" on page 33. To prevent any speakers with an impedance of between 4 and 6 ohms? ENT DIMMER SLEEP TV VOL INPUT GUIDE TOP MENU CH DISC ALBUM VOL PREVIOUS MENU SP A / B MUTING 1 AV receiver Remote controller STANDBY/ON RECEIVER or Press the [STANDBY/ON] button. Turning On the AV Receiver STANDBY/ON STANDBY indicator STANDBY/ON STANDBY PHONES TUNING PRESET MASTER VOLUME MULTI CH DVD VIDEO 1 VIDEO 2 VIDEO 3 TAPE TUNER C D ENTER RETURN SETUP SPEAKERS A B VCR TONE STEREO LISTENING MODE DIGITAL DISPLAY INPUT TUNING...
... see "Assigning Digital Inputs to Input Sources" on page 33. To prevent any speakers with an impedance of between 4 and 6 ohms? ENT DIMMER SLEEP TV VOL INPUT GUIDE TOP MENU CH DISC ALBUM VOL PREVIOUS MENU SP A / B MUTING 1 AV receiver Remote controller STANDBY/ON RECEIVER or Press the [STANDBY/ON] button. Turning On the AV Receiver STANDBY/ON STANDBY indicator STANDBY/ON STANDBY PHONES TUNING PRESET MASTER VOLUME MULTI CH DVD VIDEO 1 VIDEO 2 VIDEO 3 TAPE TUNER C D ENTER RETURN SETUP SPEAKERS A B VCR TONE STEREO LISTENING MODE DIGITAL DISPLAY INPUT TUNING...

Owner Manual
Page 34
... on page 55. Large: Select if the front speakers are small. Note: Before you change this setting, turn down the volume. 1 Press the [RECEIVER] button, followed by the [SETUP] button. First Time Setup-Continued 2-8 RETURN ON/STANDBY REMOTE MODE RECEIVER DVD TAPE INPUT SELECTOR 1 2 3 V1 V2 V3 M D/CDR C D HDD 4 5 6 TV MULTI CH DVD 7 8 9 VCR TAPE TUNER 10 11 +10 0 C D 12 CABLE CLR SAT D TUN --/--- ENT DIMMER SLEEP TV VOL INPUT GUIDE TOP MENU CH DISC ALBUM VOL...
... on page 55. Large: Select if the front speakers are small. Note: Before you change this setting, turn down the volume. 1 Press the [RECEIVER] button, followed by the [SETUP] button. First Time Setup-Continued 2-8 RETURN ON/STANDBY REMOTE MODE RECEIVER DVD TAPE INPUT SELECTOR 1 2 3 V1 V2 V3 M D/CDR C D HDD 4 5 6 TV MULTI CH DVD 7 8 9 VCR TAPE TUNER 10 11 +10 0 C D 12 CABLE CLR SAT D TUN --/--- ENT DIMMER SLEEP TV VOL INPUT GUIDE TOP MENU CH DISC ALBUM VOL...

Owner Manual
Page 35
...: Select if no surround back speakers are connected. SETUP tons to Small, the Large option cannot be output by a speaker and its name does not appear on the display, you may have wired the speakers incorrectly and you may have set to None, this setting does not appear. are large. LEVEL+ PLAY MODE DISPLAY L NIGHT VCR DVD CINE FLTR HDD 7 Use the Down [ ] button to Setup closes. The test tone will be selected. surround back speakers...
...: Select if no surround back speakers are connected. SETUP tons to Small, the Large option cannot be output by a speaker and its name does not appear on the display, you may have wired the speakers incorrectly and you may have set to None, this setting does not appear. are large. LEVEL+ PLAY MODE DISPLAY L NIGHT VCR DVD CINE FLTR HDD 7 Use the Down [ ] button to Setup closes. The test tone will be selected. surround back speakers...

Owner Manual
Page 36
... the [RECEIVER] REMOTE MODE button, and then use the INPUT SELECTOR buttons. To watch a DVD or other video source, on your TV, select the video input that while speaker set B is on or off, use the AV receiver's SPEAKERS [A] and [B] buttons, or use the MASTER VOLUME control, or the remote controller's [VOL] button. Playing Your AV Components Basic AV Receiver Operation MULTI CH 1 4 STANDBY/ON STANDBY PHONES TUNING PRESET MULTI CH DVD VIDEO 1 VIDEO 2 VIDEO 3 TAPE TUNER C D ENTER RETURN SETUP SPEAKERS A B VCR TONE STEREO LISTENING MODE DIGITAL DISPLAY INPUT TUNING...
... the [RECEIVER] REMOTE MODE button, and then use the INPUT SELECTOR buttons. To watch a DVD or other video source, on your TV, select the video input that while speaker set B is on or off, use the AV receiver's SPEAKERS [A] and [B] buttons, or use the MASTER VOLUME control, or the remote controller's [VOL] button. Playing Your AV Components Basic AV Receiver Operation MULTI CH 1 4 STANDBY/ON STANDBY PHONES TUNING PRESET MULTI CH DVD VIDEO 1 VIDEO 2 VIDEO 3 TAPE TUNER C D ENTER RETURN SETUP SPEAKERS A B VCR TONE STEREO LISTENING MODE DIGITAL DISPLAY INPUT TUNING...

Owner Manual
Page 37
...DISPLAY LISTENING MODE STEREO SURROUND AUDIO SUBTITLE RANDOM REPEAT TEST TONE CH SEL LEVEL- If the input signal is PCM, the sampling frequency is displayed. LEVEL+ PLAY MODE DISPLAY L NIGHT VCR DVD CINE FLTR HDD RC-647M Using the Multichannel DVD Input The multichannel DVD input is displayed. If the input signal is digital but not PCM, the signal format is displayed. C: LFE channel for connecting a component with a 7.1-channel analog audio output, such as a DVD-Audio or SACD-capable DVD player, or an MPEG decoder. See page 24 for about the current input source...
...DISPLAY LISTENING MODE STEREO SURROUND AUDIO SUBTITLE RANDOM REPEAT TEST TONE CH SEL LEVEL- If the input signal is PCM, the sampling frequency is displayed. LEVEL+ PLAY MODE DISPLAY L NIGHT VCR DVD CINE FLTR HDD RC-647M Using the Multichannel DVD Input The multichannel DVD input is displayed. If the input signal is digital but not PCM, the signal format is displayed. C: LFE channel for connecting a component with a 7.1-channel analog audio output, such as a DVD-Audio or SACD-capable DVD player, or an MPEG decoder. See page 24 for about the current input source...

Owner Manual
Page 48
... its display is turned off . Using the Listening Modes Selecting Listening Modes For a description of each listening mode, see "About the Listening Modes" on page 50. • The Dolby Digital and DTS listening modes can only be selected if your DVD player is connected to the AV receiver with a digital audio connection (coaxial or optical). • Listening mode availability depends on the AV Receiver STANDBY/ON STANDBY PURE AUDIO PHONES TUNING PRESET MASTER VOLUME MULTI CH DVD VIDEO 1 VIDEO 2 VIDEO 3 TAPE TUNER C D ENTER RETURN SETUP SPEAKERS A B VCR TONE STEREO...
... its display is turned off . Using the Listening Modes Selecting Listening Modes For a description of each listening mode, see "About the Listening Modes" on page 50. • The Dolby Digital and DTS listening modes can only be selected if your DVD player is connected to the AV receiver with a digital audio connection (coaxial or optical). • Listening mode availability depends on the AV Receiver STANDBY/ON STANDBY PURE AUDIO PHONES TUNING PRESET MASTER VOLUME MULTI CH DVD VIDEO 1 VIDEO 2 VIDEO 3 TAPE TUNER C D ENTER RETURN SETUP SPEAKERS A B VCR TONE STEREO...

Owner Manual
Page 57
... PRESET MULTI CH DVD VIDEO 1 VIDEO 2 VIDEO 3 TAPE TUNER C D ENTER RETURN SETUP SPEAKERS A B VCR TONE STEREO LISTENING MODE DIGITAL DISPLAY INPUT TUNING DIMMER MEMORY MODE CLEAR MASTER VOLUME VIDEO 3 INPUT VIDEO L AUDIO R DIGITAL INPUT 1 Press and hold the AV receiver's [DIGITAL INPUT] button for the subwoofer). 5 6 SETUP Repeat step 4 so that you experience either PCM or DTS: • If the beginnings of the test tone coming from -12 to +12 dB in the Speaker Configuration (page 34) do not output the test tone. If no sound. DTS: Only DTS format input...
... PRESET MULTI CH DVD VIDEO 1 VIDEO 2 VIDEO 3 TAPE TUNER C D ENTER RETURN SETUP SPEAKERS A B VCR TONE STEREO LISTENING MODE DIGITAL DISPLAY INPUT TUNING DIMMER MEMORY MODE CLEAR MASTER VOLUME VIDEO 3 INPUT VIDEO L AUDIO R DIGITAL INPUT 1 Press and hold the AV receiver's [DIGITAL INPUT] button for the subwoofer). 5 6 SETUP Repeat step 4 so that you experience either PCM or DTS: • If the beginnings of the test tone coming from -12 to +12 dB in the Speaker Configuration (page 34) do not output the test tone. If no sound. DTS: Only DTS format input...

Owner Manual
Page 59
... TV VOL INPUT GUIDE TOP MENU CH DISC ALBUM VOL PREVIOUS MENU SP A / B MUTING PLAYLIST/CAT ENTER PLAYLIST/CAT RETURN SETUP DISPLAY LISTENING MODE STEREO SURROUND AUDIO SUBTITLE RANDOM REPEAT TEST TONE CH SEL LEVEL- If the remote controller doesn't work as expected, and several remote codes are organized by other AV components, including those made by category (e.g., DVD player, TV, etc.). 59 You'll need to a REMOTE MODE button. TV VCR CABLE SAT DISPLAY RECEIVER Number buttons ON/STANDBY REMOTE MODE RECEIVER DVD TAPE INPUT SELECTOR 1 2 3 V1...
... TV VOL INPUT GUIDE TOP MENU CH DISC ALBUM VOL PREVIOUS MENU SP A / B MUTING PLAYLIST/CAT ENTER PLAYLIST/CAT RETURN SETUP DISPLAY LISTENING MODE STEREO SURROUND AUDIO SUBTITLE RANDOM REPEAT TEST TONE CH SEL LEVEL- If the remote controller doesn't work as expected, and several remote codes are organized by other AV components, including those made by category (e.g., DVD player, TV, etc.). 59 You'll need to a REMOTE MODE button. TV VCR CABLE SAT DISPLAY RECEIVER Number buttons ON/STANDBY REMOTE MODE RECEIVER DVD TAPE INPUT SELECTOR 1 2 3 V1...

Owner Manual
Page 60
... Remote Control Codes for Onkyo Components Connected via Onkyo components that are connected via , use the following remote control codes: [DVD] REMOTE MODE button 0627: Onkyo DVD player without (default) [CD/MD/CDR/HDD] REMOTE MODE button 1817: Onkyo CD player without (default) 0868: Onkyo MD recorder without 1323: Onkyo CD recorder without 1990: HDD-compatible component without Note: If you connect an -capable Onkyo MD recorder, CD recorder, or HDD-compatible component to the TAPE IN/OUT or VIDEO 2 jacks, for remote operation to work properly, you must set the Input Display...
... Remote Control Codes for Onkyo Components Connected via Onkyo components that are connected via , use the following remote control codes: [DVD] REMOTE MODE button 0627: Onkyo DVD player without (default) [CD/MD/CDR/HDD] REMOTE MODE button 1817: Onkyo CD player without (default) 0868: Onkyo MD recorder without 1323: Onkyo CD recorder without 1990: HDD-compatible component without Note: If you connect an -capable Onkyo MD recorder, CD recorder, or HDD-compatible component to the TAPE IN/OUT or VIDEO 2 jacks, for remote operation to work properly, you must set the Input Display...
Owner Manual
Page 62
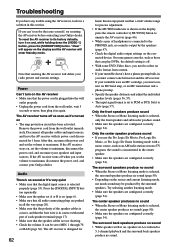
... part of headphones is connected to PCM or DTS. Only the center speaker produces sound • If you use the Pro Logic IIx Movie, Pro Logic IIx Music, or Pro Logic IIx Game listening mode with its factory defaults, turn on the display, press the remote controller's [MUTING] button to unmute the AV receiver (page 46). • While a pair of each speaker terminal (page 17) • Make sure that can play DVDs, the default setting...
... part of headphones is connected to PCM or DTS. Only the center speaker produces sound • If you use the Pro Logic IIx Movie, Pro Logic IIx Music, or Pro Logic IIx Game listening mode with its factory defaults, turn on the display, press the remote controller's [MUTING] button to unmute the AV receiver (page 46). • While a pair of each speaker terminal (page 17) • Make sure that can play DVDs, the default setting...

Owner Manual
Page 63
...). The Late Night function doesn't work • Check the multichannel DVD input connections (page 24). • To select the multichannel DVD input, press the [MULTI CH] input selector button. • Check the audio output settings on your antenna. • Move the AV receiver away from DTS to an analog input. This is Dolby Digital (page 52). This is to 79 • When the volume level of each video component is on. mation in the LFE channel, the subwoofer produces no sound...
...). The Late Night function doesn't work • Check the multichannel DVD input connections (page 24). • To select the multichannel DVD input, press the [MULTI CH] input selector button. • Check the audio output settings on your antenna. • Move the AV receiver away from DTS to an analog input. This is Dolby Digital (page 52). This is to 79 • When the volume level of each video component is on. mation in the LFE channel, the subwoofer produces no sound...


