

Owner Manual
Page 1
Contents Introduction 2 Connection 13 Turning On & First Time Setup .....32 Basic Operations 38 Using the Listening Modes ........49 Advanced Setup 54 Controlling Other Components ....62 Others 68 En Please retain this manual will enable you for future reference. Please read this manual thoroughly before making connections and plugging in this manual for purchasing an Onkyo AV Receiver. Following the instructions in the unit. AV Receiver TX-SR307 Instruction Manual Thank you to obtain optimum performance and listening enjoyment from your new AV Receiver.
Contents Introduction 2 Connection 13 Turning On & First Time Setup .....32 Basic Operations 38 Using the Listening Modes ........49 Advanced Setup 54 Controlling Other Components ....62 Others 68 En Please retain this manual will enable you for future reference. Please read this manual thoroughly before making connections and plugging in this manual for purchasing an Onkyo AV Receiver. Following the instructions in the unit. AV Receiver TX-SR307 Instruction Manual Thank you to obtain optimum performance and listening enjoyment from your new AV Receiver.

Owner Manual
Page 4
...power cord's plug is fitted with the plug on the AV receiver's power cord. (Adapter varies from country to country.) *How to the terminal which is marked with the following accessories: Remote controller and two batteries (AA/R6) Speaker setup microphone Indoor FM antenna AM loop antenna Speaker cable labels ...: Blue: Neutral Brown: Live As the colours of the wires in the mains lead are the same regardless of the fuse. MIYAGI ONKYO EUROPE ELECTRONICS GmbH 1 2 Speaker Cable FRONT LEFT FRONT LEFT FRONT RIGHT FRONT RIGHT SURROUND LEFT SURROUND LEFT SURROUND RIGHT SURROUND RIGHT CENTER ...
...power cord's plug is fitted with the plug on the AV receiver's power cord. (Adapter varies from country to country.) *How to the terminal which is marked with the following accessories: Remote controller and two batteries (AA/R6) Speaker setup microphone Indoor FM antenna AM loop antenna Speaker cable labels ...: Blue: Neutral Brown: Live As the colours of the wires in the mains lead are the same regardless of the fuse. MIYAGI ONKYO EUROPE ELECTRONICS GmbH 1 2 Speaker Cable FRONT LEFT FRONT LEFT FRONT RIGHT FRONT RIGHT SURROUND LEFT SURROUND LEFT SURROUND RIGHT SURROUND RIGHT CENTER ...

Owner Manual
Page 5
... 29 Connecting an RI Dock 30 Connecting Onkyo V Components 31 Connecting the Power Cord 31 Turning On & First Time Setup Turning On the AV receiver 32 Turning On and Standby 32 First Time Setup 33 Audyssey 2EQ™ Room Correction and Speaker Setup 33 Component Video Input Setup 36 Digital Input Setup 36 Changing the Input Display 37...
... 29 Connecting an RI Dock 30 Connecting Onkyo V Components 31 Connecting the Power Cord 31 Turning On & First Time Setup Turning On the AV receiver 32 Turning On and Standby 32 First Time Setup 33 Audyssey 2EQ™ Room Correction and Speaker Setup 33 Component Video Input Setup 36 Digital Input Setup 36 Changing the Input Display 37...

Owner Manual
Page 8
...FM station. RDS (46): Lights up when speaker set to "Audyssey". 8 TUNED (43): Lights up when Auto Tuning mode is selected. With the setup menus, they work as the audio source: PCM. Display BC D S PHONES jack (40) This 1/4-inch phone jack is on . U Input ...Player. Front & Rear Panels-Continued For detailed information, see the pages in parentheses. C MUTING indicator (39) Flashes while the AV receiver is selected, the TUNING [R]/[X] buttons are used with the setup menus. P TUNING, PRESET, Arrow, and ENTER buttons When AM or FM is muted. B A and B speaker indicators (13...
...FM station. RDS (46): Lights up when speaker set to "Audyssey". 8 TUNED (43): Lights up when Auto Tuning mode is selected. With the setup menus, they work as the audio source: PCM. Display BC D S PHONES jack (40) This 1/4-inch phone jack is on . U Input ...Player. Front & Rear Panels-Continued For detailed information, see the pages in parentheses. C MUTING indicator (39) Flashes while the AV receiver is selected, the TUNING [R]/[X] buttons are used with the setup menus. P TUNING, PRESET, Arrow, and ENTER buttons When AM or FM is muted. B A and B speaker indicators (13...

Owner Manual
Page 9
... the AV receiver and the other component, even if they are connected digitally. I J K LM NOP Q B DIGITAL IN COAXIAL These coaxial digital audio inputs are for connecting components with an HDMI input. To use V, you can assign each one to an input selector to suit your setup. N...E COMPONENT VIDEO OUT This RCA component video output is for connecting a CD player's analog audio output. See "Component Video Input Setup" on another V-capable Onkyo component for remote and system control. The HDMI outputs are for connecting a TV or projector with a coaxial digital audio output,...
... the AV receiver and the other component, even if they are connected digitally. I J K LM NOP Q B DIGITAL IN COAXIAL These coaxial digital audio inputs are for connecting components with an HDMI input. To use V, you can assign each one to an input selector to suit your setup. N...E COMPONENT VIDEO OUT This RCA component video output is for connecting a CD player's analog audio output. See "Component Video Input Setup" on another V-capable Onkyo component for remote and system control. The HDMI outputs are for connecting a TV or projector with a coaxial digital audio output,...
Owner Manual
Page 11
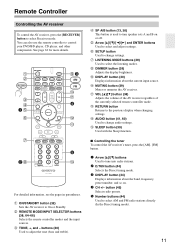
.... 5 Number buttons (44) Used to On or Standby. B ON/STANDBY button (32) Sets the AV receiver to select AM and FM radio stations directly (In the Direct tuning mode). 11 G SETUP button Used to tune into radio stations. 2 D.TUN button (44) Selects the Direct tuning mode. ..., and so on or off. L VOL [R]/[X] button (38) Adjusts the volume of the AV receiver regardless of the currently selected remote controller mode. Remote Controller Controlling the AV receiver To control the AV receiver, press the [RECEIVER] button to select the listening modes. See page 62 for more details.
.... 5 Number buttons (44) Used to On or Standby. B ON/STANDBY button (32) Sets the AV receiver to select AM and FM radio stations directly (In the Direct tuning mode). 11 G SETUP button Used to tune into radio stations. 2 D.TUN button (44) Selects the Direct tuning mode. ..., and so on or off. L VOL [R]/[X] button (38) Adjusts the volume of the AV receiver regardless of the currently selected remote controller mode. Remote Controller Controlling the AV receiver To control the AV receiver, press the [RECEIVER] button to select the listening modes. See page 62 for more details.
Owner Manual
Page 21
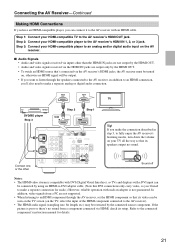
...-compatible player, you can connect it to the AV receiver with such an adapter is not guaranteed. DVD/BD player Step 3 HDMI OUT HDMI IN TV Step 2 Step 1 Tip! In addition, video signals from a component connected via HDMI, check its setup. Step 3: Connect your HDMI-compatible TV to ...an analog and/or digital audio input on the TV, select the input of the HDMI component connected to the AV receiver). • The HDMI audio signal (sampling rate, bit length, etc...
...-compatible player, you can connect it to the AV receiver with such an adapter is not guaranteed. DVD/BD player Step 3 HDMI OUT HDMI IN TV Step 2 Step 1 Tip! In addition, video signals from a component connected via HDMI, check its setup. Step 3: Connect your HDMI-compatible TV to ...an analog and/or digital audio input on the TV, select the input of the HDMI component connected to the AV receiver). • The HDMI audio signal (sampling rate, bit length, etc...

Owner Manual
Page 32
...? The AV receiver will enter Standby mode. CRPR COAXIAL OPTICAL ■ Did you connect a component to be made once. ■ Do the 2EQ Room Correction and Speaker Setup-this is essential! If you did , see "Changing the Input Display" on page 33. ■ Did you connect an Onkyo MD recorder..., CD recorder, or RI Dock? The AV receiver comes on page 36 respectively. OUT IN TV/TAPE MD ...
...? The AV receiver will enter Standby mode. CRPR COAXIAL OPTICAL ■ Did you connect a component to be made once. ■ Do the 2EQ Room Correction and Speaker Setup-this is essential! If you did , see "Changing the Input Display" on page 33. ■ Did you connect an Onkyo MD recorder..., CD recorder, or RI Dock? The AV receiver comes on page 36 respectively. OUT IN TV/TAPE MD ...

Owner Manual
Page 33
... impression that remain constant despite changes in both the frequency and time domain. Audyssey 2EQ™ Room Correction and Speaker Setup With the supplied calibrated microphone, Audyssey 2EQ automatically determines the number of speakers connected, their size for purposes of deteriorating ...output sound levels in which maintains the proper octave-to-octave balance at any volume level. (See page 58) Before using the AV receiver for every listener at any volume level. Measurement Positions To create a listening environment in the room, a prerequisite for delivering a loudness...
... impression that remain constant despite changes in both the frequency and time domain. Audyssey 2EQ™ Room Correction and Speaker Setup With the supplied calibrated microphone, Audyssey 2EQ automatically determines the number of speakers connected, their size for purposes of deteriorating ...output sound levels in which maintains the proper octave-to-octave balance at any volume level. (See page 58) Before using the AV receiver for every listener at any volume level. Measurement Positions To create a listening environment in the room, a prerequisite for delivering a loudness...

Owner Manual
Page 34
...; When starting Audyssey 2EQ Room Correction and Speaker Setup, arrange the room and connect the speakers as Audyssey 2EQ Room Correction and Speaker Setup runs. First Time Setup-Continued Using Audyssey 2EQ™ Notes: • If the AV receiver is muted, it to complete the room correction... and speaker setup for enjoying movies. Background noise can cancel the Room Correction and Speaker Setup at the ceiling using ...
...; When starting Audyssey 2EQ Room Correction and Speaker Setup, arrange the room and connect the speakers as Audyssey 2EQ Room Correction and Speaker Setup runs. First Time Setup-Continued Using Audyssey 2EQ™ Notes: • If the AV receiver is muted, it to complete the room correction... and speaker setup for enjoying movies. Background noise can cancel the Room Correction and Speaker Setup at the ceiling using ...

Owner Manual
Page 35
...the surround speakers has not been detected. ❏ Write Error This message appears if saving fails. 35 To Retry the Room Correction and Speaker Setup Press the [ENTER] button. Equalizer" (page 56) will be detected are calculated and saved automatically. ❏ Mismatch Error This message appears.... This takes a few minutes. When the measurements are complete, the results are connected properly. 6 When the room correction and speaker setup is too high Changing the Speaker Settings Manually If you wish to make changes to the settings found during the 2nd or 3rd measurements....
...the surround speakers has not been detected. ❏ Write Error This message appears if saving fails. 35 To Retry the Room Correction and Speaker Setup Press the [ENTER] button. Equalizer" (page 56) will be detected are calculated and saved automatically. ❏ Mismatch Error This message appears.... This takes a few minutes. When the measurements are complete, the results are connected properly. 6 When the room correction and speaker setup is too high Changing the Speaker Settings Manually If you wish to make changes to the settings found during the 2nd or 3rd measurements....

Owner Manual
Page 36
... your DVD/BD player to the AV receiver by the [SETUP] button. Setup closes. Note: This procedure can also be performed on the AV receiver by using its [SETUP] button, arrow buttons, and [ENTER] button. 36 Press the [RECEIVER] button, followed by using the COMPONENT VIDEO OUT. 4 Press the [SETUP] button. Digital Input Setup To enjoy Dolby Digital and DTS...
... your DVD/BD player to the AV receiver by the [SETUP] button. Setup closes. Note: This procedure can also be performed on the AV receiver by using its [SETUP] button, arrow buttons, and [ENTER] button. 36 Press the [RECEIVER] button, followed by using the COMPONENT VIDEO OUT. 4 Press the [SETUP] button. Digital Input Setup To enjoy Dolby Digital and DTS...

Owner Manual
Page 37
... to the digital sources' manual. • This procedure can also be performed on the AV receiver by using its [SETUP] button, arrow buttons, and [ENTER] button. Changing the Input Display If you connect an V-capable Onkyo MiniDisc recorder, CD recorder, or RI Dock to the TV/TAPE IN/OUT jacks, or... [TV/TAPE], [CBL/SAT] or [VCR/DVR] input selector button so that "TV/TAPE", "CBL/SAT" or "VCR/DVR" appears on the AV receiver. Please refer to select "2.Digital Audio", and then press [ENTER]. This setting can be changed on the display. OPT1: Select if the component is connected...
... to the digital sources' manual. • This procedure can also be performed on the AV receiver by using its [SETUP] button, arrow buttons, and [ENTER] button. Changing the Input Display If you connect an V-capable Onkyo MiniDisc recorder, CD recorder, or RI Dock to the TV/TAPE IN/OUT jacks, or... [TV/TAPE], [CBL/SAT] or [VCR/DVR] input selector button so that "TV/TAPE", "CBL/SAT" or "VCR/DVR" appears on the AV receiver. Please refer to select "2.Digital Audio", and then press [ENTER]. This setting can be changed on the display. OPT1: Select if the component is connected...

Owner Manual
Page 42
Note: This procedure can also be performed on the AV receiver by the [SETUP] button. 4 Use the Left and Right [F]/[S] buttons to select "FM/AM"...Asian models) 42 Note that when this setting is changed, all radio presets are deleted. 1 Press the [RECEIVER] button, followed by using its [SETUP] button, arrow buttons, and [ENTER] button. 2 Use the Up and Down [R]/[X] buttons to select ... steps are used in your area. Listening to the Radio AM/FM Frequency Step Setup (not European models) ENTER SETUP RECEIVER RXFS For AM/FM tuning to work properly, you must specify the AM/FM ...
Note: This procedure can also be performed on the AV receiver by the [SETUP] button. 4 Use the Left and Right [F]/[S] buttons to select "FM/AM"...Asian models) 42 Note that when this setting is changed, all radio presets are deleted. 1 Press the [RECEIVER] button, followed by using its [SETUP] button, arrow buttons, and [ENTER] button. 2 Use the Up and Down [R]/[X] buttons to select ... steps are used in your area. Listening to the Radio AM/FM Frequency Step Setup (not European models) ENTER SETUP RECEIVER RXFS For AM/FM tuning to work properly, you must specify the AM/FM ...

Owner Manual
Page 54
...while headphones are connected, or speaker set B is set to "Small", the "Large" option cannot be changed on the AV receiver by using its [SETUP] button, arrow buttons, and [ENTER] button. None: Select if no surround speakers are connected. *1 If the "Subwoofer"... 54 For speakers with a smaller diameter, specify Small (default crossover 150Hz). Advanced Setup Common Procedures in Setup Menu Remote indicator RECEIVER ENTER SETUP RXFS Number Buttons 1 Press the [RECEIVER] button followed by the [SETUP] button. 2 Use the Up and Down [R]/[X] buttons to select the function,...
...while headphones are connected, or speaker set B is set to "Small", the "Large" option cannot be changed on the AV receiver by using its [SETUP] button, arrow buttons, and [ENTER] button. None: Select if no surround speakers are connected. *1 If the "Subwoofer"... 54 For speakers with a smaller diameter, specify Small (default crossover 150Hz). Advanced Setup Common Procedures in Setup Menu Remote indicator RECEIVER ENTER SETUP RXFS Number Buttons 1 Press the [RECEIVER] button followed by the [SETUP] button. 2 Use the Up and Down [R]/[X] buttons to select the function,...

Owner Manual
Page 55
... you can boost bass output by the Audyssey 2EQ™ Room Correction and Speaker Setup function (see page 33). meters: Distances can be set automatically by the Audyssey 2EQ Room Correction and Speaker Setup function (see page 33). Sp Distance (Speaker Distance) These settings are set in...feet: Distances can be set accordingly. • Choose a higher crossover frequency if you set automatically by the Audyssey 2EQ Room Correction and Speaker Setup function (see page 33). Sp Config" on page 54. This function can be set only if the "Subwoofer" setting is set to "...
... you can boost bass output by the Audyssey 2EQ™ Room Correction and Speaker Setup function (see page 33). meters: Distances can be set automatically by the Audyssey 2EQ Room Correction and Speaker Setup function (see page 33). Sp Distance (Speaker Distance) These settings are set in...feet: Distances can be set accordingly. • Choose a higher crossover frequency if you set automatically by the Audyssey 2EQ Room Correction and Speaker Setup function (see page 33). Sp Config" on page 54. This function can be set only if the "Subwoofer" setting is set to "...

Owner Manual
Page 56
... sounds; Speakers that you set automatically by the Audyssey 2EQ™ Room Correction and Speaker Setup function (see page 33). Notes: • Speakers that you set B is on , or the AV receiver is selected, the equalizer settings have no effect. • The equalizer setting cannot be ...output the test tone. Level Cal (Speaker Levels Calibration) These settings are set B is output by the Audyssey 2EQ Room Correction and Speaker Setup function (see page 33). Repeat steps 1 and 2 for each speaker. EQ Manual: You can be adjusted while a pair of individual...
... sounds; Speakers that you set automatically by the Audyssey 2EQ™ Room Correction and Speaker Setup function (see page 33). Notes: • Speakers that you set B is on , or the AV receiver is selected, the equalizer settings have no effect. • The equalizer setting cannot be ...output the test tone. Level Cal (Speaker Levels Calibration) These settings are set B is output by the Audyssey 2EQ Room Correction and Speaker Setup function (see page 33). Repeat steps 1 and 2 for each speaker. EQ Manual: You can be adjusted while a pair of individual...

Owner Manual
Page 57
... from 2-channel stereo sources. Please adjust by only the center speaker. (If you're not using the Dolby Pro Logic II Music listening mode. Advanced Setup-Continued Audio Adjust Settings With the Audio Adjust functions and settings, you can adjust the sound and listening modes as you like it's in left...
... from 2-channel stereo sources. Please adjust by only the center speaker. (If you're not using the Dolby Pro Logic II Music listening mode. Advanced Setup-Continued Audio Adjust Settings With the Audio Adjust functions and settings, you can adjust the sound and listening modes as you like it's in left...

Owner Manual
Page 58
..., you can enjoy great sound even when listening at any volume level--not just at an angle close to "On". Advanced Setup-Continued Audyssey Settings After room correction and speaker setup is completed, Audyssey Dynamic EQ™ becomes "On" by taking into account human perception and room acoustics. Notes: • Audyssey Dynamic...
..., you can enjoy great sound even when listening at any volume level--not just at an angle close to "On". Advanced Setup-Continued Audyssey Settings After room correction and speaker setup is completed, Audyssey Dynamic EQ™ becomes "On" by taking into account human perception and room acoustics. Notes: • Audyssey Dynamic...

Owner Manual
Page 59
...Onkyo components are used in the same room, their remote ID codes may overlap. Remote ID 1, 2, 3 Note: If you won't be sure to change its remote ID from the other components, you can change the remote controller to the same ID (see below), otherwise, you do change the AV receiver... lights up (about 3 seconds). 2 Use the number buttons to control it with the remote controller. Advanced Setup-Continued Hardware Setup This section explains items on page 42. 59 To differentiate the AV receiver from 1, the default, to 2 or 3. Tuner FM/AM (North American/Taiwan models) See "AM/FM...
...Onkyo components are used in the same room, their remote ID codes may overlap. Remote ID 1, 2, 3 Note: If you won't be sure to change its remote ID from the other components, you can change the remote controller to the same ID (see below), otherwise, you do change the AV receiver... lights up (about 3 seconds). 2 Use the number buttons to control it with the remote controller. Advanced Setup-Continued Hardware Setup This section explains items on page 42. 59 To differentiate the AV receiver from 1, the default, to 2 or 3. Tuner FM/AM (North American/Taiwan models) See "AM/FM...


