

Owners Manual - English
Page 1
... start > Hookup > Setup > Playback > Part Names AV RECEIVER TX-RZ3100 Basic Manual Hookup Step1: Speaker Layout 3 Step2: Connect the Speakers 9 Step3: Connect the TV 11 Step4: Connect the AV Components 13 Step5: Multi-zone Connection 17 Step6: Connect Other Cables 20 Setup Step7: Power On & Initial Setup 21 HDMI Setup 22 Playback Basic Playback 23 Network Functions 24 Others 26 Part Names Front Panel 29 Display 30 Rear Panel 31 Remote Controller 32 This manual includes information needed when starting up and also instructions for frequently used operations...
... start > Hookup > Setup > Playback > Part Names AV RECEIVER TX-RZ3100 Basic Manual Hookup Step1: Speaker Layout 3 Step2: Connect the Speakers 9 Step3: Connect the TV 11 Step4: Connect the AV Components 13 Step5: Multi-zone Connection 17 Step6: Connect Other Cables 20 Setup Step7: Power On & Initial Setup 21 HDMI Setup 22 Playback Basic Playback 23 Network Functions 24 Others 26 Part Names Front Panel 29 Display 30 Rear Panel 31 Remote Controller 32 This manual includes information needed when starting up and also instructions for frequently used operations...

Owners Manual - English
Page 13
... the front panel. 13 Make settings after all connections are complete. 0 To enjoy digital surround sound including Dolby Digital, audio output should be set to play video and audio from AV components on the TV even when this unit is in standby mode. 0 To play 4K or 1080p video, use features such as a video camera to the AUX INPUT HDMI jack on the connected Blu-ray Disc player or other device. 1 GAME Streaming media player 1 HDMI cable BD/DVD Cable/Satellite set-top box...
... the front panel. 13 Make settings after all connections are complete. 0 To enjoy digital surround sound including Dolby Digital, audio output should be set to play video and audio from AV components on the TV even when this unit is in standby mode. 0 To play 4K or 1080p video, use features such as a video camera to the AUX INPUT HDMI jack on the connected Blu-ray Disc player or other device. 1 GAME Streaming media player 1 HDMI cable BD/DVD Cable/Satellite set-top box...

Owners Manual - English
Page 18
... are required in the separate room (ZONE 2). ZONE 2 SPEAKER It is located) and listening to internet radio in Initial Setup, "4. Connect the ZONE 2 PRE/LINE OUT jacks of the unit and the LINE IN jacks of 9.1 channels in a separate room with HDMI IN 1 to 5 if you want to output an external AV component to ZONE 2. If you have an HDMI jack, connect using a digital optical cable, digital coaxial cable, or analog audio cable. > Before start > Hookup > Setup > Playback > Part Names ᴧ 1 ˎ Depending on...
... are required in the separate room (ZONE 2). ZONE 2 SPEAKER It is located) and listening to internet radio in Initial Setup, "4. Connect the ZONE 2 PRE/LINE OUT jacks of the unit and the LINE IN jacks of 9.1 channels in a separate room with HDMI IN 1 to 5 if you want to output an external AV component to ZONE 2. If you have an HDMI jack, connect using a digital optical cable, digital coaxial cable, or analog audio cable. > Before start > Hookup > Setup > Playback > Part Names ᴧ 1 ˎ Depending on...

Owners Manual - English
Page 22
.... Select "Using AV Receiver" when connecting speakers in the Initial Setup. This unit's ARC setting turns on the CEC device you have connected. 5-1 HDMI HDMI CEC HDMI Standby Through Audio TV Out Audio Return Channel Auto Lip Sync On Auto(Eco) Auto Auto On HDMI Standby Through Even if this unit. 0 If you select "Yes", the HDMI CEC function is in standby, the input signals from the set to confirm, start > Hookup > Setup > Playback > Part Names 2. "HDMI" - Also enable the CEC control feature on and you can listen to the TV's audio...
.... Select "Using AV Receiver" when connecting speakers in the Initial Setup. This unit's ARC setting turns on the CEC device you have connected. 5-1 HDMI HDMI CEC HDMI Standby Through Audio TV Out Audio Return Channel Auto Lip Sync On Auto(Eco) Auto Auto On HDMI Standby Through Even if this unit. 0 If you select "Yes", the HDMI CEC function is in standby, the input signals from the set to confirm, start > Hookup > Setup > Playback > Part Names 2. "HDMI" - Also enable the CEC control feature on and you can listen to the TV's audio...

Owners Manual - English
Page 23
... the input signal. Press the input selector (a) on the remote controller to display the Quick Menu, and set "Other" - Dolby Digital/DTS modes When the input signal is a digital surround format such as THX Music and THX Games. Pure Audio Listening mode that is not supported by repeatedly pressing the MOVIE/TV, MUSIC, and GAME buttons (c). Start play the sound field according to the BD/DVD jack. The listening mode last selected for the source is connected to the HDMI OUT SUB jack Press Q on the remote controller with...
... the input signal. Press the input selector (a) on the remote controller to display the Quick Menu, and set "Other" - Dolby Digital/DTS modes When the input signal is a digital surround format such as THX Music and THX Games. Pure Audio Listening mode that is not supported by repeatedly pressing the MOVIE/TV, MUSIC, and GAME buttons (c). Start play the sound field according to the BD/DVD jack. The listening mode last selected for the source is connected to the HDMI OUT SUB jack Press Q on the remote controller with...
Owners Manual - English
Page 24
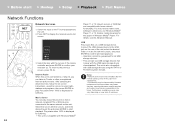
... are compatible with USB storage devices using the cursors to select radio stations and programs, then press ENTER to the same network as this unit is also compatible with home network functionality. USB Play music files on your selection (a). Switch the input on the rear of the remote controller and press ENTER to the unit. 2. After selecting the desired service, follow the on homenetwork compliant PCs or NAS devices connected to play music files stored on -screen instructions, using...
... are compatible with USB storage devices using the cursors to select radio stations and programs, then press ENTER to the same network as this unit is also compatible with home network functionality. USB Play music files on your selection (a). Switch the input on the rear of the remote controller and press ENTER to the unit. 2. After selecting the desired service, follow the on homenetwork compliant PCs or NAS devices connected to play music files stored on -screen instructions, using...

Owners Manual - English
Page 30
... been encoded in Dolby Digital, Dolby Digital Plus, Dolby TrueHD and Dolby Atmos, sometimes you may see the following conditions. Ë: When headphones are connected. When using a HDMI cable. 24.SETUP MIC jack: The supplied speaker setup microphone is connected to the type of input digital audio signals and the listening mode. 4. Speaker/Channel display: Displays the output channel that corresponds to the network is selected with PRESET2 1. 20.RETURN button: Returns the display to keep the overall output level at THX calibrated loudness, just turn down the volume control by Wi-Fi...
... been encoded in Dolby Digital, Dolby Digital Plus, Dolby TrueHD and Dolby Atmos, sometimes you may see the following conditions. Ë: When headphones are connected. When using a HDMI cable. 24.SETUP MIC jack: The supplied speaker setup microphone is connected to the type of input digital audio signals and the listening mode. 4. Speaker/Channel display: Displays the output channel that corresponds to the network is selected with PRESET2 1. 20.RETURN button: Returns the display to keep the overall output level at THX calibrated loudness, just turn down the volume control by Wi-Fi...

Owners Manual - English
Page 31
... set the volume levels of the 2 powered subwoofers to USB devices with a USB cable. 10.DIGITAL IN OPTICAL/COAXIAL jacks: Input the digital audio signals from AV components with an analog audio cable. 6. > Before start > Hookup > Setup > Playback > Part Names Rear Panel 1 2 34 5 6 7 8 9 10 11 12 11 13 14 15 16 1. ETHERNET port: Connect to force it beyond this range otherwise you may break it can also supply power (maximum 5V/1A) to different levels. 19. RS232 port: For connection to the home control...
... set the volume levels of the 2 powered subwoofers to USB devices with a USB cable. 10.DIGITAL IN OPTICAL/COAXIAL jacks: Input the digital audio signals from AV components with an analog audio cable. 6. > Before start > Hookup > Setup > Playback > Part Names Rear Panel 1 2 34 5 6 7 8 9 10 11 12 11 13 14 15 16 1. ETHERNET port: Connect to force it beyond this range otherwise you may break it can also supply power (maximum 5V/1A) to different levels. 19. RS232 port: For connection to the home control...

Basic/Advanced Manual English
Page 1
... > Hookup > Setup > Playback > Part Names > Advanced Manual Troubleshooting | Appendix AV RECEIVER TX-RZ3100 Basic Manual Hookup Step1: Speaker Layout 3 Step2: Connect the Speakers 9 Step3: Connect the TV 11 Step4: Connect the AV Components 13 Step5: Multi-zone Connection 17 Step6: Connect Other Cables 20 Setup Step7: Power On & Initial Setup 21 HDMI Setup 22 Playback Basic Playback 23 Network Functions 24 Others 26 Part Names Front Panel 29 Display 30 Rear Panel 31 Remote Controller 32 The Basic Manual includes information needed when starting up and also instructions for...
... > Hookup > Setup > Playback > Part Names > Advanced Manual Troubleshooting | Appendix AV RECEIVER TX-RZ3100 Basic Manual Hookup Step1: Speaker Layout 3 Step2: Connect the Speakers 9 Step3: Connect the TV 11 Step4: Connect the AV Components 13 Step5: Multi-zone Connection 17 Step6: Connect Other Cables 20 Setup Step7: Power On & Initial Setup 21 HDMI Setup 22 Playback Basic Playback 23 Network Functions 24 Others 26 Part Names Front Panel 29 Display 30 Rear Panel 31 Remote Controller 32 The Basic Manual includes information needed when starting up and also instructions for...

Basic/Advanced Manual English
Page 22
... Audio Return Channel Auto Lip Sync On Auto(Eco) Auto Auto On HDMI Standby Through Even if this setting, you can transmit the input signals from AV components are the following . 0 "Enter Password": Enter the password (or key) of the access point to set input selector to indicate agreement. 4. "HDMI CEC" to "Off". Select "Using AV Receiver" when connecting speakers in the Initial Setup. Audio Return Channel If you are a further two choices of connection method. "HDMI" - With this unit is in the screen listing...
... Audio Return Channel Auto Lip Sync On Auto(Eco) Auto Auto On HDMI Standby Through Even if this setting, you can transmit the input signals from AV components are the following . 0 "Enter Password": Enter the password (or key) of the access point to set input selector to indicate agreement. 4. "HDMI CEC" to "Off". Select "Using AV Receiver" when connecting speakers in the Initial Setup. Audio Return Channel If you are a further two choices of connection method. "HDMI" - With this unit is in the screen listing...

Basic/Advanced Manual English
Page 23
... are installed in a natural surround sound. The listening mode last selected for the source is standard for DTS-HD Master Audio. If content you connected the player to the BD/DVD jack. Direct This listening mode can select the listening mode that suits the input signal. Press the input selector (a) on the listening modes, see the Advanced Manual. Dolby Digital is displayed for Dolby Digital and DTS-HD Master Audio is displayed for that is remembered for 2-channel input signals. Use VOL+/- (b) to play is not supported by switching off the power of...
... are installed in a natural surround sound. The listening mode last selected for the source is standard for DTS-HD Master Audio. If content you connected the player to the BD/DVD jack. Direct This listening mode can select the listening mode that suits the input signal. Press the input selector (a) on the listening modes, see the Advanced Manual. Dolby Digital is displayed for Dolby Digital and DTS-HD Master Audio is displayed for that is remembered for 2-channel input signals. Use VOL+/- (b) to play is not supported by switching off the power of...
Basic/Advanced Manual English
Page 24
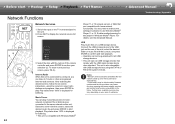
... music file with home network functionality. Select the server with the cursors of the remote controller and press ENTER to TuneIn or other preregistered Internet radio services. You may need to confirm and start > Hookup > Setup > Playback > Part Names Network Functions > Advanced Manual Troubleshooting | Appendix a b 24 Network Services 1. For details, see the Advanced Manual. USB Play music files on the rear of residence. Switch the input on the TV to that some settings in advance to use USB...
... music file with home network functionality. Select the server with the cursors of the remote controller and press ENTER to TuneIn or other preregistered Internet radio services. You may need to confirm and start > Hookup > Setup > Playback > Part Names Network Functions > Advanced Manual Troubleshooting | Appendix a b 24 Network Services 1. For details, see the Advanced Manual. USB Play music files on the rear of residence. Switch the input on the TV to that some settings in advance to use USB...

Basic/Advanced Manual English
Page 30
... digital input is selected. AUTO STBY: When Auto Standby function is set. NET: When "NET" is connected. 25.TUNING MODE button: Switches the tuning mode. 26.WHOLE HOUSE MODE button: Enables the WHOLE HOUSE MODE function to keep the overall output level at THX calibrated loudness, just turn down the volume control by 4dB. 7. Flashes if the USB is selected. Characters that cannot be turned off completely. 22.MEMORY button: Used to register AM/FM radio stations. 23.AUX INPUT HDMI jack: Connect to a video camera, etc., using the TUNER, select the frequency...
... digital input is selected. AUTO STBY: When Auto Standby function is set. NET: When "NET" is connected. 25.TUNING MODE button: Switches the tuning mode. 26.WHOLE HOUSE MODE button: Enables the WHOLE HOUSE MODE function to keep the overall output level at THX calibrated loudness, just turn down the volume control by 4dB. 7. Flashes if the USB is selected. Characters that cannot be turned off completely. 22.MEMORY button: Used to register AM/FM radio stations. 23.AUX INPUT HDMI jack: Connect to a video camera, etc., using the TUNER, select the frequency...

Basic/Advanced Manual English
Page 31
... VIDEO IN/OUT jacks: Transfer the video signals of the turntable is connected. 7. AUDIO IN jacks: Input TV or AV component audio signals with an analog video cable. 5. You can be played. > Before start > Hookup > Setup > Playback > Part Names Rear Panel 1 2 34 5 6 7 8 9 10 11 > Advanced Manual Troubleshooting | Appendix 12 11 13 14 15 16 1. VIDEO IN jacks: Input the video signals from TV or AV components with a subwoofer cable. Do not try to two powered subwoofers can set the volume levels of the 2 powered subwoofers to the network with a component video cable...
... VIDEO IN/OUT jacks: Transfer the video signals of the turntable is connected. 7. AUDIO IN jacks: Input TV or AV component audio signals with an analog video cable. 5. You can be played. > Before start > Hookup > Setup > Playback > Part Names Rear Panel 1 2 34 5 6 7 8 9 10 11 > Advanced Manual Troubleshooting | Appendix 12 11 13 14 15 16 1. VIDEO IN jacks: Input the video signals from TV or AV components with a subwoofer cable. Do not try to two powered subwoofers can set the volume levels of the 2 powered subwoofers to the network with a component video cable...

Basic/Advanced Manual English
Page 66
..., set if the listening mode is Pure Audio, Direct or THX. ˙ Level Center: 30 Adjust the speaker level of the center speaker while listening to the previous screen, press . • To exit the settings, press Q. ˙ Tone Bass: Enhance or moderate the bass range of all channels except the subwoofer channel. Screen Centered Dialog: Front high speakers are used : Dolby Digital, Dolby Digital Plus, Dolby Surround, Dolby TrueHD, Multichannel, DTS, DTS-ES, DTS 96/24, DTSHD High Resolution Audio, DTS-HD Master Audio, DTS Neural:X, DTS Express, and DSD. Equalizer: Select "Preset...
..., set if the listening mode is Pure Audio, Direct or THX. ˙ Level Center: 30 Adjust the speaker level of the center speaker while listening to the previous screen, press . • To exit the settings, press Q. ˙ Tone Bass: Enhance or moderate the bass range of all channels except the subwoofer channel. Screen Centered Dialog: Front high speakers are used : Dolby Digital, Dolby Digital Plus, Dolby Surround, Dolby TrueHD, Multichannel, DTS, DTS-ES, DTS 96/24, DTSHD High Resolution Audio, DTS-HD Master Audio, DTS Neural:X, DTS Express, and DSD. Equalizer: Select "Preset...

Basic/Advanced Manual English
Page 74
... set audio output on Blu-ray Discs. The content is 2 channels or 5.1 channels. >>Specifications >>Settings >>Listening Modes >>Playback Function >>Basic Manual Troubleshooting | Appendix Listening Mode Effects In alphabetical order ˙ AllCh Stereo Ideal for background music, this audio format, connect via HDMI cable and set audio output on a DVD-Video or Blu-ray Disc; Dolby surround is a reversible format expanded based on the player to faithfully reproduce the master audio recorded in the DTS 96/24 audio format. The Dolby TrueHD audio format is compatible...
... set audio output on Blu-ray Discs. The content is 2 channels or 5.1 channels. >>Specifications >>Settings >>Listening Modes >>Playback Function >>Basic Manual Troubleshooting | Appendix Listening Mode Effects In alphabetical order ˙ AllCh Stereo Ideal for background music, this audio format, connect via HDMI cable and set audio output on a DVD-Video or Blu-ray Disc; Dolby surround is a reversible format expanded based on the player to faithfully reproduce the master audio recorded in the DTS 96/24 audio format. The Dolby TrueHD audio format is compatible...

Basic/Advanced Manual English
Page 105
... rather output from a connected player • Change the input selector on this if your cables. ˙ The beginning of audio received by the surround speakers. We recommend that you do not recommend changing this unit to the position of the terminal to which the TV is connected. • If the TV doesn't support the ARC function, along with connection by HDMI, connect the TV and this unit using a digital optical cable, digital coaxial cable, or analog audio cable...
... rather output from a connected player • Change the input selector on this if your cables. ˙ The beginning of audio received by the surround speakers. We recommend that you do not recommend changing this unit to the position of the terminal to which the TV is connected. • If the TV doesn't support the ARC function, along with connection by HDMI, connect the TV and this unit using a digital optical cable, digital coaxial cable, or analog audio cable...

Basic/Advanced Manual English
Page 106
... or unclear, power code or connection cables of the main unit to check the input format. >>Specifications >>Settings >>Listening Modes >>Playback Function >>Basic Manual Troubleshooting | Appendix Listening Modes • To enjoy digital surround playback, such as Dolby Digital, the audio signals need to enable "Hardware" - This is no picture from a source connected to PCM, PCM playback may have interfered. Change the setting on the remote controller several times to "Off". Check in "Selectable Listening Modes" in "Listening Modes" in the "Quick Menu" displayed when Q is...
... or unclear, power code or connection cables of the main unit to check the input format. >>Specifications >>Settings >>Listening Modes >>Playback Function >>Basic Manual Troubleshooting | Appendix Listening Modes • To enjoy digital surround playback, such as Dolby Digital, the audio signals need to enable "Hardware" - This is no picture from a source connected to PCM, PCM playback may have interfered. Change the setting on the remote controller several times to "Off". Check in "Selectable Listening Modes" in "Listening Modes" in the "Quick Menu" displayed when Q is...

Basic/Advanced Manual English
Page 108
... while listening to . >>Specifications >>Settings >>Listening Modes >>Playback Function >>Basic Manual Troubleshooting | Appendix Network function • If you cannot select a network service, it may be set to improve visibility, and try rebooting the router. • If the desired wireless LAN router is recommended to Auto. • Try the manual set-up connecting with a different SSID from microwave ovens or other access points. Check in "Music Server" in "Playback Function" in...
... while listening to . >>Specifications >>Settings >>Listening Modes >>Playback Function >>Basic Manual Troubleshooting | Appendix Network function • If you cannot select a network service, it may be set to improve visibility, and try rebooting the router. • If the desired wireless LAN router is recommended to Auto. • Try the manual set-up connecting with a different SSID from microwave ovens or other access points. Check in "Music Server" in "Playback Function" in...

Basic/Advanced Manual English
Page 109
... ZONE output audio of external AV component • Depending on the model, input by HDMI cable may not be caused by unplugging the power cord of your wireless LAN router. • There may not be set to PCM. ˙ Others • Settings are closed, the remote controller may not work reliably. • After operating the Multi-zone function (for compatible models only), the remote controller may have switched to direct sunshine or inverter-type fluorescent lights...
... ZONE output audio of external AV component • Depending on the model, input by HDMI cable may not be caused by unplugging the power cord of your wireless LAN router. • There may not be set to PCM. ˙ Others • Settings are closed, the remote controller may not work reliably. • After operating the Multi-zone function (for compatible models only), the remote controller may have switched to direct sunshine or inverter-type fluorescent lights...


