Owner Manual
Page 5
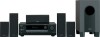
...the AV receiver 7 Front & Rear Panels 8 Speaker Package 11 Remote Controller 12 Connection Enjoying Home Theater 19 Connecting Your Speakers 20 Connecting Antenna 22 Connecting Your Components 24... Logic" and the double-D symbol are trademarks of Digital Theater Systems, Inc. *3. "DTS" and "Neo:6" are registered trademarks of Onkyo Corporation. Specifications 58 5 OptiResponse, and OR-... (20 cm) cone woofer • Color-coded speaker terminals and speaker cable *1. Features Contents HT-R340 AV Receiver • 100 W/channel into 6 ohms (FTC) • 100 W/channel ...
...the AV receiver 7 Front & Rear Panels 8 Speaker Package 11 Remote Controller 12 Connection Enjoying Home Theater 19 Connecting Your Speakers 20 Connecting Antenna 22 Connecting Your Components 24... Logic" and the double-D symbol are trademarks of Digital Theater Systems, Inc. *3. "DTS" and "Neo:6" are registered trademarks of Onkyo Corporation. Specifications 58 5 OptiResponse, and OR-... (20 cm) cone woofer • Color-coded speaker terminals and speaker cable *1. Features Contents HT-R340 AV Receiver • 100 W/channel into 6 ohms (FTC) • 100 W/channel ...
Owner Manual
Page 6
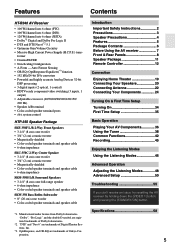
Package Contents Make sure you have the following items: HT-R340 HTP-350 HT-R340 Remote controller & two batteries (AA/R6) (American type shown) Indoor FM antenna (Connector type varies from country to country.) Front speakers (SKF-350F L/R) Center speaker (SKC-...
Package Contents Make sure you have the following items: HT-R340 HTP-350 HT-R340 Remote controller & two batteries (AA/R6) (American type shown) Indoor FM antenna (Connector type varies from country to country.) Front speakers (SKF-350F L/R) Center speaker (SKC-...
Owner Manual
Page 7
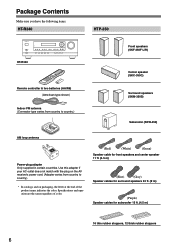
...have a voltage selector switch for compatibility with the polarity diagram inside the battery compartment. 3 Slide the cover shut. Notes: • If the remote controller doesn't work reliably, try replacing the batteries. • Don't mix new and old batteries or different types of the same type is ...used in accordance with power systems around the world. Before you intend not to bright light, such as shown below. If it isn't, use the remote controller, point it as possible to prevent damage from leakage or corrosion. &#...
...have a voltage selector switch for compatibility with the polarity diagram inside the battery compartment. 3 Slide the cover shut. Notes: • If the remote controller doesn't work reliably, try replacing the batteries. • Don't mix new and old batteries or different types of the same type is ...used in accordance with power systems around the world. Before you intend not to bright light, such as shown below. If it isn't, use the remote controller, point it as possible to prevent damage from leakage or corrosion. &#...
Owner Manual
Page 8
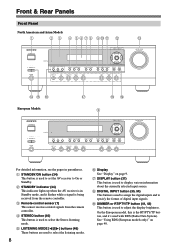
...LISTENING MODE [ ]/[ ] buttons (46) These buttons are used to On or Standby. On the European model, this is being received from the remote controller. A STANDBY/ON button (34) This button is used to specify the format of digital input signals. G DISPLAY button (37) This button... is used with RDS (Radio Data System). Front & Rear Panels Front Panel North American and Asian Models 1 2 3 4 5 6 78 9JK L STANDBY/ON A SPEAKERS B PHONES TUNING / PRESET...
...LISTENING MODE [ ]/[ ] buttons (46) These buttons are used to On or Standby. On the European model, this is being received from the remote controller. A STANDBY/ON button (34) This button is used to specify the format of digital input signals. G DISPLAY button (37) This button... is used with RDS (Radio Data System). Front & Rear Panels Front Panel North American and Asian Models 1 2 3 4 5 6 78 9JK L STANDBY/ON A SPEAKERS B PHONES TUNING / PRESET...
Owner Manual
Page 10
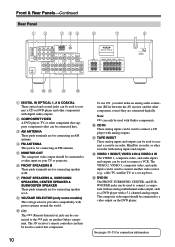
... See pages 19-33 for connecting an FM antenna. H VOLTAGE SELECTOR (only some models) This voltage selector provides compatibility with Onkyo components. Note: can be used with power systems around the world. L VIDEO 1 IN/OUT, VIDEO 2 IN & VIDEO 3 IN The VIDEO 1, composite video, and audio...even if they are for connecting an AM antenna. D FM ANTENNA This jack is for connection information. The AV receiver's remote controller can be connected to connect another Onkyo component. B COMPONENT VIDEO A DVD player, TV, or other component that component. 10 To use , you must make...
... See pages 19-33 for connecting an FM antenna. H VOLTAGE SELECTOR (only some models) This voltage selector provides compatibility with Onkyo components. Note: can be used with power systems around the world. L VIDEO 1 IN/OUT, VIDEO 2 IN & VIDEO 3 IN The VIDEO 1, composite video, and audio...even if they are for connecting an AM antenna. D FM ANTENNA This jack is for connection information. The AV receiver's remote controller can be connected to connect another Onkyo component. B COMPONENT VIDEO A DVD player, TV, or other component that component. 10 To use , you must make...
Owner Manual
Page 12
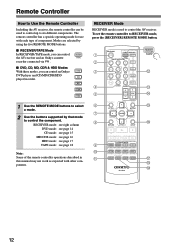
...buttons to select a mode. 2 Use the buttons supported by using the five REMOTE MODE buttons. ■ RECEIVER/TAPE Mode In RECEIVER/TAPE mode, you can control RECEIVER the AV receiver and an Onkyo cassette TAPE recorder connected via . ■ DVD, CD, MD, CDR & HDD... N O P 9 J K LISTENING MODE STEREO SURROUND AUDIO SUBTITLE RANDOM REPEAT TEST TONE CH SEL LEVEL- Remote Controller How to Use the Remote Controller Including the AV receiver, the remote controller can control an Onkyo DVD DVD player and CD/MD/CDR/HDD C D player/recorder. LEVEL+ PLAY MODE DISPLAY OR-EQ L ...
...buttons to select a mode. 2 Use the buttons supported by using the five REMOTE MODE buttons. ■ RECEIVER/TAPE Mode In RECEIVER/TAPE mode, you can control RECEIVER the AV receiver and an Onkyo cassette TAPE recorder connected via . ■ DVD, CD, MD, CDR & HDD... N O P 9 J K LISTENING MODE STEREO SURROUND AUDIO SUBTITLE RANDOM REPEAT TEST TONE CH SEL LEVEL- Remote Controller How to Use the Remote Controller Including the AV receiver, the remote controller can control an Onkyo DVD DVD player and CD/MD/CDR/HDD C D player/recorder. LEVEL+ PLAY MODE DISPLAY OR-EQ L ...
Owner Manual
Page 13
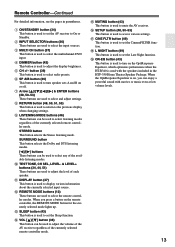
... to select the multichannel DVD input. button (39) This button is used to turn on the OptiResponse Equalizer, which optimizes performance when the HT-R340 is used to set the AV receiver to set the CinemaFILTER function. J TEST TONE, CH SEL, LEVEL- & LEVEL+ buttons (34... OptiResponse Equalizer is used to adjust the volume of the AV receiver regardless of the currently selected remote controller mode. Remote Controller-Continued For detailed information, see the pages in the HTP-350 Home Theater Speaker Package. P SETUP button (48, 50-53) This button is on, you press a...
... to select the multichannel DVD input. button (39) This button is used to turn on the OptiResponse Equalizer, which optimizes performance when the HT-R340 is used to set the AV receiver to set the CinemaFILTER function. J TEST TONE, CH SEL, LEVEL- & LEVEL+ buttons (34... OptiResponse Equalizer is used to adjust the volume of the AV receiver regardless of the currently selected remote controller mode. Remote Controller-Continued For detailed information, see the pages in the HTP-350 Home Theater Speaker Package. P SETUP button (48, 50-53) This button is on, you press a...
Owner Manual
Page 14
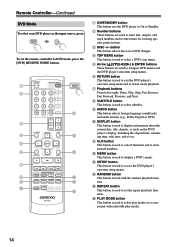
...selects foreign language soundtracks and audio formats (e.g., Dolby Digital or DTS). M SETUP button This button is used to set the remote controller to DVD mode, press the [DVD] REMOTE MODE button. 1 2 3 4 5 6 7 8 9 J ON/STANDBY REMOTE MODE RECEIVER DVD TAPE INPUT SELECTOR 1 2 3 C D V1 V2 V3 4 5 6 MD MULTI CH DVD 7... top menu. G Playback buttons From left to On or Standby. K CLR button This button is used to select subtitles. Remote Controller-Continued DVD Mode To select your DVD player as the input source, press: RECEIVER 6 DVD To set the repeat playback ...
...selects foreign language soundtracks and audio formats (e.g., Dolby Digital or DTS). M SETUP button This button is used to set the remote controller to DVD mode, press the [DVD] REMOTE MODE button. 1 2 3 4 5 6 7 8 9 J ON/STANDBY REMOTE MODE RECEIVER DVD TAPE INPUT SELECTOR 1 2 3 C D V1 V2 V3 4 5 6 MD MULTI CH DVD 7... top menu. G Playback buttons From left to On or Standby. K CLR button This button is used to select subtitles. Remote Controller-Continued DVD Mode To select your DVD player as the input source, press: RECEIVER 6 DVD To set the repeat playback ...

Owner Manual
Page 15
Remote Controller-Continued CD Mode To select your CD player as the input source, press: RECEIVER 9 C D To set the repeat playback functions. ✽ The VOL [ ]/[ ] and ..., total time, and so on a CD changer. H REPEAT button This button is used to cancel functions and to CD mode, press the [CD] REMOTE MODE button. 1 2 3 4 ✽ 5 ON/STANDBY REMOTE MODE RECEIVER DVD TAPE INPUT SELECTOR 1 2 3 C D V1 V2 V3 4 5 6 MD MULTI CH DVD 7 8 9 CDR TAPE TUNER C D +10 0 CLR HDD --/--- E DISPLAY button This...
Remote Controller-Continued CD Mode To select your CD player as the input source, press: RECEIVER 9 C D To set the repeat playback functions. ✽ The VOL [ ]/[ ] and ..., total time, and so on a CD changer. H REPEAT button This button is used to cancel functions and to CD mode, press the [CD] REMOTE MODE button. 1 2 3 4 ✽ 5 ON/STANDBY REMOTE MODE RECEIVER DVD TAPE INPUT SELECTOR 1 2 3 C D V1 V2 V3 4 5 6 MD MULTI CH DVD 7 8 9 CDR TAPE TUNER C D +10 0 CLR HDD --/--- E DISPLAY button This...

Owner Manual
Page 16
..., Play, Stop, Fast Reverse, Fast Forward, Previous and Next. To set the repeat playback functions. G REPEAT button This button is used to set the remote controller to select play modes. ✽ The VOL [ ]/[ ] and LISTENING MODE buttons work the same as the input source, press: RECEIVER 7 MD ...C Playback buttons From left to On or Standby. D DISPLAY button This button is used to cancel functions and to enter numbers above 10. Remote Controller-Continued MD, & CDR Mode To select your MiniDisc or CD recorder as for locating specific points in time. DIMMER SLEEP CH DISC...
..., Play, Stop, Fast Reverse, Fast Forward, Previous and Next. To set the repeat playback functions. G REPEAT button This button is used to set the remote controller to select play modes. ✽ The VOL [ ]/[ ] and LISTENING MODE buttons work the same as the input source, press: RECEIVER 7 MD ...C Playback buttons From left to On or Standby. D DISPLAY button This button is used to cancel functions and to enter numbers above 10. Remote Controller-Continued MD, & CDR Mode To select your MiniDisc or CD recorder as for locating specific points in time. DIMMER SLEEP CH DISC...

Owner Manual
Page 17
...component. C PLAYLIST [ ]/[ ] buttons These buttons select the previous or next playlist on the HDD component's menu. RC-646S 17 Remote Controller-Continued HDD Mode To select your HDD component as the input source, press: RECEIVER 7 TAPE or 3 V3 * You must ...component's menu. [ ]/[ ] buttons: Select options on the HDD component. H REPEAT button This button is used to set the remote controller to HDD mode, press the [HDD] REMOTE MODE button. 1 2 3 4 5 ON/STANDBY REMOTE MODE RECEIVER DVD TAPE INPUT SELECTOR 1 2 3 C D V1 V2 V3 4 5 6 MD MULTI CH DVD 7 8 9 ...
...component. C PLAYLIST [ ]/[ ] buttons These buttons select the previous or next playlist on the HDD component's menu. RC-646S 17 Remote Controller-Continued HDD Mode To select your HDD component as the input source, press: RECEIVER 7 TAPE or 3 V3 * You must ...component's menu. [ ]/[ ] buttons: Select options on the HDD component. H REPEAT button This button is used to set the remote controller to HDD mode, press the [HDD] REMOTE MODE button. 1 2 3 4 5 ON/STANDBY REMOTE MODE RECEIVER DVD TAPE INPUT SELECTOR 1 2 3 C D V1 V2 V3 4 5 6 MD MULTI CH DVD 7 8 9 ...

Owner Manual
Page 18
...] button This button is used to stop playback. The FF [ ] button is used to control an Onkyo cassette recorder connected to the AV receiver via . To set the remote controller to start rewind. ON/STANDBY REMOTE MODE RECEIVER DVD TAPE INPUT SELECTOR 1 2 3 C D V1 V2 V3 4 5 6 MD MULTI... CH DVD 7 8 9 CDR TAPE TUNER C D +10 0 CLR HDD --/--- Remote Controller-Continued TAPE Mode To select your ...
...] button This button is used to stop playback. The FF [ ] button is used to control an Onkyo cassette recorder connected to the AV receiver via . To set the remote controller to start rewind. ON/STANDBY REMOTE MODE RECEIVER DVD TAPE INPUT SELECTOR 1 2 3 C D V1 V2 V3 4 5 6 MD MULTI... CH DVD 7 8 9 CDR TAPE TUNER C D +10 0 CLR HDD --/--- Remote Controller-Continued TAPE Mode To select your ...

Owner Manual
Page 19
... Set B: Sub Room 1/3 wall length Surround left and right speakers, making sound movements distinct and providing a full sound image. AV receiver A SPEAKERS B Remote controller or SP A / B Speaker set A On Off Speaker set A is on, these speakers output no sound. Center speaker (SKC-350C) This ...In general, a good bass sound can be obtained by installing the subwoofer in a front corner, or at the same height as shown. Enjoying Home Theater Speaker Sets A and B You can be used in another room and offers 2-channel stereo playback. Speaker set B. Speaker set B can use two...
... Set B: Sub Room 1/3 wall length Surround left and right speakers, making sound movements distinct and providing a full sound image. AV receiver A SPEAKERS B Remote controller or SP A / B Speaker set A On Off Speaker set A is on, these speakers output no sound. Center speaker (SKC-350C) This ...In general, a good bass sound can be obtained by installing the subwoofer in a front corner, or at the same height as shown. Enjoying Home Theater Speaker Sets A and B You can be used in another room and offers 2-channel stereo playback. Speaker set B. Speaker set B can use two...
Owner Manual
Page 32
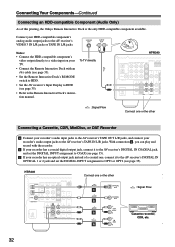
...35). • Refer to the Remote Interactive Dock's instruction manual. IN RED a R 32 To TV directly HT-R340 : Signal Flow Connect one or... and record with an cable (see page 33). • Set the Remote Interactive Dock's RI MODE switch to HDD. • Set the AV ... IN L/R jacks. b If your recorder's audio output jacks to HDD (see page 35). HT-R340 Connect one or the other OPTICAL OUT : Signal Flow c COAXIAL OUT b L OUT PLAY... IN L/R jacks. c If your TV. • Connect the Remote Interactive Dock with the recorder. Connect your HDD-compatible component's analog audio...
...35). • Refer to the Remote Interactive Dock's instruction manual. IN RED a R 32 To TV directly HT-R340 : Signal Flow Connect one or... and record with an cable (see page 33). • Set the Remote Interactive Dock's RI MODE switch to HDD. • Set the AV ... IN L/R jacks. b If your recorder's audio output jacks to HDD (see page 35). HT-R340 Connect one or the other OPTICAL OUT : Signal Flow c COAXIAL OUT b L OUT PLAY... IN L/R jacks. c If your TV. • Connect the Remote Interactive Dock with the recorder. Connect your HDD-compatible component's analog audio...
Owner Manual
Page 33
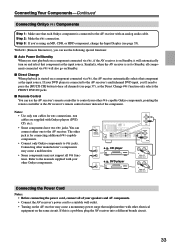
... only selects the FRONT DVD IN jacks. ■ Remote Control You can connect either one to control your other Onkyo components. Notes: • Use only cables for connecting additional -capable components. • Connect only Onkyo components to Standby, all channels (see page 35). ...connect all functions. If this is for connections. The other -capable Onkyo components, pointing the remote controller at the AV receiver's remote control sensor instead of your DVD player is connected to the manuals supplied with Onkyo players (DVD, CD, etc.). • Some components have two...
... only selects the FRONT DVD IN jacks. ■ Remote Control You can connect either one to control your other Onkyo components. Notes: • Use only cables for connecting additional -capable components. • Connect only Onkyo components to Standby, all channels (see page 35). ...connect all functions. If this is for connections. The other -capable Onkyo components, pointing the remote controller at the AV receiver's remote control sensor instead of your DVD player is connected to the manuals supplied with Onkyo players (DVD, CD, etc.). • Some components have two...
Owner Manual
Page 34
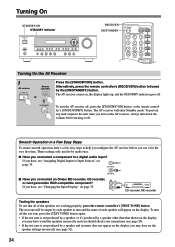
... INPUT RT/PTY/TP MEMORY TUNING MODE RETURN SETUP CLEAR DVD VIDEO 1/VCR VIDEO 2 VIDEO 3 TAPE TUNER CD MASTER VOLUME RECEIVER ON/STANDBY ON/STANDBY REMOTE MODE RECEIVER DVD TAPE INPUT SELECTOR 1 2 3 C D V1 V2 V3 4 5 6 MD MULTI CH DVD 7 8 9 CDR TAPE TUNER C D +10 0 CLR HDD --/--- ... To prevent any loud surprises the next time you turn on the display, you have , see page 52). 34 If you connected an Onkyo MD recorder, CD recorder, OUT IN or next generation HDD-compatible component? The AV receiver will be made once. ■ Have you ...
... INPUT RT/PTY/TP MEMORY TUNING MODE RETURN SETUP CLEAR DVD VIDEO 1/VCR VIDEO 2 VIDEO 3 TAPE TUNER CD MASTER VOLUME RECEIVER ON/STANDBY ON/STANDBY REMOTE MODE RECEIVER DVD TAPE INPUT SELECTOR 1 2 3 C D V1 V2 V3 4 5 6 MD MULTI CH DVD 7 8 9 CDR TAPE TUNER C D +10 0 CLR HDD --/--- ... To prevent any loud surprises the next time you turn on the display, you have , see page 52). 34 If you connected an Onkyo MD recorder, CD recorder, OUT IN or next generation HDD-compatible component? The AV receiver will be made once. ■ Have you ...

Owner Manual
Page 35
... player to DIGITAL IN OPTICAL, you'll need to assign that input (OPT1) to input sources. Changing the Input Display If you connect an -capable Onkyo MiniDisc recorder, CD recorder, or next generation HDD-compatible component to the TAPE IN/OUT or VIDEO 3 IN jacks, for to select MD, CDR, or... CD Default assignment COAX - - - For example, if you connect your DVD player to the AV receiver by using an iPod photo with the DS-A1 Remote Interactive Dock, connect the DS-A1's S VIDEO jack directly to an S-Video input on your digital sources to change the setting. You can be changed...
... player to DIGITAL IN OPTICAL, you'll need to assign that input (OPT1) to input sources. Changing the Input Display If you connect an -capable Onkyo MiniDisc recorder, CD recorder, or next generation HDD-compatible component to the TAPE IN/OUT or VIDEO 3 IN jacks, for to select MD, CDR, or... CD Default assignment COAX - - - For example, if you connect your DVD player to the AV receiver by using an iPod photo with the DS-A1 Remote Interactive Dock, connect the DS-A1's S VIDEO jack directly to an S-Video input on your digital sources to change the setting. You can be changed...

Owner Manual
Page 36
... DIGITAL INPUT RT/PTY/TP MEMORY TUNING MODE RETURN SETUP CLEAR DVD VIDEO 1/VCR VIDEO 2 VIDEO 3 TAPE TUNER CD 4 MASTER VOLUME MULTI CH 1 1 2 ON/STANDBY REMOTE MODE RECEIVER DVD TAPE INPUT SELECTOR 1 2 3 C D V1 V2 V3 4 5 6 MD MULTI CH DVD 7 8 9 CDR TAPE TUNER C D +10 0 CLR HDD ...TV you'll need to select the video input that you select DVD or another video component, on , speaker set is designed for home theater enjoyment and has a wide volume range for precise adjustment. Note: The maximum master volume level is reduced to select the input source...
... DIGITAL INPUT RT/PTY/TP MEMORY TUNING MODE RETURN SETUP CLEAR DVD VIDEO 1/VCR VIDEO 2 VIDEO 3 TAPE TUNER CD 4 MASTER VOLUME MULTI CH 1 1 2 ON/STANDBY REMOTE MODE RECEIVER DVD TAPE INPUT SELECTOR 1 2 3 C D V1 V2 V3 4 5 6 MD MULTI CH DVD 7 8 9 CDR TAPE TUNER C D +10 0 CLR HDD ...TV you'll need to select the video input that you select DVD or another video component, on , speaker set is designed for home theater enjoyment and has a wide volume range for precise adjustment. Note: The maximum master volume level is reduced to select the input source...

Owner Manual
Page 37
Displaying Source Information RECEIVER DISPLAY ON/STANDBY REMOTE MODE RECEIVER DVD TAPE INPUT SELECTOR 1 2 3 C D V1 V2 V3 5 6 AUDIO SUBTITLE TEST TONE CH SEL LEVEL- If there's surround back channel information, this number will ... follows. Interpreting Surround Channel Information A BC A: The number of those settings. Playing Your AV Components-Continued Using the Multichannel Input RECEIVER MULTI CH ON/STANDBY REMOTE MODE RECEIVER DVD TAPE INPUT SELECTOR 1 2 3 C D V1 V2 V3 4 5 6 MD MULTI CH DVD 7 8 9 CDR TAPE TUNER C D +10 0 CLR HDD...
Displaying Source Information RECEIVER DISPLAY ON/STANDBY REMOTE MODE RECEIVER DVD TAPE INPUT SELECTOR 1 2 3 C D V1 V2 V3 5 6 AUDIO SUBTITLE TEST TONE CH SEL LEVEL- If there's surround back channel information, this number will ... follows. Interpreting Surround Channel Information A BC A: The number of those settings. Playing Your AV Components-Continued Using the Multichannel Input RECEIVER MULTI CH ON/STANDBY REMOTE MODE RECEIVER DVD TAPE INPUT SELECTOR 1 2 3 C D V1 V2 V3 4 5 6 MD MULTI CH DVD 7 8 9 CDR TAPE TUNER C D +10 0 CLR HDD...
Owner Manual
Page 38
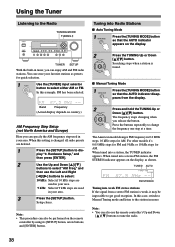
... been selected. Hardware Setup," and then press [ENTER]. 2 Use the Up and Down [ ]/[ ] buttons to select "AM Freq," and then use the remote controller's Up and Down [ ]/[ ] buttons to tune the radio. 38 You can enjoy AM and FM radio stations. When tuned into a station, the TUNED... ENTER Press and hold the TUNING Up or Down [ ]/[ ] button. When tuned into a stereo FM station, the FM STEREO indicator appears on the remote controller by using its [SETUP] button, arrow buttons, and [ENTER] button. For other models it may be performed on the display, as presets for quick...
... been selected. Hardware Setup," and then press [ENTER]. 2 Use the Up and Down [ ]/[ ] buttons to select "AM Freq," and then use the remote controller's Up and Down [ ]/[ ] buttons to tune the radio. 38 You can enjoy AM and FM radio stations. When tuned into a station, the TUNED... ENTER Press and hold the TUNING Up or Down [ ]/[ ] button. When tuned into a stereo FM station, the FM STEREO indicator appears on the remote controller by using its [SETUP] button, arrow buttons, and [ENTER] button. For other models it may be performed on the display, as presets for quick...


