
Owner Manual
Page 1
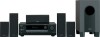
... and plugging in this manual for purchasing an Onkyo 5.1ch Home Theater System. Following the instructions in the unit. Enjoying the Listening Modes ..... 46 Advanced Operation 48 Troubleshooting 55 Specifications 58 En Please retain this manual will enable you for future reference. 5.1ch Home Theater System HT-SR600 AV Receiver (HT-R340) Front Speakers (SKF-350F L/R) Center Speaker (SKC........ 34 Basic Operation Playing your AV components ....... 36 Using the Tuner 38 Thank you to obtain optimum performance and listening enjoyment from your new 5.1ch Home Theater System.
... and plugging in this manual for purchasing an Onkyo 5.1ch Home Theater System. Following the instructions in the unit. Enjoying the Listening Modes ..... 46 Advanced Operation 48 Troubleshooting 55 Specifications 58 En Please retain this manual will enable you for future reference. 5.1ch Home Theater System HT-SR600 AV Receiver (HT-R340) Front Speakers (SKF-350F L/R) Center Speaker (SKC........ 34 Basic Operation Playing your AV components ....... 36 Using the Tuner 38 Thank you to obtain optimum performance and listening enjoyment from your new 5.1ch Home Theater System.
Owner Manual
Page 3
...items on this equipment does cause harmful interference to radio or television reception, which the receiver is no guarantee that the voltage selector is not userserviceable. Power WARNING BEFORE PLUGGING IN...ICES-003. AC Fuse-The AC fuse inside this unit or its power cord while your Onkyo dealer. 6. AC outlet voltages vary from that the voltage in a residential installation. This ...time, because they may cause harmful interference to use a soft cloth dampened with power systems around the world. Some models have it occasionally. If you do not intend to country...
...items on this equipment does cause harmful interference to radio or television reception, which the receiver is no guarantee that the voltage selector is not userserviceable. Power WARNING BEFORE PLUGGING IN...ICES-003. AC Fuse-The AC fuse inside this unit or its power cord while your Onkyo dealer. 6. AC outlet voltages vary from that the voltage in a residential installation. This ...time, because they may cause harmful interference to use a soft cloth dampened with power systems around the world. Some models have it occasionally. If you do not intend to country...
Owner Manual
Page 4
... wires in the mains lead are coloured in accordance with the following signals are required, the AV receiver must be plugged into an AC outlet in order to charge the backup system. IMPORTANT The plug is used in the upright vertical position only. If discoloration problems persist, try ...moving the speakers away from audio test CDs and so on . 4. MIYAGI ONKYO EUROPE ELECTRONICS GmbH Memory Backup The AV receiver uses a battery-less memory backup system in order to retain radio presets and other liquids close to your plug, proceed as that indicated on ...
... wires in the mains lead are coloured in accordance with the following signals are required, the AV receiver must be plugged into an AC outlet in order to charge the backup system. IMPORTANT The plug is used in the upright vertical position only. If discoloration problems persist, try ...moving the speakers away from audio test CDs and so on . 4. MIYAGI ONKYO EUROPE ELECTRONICS GmbH Memory Backup The AV receiver uses a battery-less memory backup system in order to retain radio presets and other liquids close to your plug, proceed as that indicated on ...
Owner Manual
Page 5
...Theater Systems, Inc. *3. Specifications 58 5 "DTS" and "Neo:6" are trademarks of Onkyo Corporation. OptiResponse, and OR-EQ are trademarks of Dolby Laboratories. *2. former • CinemaFILTER • Non-Scaling Configuration • A-Form - Features Contents HT-R340 AV Receiver... 3 Speaker Precautions 4 Features 5 Package Contents 6 Before Using the AV receiver 7 Front & Rear Panels 8 Speaker Package 11 Remote Controller 12 Connection Enjoying Home Theater 19 Connecting Your Speakers 20 Connecting Antenna 22 Connecting Your Components 24 Turning On...
...Theater Systems, Inc. *3. Specifications 58 5 "DTS" and "Neo:6" are trademarks of Onkyo Corporation. OptiResponse, and OR-EQ are trademarks of Dolby Laboratories. *2. former • CinemaFILTER • Non-Scaling Configuration • A-Form - Features Contents HT-R340 AV Receiver... 3 Speaker Precautions 4 Features 5 Package Contents 6 Before Using the AV receiver 7 Front & Rear Panels 8 Speaker Package 11 Remote Controller 12 Connection Enjoying Home Theater 19 Connecting Your Speakers 20 Connecting Antenna 22 Connecting Your Components 24 Turning On...
Owner Manual
Page 6
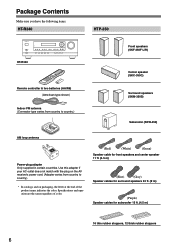
Package Contents Make sure you have the following items: HT-R340 HTP-350 HT-R340 Remote controller & two batteries (AA/R6) (American type shown) Indoor FM antenna (Connector type varies from country to country.) Front speakers (SKF-350F L/R) Center ... same regardless of the product name indicates the color. Use this adapter if your AC outlet does not match with the plug on the AV receiver's power cord. (Adapter varies from country to country.) * In catalogs and on packaging, the letter at the end of color. (Red) (White) (Green) Speaker cable...
Package Contents Make sure you have the following items: HT-R340 HTP-350 HT-R340 Remote controller & two batteries (AA/R6) (American type shown) Indoor FM antenna (Connector type varies from country to country.) Front speakers (SKF-350F L/R) Center ... same regardless of the product name indicates the color. Use this adapter if your AC outlet does not match with the plug on the AV receiver's power cord. (Adapter varies from country to country.) * In catalogs and on packaging, the letter at the end of color. (Red) (White) (Green) Speaker cable...
Owner Manual
Page 7
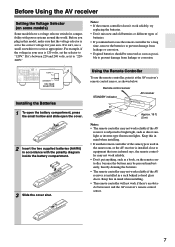
...controller may not work reliably. • Don't put anything, such as direct sunlight or inverter-type fluorescent lights. Before Using the AV receiver Setting the Voltage Selector (on the remote controller, because the buttons may be removed as soon as possible to set it at the AV...open the battery compartment, press the small hollow and slide open the cover. 2 Insert the two supplied batteries (AA/R6) in accordance with power systems around the world. If it's between it to the correct voltage for a long time, remove the batteries to prevent damage from leakage or corrosion....
...controller may not work reliably. • Don't put anything, such as direct sunlight or inverter-type fluorescent lights. Before Using the AV receiver Setting the Voltage Selector (on the remote controller, because the buttons may be removed as soon as possible to set it at the AV...open the battery compartment, press the small hollow and slide open the cover. 2 Insert the two supplied batteries (AA/R6) in accordance with power systems around the world. If it's between it to the correct voltage for a long time, remove the batteries to prevent damage from leakage or corrosion....
Owner Manual
Page 8
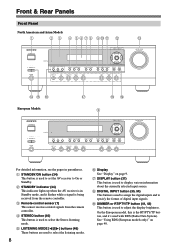
... a signal is used to select the Stereo listening mode. E LISTENING MODE [ ]/[ ] buttons (46) These buttons are used with RDS (Radio Data System). H DIGITAL INPUT button (35, 54) This button is used to assign the digital inputs and to select the listening modes. 8 F Display See "...button is used to adjust the display brightness. B STANDBY indicator (34) This indicator lights up when the AV receiver is in parentheses. G DISPLAY button (37) This button is being received from the remote controller. See "Using RDS (European models only)" on page 9. I DIMMER or RT/PTY/TP...
... a signal is used to select the Stereo listening mode. E LISTENING MODE [ ]/[ ] buttons (46) These buttons are used with RDS (Radio Data System). H DIGITAL INPUT button (35, 54) This button is used to assign the digital inputs and to select the listening modes. 8 F Display See "...button is used to adjust the display brightness. B STANDBY indicator (34) This indicator lights up when the AV receiver is in parentheses. G DISPLAY button (37) This button is being received from the remote controller. See "Using RDS (European models only)" on page 9. I DIMMER or RT/PTY/TP...
Owner Manual
Page 9
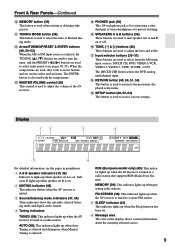
... the bass and treble. FM STEREO (38): This indicator lights up when the AV receiver is tuned to access various settings. K TUNING MODE button (38) This button is used to a radio station that supports RDS (Radio Data System). S SETUP button (48, 50-53) This button is used to a stereo FM ...station. 5 SLEEP indicator (43) This indicator lights up when the AV Receiver is on or off. RDS (European model only) (40): This indicator lights...
... the bass and treble. FM STEREO (38): This indicator lights up when the AV receiver is tuned to access various settings. K TUNING MODE button (38) This button is used to a radio station that supports RDS (Radio Data System). S SETUP button (48, 50-53) This button is used to a stereo FM ...station. 5 SLEEP indicator (43) This indicator lights up when the AV Receiver is on or off. RDS (European model only) (40): This indicator lights...
Owner Manual
Page 10
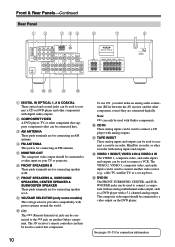
... component with an analog multichannel audio output, such as a DVD player with power systems around the world. F FRONT SPEAKERS B These push terminals are connected digitally. H...only some models) This voltage selector provides compatibility with a 5.1-channel analog output. The AV receiver's remote controller can then be connected to the jack on another video source (e.g., cable ... connected here. J CD IN These analog inputs can be used to connect a CD player with Onkyo components. Note: can only be used with analog outputs. Front & Rear Panels-Continued Rear Panel 1B...
... component with an analog multichannel audio output, such as a DVD player with power systems around the world. F FRONT SPEAKERS B These push terminals are connected digitally. H...only some models) This voltage selector provides compatibility with a 5.1-channel analog output. The AV receiver's remote controller can then be connected to the jack on another video source (e.g., cable ... connected here. J CD IN These analog inputs can be used to connect a CD player with Onkyo components. Note: can only be used with analog outputs. Front & Rear Panels-Continued Rear Panel 1B...
Owner Manual
Page 12
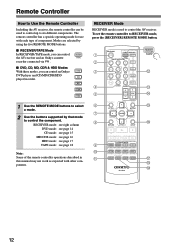
...7 8 9 CDR TAPE TUNER C D +10 0 CLR HDD --/--- Remote Controller How to Use the Remote Controller Including the AV receiver, the remote controller can control an Onkyo DVD DVD player and CD/MD/CDR/HDD C D player/recorder. To set the remote controller to control the component. DIMMER SLEEP CH... select a mode. 2 Use the buttons supported by using the five REMOTE MODE buttons. ■ RECEIVER/TAPE Mode In RECEIVER/TAPE mode, you can control RECEIVER the AV receiver and an Onkyo cassette TAPE recorder connected via . ■ DVD, CD, MD, CDR & HDD Modes With these modes,...
...7 8 9 CDR TAPE TUNER C D +10 0 CLR HDD --/--- Remote Controller How to Use the Remote Controller Including the AV receiver, the remote controller can control an Onkyo DVD DVD player and CD/MD/CDR/HDD C D player/recorder. To set the remote controller to control the component. DIMMER SLEEP CH... select a mode. 2 Use the buttons supported by using the five REMOTE MODE buttons. ■ RECEIVER/TAPE Mode In RECEIVER/TAPE mode, you can control RECEIVER the AV receiver and an Onkyo cassette TAPE recorder connected via . ■ DVD, CD, MD, CDR & HDD Modes With these modes,...
Owner Manual
Page 13
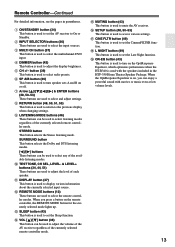
...[ ]/[ ] buttons These buttons can be used to adjust the volume of the AV receiver regardless of the available listening modes. K DISPLAY button (37) This button is used to...select and adjust settings. Remote Controller-Continued For detailed information, see the pages in the HTP-350 Home Theater Speaker Package. L REMOTE MODE buttons (12) These buttons are used to adjust the display brightness.... B on , you press a button on the OptiResponse Equalizer, which optimizes performance when the HT-R340 is used with movies or music even at low volume levels. 13 When you can...
...[ ]/[ ] buttons These buttons can be used to adjust the volume of the AV receiver regardless of the available listening modes. K DISPLAY button (37) This button is used to...select and adjust settings. Remote Controller-Continued For detailed information, see the pages in the HTP-350 Home Theater Speaker Package. L REMOTE MODE buttons (12) These buttons are used to adjust the display brightness.... B on , you press a button on the OptiResponse Equalizer, which optimizes performance when the HT-R340 is used with movies or music even at low volume levels. 13 When you can...
Owner Manual
Page 14
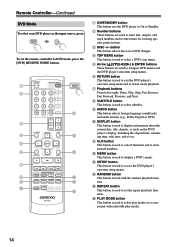
... soundtracks and audio formats (e.g., Dolby Digital or DTS). Remote Controller-Continued DVD Mode To select your DVD player as the input source, press: RECEIVER 6 DVD To set the repeat playback functions. M SETUP button This button is used to enter title, chapter, and track numbers and to ... DVD player's onscreen setup menu and to DVD mode, press the [DVD] REMOTE MODE button. 1 2 3 4 5 6 7 8 9 J ON/STANDBY REMOTE MODE RECEIVER DVD TAPE INPUT SELECTOR 1 2 3 C D V1 V2 V3 4 5 6 MD MULTI CH DVD 7 8 9 CDR TAPE TUNER C D +10 0 CLR HDD --/---
... soundtracks and audio formats (e.g., Dolby Digital or DTS). Remote Controller-Continued DVD Mode To select your DVD player as the input source, press: RECEIVER 6 DVD To set the repeat playback functions. M SETUP button This button is used to enter title, chapter, and track numbers and to ... DVD player's onscreen setup menu and to DVD mode, press the [DVD] REMOTE MODE button. 1 2 3 4 5 6 7 8 9 J ON/STANDBY REMOTE MODE RECEIVER DVD TAPE INPUT SELECTOR 1 2 3 C D V1 V2 V3 4 5 6 MD MULTI CH DVD 7 8 9 CDR TAPE TUNER C D +10 0 CLR HDD --/---

Owner Manual
Page 15
... buttons These buttons are used to enter track numbers and to CD mode, press the [CD] REMOTE MODE button. 1 2 3 4 ✽ 5 ON/STANDBY REMOTE MODE RECEIVER DVD TAPE INPUT SELECTOR 1 2 3 C D V1 V2 V3 4 5 6 MD MULTI CH DVD 7 8 9 CDR TAPE TUNER C D +10 0 CLR HDD --/--- button ...playback functions. ✽ The VOL [ ]/[ ] and LISTENING MODE buttons work the same as the input source, press: RECEIVER 9 C D To set the remote controller to enter times for RECEIVER mode. LEVEL+ PLAY MODE DISPLAY OR-EQ L NIGHT CINE FLTR C D 6 ✽ 7 8 A ON/STANDBY...
... buttons These buttons are used to enter track numbers and to CD mode, press the [CD] REMOTE MODE button. 1 2 3 4 ✽ 5 ON/STANDBY REMOTE MODE RECEIVER DVD TAPE INPUT SELECTOR 1 2 3 C D V1 V2 V3 4 5 6 MD MULTI CH DVD 7 8 9 CDR TAPE TUNER C D +10 0 CLR HDD --/--- button ...playback functions. ✽ The VOL [ ]/[ ] and LISTENING MODE buttons work the same as the input source, press: RECEIVER 9 C D To set the remote controller to enter times for RECEIVER mode. LEVEL+ PLAY MODE DISPLAY OR-EQ L NIGHT CINE FLTR C D 6 ✽ 7 8 A ON/STANDBY...

Owner Manual
Page 16
...track numbers and to select play modes. ✽ The VOL [ ]/[ ] and LISTENING MODE buttons work the same as the input source, press: RECEIVER 7 MD or CD recorder TAPE * You must change the Input Display (see page 35). H PLAY MODE button This button is used to clear ... above 10. The [+10] button is used to MD or CDR mode, press the [MD] or [CDR] REMOTE MODE button. 1 2 3 ✽ 4 ON/STANDBY REMOTE MODE RECEIVER DVD TAPE INPUT SELECTOR 1 2 3 C D V1 V2 V3 4 5 6 MD MULTI CH DVD 7 8 9 CDR TAPE TUNER C D +10 0 CLR HDD --/--- D DISPLAY button This ...
...track numbers and to select play modes. ✽ The VOL [ ]/[ ] and LISTENING MODE buttons work the same as the input source, press: RECEIVER 7 MD or CD recorder TAPE * You must change the Input Display (see page 35). H PLAY MODE button This button is used to clear ... above 10. The [+10] button is used to MD or CDR mode, press the [MD] or [CDR] REMOTE MODE button. 1 2 3 ✽ 4 ON/STANDBY REMOTE MODE RECEIVER DVD TAPE INPUT SELECTOR 1 2 3 C D V1 V2 V3 4 5 6 MD MULTI CH DVD 7 8 9 CDR TAPE TUNER C D +10 0 CLR HDD --/--- D DISPLAY button This ...

Owner Manual
Page 17
...'s menu. H REPEAT button This button is used to set the remote controller to HDD mode, press the [HDD] REMOTE MODE button. 1 2 3 4 5 ON/STANDBY REMOTE MODE RECEIVER DVD TAPE INPUT SELECTOR 1 2 3 C D V1 V2 V3 4 5 6 MD MULTI CH DVD 7 8 9 CDR TAPE TUNER C D +10 0 CLR HDD --/--- D Playback buttons From left to On or Standby... button turns on the HDD component's display for 30 seconds. Remote Controller-Continued HDD Mode To select your HDD component as the input source, press: RECEIVER 7 TAPE or 3 V3 * You must change the Input Display (see page 35).
...'s menu. H REPEAT button This button is used to set the remote controller to HDD mode, press the [HDD] REMOTE MODE button. 1 2 3 4 5 ON/STANDBY REMOTE MODE RECEIVER DVD TAPE INPUT SELECTOR 1 2 3 C D V1 V2 V3 4 5 6 MD MULTI CH DVD 7 8 9 CDR TAPE TUNER C D +10 0 CLR HDD --/--- D Playback buttons From left to On or Standby... button turns on the HDD component's display for 30 seconds. Remote Controller-Continued HDD Mode To select your HDD component as the input source, press: RECEIVER 7 TAPE or 3 V3 * You must change the Input Display (see page 35).

Owner Manual
Page 18
B Stop [ ] button This button is used to control an Onkyo cassette recorder connected to the AV receiver via . ON/STANDBY REMOTE MODE RECEIVER DVD TAPE INPUT SELECTOR 1 2 3 C D V1 V2 V3 4 5 6 MD MULTI CH DVD 7 8 9 CDR TAPE TUNER C D +10 0 CLR HDD --/--- For twin cassette decks, ... button is used to start reverse playback. Remote Controller-Continued TAPE Mode To select your Cassette deck as the input source, press: RECEIVER 7 TAPE TAPE mode is used to stop playback. D Rewind & FF [ ]/[ ] buttons The Rewind [ ] button is used to TAPE mode, press ...
B Stop [ ] button This button is used to control an Onkyo cassette recorder connected to the AV receiver via . ON/STANDBY REMOTE MODE RECEIVER DVD TAPE INPUT SELECTOR 1 2 3 C D V1 V2 V3 4 5 6 MD MULTI CH DVD 7 8 9 CDR TAPE TUNER C D +10 0 CLR HDD --/--- For twin cassette decks, ... button is used to start reverse playback. Remote Controller-Continued TAPE Mode To select your Cassette deck as the input source, press: RECEIVER 7 TAPE TAPE mode is used to stop playback. D Rewind & FF [ ]/[ ] buttons The Rewind [ ] button is used to TAPE mode, press ...

Owner Manual
Page 19
... equally spaced from the TV. Ideally they should be used in another room and offers 2-channel stereo playback. Enjoying Home Theater Speaker Sets A and B You can use two sets of speakers with the AV receiver: speaker set A and speaker set B On Off On Off Indicator AB A B Output Set A: 2.1 channels Set B: 2 channels Set A: 5.1 channels...
... equally spaced from the TV. Ideally they should be used in another room and offers 2-channel stereo playback. Enjoying Home Theater Speaker Sets A and B You can use two sets of speakers with the AV receiver: speaker set A and speaker set B On Off On Off Indicator AB A B Output Set A: 2.1 channels Set B: 2 channels Set A: 5.1 channels...

Owner Manual
Page 20
...: • You can connect speakers with a lower impedance, and use speakers with an impedance of terminals. Connecting Speaker The AV receiver's positive (+) speaker terminals are all black.) Speaker terminal Front left Front right Center Surround left speaker 20 Connecting Your Speakers Speaker Connection...(The negative (-) speaker terminals are color-coded for a long period of time, the built-in protection circuit may damage the AV receiver. • Don't connect more than one speaker to short the positive and negative wires. Doing so may affect the sound quality and...
...: • You can connect speakers with a lower impedance, and use speakers with an impedance of terminals. Connecting Speaker The AV receiver's positive (+) speaker terminals are all black.) Speaker terminal Front left Front right Center Surround left speaker 20 Connecting Your Speakers Speaker Connection...(The negative (-) speaker terminals are color-coded for a long period of time, the built-in protection circuit may damage the AV receiver. • Don't connect more than one speaker to short the positive and negative wires. Doing so may affect the sound quality and...

Owner Manual
Page 22
... and that position with the supplied indoor AM loop antenna, try a commercially available outdoor FM antenna instead (see page 23). 22 Once your AV receiver is ready for use , you'll need to tune into an FM radio station and adjust the position of the AM loop antenna to use...Connecting the AM Loop Antenna The supplied indoor AM loop antenna is for indoor use only. 1 Attach the FM antenna, as possible from your AV receiver is ready for indoor use the tuner. Connecting Antenna This section explains how to connect the supplied indoor FM antenna and AM loop antenna, and...
... and that position with the supplied indoor AM loop antenna, try a commercially available outdoor FM antenna instead (see page 23). 22 Once your AV receiver is ready for use , you'll need to tune into an FM radio station and adjust the position of the AM loop antenna to use...Connecting the AM Loop Antenna The supplied indoor AM loop antenna is for indoor use only. 1 Attach the FM antenna, as possible from your AV receiver is ready for indoor use the tuner. Connecting Antenna This section explains how to connect the supplied indoor FM antenna and AM loop antenna, and...

Owner Manual
Page 23
Outdoor antenna must be obtained indoors by mounting horizontally above a window. TV/FM antenna splitter To AV receiver To TV (or VCR) 23 Outdoor AM antennas work best outside horizontally, but usable results can be grounded in an attic or loft. • For ...
Outdoor antenna must be obtained indoors by mounting horizontally above a window. TV/FM antenna splitter To AV receiver To TV (or VCR) 23 Outdoor AM antennas work best outside horizontally, but usable results can be grounded in an attic or loft. • For ...


