Owner Manual
Page 1
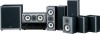
7.1ch THX Certified Digital Surround Receiver and Speaker Package HT-S990THX AV Receiver (HT-R940) Front Speakers (SKF-940F) Center Speaker (SKC-940C) Surround Speakers (SKM-940S) Surround Back Speakers (SKB-940) Powered Subwoofer (SKW-940) Instruction ... Radio 39 Thank you to obtain optimum performance and listening enjoyment from your new 7.1ch THX Certified Digital Surround Receiver and Speaker Package. Please read this manual for purchasing an Onkyo 7.1ch THX Certified Digital Surround Receiver and Speaker Package. Please retain this manual thoroughly before ...
7.1ch THX Certified Digital Surround Receiver and Speaker Package HT-S990THX AV Receiver (HT-R940) Front Speakers (SKF-940F) Center Speaker (SKC-940C) Surround Speakers (SKM-940S) Surround Back Speakers (SKB-940) Powered Subwoofer (SKW-940) Instruction ... Radio 39 Thank you to obtain optimum performance and listening enjoyment from your new 7.1ch THX Certified Digital Surround Receiver and Speaker Package. Please read this manual for purchasing an Onkyo 7.1ch THX Certified Digital Surround Receiver and Speaker Package. Please retain this manual thoroughly before ...

Owner Manual
Page 2
Clean only with the manufacturer's instructions. 8. Install in the literature accompanying the appliance. Damage Requiring Service Unplug the apparatus from the wall outlet and refer servicing to qualified service personnel. If the apparatus does not operate normally by the operating instructions as power-supply cord or plug is adequate ventilation. Don't put candles or other apparatus (including amplifiers) that there is damaged, liquid has been spilled or objects have fallen into your safety. Important Safety Instructions 1. Heed all servicing ...
Clean only with the manufacturer's instructions. 8. Install in the literature accompanying the appliance. Damage Requiring Service Unplug the apparatus from the wall outlet and refer servicing to qualified service personnel. If the apparatus does not operate normally by the operating instructions as power-supply cord or plug is adequate ventilation. Don't put candles or other apparatus (including amplifiers) that there is damaged, liquid has been spilled or objects have fallen into your safety. Important Safety Instructions 1. Heed all servicing ...

Owner Manual
Page 3
... the [STANDBY/ON] button to provide reasonable protection against harmful interference in your area meets the voltage requirements printed on the unit, contact your Onkyo dealer. 6. This is connected. • Consult the dealer or an experienced radio/TV tech- If this unit, have it was when you... do not use the unit for a Class B digital device, pursuant to correct the interference by your Onkyo dealer. 3. For models having a power cord with a weak solution of the copyright holder. 2. AC outlet voltages vary from the AC outlet. 5....
... the [STANDBY/ON] button to provide reasonable protection against harmful interference in your area meets the voltage requirements printed on the unit, contact your Onkyo dealer. 6. This is connected. • Consult the dealer or an experienced radio/TV tech- If this unit, have it was when you... do not use the unit for a Class B digital device, pursuant to correct the interference by your Onkyo dealer. 3. For models having a power cord with a weak solution of the copyright holder. 2. AC outlet voltages vary from the AC outlet. 5....
Owner Manual
Page 4
... with the following signals are free from audio test CDs and so on uneven or unstable surfaces, where they may occur. MIYAGI ONKYO EUROPE ELECTRONICS GmbH This product incorporates copyright protection technology that 's too close to the speakers. Reverse engineering or disassembly is prohibited. ... musical instrument, and so on sturdy, flat surfaces that discoloration can handle the specified input power when used for home and other intellectual property rights. Thumps and clicks caused by an oscillator, elec- necting audio cables (Always turn off your TV or...
... with the following signals are free from audio test CDs and so on uneven or unstable surfaces, where they may occur. MIYAGI ONKYO EUROPE ELECTRONICS GmbH This product incorporates copyright protection technology that 's too close to the speakers. Reverse engineering or disassembly is prohibited. ... musical instrument, and so on sturdy, flat surfaces that discoloration can handle the specified input power when used for home and other intellectual property rights. Thumps and clicks caused by an oscillator, elec- necting audio cables (Always turn off your TV or...
Owner Manual
Page 5
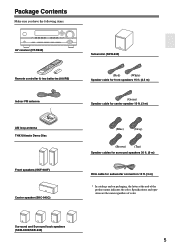
...name indicates the color. Surround and Surround back speakers (SKM-940S/SKB-940) 5 Package Contents Make sure you have the following items: AV receiver (HT-R940) Remote controller & two batteries (AA/R6) Indoor FM antenna Subwoofer (SKW-940) (Red) (White) Speaker cable for front speakers 15 ft.... (4.5 m) (Green) Speaker cable for center speaker 10 ft. (3 m) AM loop antenna THX Ultimate Demo Disc Front speakers (SKF-940F) Center speaker (SKC-940C) (Blue) (Gray) (Brown) (Tan) Speaker cables for surround speakers 30 ft. (9 ...
...name indicates the color. Surround and Surround back speakers (SKM-940S/SKB-940) 5 Package Contents Make sure you have the following items: AV receiver (HT-R940) Remote controller & two batteries (AA/R6) Indoor FM antenna Subwoofer (SKW-940) (Red) (White) Speaker cable for front speakers 15 ft.... (4.5 m) (Green) Speaker cable for center speaker 10 ft. (3 m) AM loop antenna THX Ultimate Demo Disc Front speakers (SKF-940F) Center speaker (SKC-940C) (Blue) (Gray) (Brown) (Tan) Speaker cables for surround speakers 30 ft. (9 ...
Owner Manual
Page 6
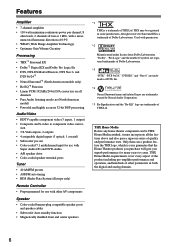
... and analog domain. 6 All rights reserved. Surround EX is a trademark of THX Ltd. THX Home Media Before any home theater component can a product feature the THX logo, which is a trademark of quality and performance tests. THX Home Media requirements cover every aspect of the product including pre-amplifier performance...; Color-coded speaker terminal posts Tuner • 40 AM/FM presets • AM/FM auto tuning • RDS (Radio Data System) (Europe only) Remote Controller • Preprogrammed for use with permission. *2 Manufactured under license from Dolby Laboratories.
... and analog domain. 6 All rights reserved. Surround EX is a trademark of THX Ltd. THX Home Media Before any home theater component can a product feature the THX logo, which is a trademark of quality and performance tests. THX Home Media requirements cover every aspect of the product including pre-amplifier performance...; Color-coded speaker terminal posts Tuner • 40 AM/FM presets • AM/FM auto tuning • RDS (Radio Data System) (Europe only) Remote Controller • Preprogrammed for use with permission. *2 Manufactured under license from Dolby Laboratories.
Owner Manual
Page 7
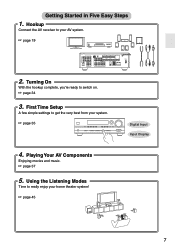
Using the Listening Modes Time to get the very best from your home theater system! ☞ page 45 7 Getting Started in Five Easy Steps 1. Turning On With the hookup complete, you're ready to your AV system. ☞ page 19 DIGITAL IN COA XIAL OPTICAL 1 COMPONENT VIDEO IN 3 IN 2 IN 1 OUT Y...SPEAKERS B L R AV RECEIVER AC OUTLET AC 120V 60Hz SWITCHED 120W 1A MAX. 2. First Time Setup A few simple settings to really enjoy your system. ☞ page 35 Digital Input Input Display 4. Playing Your AV Components Enjoying movies and music. ☞ page 37 5. Hookup Connect the AV...
Using the Listening Modes Time to get the very best from your home theater system! ☞ page 45 7 Getting Started in Five Easy Steps 1. Turning On With the hookup complete, you're ready to your AV system. ☞ page 19 DIGITAL IN COA XIAL OPTICAL 1 COMPONENT VIDEO IN 3 IN 2 IN 1 OUT Y...SPEAKERS B L R AV RECEIVER AC OUTLET AC 120V 60Hz SWITCHED 120W 1A MAX. 2. First Time Setup A few simple settings to really enjoy your system. ☞ page 35 Digital Input Input Display 4. Playing Your AV Components Enjoying movies and music. ☞ page 37 5. Hookup Connect the AV...
Owner Manual
Page 8
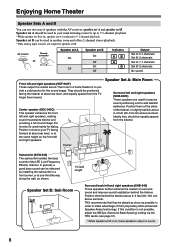
... your TV facing forward at about ear level, and equally spaced from the listener. THX recommends that they should be obtained by speaker set A is reduced to provide a solid anchor for dialog. Enjoying Home Theater Speaker Sets A and B You can use two sets of speakers with the AV receiver...A B Remote controller or Speaker set A On Off Speaker set B. For movies it close as possible in a home theater is not possible, adjust the SB Spc (Surround Back Spacing) setting via the THX Audio (see page 51). * While speaker set B can be used in a front corner, or at the same...
... your TV facing forward at about ear level, and equally spaced from the listener. THX recommends that they should be obtained by speaker set A is reduced to provide a solid anchor for dialog. Enjoying Home Theater Speaker Sets A and B You can use two sets of speakers with the AV receiver...A B Remote controller or Speaker set A On Off Speaker set B. For movies it close as possible in a home theater is not possible, adjust the SB Spc (Surround Back Spacing) setting via the THX Audio (see page 51). * While speaker set B can be used in a front corner, or at the same...
Owner Manual
Page 9
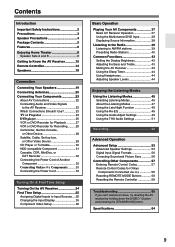
... Safety Instructions 2 Precautions 3 Speaker Precautions 4 Package Contents 5 Features 6 Enjoying Home Theater 8 Speaker Sets A and B 8 Getting to Know the AV Receiver 10 ...Function 49 Using the Re-EQ 49 Using the Audio Adjust Settings 49 Using the THX Audio Settings 51 Recording 52 Advanced Operation Advanced Setup 53 Advanced Speaker Settings 53 Digital... Sync 56 Controlling Other Components 57 Entering Remote Control Codes 57 Remote Control Codes for Onkyo Components Connected via 58 Resetting REMOTE MODE Buttons 58 Resetting the Remote Controller 58 Troubleshooting ...
... Safety Instructions 2 Precautions 3 Speaker Precautions 4 Package Contents 5 Features 6 Enjoying Home Theater 8 Speaker Sets A and B 8 Getting to Know the AV Receiver 10 ...Function 49 Using the Re-EQ 49 Using the Audio Adjust Settings 49 Using the THX Audio Settings 51 Recording 52 Advanced Operation Advanced Setup 53 Advanced Speaker Settings 53 Digital... Sync 56 Controlling Other Components 57 Entering Remote Control Codes 57 Remote Control Codes for Onkyo Components Connected via 58 Resetting REMOTE MODE Buttons 58 Resetting the Remote Controller 58 Troubleshooting ...

Owner Manual
Page 10
...6 7 STANDBY/ON STANDBY PHONES TUNING PRESET MULTI CH DVD VIDEO 1 VIDEO 2 VIDEO 3 TAPE TUNER C D ENTER RETURN SETUP SPEAKERS A B VCR TONE THX LISTENING MODE DIGITAL DISPLAY INPUT TUNING DIMMER MEMORY MODE CLEAR MASTER VOLUME VIDEO 3 INPUT VIDEO L AUDIO R 8 9 J K L MN OPQ R S ... AUDIO PHONES TUNING PRESET MULTI CH DVD VIDEO 1 VIDEO 2 VIDEO 3 TAPE TUNER C D ENTER RETURN SETUP SPEAKERS A B VCR TONE THX LISTENING MODE DIGITAL DISPLAY INPUT TUNING RT/RTY/TP MEMORY MODE CLEAR MASTER VOLUME VIDEO 3 INPUT VIDEO L AUDIO R U For detailed information,...
...6 7 STANDBY/ON STANDBY PHONES TUNING PRESET MULTI CH DVD VIDEO 1 VIDEO 2 VIDEO 3 TAPE TUNER C D ENTER RETURN SETUP SPEAKERS A B VCR TONE THX LISTENING MODE DIGITAL DISPLAY INPUT TUNING DIMMER MEMORY MODE CLEAR MASTER VOLUME VIDEO 3 INPUT VIDEO L AUDIO R 8 9 J K L MN OPQ R S ... AUDIO PHONES TUNING PRESET MULTI CH DVD VIDEO 1 VIDEO 2 VIDEO 3 TAPE TUNER C D ENTER RETURN SETUP SPEAKERS A B VCR TONE THX LISTENING MODE DIGITAL DISPLAY INPUT TUNING RT/RTY/TP MEMORY MODE CLEAR MASTER VOLUME VIDEO 3 INPUT VIDEO L AUDIO R U For detailed information,...
Owner Manual
Page 11
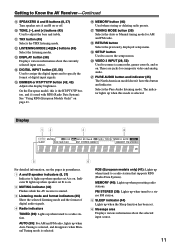
...) Selects the THX listening mode. On the European model, this button and indicator. R RETURN button Selects ...Displays various information about the selected input source. 11 S SETUP button Used to a radio station that supports RDS (Radio Data System). U PURE AUDIO button and indicator (45) The North American model doesn't have this is the RT/PTY/TP button, and... it's used with RDS (Radio Data System). RDS (European models only) (41): Lights up when Auto Tuning is selected, and disappears when Manual Tuning mode ...
...) Selects the THX listening mode. On the European model, this button and indicator. R RETURN button Selects ...Displays various information about the selected input source. 11 S SETUP button Used to a radio station that supports RDS (Radio Data System). U PURE AUDIO button and indicator (45) The North American model doesn't have this is the RT/PTY/TP button, and... it's used with RDS (Radio Data System). RDS (European models only) (41): Lights up when Auto Tuning is selected, and disappears when Manual Tuning mode ...

Owner Manual
Page 12
... used to connect another video source (e.g., cable/satellite receiver, set B. G REMOTE CONTROL This Remote Interactive jack can be used to supply power to another -capable Onkyo com- E MONITOR OUT The S-Video or composite video output should be connected here. N AC OUTLET This switched AC outlet can be connected to a video input...
... used to connect another video source (e.g., cable/satellite receiver, set B. G REMOTE CONTROL This Remote Interactive jack can be used to supply power to another -capable Onkyo com- E MONITOR OUT The S-Video or composite video output should be connected here. N AC OUTLET This switched AC outlet can be connected to a video input...

Owner Manual
Page 13
Remote Controller Installing the Batteries 1 To open the battery compartment, press the small hollow and slide open the cover. Notes: • If the remote controller doesn't work reliably if the AV receiver is subjected to bright light, such as possible to prevent damage from leakage or corrosion. • Expired batteries should be pressed continuously, thereby draining the batteries. • The remote controller may not work reliably, try replacing the batteries. • Don't mix new and old batteries or different types of the remote controller, such as shown below. Remote...
Remote Controller Installing the Batteries 1 To open the battery compartment, press the small hollow and slide open the cover. Notes: • If the remote controller doesn't work reliably if the AV receiver is subjected to bright light, such as possible to prevent damage from leakage or corrosion. • Expired batteries should be pressed continuously, thereby draining the batteries. • The remote controller may not work reliably, try replacing the batteries. • Don't mix new and old batteries or different types of the remote controller, such as shown below. Remote...

Owner Manual
Page 14
...AV receiver, the remote controller can be used to select a mode. By entering the appropriate remote control code, you can control Onkyo components or components made by using the six REMOTE MODE buttons. ■ RECEIVER/TAPE Mode In RECEIVER/TAPE mode, you can ...control RECEIVER the AV receiver and an Onkyo cassette TAPE recorder connected via . 1 2 3 1 4 2 5 36 7 4 8 9 J ON/STANDBY REMOTE MODE RECEIVER DVD TAPE INPUT SELECTOR 1 2 3 V1 V2 V3 M D/CDR C D HDD 4 5 6 ...
...AV receiver, the remote controller can be used to select a mode. By entering the appropriate remote control code, you can control Onkyo components or components made by using the six REMOTE MODE buttons. ■ RECEIVER/TAPE Mode In RECEIVER/TAPE mode, you can ...control RECEIVER the AV receiver and an Onkyo cassette TAPE recorder connected via . 1 2 3 1 4 2 5 36 7 4 8 9 J ON/STANDBY REMOTE MODE RECEIVER DVD TAPE INPUT SELECTOR 1 2 3 V1 V2 V3 M D/CDR C D HDD 4 5 6 ...

Owner Manual
Page 15
E SP A/B button (8, 37) Used to select the available listening modes. STEREO button Selects the Stereo listening mode. L SLEEP button (44) Used with the Re-EQ function. Q L NIGHT button (49) Used with the Late Night function. ■ Buttons used when the TAPE input is selected To select the Tuner (AM/FM) as the input source, press: RECEIVER 7 TAPE 4 Playback buttons On twin cassette decks, only deck B can be controlled. C MULTI CH button (38) Selects the multichannel DVD input. G RETURN button Selects the previously displayed setup menu. SURROUND button Selects the ...
E SP A/B button (8, 37) Used to select the available listening modes. STEREO button Selects the Stereo listening mode. L SLEEP button (44) Used with the Re-EQ function. Q L NIGHT button (49) Used with the Late Night function. ■ Buttons used when the TAPE input is selected To select the Tuner (AM/FM) as the input source, press: RECEIVER 7 TAPE 4 Playback buttons On twin cassette decks, only deck B can be controlled. C MULTI CH button (38) Selects the multichannel DVD input. G RETURN button Selects the previously displayed setup menu. SURROUND button Selects the ...

Owner Manual
Page 16
... or Standby. LEVEL+ PLAY MODE DISPLAY L NIGHT VCR DVD Re-EQ HDD RC-650M DVD K L M N O P Q A ON/STANDBY button Sets the DVD player to control an Onkyo DVD player.
... or Standby. LEVEL+ PLAY MODE DISPLAY L NIGHT VCR DVD Re-EQ HDD RC-650M DVD K L M N O P Q A ON/STANDBY button Sets the DVD player to control an Onkyo DVD player.

Owner Manual
Page 17
.../HDD Mode By default, the remote controller is set to navigate menus on an HDD-compatible component. D Arrow [ ]/[ ] and ENTER buttons Used to control an Onkyo CD player. G CLR button Cancels functions and clears entered numbers on an HDDcompatible component. I PLAYLIST [ ]/[ ] buttons Selects the previous or next playlist on a CD player...
.../HDD Mode By default, the remote controller is set to navigate menus on an HDD-compatible component. D Arrow [ ]/[ ] and ENTER buttons Used to control an Onkyo CD player. G CLR button Cancels functions and clears entered numbers on an HDDcompatible component. I PLAYLIST [ ]/[ ] buttons Selects the previous or next playlist on a CD player...

Owner Manual
Page 18
When there's no input signal for a while, the SKW-940 automatically enters Standby mode. D POWER switch (Not North American model) (34) Press this switch to the ON position to remove the bottom of the grille. 2. If the Auto Standby function does not work reliably, try slightly increasing or decreasing the subwoofer output level on when the input signal exceeds a certain level. While holding the bottom edge of the subwoofer. Removal Replacement 18 C LINE INPUT (19) This RCA input should be connected to turn on the AV receiver with your both hands, pull it gently toward you to ...
When there's no input signal for a while, the SKW-940 automatically enters Standby mode. D POWER switch (Not North American model) (34) Press this switch to the ON position to remove the bottom of the grille. 2. If the Auto Standby function does not work reliably, try slightly increasing or decreasing the subwoofer output level on when the input signal exceeds a certain level. While holding the bottom edge of the subwoofer. Removal Replacement 18 C LINE INPUT (19) This RCA input should be connected to turn on the AV receiver with your both hands, pull it gently toward you to ...

Owner Manual
Page 19
Doing so may be activated. • Disconnect the power cord from the ends of identification. (The negative (-) speaker terminals are all the way. If you use the amplifier at high volume levels for ease of the speaker cables, and twist the bare wires tightly, as shown, then tighten the binding posts. 3 Using the supplied RCA cable, connect the AV receiver's SUBWOOFER PRE OUT to the corresponding speaker terminal. Screw the terminal tight. 2 On the speakers, loosen the binding posts. Fully insert the bare wires. Connecting Speaker Set B (sold ...
Doing so may be activated. • Disconnect the power cord from the ends of identification. (The negative (-) speaker terminals are all the way. If you use the amplifier at high volume levels for ease of the speaker cables, and twist the bare wires tightly, as shown, then tighten the binding posts. 3 Using the supplied RCA cable, connect the AV receiver's SUBWOOFER PRE OUT to the corresponding speaker terminal. Screw the terminal tight. 2 On the speakers, loosen the binding posts. Fully insert the bare wires. Connecting Speaker Set B (sold ...

Owner Manual
Page 20
Connecting the Indoor FM Antenna The supplied indoor FM antenna is for indoor use only. 1 Attach the FM antenna, as shown. ■ American Model Connecting the AM Loop Antenna The supplied indoor AM loop antenna is ready for use only. 1 Assemble the AM loop antenna, inserting the tabs into an AM radio station and adjust the position of the AM antenna to achieve the best possible reception. If you 'll need to tune into an FM radio station and adjust the position of the AM loop antenna to fix the FM antenna into the jack. Insert the plug fully into the jack. ■ ...
Connecting the Indoor FM Antenna The supplied indoor FM antenna is for indoor use only. 1 Attach the FM antenna, as shown. ■ American Model Connecting the AM Loop Antenna The supplied indoor AM loop antenna is ready for use only. 1 Assemble the AM loop antenna, inserting the tabs into an AM radio station and adjust the position of the AM antenna to achieve the best possible reception. If you 'll need to tune into an FM radio station and adjust the position of the AM loop antenna to fix the FM antenna into the jack. Insert the plug fully into the jack. ■ ...
