
Owner Manual
Page 1
Contents Introduction 2 Connection 15 Turning On & First Time Setup .....37 Basic Operations 50 Using the Listening Modes ........59 Advanced Setup 66 Zone 2 82 Controlling Other Components ....86 Others 97 En Following the instructions in the unit. Please retain this manual will enable you for future reference. AV Receiver HT-RC160 Instruction Manual Thank you to obtain optimum performance and listening enjoyment from your new AV Receiver. Please read this manual thoroughly before making connections and plugging in this manual for purchasing an Onkyo AV Receiver.
Contents Introduction 2 Connection 15 Turning On & First Time Setup .....37 Basic Operations 50 Using the Listening Modes ........59 Advanced Setup 66 Zone 2 82 Controlling Other Components ....86 Others 97 En Following the instructions in the unit. Please retain this manual will enable you for future reference. AV Receiver HT-RC160 Instruction Manual Thank you to obtain optimum performance and listening enjoyment from your new AV Receiver. Please read this manual thoroughly before making connections and plugging in this manual for purchasing an Onkyo AV Receiver.

Owner Manual
Page 4
... the color. Supplied Accessories Make sure you have the following accessories: Remote controller & two batteries (AA/R6) Speaker setup microphone Indoor FM antenna AM loop antenna Speaker cable labels (not supplied with the HT-S7200 Home Theater System.) * In catalogs and on packaging, the letter at the end of color. 4 1 2 3 FRONT LEFT FRONT...
... the color. Supplied Accessories Make sure you have the following accessories: Remote controller & two batteries (AA/R6) Speaker setup microphone Indoor FM antenna AM loop antenna Speaker cable labels (not supplied with the HT-S7200 Home Theater System.) * In catalogs and on packaging, the letter at the end of color. 4 1 2 3 FRONT LEFT FRONT...

Owner Manual
Page 5
...Dock with the Universal Port connector ... 35 Connecting Onkyo V Components 36 Connecting the Power Cord 36 Turning On & First Time Setup Turning On the AV Receiver 37 Turning On and Standby 37 First Time Setup 38 Using the Onscreen Setup Menus 38 Using the Display to change the settings... Modes 59 Listening Modes Available for Each Source Format 60 About the Listening Modes 64 Advanced Setup Advanced Setup 66 Onscreen Setup Menus 66 Common Procedures in Setup Menu 67 Speaker Setup 67 Audio Adjust 70 Using the Audio Settings 72 Assigning Listening Modes to Input Sources....... 74...
...Dock with the Universal Port connector ... 35 Connecting Onkyo V Components 36 Connecting the Power Cord 36 Turning On & First Time Setup Turning On the AV Receiver 37 Turning On and Standby 37 First Time Setup 38 Using the Onscreen Setup Menus 38 Using the Display to change the settings... Modes 59 Listening Modes Available for Each Source Format 60 About the Listening Modes 64 Advanced Setup Advanced Setup 66 Onscreen Setup Menus 66 Common Procedures in Setup Menu 67 Speaker Setup 67 Audio Adjust 70 Using the Audio Settings 72 Assigning Listening Modes to Input Sources....... 74...
Owner Manual
Page 8
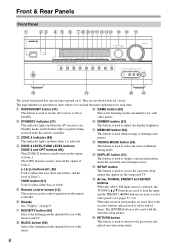
... you can find the main explanation for clarity. The [OFF] button is used to adjust the tone (bass and treble), and the level of Zone 2. O SETUP button This button is used to select the Auto or Manual tuning mode. Front & Rear Panels Front Panel B C D E F G HI J K L M NO P Q R S... remote controller. N DISPLAY button (51) This button is used to set items. The [ENTER] button is used to the previously displayed onscreen setup menu. 8 Q RETURN button This button is selected, the TUNING [R]/[X] buttons are used to select either bass or treble. The page numbers in...
... you can find the main explanation for clarity. The [OFF] button is used to adjust the tone (bass and treble), and the level of Zone 2. O SETUP button This button is used to select the Auto or Manual tuning mode. Front & Rear Panels Front Panel B C D E F G HI J K L M NO P Q R S... remote controller. N DISPLAY button (51) This button is used to set items. The [ENTER] button is used to the previously displayed onscreen setup menu. 8 Q RETURN button This button is selected, the TUNING [R]/[X] buttons are used to select either bass or treble. The page numbers in...

Owner Manual
Page 9
.... F Message area Displays various information. Lights up when tuned to connect a portable Audio Player. V SETUP MIC jack (46) The Audyssey 2EQ™ Room Correction and Speaker Setup microphone connects here. C MUTING indicator (52) Flashes while the AV receiver is selected. TUNED (53):...) These buttons are jacks for AM or FM radio. H Audyssey indicator (45, 69) Flashes during Audyssey 2EQ™ Room Correction and Speaker Setup. Front & Rear Panels-Continued R MASTER VOLUME control (50) This control is used to a stereo FM station. E Tuning indicators (53) ...
.... F Message area Displays various information. Lights up when tuned to connect a portable Audio Player. V SETUP MIC jack (46) The Audyssey 2EQ™ Room Correction and Speaker Setup microphone connects here. C MUTING indicator (52) Flashes while the AV receiver is selected. TUNED (53):...) These buttons are jacks for AM or FM radio. H Audyssey indicator (45, 69) Flashes during Audyssey 2EQ™ Room Correction and Speaker Setup. Front & Rear Panels-Continued R MASTER VOLUME control (50) This control is used to a stereo FM station. E Tuning indicators (53) ...

Owner Manual
Page 10
...'s remote controller can assign each one to an input selector to a video input on another Onkyo AV component. They're assignable, which means you can then be used to suit your setup. C DIGITAL IN OPTICAL 1 and 2 These optical digital audio inputs are for connecting components ...IN 1-5 and OUT HDMI (High Definition Multimedia Interface) connections carry digital audio and digital video. See "Speaker Settings" on page 18". See "Component Video Setup" on page 39. H MONITOR OUT V The composite video jack should be used with an HDMI input. J FRONT L/R, CENTER, SURR L/R, and SURR ...
...'s remote controller can assign each one to an input selector to a video input on another Onkyo AV component. They're assignable, which means you can then be used to suit your setup. C DIGITAL IN OPTICAL 1 and 2 These optical digital audio inputs are for connecting components ...IN 1-5 and OUT HDMI (High Definition Multimedia Interface) connections carry digital audio and digital video. See "Speaker Settings" on page 18". See "Component Video Setup" on page 39. H MONITOR OUT V The composite video jack should be used with an HDMI input. J FRONT L/R, CENTER, SURR L/R, and SURR ...

Owner Manual
Page 13
... when changing settings. B C 1D E F 2G H3 I MUTING button (52) Mutes or unmutes the AV receiver. M AUDIO button (72) Used to change audio settings. Note: An Onkyo cassette recorder connected via V can select a preset directly. See page 88 for more details. N SLEEP button (52) Used with the Sleep function. ■ Controlling the... (80) Used to change video settings. Remote Controller-Continued Controlling the AV Receiver To control the AV receiver, press the [RECEIVER] button to change settings. E SETUP button Used to select Receiver mode.
... when changing settings. B C 1D E F 2G H3 I MUTING button (52) Mutes or unmutes the AV receiver. M AUDIO button (72) Used to change audio settings. Note: An Onkyo cassette recorder connected via V can select a preset directly. See page 88 for more details. N SLEEP button (52) Used with the Sleep function. ■ Controlling the... (80) Used to change video settings. Remote Controller-Continued Controlling the AV Receiver To control the AV receiver, press the [RECEIVER] button to change settings. E SETUP button Used to select Receiver mode.
Owner Manual
Page 23
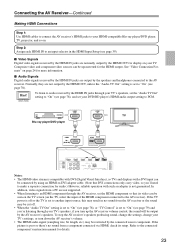
... there's no sound from a component connected via HDMI, check its video can be restricted by using an HDMI-to-DVI adapter cable. (Note that its setup. To stop the AV receiver's speakers producing sound, change the settings, change your TV's settings, or turn up the AV receiver volume control, the sound... the AV receiver). If the TV power is off or the TV is set to another input source, this may result in the HDMI Input Setup (see page 39). ■ Video Signals Digital video signals received by the HDMI IN jacks are not output by the HDMI OUT for audio.) However...
... there's no sound from a component connected via HDMI, check its video can be restricted by using an HDMI-to-DVI adapter cable. (Note that its setup. To stop the AV receiver's speakers producing sound, change the settings, change your TV's settings, or turn up the AV receiver volume control, the sound... the AV receiver). If the TV power is off or the TV is set to another input source, this may result in the HDMI Input Setup (see page 39). ■ Video Signals Digital video signals received by the HDMI IN jacks are not output by the HDMI OUT for audio.) However...

Owner Manual
Page 25
The onscreen setup menus appear only on a TV that the AV receiver does not convert digital Analog Optical Coaxial IN HDMI input signals for component video only, regardless ...
The onscreen setup menus appear only on a TV that the AV receiver does not convert digital Analog Optical Coaxial IN HDMI input signals for component video only, regardless ...

Owner Manual
Page 26
... is connected to the HDMI OUT. Hint! Step 1: Video Connection Choose a video connection that matches your TV ( a , b , or c ), and then make the connection. The onscreen setup menus appear only on page 22 for HDMI connection information. If your TV has no audio outputs, connect an audio output from your VCR or...
... is connected to the HDMI OUT. Hint! Step 1: Video Connection Choose a video connection that matches your TV ( a , b , or c ), and then make the connection. The onscreen setup menus appear only on page 22 for HDMI connection information. If your TV has no audio outputs, connect an audio output from your VCR or...
Owner Manual
Page 37
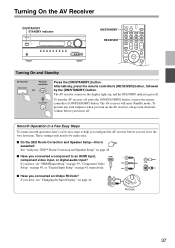
...HDMI component video input, or digital audio input? If you connected a component to be made once. ■ Do the 2EQ Room Correction and Speaker Setup-this is essential! If you have , see "Changing the Input Display" on the AV receiver, always turn down the volume before you use it ... in a Few Easy Steps To ensure smooth operation, here's a few easy steps to help you configure the AV receiver before you connected an Onkyo RI Dock? The AV receiver will enter Standby mode. Turning On the AV Receiver ON/STANDBY STANDBY indicator ON/STANDBY RECEIVER Turning On and Standby...
...HDMI component video input, or digital audio input? If you connected a component to be made once. ■ Do the 2EQ Room Correction and Speaker Setup-this is essential! If you have , see "Changing the Input Display" on the AV receiver, always turn down the volume before you use it ... in a Few Easy Steps To ensure smooth operation, here's a few easy steps to help you configure the AV receiver before you connected an Onkyo RI Dock? The AV receiver will enter Standby mode. Turning On the AV Receiver ON/STANDBY STANDBY indicator ON/STANDBY RECEIVER Turning On and Standby...

Owner Manual
Page 38
... the AV receiver for the AV receiver by the [SETUP] button. Speaker Setup 3. Audio Adjust 4. tons to the previous menu. Onscreen Setup Menus and Display As each item in the Display. 38 Onscreen Setup Menus Menu 1. The onscreen setup menus appear only on a TV that are displayed on... appears. Press the [RETURN] button to return to select main menu item and then press [ENTER]. Miscellaneous 7. Hardware Setup 8. Remote Controller Setup 9. Using the Display to change the settings RECEIVER The settings of the AV receiver can be displayed under the screen. ...
... the AV receiver for the AV receiver by the [SETUP] button. Speaker Setup 3. Audio Adjust 4. tons to the previous menu. Onscreen Setup Menus and Display As each item in the Display. 38 Onscreen Setup Menus Menu 1. The onscreen setup menus appear only on a TV that are displayed on... appears. Press the [RETURN] button to return to select main menu item and then press [ENTER]. Miscellaneous 7. Hardware Setup 8. Remote Controller Setup 9. Using the Display to change the settings RECEIVER The settings of the AV receiver can be displayed under the screen. ...

Owner Manual
Page 39
... component video sources from the HDMI OUT is not guaranteed. • This procedure can set this for more than one configured in "Component Video Setup" (see page 79). tons to assign HDMI1 - Input Assign 1. The "HDMI Input" menu appears. 1-1. HDMI5 have already been assigned, you...output signal from the HDMI OUT. Otherwise, appropriate CEC (Consumer Electronics Control) operation is the one input selector. First Time Setup-Continued Video Input Setup HDMI Input Setup If you connect a video component to HDMI IN, you must assign that input to the AV receiver with the HDMI ...
... component video sources from the HDMI OUT is not guaranteed. • This procedure can set this for more than one configured in "Component Video Setup" (see page 79). tons to assign HDMI1 - Input Assign 1. The "HDMI Input" menu appears. 1-1. HDMI5 have already been assigned, you...output signal from the HDMI OUT. Otherwise, appropriate CEC (Consumer Electronics Control) operation is the one input selector. First Time Setup-Continued Video Input Setup HDMI Input Setup If you connect a video component to HDMI IN, you must assign that input to the AV receiver with the HDMI ...

Owner Manual
Page 40
... main menu appears onscreen. Digital Audio Input 4 Use the Up and Down [R]/[X] but - NENT VIDEO IN 1. The setup menu closes. First Time Setup-Continued Component Video Setup If you connect to a COMPONENT VIDEO IN, you must assign it to the DVD/BD input selector. The "Input ... 1 Press the [RECEIVER] button fol- Input Assign 1. tons to select "1. NENT VIDEO IN 2. - - - - -: Select if you are using its [SETUP] button, arrow buttons, and [ENTER] button. 3 Use the Up and Down [R]/[X] but- IN2 40 tons to select "2. Component Video Input", and then press ...
... main menu appears onscreen. Digital Audio Input 4 Use the Up and Down [R]/[X] but - NENT VIDEO IN 1. The setup menu closes. First Time Setup-Continued Component Video Setup If you connect to a COMPONENT VIDEO IN, you must assign it to the DVD/BD input selector. The "Input ... 1 Press the [RECEIVER] button fol- Input Assign 1. tons to select "1. NENT VIDEO IN 2. - - - - -: Select if you are using its [SETUP] button, arrow buttons, and [ENTER] button. 3 Use the Up and Down [R]/[X] but- IN2 40 tons to select "2. Component Video Input", and then press ...
Owner Manual
Page 41
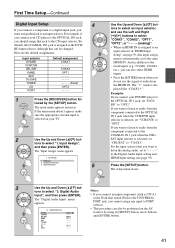
... AUX TV/TAPE TUNER CD PORT Default assignment COAX1 ----COAX2 OPT1 Fixed) OPT2 ----- 1 Press the [RECEIVER] button fol- lowed by using its [SETUP] button, arrow buttons, and [ENTER] button. 41 Input Assign", and then press [ENTER]. Digital Audio Input 5 Use the Up and Down [R]/[X]... buttons to select an input selector, and use the signal of audio from the HDMI IN. Press the [SETUP] button. The setup menu closes. 3 Use the Up and Down [R]/[X] buttons to select "1. COAX 2 OPT 1 OPT 2 - - - - - • This procedure can also select...
... AUX TV/TAPE TUNER CD PORT Default assignment COAX1 ----COAX2 OPT1 Fixed) OPT2 ----- 1 Press the [RECEIVER] button fol- lowed by using its [SETUP] button, arrow buttons, and [ENTER] button. 41 Input Assign", and then press [ENTER]. Digital Audio Input 5 Use the Up and Down [R]/[X]... buttons to select an input selector, and use the signal of audio from the HDMI IN. Press the [SETUP] button. The setup menu closes. 3 Use the Up and Down [R]/[X] buttons to select "1. COAX 2 OPT 1 OPT 2 - - - - - • This procedure can also select...

Owner Manual
Page 42
...ve con- Surr Back: Select this if you've connected your surround back speakers to "Bi-Amp". Speaker Distance 4. Press the [SETUP] button. The setup menu closes. 3 Use the Up and Down [R]/[X] but - The "Speaker Settings" menu appears. Speaker Settings 2. Note: Powered Zone ...2 cannot be performed on page 82. Speaker Settings by the [SETUP] button. The "Speaker Setup" menu appears. 2. Bi-Amp:Select this if you've connected your front speakers for bi-amping, you must run the ...
...ve con- Surr Back: Select this if you've connected your surround back speakers to "Bi-Amp". Speaker Distance 4. Press the [SETUP] button. The setup menu closes. 3 Use the Up and Down [R]/[X] but - The "Speaker Settings" menu appears. Speaker Settings 2. Note: Powered Zone ...2 cannot be performed on page 82. Speaker Settings by the [SETUP] button. The "Speaker Setup" menu appears. 2. Bi-Amp:Select this if you've connected your front speakers for bi-amping, you must run the ...

Owner Manual
Page 43
...main menu doesn't appear, make sure the appropriate external input is changed, all radio presets are used in your TV. 5 Press the [SETUP] button. Hardware Setup 1. tons to work properly, you must specify the FM/AM frequency step used in your area. HDMI 3 Use the Up and Down ...and Down [R]/[X] but - Remote ID 2. Note that when this setting is selected on the AV receiver by the [SETUP] button. Hardware Setup", and then press [ENTER]. The "Hardware Setup" menu appears. 7. tons to select: 200kHz/10kHz: Select if 200 kHz/10 kHz steps are used in your ...
...main menu doesn't appear, make sure the appropriate external input is changed, all radio presets are used in your TV. 5 Press the [SETUP] button. Hardware Setup 1. tons to work properly, you must specify the FM/AM frequency step used in your area. HDMI 3 Use the Up and Down ...and Down [R]/[X] but - Remote ID 2. Note that when this setting is selected on the AV receiver by the [SETUP] button. Hardware Setup", and then press [ENTER]. The "Hardware Setup" menu appears. 7. tons to select: 200kHz/10kHz: Select if 200 kHz/10 kHz steps are used in your ...

Owner Manual
Page 44
... the same time. • Enter the appropriate remote control code before using the AV receiver's remote controller for V to work properly, you connect an V-capable Onkyo RI Dock to the TV/TAPE IN, GAME IN or VCR/DVR IN jacks, for the first time (see page 88). For the TV/TAPE... the [TV/TAPE], [GAME] or [VCR/DVR] input selector button so that "TV/TAPE", "GAME" or "VCR/DVR" appears on the AV receiver. First Time Setup-Continued Changing the Input Display If you must change the setting.
... the same time. • Enter the appropriate remote control code before using the AV receiver's remote controller for V to work properly, you connect an V-capable Onkyo RI Dock to the TV/TAPE IN, GAME IN or VCR/DVR IN jacks, for the first time (see page 88). For the TV/TAPE... the [TV/TAPE], [GAME] or [VCR/DVR] input selector button so that "TV/TAPE", "GAME" or "VCR/DVR" appears on the AV receiver. First Time Setup-Continued Changing the Input Display If you must change the setting.

Owner Manual
Page 45
... combines information from the primary listening position. From the examples below, choose the listening area that all of movies. First Time Setup-Continued Audyssey 2EQ™ Room Correction and Speaker Setup With the supplied calibrated microphone, Audyssey 2EQ automatically determines the number of speakers connected, their size for purposes of bass management...
... combines information from the primary listening position. From the examples below, choose the listening area that all of movies. First Time Setup-Continued Audyssey 2EQ™ Room Correction and Speaker Setup With the supplied calibrated microphone, Audyssey 2EQ automatically determines the number of speakers connected, their size for purposes of bass management...

Owner Manual
Page 46
...2 Surr Back/Front High Normal Not Act Surr Back Enter : Next If you 've finished, press the [ENTER] button. 2EQ: Auto Setup Please place setup microphone at center of a seated listener with the microphone tip pointed directly at the ceiling using a tripod. tion 1 (page 45), and ...connect it will produce innacurate results. Next Notes: • Before starting the room correction and speaker setup, do not stand between the speakers and microphone, and avoid obstacles blocking the path between speakers and microphone. Changes to the HDMI OUT. The...
...2 Surr Back/Front High Normal Not Act Surr Back Enter : Next If you 've finished, press the [ENTER] button. 2EQ: Auto Setup Please place setup microphone at center of a seated listener with the microphone tip pointed directly at the ceiling using a tripod. tion 1 (page 45), and ...connect it will produce innacurate results. Next Notes: • Before starting the room correction and speaker setup, do not stand between the speakers and microphone, and avoid obstacles blocking the path between speakers and microphone. Changes to the HDMI OUT. The...


