
Owner Manual
Page 2
... and refer servicing to persons. Damage Requiring Service Unplug the apparatus from tip-over. 13. If the apparatus does not operate normally by the manufacturer. 12. If the apparatus has been dropped or damaged in a fire or electric shock. Object and Liquid Entry Never push objects of other apparatus (including amplifiers...
... and refer servicing to persons. Damage Requiring Service Unplug the apparatus from tip-over. 13. If the apparatus does not operate normally by the manufacturer. 12. If the apparatus has been dropped or damaged in a fire or electric shock. Object and Liquid Entry Never push objects of other apparatus (including amplifiers...

Owner Manual
Page 5
... Features 6 Multiroom Capability 7 Front & Rear Panels 8 Front Panel 8 Display 9 Rear Panel 10 Remote Controller 12 Installing the Batteries 12 Aiming the Remote Controller 12 Controlling the AV Receiver 13 About Home Theater 14 Enjoying Home Theater 14 Connection Connecting the AV Receiver 15 Connecting ...Preprogrammed Remote Control Codes 86 Looking up for Remote Control Code 86 Entering Remote Control Codes 88 Remote Control Codes for Onkyo Components Connected via V 89 Resetting REMOTE MODE Buttons 89 Resetting the Remote Controller 89 Controlling a TV 90 Controlling a ...
... Features 6 Multiroom Capability 7 Front & Rear Panels 8 Front Panel 8 Display 9 Rear Panel 10 Remote Controller 12 Installing the Batteries 12 Aiming the Remote Controller 12 Controlling the AV Receiver 13 About Home Theater 14 Enjoying Home Theater 14 Connection Connecting the AV Receiver 15 Connecting ...Preprogrammed Remote Control Codes 86 Looking up for Remote Control Code 86 Entering Remote Control Codes 88 Remote Control Codes for Onkyo Components Connected via V 89 Resetting REMOTE MODE Buttons 89 Resetting the Remote Controller 89 Controlling a TV 90 Controlling a ...
Owner Manual
Page 8
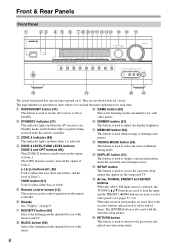
... off the output of Zone 2. [-] & [+] buttons (51, 85) Used to set items. The [ENTER] button is being received from the remote controller. F Remote control sensor (12) This sensor receives control signals from the remote controller. I MUSIC button (59) Selects the listening modes intended for use with video games. P Arrow, TUNING, PRESET...
... off the output of Zone 2. [-] & [+] buttons (51, 85) Used to set items. The [ENTER] button is being received from the remote controller. F Remote control sensor (12) This sensor receives control signals from the remote controller. I MUSIC button (59) Selects the listening modes intended for use with video games. P Arrow, TUNING, PRESET...

Owner Manual
Page 12
... without V connection, point the remote controller at the other component to use it at the AV receiver's remote control sensor. 12 troller, because the buttons may not work reliably if the AV receiver is subjected to use the remote controller, point it . • ...(AA/R6) in mind when installing. • The remote controller will not work reliably if the AV receiver is installed close to operate an Onkyo component with the polarity diagram inside the battery compartment. 3 Replace the cover and push it and the AV receiver's remote con- Remote Controller Installing...
... without V connection, point the remote controller at the other component to use it at the AV receiver's remote control sensor. 12 troller, because the buttons may not work reliably if the AV receiver is subjected to use the remote controller, point it . • ...(AA/R6) in mind when installing. • The remote controller will not work reliably if the AV receiver is installed close to operate an Onkyo component with the polarity diagram inside the battery compartment. 3 Replace the cover and push it and the AV receiver's remote con- Remote Controller Installing...
Owner Manual
Page 16
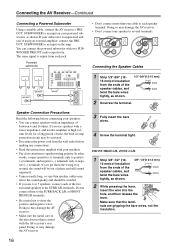
... Make sure that the terminals are gripping the bare wires, not the insulation. FRONT HIGH L/R, ZONE 2 L/R 1 Strip 3/8"-1/2" (10- 3/8"-1/2"(10-12 mm) 12 mm) of insulation from the ends of the speaker cables, and twist the bare wires tightly, as shown. 2 Unscrew the terminal. 3 Fully .... Doing so may damage the AV receiver. • Don't connect one cable to each jack. Connecting the Speaker Cables 1 Strip 1/2"-5/8" (12- 1/2"-5/8"(12-15 mm) 15 mm) of insulation from the ends of the speaker cables, and twist the bare wires tightly, as shown. 2 While pressing...
... Make sure that the terminals are gripping the bare wires, not the insulation. FRONT HIGH L/R, ZONE 2 L/R 1 Strip 3/8"-1/2" (10- 3/8"-1/2"(10-12 mm) 12 mm) of insulation from the ends of the speaker cables, and twist the bare wires tightly, as shown. 2 Unscrew the terminal. 3 Fully .... Doing so may damage the AV receiver. • Don't connect one cable to each jack. Connecting the Speaker Cables 1 Strip 1/2"-5/8" (12- 1/2"-5/8"(12-15 mm) 15 mm) of insulation from the ends of the speaker cables, and twist the bare wires tightly, as shown. 2 While pressing...
Owner Manual
Page 69
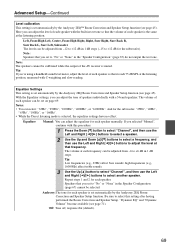
Here you selected "Manual", continue with the built-in the Speaker Configuration (page 67) cannot be adjusted from -12 to +12 dB in 1 dB steps (-15 to adjust the level at each speaker with this setting after having performed the Room Correction and Speaker Setup...another speaker. high frequencies (e.g., 16000Hz) affect treble sounds. 3 Use the Up [R] button to select "Channel", and then use the Left and Right [F]/[S] buttons to +12 dB for the subwoofer). Repeat steps 1 and 2 for each speaker. Be sure to +6 dB in the "Speaker Configuration" (page 67) do not output the ...
Here you selected "Manual", continue with the built-in the Speaker Configuration (page 67) cannot be adjusted from -12 to +12 dB in 1 dB steps (-15 to adjust the level at each speaker with this setting after having performed the Room Correction and Speaker Setup...another speaker. high frequencies (e.g., 16000Hz) affect treble sounds. 3 Use the Up [R] button to select "Channel", and then use the Left and Right [F]/[S] buttons to +12 dB for the subwoofer). Repeat steps 1 and 2 for each speaker. Be sure to +6 dB in the "Speaker Configuration" (page 67) do not output the ...

Owner Manual
Page 73
... remote controller by priority. Cinema Fltr Off: CinemaFILTER off (default). On: CinemaFILTER on . On: Music Optimizer on . Subwfr (Subwoofer) -15 dB to +12 dB (default: 0 dB) Center -12 dB to +12 dB (default: 0 dB) Notes: • You cannot use this function while the AV receiver is stored individually for each input selector. 73...
... remote controller by priority. Cinema Fltr Off: CinemaFILTER off (default). On: CinemaFILTER on . On: Music Optimizer on . Subwfr (Subwoofer) -15 dB to +12 dB (default: 0 dB) Center -12 dB to +12 dB (default: 0 dB) Notes: • You cannot use this function while the AV receiver is stored individually for each input selector. 73...

Owner Manual
Page 75
...The "Source Setup" menu items are out of your TV or display supports HDMI Lip Sync, the displayed delay time will be set from −12 dB to set the input level for each input selector. 1 Press the input selector buttons to increase its input level. If a component is used ...]. 5 Use the Left and Right [F]/[S] buttons to change it 's noticeably quieter, use the Left [F] button to select "4. Use the Left and Right [F]/[S] buttons to +12 dB in 10 millisecond steps. If the main menu doesn't appear, make sure the appropriate external input is enabled (see page 78), and your source...
...The "Source Setup" menu items are out of your TV or display supports HDMI Lip Sync, the displayed delay time will be set from −12 dB to set the input level for each input selector. 1 Press the input selector buttons to increase its input level. If a component is used ...]. 5 Use the Left and Right [F]/[S] buttons to change it 's noticeably quieter, use the Left [F] button to select "4. Use the Left and Right [F]/[S] buttons to +12 dB in 10 millisecond steps. If the main menu doesn't appear, make sure the appropriate external input is enabled (see page 78), and your source...
Owner Manual
Page 77
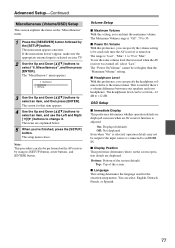
... With this preference, you can specify the volume setting to the main volume. Even when "On" is selected, operation details may not be set from -12 dB to select "6. OSD Setup 3 Use the Up and Down [R]/[X] buttons to 79 or "Max". The "Power On Volume" cannot be output if ...the input source is useful if there's a volume difference between your speakers and your TV. 2 Use the Up and Down [R]/[X] buttons to +12 dB. Off: Not displayed. The items are explained below. 5 When you can specify the headphone volume relative to be used when the AV receiver was...
... With this preference, you can specify the volume setting to the main volume. Even when "On" is selected, operation details may not be set from -12 dB to select "6. OSD Setup 3 Use the Up and Down [R]/[X] buttons to 79 or "Max". The "Power On Volume" cannot be output if ...the input source is useful if there's a volume difference between your speakers and your TV. 2 Use the Up and Down [R]/[X] buttons to +12 dB. Off: Not displayed. The items are explained below. 5 When you can specify the headphone volume relative to be used when the AV receiver was...

Owner Manual
Page 90
... channels on entering a remote control code for TV, you can control your TV's remote con- Q CLR button Cancels functions and clears entered numbers, or enters 12. C TV VOL [R]/[X] button Adjust the TV's volume. F Arrow [R]/[X]/[F]/[S] and ENTER buttons Used to navigate menus and select items. G SETUP button Displays a menu. ent component, see...
... channels on entering a remote control code for TV, you can control your TV's remote con- Q CLR button Cancels functions and clears entered numbers, or enters 12. C TV VOL [R]/[X] button Adjust the TV's volume. F Arrow [R]/[X]/[F]/[S] and ENTER buttons Used to navigate menus and select items. G SETUP button Displays a menu. ent component, see...

Owner Manual
Page 92
...] button works as colored or A, B, C, D buttons. P RETURN button Exits the menu or returns to On or Standby. S CLR button Cancels functions or enters the number 12. Note: With some components, certain buttons may not work as expected, and some may not work at all . In this case, these buttons cannot be...
...] button works as colored or A, B, C, D buttons. P RETURN button Exits the menu or returns to On or Standby. S CLR button Cancels functions or enters the number 12. Note: With some components, certain buttons may not work as expected, and some may not work at all . In this case, these buttons cannot be...

Owner Manual
Page 99
...selected on your iPod's Play button. Be sure to enter the appropriate remote control code first (page 89). • To control an Onkyo component that's not connected via V, or another manufacturer's component, point the remote controller at the AV receiver. The AV receiver's remote ...mode. • When you use the AV receiver's remote controller, point it may not connect properly to the Dock. rect polarity (page 12). • Install new batteries. Troubleshooting-Continued There's no picture from a source connected to an HDMI IN • Reliable operation with colored-...
...selected on your iPod's Play button. Be sure to enter the appropriate remote control code first (page 89). • To control an Onkyo component that's not connected via V, or another manufacturer's component, point the remote controller at the AV receiver. The AV receiver's remote ...mode. • When you use the AV receiver's remote controller, point it may not connect properly to the Dock. rect polarity (page 12). • Install new batteries. Troubleshooting-Continued There's no picture from a source connected to an HDMI IN • Reliable operation with colored-...

Owner Manual
Page 101
... Channel 40 General Power Supply AC 120 V, 60 Hz Power Consumption 5.5 A Dimensions (W × H × D) 435 × 176 × 329 mm (17-1/8" × 6-15/16" × 12-15/16") Weight 10.8 kg (23.8 lbs.) ■ Video Inputs HDMI Component Composite IN 1, IN 2, IN 3, IN 4, IN 5 IN 1, IN 2 DVD/BD, VCR/DVR, CBL...
... Channel 40 General Power Supply AC 120 V, 60 Hz Power Consumption 5.5 A Dimensions (W × H × D) 435 × 176 × 329 mm (17-1/8" × 6-15/16" × 12-15/16") Weight 10.8 kg (23.8 lbs.) ■ Video Inputs HDMI Component Composite IN 1, IN 2, IN 3, IN 4, IN 5 IN 1, IN 2 DVD/BD, VCR/DVR, CBL...

Owner Manual
Page 104
... Tel: +49-8142-4401-0 Fax: +49-8142-4401-555 http://www.eu.onkyo.com/ ONKYO EUROPE UK Office Suite 1, Gregories Court, Gregories Road, Beaconsfield, Buckinghamshire, HP9 1HQ UNITED KINGDOM Tel: +44-(0)1494-681515 Fax: +44(0)-1494-680452 ONKYO CHINA LIMITED Unit 1&12, 9/F, Ever Gain PlazaTower 1, 88, Container Port Road, Kwai Chung, N.T., HONG KONG Tel...
... Tel: +49-8142-4401-0 Fax: +49-8142-4401-555 http://www.eu.onkyo.com/ ONKYO EUROPE UK Office Suite 1, Gregories Court, Gregories Road, Beaconsfield, Buckinghamshire, HP9 1HQ UNITED KINGDOM Tel: +44-(0)1494-681515 Fax: +44(0)-1494-680452 ONKYO CHINA LIMITED Unit 1&12, 9/F, Ever Gain PlazaTower 1, 88, Container Port Road, Kwai Chung, N.T., HONG KONG Tel...

Owner Manual
Page 106
... shock. Heed all warnings. 4. Do not defeat the safety purpose of batteries. 18. The wide blade or the third prong are covered by the manufacturer. 12. REFER SERVICING TO QUALIFIED SERVICE PERSONNEL. WARNING: TO REDUCE THE RISK OF FIRE OR ELECTRIC SHOCK, DO NOT EXPOSE THIS APPARATUS TO RAIN OR MOISTURE...
... shock. Heed all warnings. 4. Do not defeat the safety purpose of batteries. 18. The wide blade or the third prong are covered by the manufacturer. 12. REFER SERVICING TO QUALIFIED SERVICE PERSONNEL. WARNING: TO REDUCE THE RISK OF FIRE OR ELECTRIC SHOCK, DO NOT EXPOSE THIS APPARATUS TO RAIN OR MOISTURE...

Owner Manual
Page 107
AC Fuse-The fuse is located inside the chassis and is used meets the required voltage (AC 120 V, 60 Hz) written on , contact your Onkyo authorized service station. 2. For heavier dirt, dampen a soft cloth in a weak solution of mild detergent and water, wring it out dry, and wipe... The voltage of the area where this unit will be used to know Your Speaker Package 7 Installing & Using Connecting the Speakers 10 Appendix Troubleshooting 12 Specifications 13 Universal Port Option Dock for iPod® Universal Port Option Dock for iPod 14 En-3 For models having a power cord with a ...
AC Fuse-The fuse is located inside the chassis and is used meets the required voltage (AC 120 V, 60 Hz) written on , contact your Onkyo authorized service station. 2. For heavier dirt, dampen a soft cloth in a weak solution of mild detergent and water, wring it out dry, and wipe... The voltage of the area where this unit will be used to know Your Speaker Package 7 Installing & Using Connecting the Speakers 10 Appendix Troubleshooting 12 Specifications 13 Universal Port Option Dock for iPod® Universal Port Option Dock for iPod 14 En-3 For models having a power cord with a ...

Owner Manual
Page 116
... picked up the OUTPUT LEVEL control. Slightly increase the subwoofer pre out output level on your audio system is not set correctly. bass content. En-12 Troubleshooting Symptom Possible cause Remedy There's no sound coming from a TV or other Move the subwoofer and RCA cable away electronic device is not fully...
... picked up the OUTPUT LEVEL control. Slightly increase the subwoofer pre out output level on your audio system is not set correctly. bass content. En-12 Troubleshooting Symptom Possible cause Remedy There's no sound coming from a TV or other Move the subwoofer and RCA cable away electronic device is not fully...