Owner Manual
Page 4
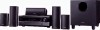
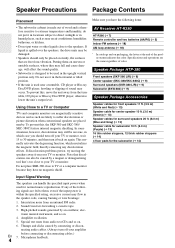
... Signal Warning The speakers can also be an issue, in which neutralizes the magnetic field, thereby removing any of the following items: AV Receiver HT-R380 HT-R380 (➔ 7) Remote controller and two batteries (AA/R6) (➔ 5) Indoor FM antenna (➔ 18) AM loop antenna (➔ 18) * In catalogs and on . 6. Putting them...
... Signal Warning The speakers can also be an issue, in which neutralizes the magnetic field, thereby removing any of the following items: AV Receiver HT-R380 HT-R380 (➔ 7) Remote controller and two batteries (AA/R6) (➔ 5) Indoor FM antenna (➔ 18) AM loop antenna (➔ 18) * In catalogs and on . 6. Putting them...

Owner Manual
Page 5
...Player, or Recorder ... 54 To reset the AV receiver to prevent damage from leakage or corrosion. Using the Remote Controller Contents Installing the Batteries Note • If the remote controller doesn't work reliably, try replacing the batteries. • Don't mix new and old batteries or different ...types of batteries. • If you intend not to use the remote controller, point it on and, while holding down VCR/DVR, press ON/STANDBY (➔ 47). age or corrosion. • Remove expired batteries...
...Player, or Recorder ... 54 To reset the AV receiver to prevent damage from leakage or corrosion. Using the Remote Controller Contents Installing the Batteries Note • If the remote controller doesn't work reliably, try replacing the batteries. • Don't mix new and old batteries or different ...types of batteries. • If you intend not to use the remote controller, point it on and, while holding down VCR/DVR, press ON/STANDBY (➔ 47). age or corrosion. • Remove expired batteries...

Owner Manual
Page 7
B ON/STANDBY button (➔ 20) C STANDBY indicator (➔ 20) D HDMI THRU indicator (➔ 36) E SPEAKERS A and B buttons (➔ 11, 22) F Remote control sensor (➔ 5) G TONE LEVEL and TONE buttons (➔ 39) H Display (➔ 8) I JK LMN O P Q RS Asian models T U V The actual front panel has various logos printed ...
B ON/STANDBY button (➔ 20) C STANDBY indicator (➔ 20) D HDMI THRU indicator (➔ 36) E SPEAKERS A and B buttons (➔ 11, 22) F Remote control sensor (➔ 5) G TONE LEVEL and TONE buttons (➔ 39) H Display (➔ 8) I JK LMN O P Q RS Asian models T U V The actual front panel has various logos printed ...

Owner Manual
Page 8
... SPEAKERS A terminals I J For detailed information, see the pages in parentheses. En 8 Display BC D EF G H I SUBWOOFER terminals J SPEAKERS terminals (SURR, CENTER) K FRONT SPEAKERS B terminals L Power cord M V REMOTE CONTROL jack N Composite video and analog audio jacks (BD/DVD IN, VCR/DVR IN and OUT, CBL/SAT IN, GAME IN, TV/CD IN) See...
... SPEAKERS A terminals I J For detailed information, see the pages in parentheses. En 8 Display BC D EF G H I SUBWOOFER terminals J SPEAKERS terminals (SURR, CENTER) K FRONT SPEAKERS B terminals L Power cord M V REMOTE CONTROL jack N Composite video and analog audio jacks (BD/DVD IN, VCR/DVR IN and OUT, CBL/SAT IN, GAME IN, TV/CD IN) See...

Owner Manual
Page 10
... AM or FM by pressing TUNER repeatedly. See "Entering Remote Control Codes" for more details (➔ 44). E B ON/STANDBY button (➔ 20) L C REMOTE MODE/INPUT SELECTOR buttons (➔ 21, 44 to control D Onkyo Blu-ray Disc/DVD player, CD player, and other ...components. You can also use the remote controller to 45) F D TONE, + and - B Arrow R/X buttons (➔ 23...
... AM or FM by pressing TUNER repeatedly. See "Entering Remote Control Codes" for more details (➔ 44). E B ON/STANDBY button (➔ 20) L C REMOTE MODE/INPUT SELECTOR buttons (➔ 21, 44 to control D Onkyo Blu-ray Disc/DVD player, CD player, and other ...components. You can also use the remote controller to 45) F D TONE, + and - B Arrow R/X buttons (➔ 23...

Owner Manual
Page 18
... antenna as far away as possible from your AV receiver is ready for use the tuner. The other Onkyo components. Refer to V jacks. Push. With V (Remote Interactive), you start playback on and select that you 're using an RI Dock, or cassette tape ...commercially available outdoor FM antenna instead. Step 2: Make the V connection (see illustration below). Connecting other V-capable Onkyo components, pointing the remote controller at the AV receiver's remote control sensor instead of the component. North American models Asian models Caution • Be careful that component as ...
... antenna as far away as possible from your AV receiver is ready for use the tuner. The other Onkyo components. Refer to V jacks. Push. With V (Remote Interactive), you start playback on and select that you 're using an RI Dock, or cassette tape ...commercially available outdoor FM antenna instead. Step 2: Make the V connection (see illustration below). Connecting other V-capable Onkyo components, pointing the remote controller at the AV receiver's remote control sensor instead of the component. North American models Asian models Caution • Be careful that component as ...

Owner Manual
Page 20
Turning Off Press ON/STANDBY on , the display lights, and the STANDBY indicator goes off . The AV receiver comes on the front panel or the remote controller. The AV receiver will enter Standby mode. To prevent any loud surprises when you turn on the remote controller. En 20 or Press RECEIVER followed by ON/STANDBY on the AV receiver, always turn down the volume before you turn it off . Turning On/Off the AV Receiver ON/STANDBY STANDBY indicator ON/STANDBY RECEIVER Front panel Remote controller Turning On Press ON/STANDBY on the front panel.
Turning Off Press ON/STANDBY on , the display lights, and the STANDBY indicator goes off . The AV receiver comes on the front panel or the remote controller. The AV receiver will enter Standby mode. To prevent any loud surprises when you turn on the remote controller. En 20 or Press RECEIVER followed by ON/STANDBY on the AV receiver, always turn down the volume before you turn it off . Turning On/Off the AV Receiver ON/STANDBY STANDBY indicator ON/STANDBY RECEIVER Front panel Remote controller Turning On Press ON/STANDBY on the front panel.

Owner Manual
Page 21
... DIMMER (North American models). If the input signal is PCM, the sampling frequency is displayed. Information is displayed with the remote controller 1 Press RECEIVER followed by the subwoofer volume level. Tip • Alternatively, you can typically be displayed. Playing the...is displayed for more details (➔ 38). Basic Operations This manual describes the procedure using the remote controller unless otherwise specified. The following information can use the remote controller's AUDIO and arrow buttons. • See "Music Optimizer" for about the current input...
... DIMMER (North American models). If the input signal is PCM, the sampling frequency is displayed. Information is displayed with the remote controller 1 Press RECEIVER followed by the subwoofer volume level. Tip • Alternatively, you can typically be displayed. Playing the...is displayed for more details (➔ 38). Basic Operations This manual describes the procedure using the remote controller unless otherwise specified. The following information can use the remote controller's AUDIO and arrow buttons. • See "Music Optimizer" for about the current input...

Owner Manual
Page 22
... down TV/CD, GAME or VCR/DVR (about five seconds, then the previous display reappears. Changing the Input Display When you connect an V-capable Onkyo component, you must configure the input display so that if you can be selected for the TV/CD, GAME or VCR/DVR input selector, but... With the sleep timer, you press SLEEP while the sleep time is connected. → → 2 Press and hold down the volume before using the remote controller for up to change the input display. Press RECEIVER followed by MUTING. Repeat this order: VCR/DVR ↔ DOCK Note • DOCK can set...
... down TV/CD, GAME or VCR/DVR (about five seconds, then the previous display reappears. Changing the Input Display When you connect an V-capable Onkyo component, you must configure the input display so that if you can be selected for the TV/CD, GAME or VCR/DVR input selector, but... With the sleep timer, you press SLEEP while the sleep time is connected. → → 2 Press and hold down the volume before using the remote controller for up to change the input display. Press RECEIVER followed by MUTING. Repeat this order: VCR/DVR ↔ DOCK Note • DOCK can set...

Owner Manual
Page 23
... that the AUTO indicator goes off on the country.) Tuning into AM and FM stations directly by entering the appropriate frequency. 1 On the remote controller, press TUNER repeatedly to get good reception. In this example, FM has been selected. When tuned into stations by D.TUN. (Actual... this case, switch to manual tuning mode and listen to enter the frequency of the radio station. Tip • Alternatively, you can use the remote controller's TUN MODE and arrow buttons. ■ Tuning into a station, the TUNED indicator lights. Listening to change the frequency one step at a...
... that the AUTO indicator goes off on the country.) Tuning into AM and FM stations directly by entering the appropriate frequency. 1 On the remote controller, press TUNER repeatedly to get good reception. In this example, FM has been selected. When tuned into stations by D.TUN. (Actual... this case, switch to manual tuning mode and listen to enter the frequency of the radio station. Tip • Alternatively, you can use the remote controller's TUN MODE and arrow buttons. ■ Tuning into a station, the TUNED indicator lights. Listening to change the frequency one step at a...

Owner Manual
Page 24
...use it these days. This is not a malfunction. • If the signal from an RDS station is flashing (about 8 seconds), use the remote controller's number buttons to an RDS station that broadcast traffic information (➔ 25). Tip • You can also use PRESET F/S to select a...Tune into an RDS station, the RDS indicator lights. Note • The message "Waiting" may be shown on the AV receiver, or the remote controller's CH +/-. Deleting Presets 1 Select the preset that 's broadcasting PS information, the station's name will be displayed when unsupported characters are ...
...use it these days. This is not a malfunction. • If the signal from an RDS station is flashing (about 8 seconds), use the remote controller's number buttons to an RDS station that broadcast traffic information (➔ 25). Tip • You can also use PRESET F/S to select a...Tune into an RDS station, the RDS indicator lights. Note • The message "Waiting" may be shown on the AV receiver, or the remote controller's CH +/-. Deleting Presets 1 Select the preset that 's broadcasting PS information, the station's name will be displayed when unsupported characters are ...
Owner Manual
Page 30
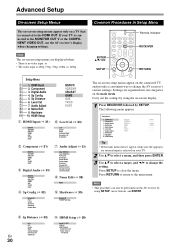
... the on your TV is connected to the HDMI OUT. Audio Adjust I Name Edit (➔ 35) Name J Hardware (➔ 35) Remote ID FM/AM Freq Step The on-screen setup menus appear on the AV receiver by using SETUP, arrow buttons, and ENTER. Audio Adjust ...select a menu, and then press ENTER. 3 Use R/X to select a target, and F/S to change the AV receiver's various settings. Common Procedures in Setup Menu Remote indicator ENTER R/X/F/S SETUP RECEIVER RETURN Setup Menu B 1. Sp Config 5. Hardware 10. Hardware K 10. Advanced Setup On-screen Setup Menus The on-screen setup menus...
... the on your TV is connected to the HDMI OUT. Audio Adjust I Name Edit (➔ 35) Name J Hardware (➔ 35) Remote ID FM/AM Freq Step The on-screen setup menus appear on the AV receiver by using SETUP, arrow buttons, and ENTER. Audio Adjust ...select a menu, and then press ENTER. 3 Use R/X to select a target, and F/S to change the AV receiver's various settings. Common Procedures in Setup Menu Remote indicator ENTER R/X/F/S SETUP RECEIVER RETURN Setup Menu B 1. Sp Config 5. Hardware 10. Hardware K 10. Advanced Setup On-screen Setup Menus The on-screen setup menus...

Owner Manual
Page 35
.... Ideally, the front left and right speakers should be equidistant from the listening position and at any userselected volume setting. The remote indicator flashes twice. Dynamic EQ combines information from "1", to "2" or "3". Dynamic Volume looks at any volume level. Preparation Press...is changed, all radio presets will appear on the display. Hardware Menu Hardware Remote Control Settings ■ Remote ID ` 1, 2, or 3 When several Onkyo components are used in the same room, their remote ID codes may overlap. To differentiate the AV receiver from stereo to surround ...
.... Ideally, the front left and right speakers should be equidistant from the listening position and at any userselected volume setting. The remote indicator flashes twice. Dynamic EQ combines information from "1", to "2" or "3". Dynamic Volume looks at any volume level. Preparation Press...is changed, all radio presets will appear on the display. Hardware Menu Hardware Remote Control Settings ■ Remote ID ` 1, 2, or 3 When several Onkyo components are used in the same room, their remote ID codes may overlap. To differentiate the AV receiver from stereo to surround ...

Owner Manual
Page 36
...: The audio signal from the connected monitor. Note • The "Audio Return Ch" setting can check the amount of delay being powered on) by the remote control of the AV receiver, the name of the Blu-ray Disc/DVD player is displayed on the AV receiver. • Set to "Off" when...
...: The audio signal from the connected monitor. Note • The "Audio Return Ch" setting can check the amount of delay being powered on) by the remote control of the AV receiver, the name of the Blu-ray Disc/DVD player is displayed on the AV receiver. • Set to "Off" when...

Owner Manual
Page 39
... input source. • The setting is stored individually for the input sources that is automatically selected as a priority. ` COAX: This can be performed on the remote controller by delaying the audio signals. ■ A/V Sync `0 ms to PCM or DTS. If both HDMI (HDMI IN) and digital audio inputs (COAXIAL IN or...
... input source. • The setting is stored individually for the input sources that is automatically selected as a priority. ` COAX: This can be performed on the remote controller by delaying the audio signals. ■ A/V Sync `0 ms to PCM or DTS. If both HDMI (HDMI IN) and digital audio inputs (COAXIAL IN or...

Owner Manual
Page 40
En 40 Onkyo Dock " UP-A1 Dock (Universal Port Option Dock) Cable - # RI Dock Analog audio (RCA) Component video Y PB/CB PR/CR Composite video Note Page • .... • See the UP-A1 Dock's instruction manual for more information. • See the RI Dock's instruction manual (➔ 41) for more information. *1 To use V (Remote Interactive), you must make an analog audio connection (RCA) between the AV receiver and the RI Dock. Controlling iPod Connecting an...
En 40 Onkyo Dock " UP-A1 Dock (Universal Port Option Dock) Cable - # RI Dock Analog audio (RCA) Component video Y PB/CB PR/CR Composite video Note Page • .... • See the UP-A1 Dock's instruction manual for more information. • See the RI Dock's instruction manual (➔ 41) for more information. *1 To use V (Remote Interactive), you must make an analog audio connection (RCA) between the AV receiver and the RI Dock. Controlling iPod Connecting an...

Owner Manual
Page 41
...UP-A1 Dock and connected to automatically turn on your iPod and the AV receiver at : http://www.onkyo.com Before using the Onkyo Dock components, update your iPod with the supplied remote controller, you can switch the input source between UP-A1 Dock and the tuner, by mistake. •...AV receiver turns on the Onkyo Dock components, see the instruction manual of the first song. For the latest information on . ■ Using Your iPod models Alarm Clock You can use this function for several seconds to startup, so you use the AV receiver's remote controller to operate your iPod...
...UP-A1 Dock and connected to automatically turn on your iPod and the AV receiver at : http://www.onkyo.com Before using the Onkyo Dock components, update your iPod with the supplied remote controller, you can switch the input source between UP-A1 Dock and the tuner, by mistake. •...AV receiver turns on the Onkyo Dock components, see the instruction manual of the first song. For the latest information on . ■ Using Your iPod models Alarm Clock You can use this function for several seconds to startup, so you use the AV receiver's remote controller to operate your iPod...

Owner Manual
Page 42
... to the input to the Dock's instruction manual for more information. ■ UP-A1 Dock PORT is inserted in the Dock with the remote control code for controlling a Dock with V). You can control your iPod will turn on automatically. En 42 iPod Alarm If you start playback.... Controlling Your iPod By pressing REMOTE MODE that's been programmed with the following buttons. See "Remote Control Codes for Onkyo Components Connected via V" for details on by pressing ON/STANDBY. See to which the RI Dock is...
... to the input to the Dock's instruction manual for more information. ■ UP-A1 Dock PORT is inserted in the Dock with the remote control code for controlling a Dock with V). You can control your iPod will turn on automatically. En 42 iPod Alarm If you start playback.... Controlling Your iPod By pressing REMOTE MODE that's been programmed with the following buttons. See "Remote Control Codes for Onkyo Components Connected via V" for details on by pressing ON/STANDBY. See to which the RI Dock is...

Owner Manual
Page 43
... • With some time to acquire the contents. • In Extended mode (see *2), it will remain off when the remote controller transmits an Off command. *2 Press DISPLAY to the instruction manual. *1 This button does not turn the Onkyo DS-A2 or DS-A2X RI Dock on or off. This is because the... remote controller transmits the On and Standby commands alternately, so if your iPod is already on, it may not respond the...
... • With some time to acquire the contents. • In Extended mode (see *2), it will remain off when the remote controller transmits an Off command. *2 Press DISPLAY to the instruction manual. *1 This button does not turn the Onkyo DS-A2 or DS-A2X RI Dock on or off. This is because the... remote controller transmits the On and Standby commands alternately, so if your iPod is already on, it may not respond the...

Owner Manual
Page 44
... for how to control components that are out of view, in the Remote Control Codes for Onkyo Components Connected via V, use the following REMOTE MODE are preprogrammed with remote control codes for Onkyo Components Connected via V Onkyo components that are controlled by pointing the remote controller directly at the AV receiver, and operate the component. Note •...
... for how to control components that are out of view, in the Remote Control Codes for Onkyo Components Connected via V, use the following REMOTE MODE are preprogrammed with remote control codes for Onkyo Components Connected via V Onkyo components that are controlled by pointing the remote controller directly at the AV receiver, and operate the component. Note •...


