
Owner Manual
Page 2
...apparatus has been dropped or damaged in installation, such as they exit from tip-over. Leave 20 cm (8") of time. 14. The rear edge of the obsolete outlet. 10. Clean only with the manufacturer's instructions. 8. Install in performance this unit. 17. If the apparatus ... a bookcase or rack, ensure that are provided for service. 16. Protect the power cord from being walked on or pinched particularly at the rear. Ser- When the apparatus exhibits a distinct change in accordance with dry cloth. 7. Don't put candles or other apparatus (including amplifiers) that...
...apparatus has been dropped or damaged in installation, such as they exit from tip-over. Leave 20 cm (8") of time. 14. The rear edge of the obsolete outlet. 10. Clean only with the manufacturer's instructions. 8. Install in performance this unit. 17. If the apparatus ... a bookcase or rack, ensure that are provided for service. 16. Protect the power cord from being walked on or pinched particularly at the rear. Ser- When the apparatus exhibits a distinct change in accordance with dry cloth. 7. Don't put candles or other apparatus (including amplifiers) that...

Owner Manual
Page 3
... the separation between the equipment and receiver. • Connect the equipment into an outlet on the case. • This unit's top and rear panels may damage the finish or remove the panel lettering. 4. Batteries and Heat Exposure Warning Batteries (battery pack or batteries installed) shall not ... to try to which the receiver is used in a residential installation. Care-Occasionally you cannot turn it on the unit, contact your Onkyo dealer. 8. Dry the unit immediately afterwards with the instructions, may not work properly the next time you do not intend to country....
... the separation between the equipment and receiver. • Connect the equipment into an outlet on the case. • This unit's top and rear panels may damage the finish or remove the panel lettering. 4. Batteries and Heat Exposure Warning Batteries (battery pack or batteries installed) shall not ... to try to which the receiver is used in a residential installation. Care-Occasionally you cannot turn it on the unit, contact your Onkyo dealer. 8. Dry the unit immediately afterwards with the instructions, may not work properly the next time you do not intend to country....

Owner Manual
Page 5
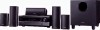
Remote control sensor AV receiver Introduction Important Safety Instructions 2 Precautions 3 Speaker Precautions 4 Package Contents 4 Features 6 Front & Rear Panels 7 Speaker Package 9 Remote Controller 10 About Home Theater 11 Connections Connecting the AV Receiver 12 Turning On & Basic Operations Turning On/Off the AV ...
Remote control sensor AV receiver Introduction Important Safety Instructions 2 Precautions 3 Speaker Precautions 4 Package Contents 4 Features 6 Front & Rear Panels 7 Speaker Package 9 Remote Controller 10 About Home Theater 11 Connections Connecting the AV Receiver 12 Turning On & Basic Operations Turning On/Off the AV ...

Owner Manual
Page 7
...; 5) G TONE LEVEL and TONE buttons (➔ 39) H Display (➔ 8) I JK LMN O P Q RS Asian models T U V The actual front panel has various logos printed on it. Front & Rear Panels Front Panel North American models B C DEF G H I LISTENING MODE buttons (➔ 27) J DIMMER button (North American models) (➔ 21) K MEMORY button (➔ 24) L TUNING MODE...
...; 5) G TONE LEVEL and TONE buttons (➔ 39) H Display (➔ 8) I JK LMN O P Q RS Asian models T U V The actual front panel has various logos printed on it. Front & Rear Panels Front Panel North American models B C DEF G H I LISTENING MODE buttons (➔ 27) J DIMMER button (North American models) (➔ 21) K MEMORY button (➔ 24) L TUNING MODE...

Owner Manual
Page 8
... B speaker indicators (➔ 11, 22) C Audio input indicators D Listening mode and format indicators (➔ 21, 27) E Audyssey indicators (➔ 34, 38) F Tuning indicators (➔ 23) Rear Panel G RDS indicator (excluding North American models) (➔ 24) H SLEEP indicator (➔ 22) I MUTING indicator (➔ 22) J Message area B CD EFG H I J K L M N B DIGITAL IN COAXIAL and...
... B speaker indicators (➔ 11, 22) C Audio input indicators D Listening mode and format indicators (➔ 21, 27) E Audyssey indicators (➔ 34, 38) F Tuning indicators (➔ 23) Rear Panel G RDS indicator (excluding North American models) (➔ 24) H SLEEP indicator (➔ 22) I MUTING indicator (➔ 22) J Message area B CD EFG H I J K L M N B DIGITAL IN COAXIAL and...

Owner Manual
Page 9
...them forcibly, as this will damage them. Caution • The front grilles are not designed to be used to wall-mount the the HT-R380 with the supplied speaker cables. identification. En 9 The supplied speaker cables are for connecting the speaker to These keyhole slots can ... Front, Center, Surround Speakers and Subwoofer (SKF-380, SKC-380/SKC-380C, SKR-380, SKW-380) SKF-380 C SKR-380 C B Front B C Rear Front Rear SKC-380/SKC-380C SKW-380 Front C BC Front B Rear Rear B Speaker terminals C Keyhole slots These push terminals are color-coded for easy speaker.
...them forcibly, as this will damage them. Caution • The front grilles are not designed to be used to wall-mount the the HT-R380 with the supplied speaker cables. identification. En 9 The supplied speaker cables are for connecting the speaker to These keyhole slots can ... Front, Center, Surround Speakers and Subwoofer (SKF-380, SKC-380/SKC-380C, SKR-380, SKW-380) SKF-380 C SKR-380 C B Front B C Rear Front Rear SKC-380/SKC-380C SKW-380 Front C BC Front B Rear Rear B Speaker terminals C Keyhole slots These push terminals are color-coded for easy speaker.

Owner Manual
Page 12
... system, you use the amplifier at high volume levels for a long period of between 6 and 16 ohms. If you have contact with the AV receiver's rear panel. In other words, connect positive (+) terminals only to positive (+) terminals, and negative (-) terminals only to set the speaker settings.
... system, you use the amplifier at high volume levels for a long period of between 6 and 16 ohms. If you have contact with the AV receiver's rear panel. In other words, connect positive (+) terminals only to positive (+) terminals, and negative (-) terminals only to set the speaker settings.

Owner Manual
Page 14
...-380 Keyhole slot for wall mounting Thick rubber stoppers Thick rubber stoppers To mount the center speaker horizontally, use the keyhole slot shown to the rear of the SKC-380/SKC-380C 2-3/16" (55 mm) 1/2" (12 mm) Center speaker (SKC-380/SKC-380C) Keyhole slot for wall mounting Thick rubber stoppers...
...-380 Keyhole slot for wall mounting Thick rubber stoppers Thick rubber stoppers To mount the center speaker horizontally, use the keyhole slot shown to the rear of the SKC-380/SKC-380C 2-3/16" (55 mm) 1/2" (12 mm) Center speaker (SKC-380/SKC-380C) Keyhole slot for wall mounting Thick rubber stoppers...