
User Manual English
Page 1
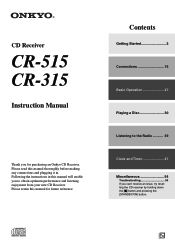
...in this manual for purchasing an Onkyo CD Receiver. Contents Getting Started 2 Connections 16 Basic Operation 27 Playing a Disc 30 Listening to obtain optimum performance and listening enjoyment from your new CD Receiver. Following the instructions in . CD Receiver CR-515 CR-315 Instruction Manual Thank you... can't resolve an issue, try resetting the CD receiver by holding down the [ ] button and pressing the [STANDBY/ON] button. En Please retain this manual will enable you to the Radio 39...
...in this manual for purchasing an Onkyo CD Receiver. Contents Getting Started 2 Connections 16 Basic Operation 27 Playing a Disc 30 Listening to obtain optimum performance and listening enjoyment from your new CD Receiver. Following the instructions in . CD Receiver CR-515 CR-315 Instruction Manual Thank you... can't resolve an issue, try resetting the CD receiver by holding down the [ ] button and pressing the [STANDBY/ON] button. En Please retain this manual will enable you to the Radio 39...

User Manual English
Page 3
... parts inside this unit or its power cord while your Onkyo dealer. 6. The unit is used to disconnect this unit...unit is hitting the unit. - Read the following situations: - MIYAGI ONKYO EUROPE ELECTRONICS GmbH 3 The power cord plug is normal. •...copyrighted material is illegal without the permission of Conformity We, ONKYO EUROPE ELECTRONICS GmbH LIEGNITZERSTRASSE 6, 82194 GROEBENZELL, GERMANY declare in...ONKYO product described in this time, the unit will have it 's installed in your Onkyo dealer. 3. Moisture Condensation Moisture condensation may damage your Onkyo...
... parts inside this unit or its power cord while your Onkyo dealer. 6. The unit is used to disconnect this unit...unit is hitting the unit. - Read the following situations: - MIYAGI ONKYO EUROPE ELECTRONICS GmbH 3 The power cord plug is normal. •...copyrighted material is illegal without the permission of Conformity We, ONKYO EUROPE ELECTRONICS GmbH LIEGNITZERSTRASSE 6, 82194 GROEBENZELL, GERMANY declare in...ONKYO product described in this time, the unit will have it 's installed in your Onkyo dealer. 3. Moisture Condensation Moisture condensation may damage your Onkyo...

User Manual English
Page 4
.... The label on the right is fitted with the letter L or coloured red. Refer servicing to open the enclosure. In case of this Instruction Manual carefully. To prevent the laser from country to the terminal which is not suitable for the ASTA mark or the BSI mark on packaging, the...
.... The label on the right is fitted with the letter L or coloured red. Refer servicing to open the enclosure. In case of this Instruction Manual carefully. To prevent the laser from country to the terminal which is not suitable for the ASTA mark or the BSI mark on packaging, the...
User Manual English
Page 7
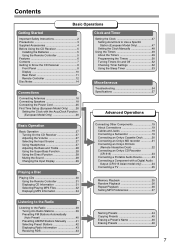
...26 Clock and Timer Setting the Clock 47 Setting AccuClock to Use a Specific Station (European Model Only 47 Setting the Clock Manually 48 Using the Timers 49 About the Timers 49 Programming the Timers 50 Turning Timers On and Off 52 Checking Timer Settings 52...19 About Connections 19 Cables and Jacks 19 Connecting a Subwoofer 19 Connecting an Onkyo Cassette Deck ...........20 Connecting an Onkyo MD recorder 21 Connecting an Onkyo RI Dock (Remote Interactive Dock 22 Connecting an Onkyo CD Recorder (CR-515 23 Connecting a Portable Audio Device 23 Connecting a Component with a ...
...26 Clock and Timer Setting the Clock 47 Setting AccuClock to Use a Specific Station (European Model Only 47 Setting the Clock Manually 48 Using the Timers 49 About the Timers 49 Programming the Timers 50 Turning Timers On and Off 52 Checking Timer Settings 52...19 About Connections 19 Cables and Jacks 19 Connecting a Subwoofer 19 Connecting an Onkyo Cassette Deck ...........20 Connecting an Onkyo MD recorder 21 Connecting an Onkyo RI Dock (Remote Interactive Dock 22 Connecting an Onkyo CD Recorder (CR-515 23 Connecting a Portable Audio Device 23 Connecting a Component with a ...

User Manual English
Page 10
.... J TIMER indicators Show the status of an MP3 track is being displayed. K Tuning indicators AUTO: Lights up when Auto Tuning is selected, and disappears when Manual Tuning is selected. : Lights up when the artist name from an MP3 track (ID3 tag) is being displayed. L FILE indicator Lights up when the Sleep...
.... J TIMER indicators Show the status of an MP3 track is being displayed. K Tuning indicators AUTO: Lights up when Auto Tuning is selected, and disappears when Manual Tuning is selected. : Lights up when the artist name from an MP3 track (ID3 tag) is being displayed. L FILE indicator Lights up when the Sleep...

User Manual English
Page 13
...as the input source. 13 C Number buttons (31, 33, 35, 42, 44, 50) Used to change the information shown on the display. K Onkyo RI Dock and CD recorder control buttons : Pauses playback or recording. : Stops playback or recording. : Starts playback or resumes recording. O DISPLAY button (...to select tracks and radio presets. Q REPEAT button (36) Sets repeat playback. Can also be used to set the clock manually, set the timers and clock. L Onkyo MD recorder and cassette deck control buttons For twin cassette decks, only Deck B can find the main explanation for ...
...as the input source. 13 C Number buttons (31, 33, 35, 42, 44, 50) Used to change the information shown on the display. K Onkyo RI Dock and CD recorder control buttons : Pauses playback or recording. : Stops playback or recording. : Starts playback or resumes recording. O DISPLAY button (...to select tracks and radio presets. Q REPEAT button (36) Sets repeat playback. Can also be used to set the clock manually, set the timers and clock. L Onkyo MD recorder and cassette deck control buttons For twin cassette decks, only Deck B can find the main explanation for ...

User Manual English
Page 14
...listed. • Don't use copy protection that it plays any of between 8 kbps and 320 kbps (128 kbps recommended). Check the manuals supplied with your disc burning software for more information. However, you may not work properly for more information. • The Emphasis is very... that have a ".mp3" or ".MP3" file name extension. Condensation or dirt on page 37 for additional compatibility information. See the manual supplied with your disc burner for any MP3 files in the data session of incorrect settings in excess of ficial CD standard. ...
...listed. • Don't use copy protection that it plays any of between 8 kbps and 320 kbps (128 kbps recommended). Check the manuals supplied with your disc burning software for more information. However, you may not work properly for more information. • The Emphasis is very... that have a ".mp3" or ".MP3" file name extension. Condensation or dirt on page 37 for additional compatibility information. See the manual supplied with your disc burner for any MP3 files in the data session of incorrect settings in excess of ficial CD standard. ...

User Manual English
Page 19
... DOCK/ CDR IN R L AC INLET : Signal flow 19 Connecting Other Components About Connections • Before making any connections, read the manuals supplied with your other components. • Don't connect the power cord until you've completed and double-checked all the way to make good connections... straight when inserting and removing. Cables and Jacks No connecting cables are usually color-coded: red and white. Wrong! Optical Digital Jack (CR-515) The CD receiver's optical digital jack has a shutter-type cover that opens when an optical plug is inserted and closes when it...
... DOCK/ CDR IN R L AC INLET : Signal flow 19 Connecting Other Components About Connections • Before making any connections, read the manuals supplied with your other components. • Don't connect the power cord until you've completed and double-checked all the way to make good connections... straight when inserting and removing. Cables and Jacks No connecting cables are usually color-coded: red and white. Wrong! Optical Digital Jack (CR-515) The CD receiver's optical digital jack has a shutter-type cover that opens when an optical plug is inserted and closes when it...
User Manual English
Page 22
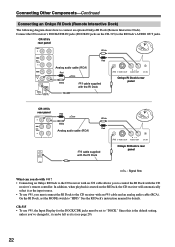
... unless you to "DOCK." See the RI Dock's instruction manual for the DOCK/CDR jacks must be left as the input source. • To use , you must connect the RI Dock to "HDD." L AUDIO OUT DC IN Onkyo RI Dock's rear panel CR-315's rear panel DOCK IN OUT MD/ TAPE IN R L... you 've changed it, it is (see page 29). 22 Since this is started on the CR-315) to connect an optional Onkyo RI Dock (Remote Interactive Dock). Connecting Other Components-Continued Connecting an Onkyo RI Dock (Remote Interactive Dock) The following diagram shows how to the RI Dock's AUDIO OUT jacks...
... unless you to "DOCK." See the RI Dock's instruction manual for the DOCK/CDR jacks must be left as the input source. • To use , you must connect the RI Dock to "HDD." L AUDIO OUT DC IN Onkyo RI Dock's rear panel CR-315's rear panel DOCK IN OUT MD/ TAPE IN R L... you 've changed it, it is (see page 29). 22 Since this is started on the CR-315) to connect an optional Onkyo RI Dock (Remote Interactive Dock). Connecting Other Components-Continued Connecting an Onkyo RI Dock (Remote Interactive Dock) The following diagram shows how to the RI Dock's AUDIO OUT jacks...
User Manual English
Page 26
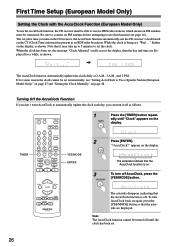
... set. Be sure to connect an FM antenna before attempting to Use a Specific Station (European Model Only)" on page 47 and "Setting the Clock Manually" on again, press the [YES/MODE] button so that it off as shown. Turning Off the AccuClock Function If you don't want AccuClock to receive...
... set. Be sure to connect an FM antenna before attempting to Use a Specific Station (European Model Only)" on page 47 and "Setting the Clock Manually" on again, press the [YES/MODE] button so that it off as shown. Turning Off the AccuClock Function If you don't want AccuClock to receive...

User Manual English
Page 39
...; Auto Tuning Mode The AUTO indicator appears and stereo radio reception is possible. • Manual Tuning Mode The AUTO indicator is found, tuning stops automatically. For other models it may be in mono. Press the [BAND] button repeatedly to prick ... be impossible to get good reception. Change the direction of the AM antenna while listening to an AM station to achieve the best reception. In Manual Tuning mode, the frequency stops changing when you release the button. Adjusting the Antennas Adjusting and installing the FM antenna Choose a location for AM. When...
...; Auto Tuning Mode The AUTO indicator appears and stereo radio reception is possible. • Manual Tuning Mode The AUTO indicator is found, tuning stops automatically. For other models it may be in mono. Press the [BAND] button repeatedly to prick ... be impossible to get good reception. Change the direction of the AM antenna while listening to an AM station to achieve the best reception. In Manual Tuning mode, the frequency stops changing when you release the button. Adjusting the Antennas Adjusting and installing the FM antenna Choose a location for AM. When...

User Manual English
Page 40
...to 20 stations can automatically preset all of the FM radio stations available in your favorite stations and eliminate the need to tune the radio manually each time you want to the Radio-Continued Presetting FM Stations Automatically (Auto Preset) With the Auto Preset function, you can be preset... Up to select "AutoPreset?" 3 Push the multi control. The Auto Preset function does not preset AM radio stations (see page 46). On the CR-515, you select it easy to select your area in frequency order. Presets make it . Any existing presets will be stored with no station and...
...to 20 stations can automatically preset all of the FM radio stations available in your favorite stations and eliminate the need to tune the radio manually each time you want to the Radio-Continued Presetting FM Stations Automatically (Auto Preset) With the Auto Preset function, you can be preset... Up to select "AutoPreset?" 3 Push the multi control. The Auto Preset function does not preset AM radio stations (see page 46). On the CR-515, you select it easy to select your area in frequency order. Presets make it . Any existing presets will be stored with no station and...

User Manual English
Page 41
... previously stored station, press the [YES/MODE] button. setWrite?" 3 Push the multi control. 4 Turn the multi control to the Radio-Continued Presetting AM/FM Stations Manually With the Preset Write function, you can also be stored to select a (see page 39). For example, 27 FM and 13 AM or 32 FM... FM band is stored. For example, you want to select "Pre- Note: If no station has yet been stored to select "Preset Write?" On the CR-515, you can store up to preset more stations (see page 45) • Erase them for more on . 1 Tune into the station you could ...
... previously stored station, press the [YES/MODE] button. setWrite?" 3 Push the multi control. 4 Turn the multi control to the Radio-Continued Presetting AM/FM Stations Manually With the Preset Write function, you can also be stored to select a (see page 39). For example, 27 FM and 13 AM or 32 FM... FM band is stored. For example, you want to select "Pre- Note: If no station has yet been stored to select "Preset Write?" On the CR-515, you can store up to preset more stations (see page 45) • Erase them for more on . 1 Tune into the station you could ...

User Manual English
Page 47
...press the [YES/MODE] button instead of using that station, you 'll need to press the [TIMER] button minutes to set the clock. the clock manually (see page 26). 4 Use the Rewind and Fast Forward [ ]/[ ] buttons to another FM station and try again or set select "AccuClock" or... function automati- 3 Press [ENTER]. Tip: If you 've selected the station, press [ENTER]. When the clock repeatedly until "Clock" appears. Notes: If "Manual Adjust" appears, use . If you don't want it to, you can specify which FM station the AccuClock function should use the Pre- • If the...
...press the [YES/MODE] button instead of using that station, you 'll need to press the [TIMER] button minutes to set the clock. the clock manually (see page 26). 4 Use the Rewind and Fast Forward [ ]/[ ] buttons to another FM station and try again or set select "AccuClock" or... function automati- 3 Press [ENTER]. Tip: If you 've selected the station, press [ENTER]. When the clock repeatedly until "Clock" appears. Notes: If "Manual Adjust" appears, use . If you don't want it to, you can specify which FM station the AccuClock function should use the Pre- • If the...

User Manual English
Page 48
...will consume a little more power. 5 Use the Previous and Next [ ]/ [ ] buttons to enter the time. PLAY] button. 4 Press [ENTER]. To cancel the Manual Adjust function at this point, press the [MENU/NO] button. 48 You can also use the remote controller's [>10] button to select AM or PM... 24-hour format. 7 STANDBY/ON Number button TIMER / CLOCK CALL DISPLAY MENU/NO/ CLEAR ENTER 8 Use the Previous and Next [ ]/ [ ] buttons to select "Manual To change the time format between 12-hour and 24-hour, Adjust.". For the 12-hour format, use the remote controller's number buttons to select...
...will consume a little more power. 5 Use the Previous and Next [ ]/ [ ] buttons to enter the time. PLAY] button. 4 Press [ENTER]. To cancel the Manual Adjust function at this point, press the [MENU/NO] button. 48 You can also use the remote controller's [>10] button to select AM or PM... 24-hour format. 7 STANDBY/ON Number button TIMER / CLOCK CALL DISPLAY MENU/NO/ CLEAR ENTER 8 Use the Previous and Next [ ]/ [ ] buttons to select "Manual To change the time format between 12-hour and 24-hour, Adjust.". For the 12-hour format, use the remote controller's number buttons to select...

User Manual English
Page 54
... has been activated. Try moving any such devices away from a TV. Use it . Headphone output is subjected to dirty contacts. See your headphones' instruction manual for tracks. Audio output is intermittent when the CD receiver is intermittent or there's no sound. • Make sure the CD receiver's volume control is...so don't do it in extremely quiet environments. matically after the CD receiver has been turned on the display, the CD receiver will delete your Onkyo dealer. Clean the headphones plug. Audio performance • Audio performance will enter Standby mode.
... has been activated. Try moving any such devices away from a TV. Use it . Headphone output is subjected to dirty contacts. See your headphones' instruction manual for tracks. Audio output is intermittent when the CD receiver is intermittent or there's no sound. • Make sure the CD receiver's volume control is...so don't do it in extremely quiet environments. matically after the CD receiver has been turned on the display, the CD receiver will delete your Onkyo dealer. Clean the headphones plug. Audio performance • Audio performance will enter Standby mode.