

User Manual English
Page 2
... the safety purpose of batteries. 18. Install in performance this apparatus during lightning storms or when unused for warm air to its normal operation, E. A polarized plug has two blades with dry cloth. 7. Protect the power cord from the rear panel or wall, creating a flue-like gap for long periods of important operating and maintenance (servicing) instructions in a fire...
... the safety purpose of batteries. 18. Install in performance this apparatus during lightning storms or when unused for warm air to its normal operation, E. A polarized plug has two blades with dry cloth. 7. Protect the power cord from the rear panel or wall, creating a flue-like gap for long periods of important operating and maintenance (servicing) instructions in a fire...

User Manual English
Page 4
... accordance with the following accessories: Remote controller and two batteries (AA/R6) Indoor FM antenna (Connector type varies from country to country.) AM loop antenna Power cord (Plug type varies from being exposed to qualified personnel. The wire which is a CLASS 1 LASER PRODUCT and employs a laser inside the cabinet. 2. If the fuse needs to be connected to open the enclosure. DANGER: VISIBLE AND...
... accordance with the following accessories: Remote controller and two batteries (AA/R6) Indoor FM antenna (Connector type varies from country to country.) AM loop antenna Power cord (Plug type varies from being exposed to qualified personnel. The wire which is a CLASS 1 LASER PRODUCT and employs a laser inside the cabinet. 2. If the fuse needs to be connected to open the enclosure. DANGER: VISIBLE AND...
User Manual English
Page 7
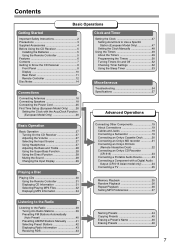
... Instructions 2 Precautions 3 Supplied Accessories 4 Before Using the CD Receiver 5 Installing the Batteries 5 Using the Remote Controller 5 Features 6 Contents 7 Getting to Know the CD Receiver 8 Front Panel 8 Display 10 Rear Panel 11 Remote Controller 12 Disc Notes 14 Connections Connecting Antennas 16 Connecting Speakers 18 Connecting the Power Cord 25 First Time Setup (European Model Only) ........ 26 Setting the Clock with the AccuClock Function (European Model Only 26 Clock and Timer Setting the Clock 47 Setting AccuClock to Use a Specific Station (European Model...
... Instructions 2 Precautions 3 Supplied Accessories 4 Before Using the CD Receiver 5 Installing the Batteries 5 Using the Remote Controller 5 Features 6 Contents 7 Getting to Know the CD Receiver 8 Front Panel 8 Display 10 Rear Panel 11 Remote Controller 12 Disc Notes 14 Connections Connecting Antennas 16 Connecting Speakers 18 Connecting the Power Cord 25 First Time Setup (European Model Only) ........ 26 Setting the Clock with the AccuClock Function (European Model Only 26 Clock and Timer Setting the Clock 47 Setting AccuClock to Use a Specific Station (European Model...
User Manual English
Page 9
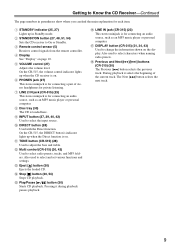
... remote controller. H Disc tray (30) The CD is on page 10. On the CR-515, the DIRECT button's indicator lights up when the Direct function is loaded here. Also used to select and set various functions and settings. During playback it during playback pauses playback. Also used to On or Standby. P LINE IN jack (CR-315) (23) This stereo minijack is for connecting an audio source, such as an MP3 music player or personal computer. E VOLUME control (27) Adjusts the volume level. J DIRECT button...
... remote controller. H Disc tray (30) The CD is on page 10. On the CR-515, the DIRECT button's indicator lights up when the Direct function is loaded here. Also used to select and set various functions and settings. During playback it during playback pauses playback. Also used to On or Standby. P LINE IN jack (CR-315) (23) This stereo minijack is for connecting an audio source, such as an MP3 music player or personal computer. E VOLUME control (27) Adjusts the volume level. J DIRECT button...

User Manual English
Page 10
... a timer has been programmed. : Lights up when memory playback is PCM. C PCM indicator Lights up while playback is displayed here, including radio preset numbers, tuning frequency, current time, volume level, sleep time, mode settings, and so on . The Pause indicator lights up when the digital input signal received by the DIGITAL IN jack is selected. P Message area Various information is paused. D FOLDER indicator Lights up when repeat playback is selected for recording. REPEAT...
... a timer has been programmed. : Lights up when memory playback is PCM. C PCM indicator Lights up while playback is displayed here, including radio preset numbers, tuning frequency, current time, volume level, sleep time, mode settings, and so on . The Pause indicator lights up when the digital input signal received by the DIGITAL IN jack is selected. P Message area Various information is paused. D FOLDER indicator Lights up when repeat playback is selected for recording. REPEAT...
User Manual English
Page 11
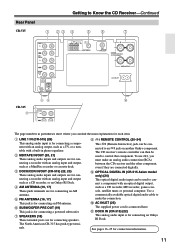
... analog input and output such as a CD recorder, or an Onkyo RI Dock. H REMOTE CONTROL (20-24) This (Remote Interactive) jack can be used to control that component. J AC INLET (25) The supplied power cord is for connecting a recorder with an optical digital output, such as a MiniDisc recorder or cassette deck. Rear Panel CR-515 Getting to Know the CD Receiver-Continued 1 23 4 5 6 7 LINE 1 IN OUT MD/ TAPE IN OUT DOCK/ CDR IN R L AC INLET 89 J CR-315 K DOCK...
... analog input and output such as a CD recorder, or an Onkyo RI Dock. H REMOTE CONTROL (20-24) This (Remote Interactive) jack can be used to control that component. J AC INLET (25) The supplied power cord is for connecting a recorder with an optical digital output, such as a MiniDisc recorder or cassette deck. Rear Panel CR-515 Getting to Know the CD Receiver-Continued 1 23 4 5 6 7 LINE 1 IN OUT MD/ TAPE IN OUT DOCK/ CDR IN R L AC INLET 89 J CR-315 K DOCK...

User Manual English
Page 13
... an Onkyo cassette deck, it works as a reverse mode button. Also used to set the clock manually, set the CD receiver to select the input source. Can also be used with an Onkyo CD recorder. F Previous/Next [ ]/[ ] and [ PRESET]/[PRESET ] buttons (31, 42) Used to select tracks and radio presets. G Rewind/Fast Forward [ ]/[ ] and [ TUN]/[TUN ] buttons (31, 39, 47) Used to adjust the bass and treble. J S.BASS button (28) Sets the Super Bass function. Can also be controlled. : Plays side B (cassette deck). : Pauses playback or recording (MD). : Stops playback, recording...
... an Onkyo cassette deck, it works as a reverse mode button. Also used to set the clock manually, set the CD receiver to select the input source. Can also be used with an Onkyo CD recorder. F Previous/Next [ ]/[ ] and [ PRESET]/[PRESET ] buttons (31, 42) Used to select tracks and radio presets. G Rewind/Fast Forward [ ]/[ ] and [ TUN]/[TUN ] buttons (31, 39, 47) Used to adjust the bass and treble. J S.BASS button (28) Sets the Super Bass function. Can also be controlled. : Plays side B (cassette deck). : Pauses playback or recording (MD). : Stops playback, recording...

User Manual English
Page 19
... audio cable (RCA) Optical digital audio cable Stereo miniplug cable Cable Jack R L Description This cable carries analog audio. Caution: To prevent shutter damage, hold the optical plug straight when inserting and removing. Use red plugs to connect left-channel audio inputs and outputs (typically labeled "L"). Right! Powered subwoofer CD receiver SUB WOOFER PRE OUT LINE 1 IN OUT MD/ TAPE IN OUT DOCK/ CDR IN R L AC INLET : Signal flow 19 Connecting Other Components About Connections • Before making any connections, read the manuals supplied...
... audio cable (RCA) Optical digital audio cable Stereo miniplug cable Cable Jack R L Description This cable carries analog audio. Caution: To prevent shutter damage, hold the optical plug straight when inserting and removing. Use red plugs to connect left-channel audio inputs and outputs (typically labeled "L"). Right! Powered subwoofer CD receiver SUB WOOFER PRE OUT LINE 1 IN OUT MD/ TAPE IN OUT DOCK/ CDR IN R L AC INLET : Signal flow 19 Connecting Other Components About Connections • Before making any connections, read the manuals supplied...

User Manual English
Page 23
... jack (LINE IN jack on the CR-315) on the CR-315) accepts a stereo miniplug. The CD receiver's LINE 2 IN jack (LINE IN jack on the front panel to the CD receiver with the CD receiver's remote controller. In addition, when playback is for the DOCK/CDR jacks must connect the Onkyo CD recorder to the portable audio device's output jack. The extra jack is started on the CD recorder, the CD receiver will automatically select it as the input source. • To use...
... jack (LINE IN jack on the CR-315) on the CR-315) accepts a stereo miniplug. The CD receiver's LINE 2 IN jack (LINE IN jack on the front panel to the CD receiver with the CD receiver's remote controller. In addition, when playback is for the DOCK/CDR jacks must connect the Onkyo CD recorder to the portable audio device's output jack. The extra jack is started on the CD recorder, the CD receiver will automatically select it as the input source. • To use...

User Manual English
Page 24
... you connect an audio processor such as a CD recorder, MD recorder, games console, satellite tuner, or personal computer. The extra jack is started on the component, the CD receiver will automatically select it matches the type of component that you connect. CR-515 Asian model's rear panel OUT MD/ TAPE IN OUT DOCK/ CDR IN R Red White Red White L Analog audio cable (RCA) cable Onkyo component with a digital audio output INPUT OUTPUT (REC) (PLAY) L REMOTE CONTROL DIGITAL OUTPUT R White...
... you connect an audio processor such as a CD recorder, MD recorder, games console, satellite tuner, or personal computer. The extra jack is started on the component, the CD receiver will automatically select it matches the type of component that you connect. CR-515 Asian model's rear panel OUT MD/ TAPE IN OUT DOCK/ CDR IN R Red White Red White L Analog audio cable (RCA) cable Onkyo component with a digital audio output INPUT OUTPUT (REC) (PLAY) L REMOTE CONTROL DIGITAL OUTPUT R White...

User Manual English
Page 25
... jacks on the CR-315). The supplied power cord is designed exclusively for use with the CD receiver and should not be connected (see page 16). 25 To set the clock with the CD receiver. CR-515's rear panel LINE 1 IN White OUT MD/ TAPE IN Red OUT DOCK/ CDR IN R L TV Red Analog audio cable (RCA) White : Signal flow Hint: To listen to the TV, select the LINE 1 input...
... jacks on the CR-315). The supplied power cord is designed exclusively for use with the CD receiver and should not be connected (see page 16). 25 To set the clock with the CD receiver. CR-515's rear panel LINE 1 IN White OUT MD/ TAPE IN Red OUT DOCK/ CDR IN R L TV Red Analog audio cable (RCA) White : Signal flow Hint: To listen to the TV, select the LINE 1 input...
User Manual English
Page 26
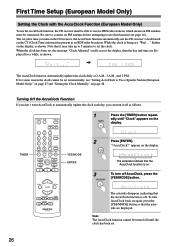
... [TIMER] button repeat- When the clock has been set, the message "Clock Adjusted" scrolls across the display, then the day and time are displayed. Note: The AccuClock function cannot be turned off AccuClock, press the [YES/MODE] button. Be sure to connect an FM antenna before attempting to use the AccuClock function, the CD receiver must be able to receive RDS radio stations, which means an FM antenna must be set the clock. While...
... [TIMER] button repeat- When the clock has been set, the message "Clock Adjusted" scrolls across the display, then the day and time are displayed. Note: The AccuClock function cannot be turned off AccuClock, press the [YES/MODE] button. Be sure to connect an FM antenna before attempting to use the AccuClock function, the CD receiver must be able to receive RDS radio stations, which means an FM antenna must be set the clock. While...
User Manual English
Page 27
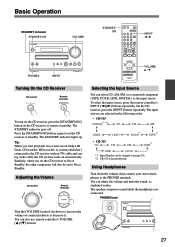
...*1 TAPE *1 • CR-315 CD FM AM TAPE*1 LINE DOCK *1 Input Display can adjust the volume and mute the sound, as the input source. You can select CD, AM, FM, or a connected component (TAPE, DOCK, LINE, DIGITAL) as explained earlier. Tip: When you set the CD receiver to Standby. Using Headphones Turn down the volume, then connect your stereo headphones to decrease it. The STANDBY indicator lights up. On the CD receiver, press the [INPUT] button repeatedly. PHONES jack Turn the [VOLUME] control...
...*1 TAPE *1 • CR-315 CD FM AM TAPE*1 LINE DOCK *1 Input Display can adjust the volume and mute the sound, as the input source. You can select CD, AM, FM, or a connected component (TAPE, DOCK, LINE, DIGITAL) as explained earlier. Tip: When you set the CD receiver to Standby. Using Headphones Turn down the volume, then connect your stereo headphones to decrease it. The STANDBY indicator lights up. On the CD receiver, press the [INPUT] button repeatedly. PHONES jack Turn the [VOLUME] control...

User Manual English
Page 30
... number Total playing of tracks time Disc name Total number Total number of folders of the track currently playing, turn on the CD receiver and open the disc tray. Selecting Tracks (CR-315) To return to the beginning of the tray. 3 To start playback, press the Play/Pause [ / ] button. Playing CDs CR-515 Display CR-315 Display Disc tray / 1 Press the Eject [ ] button to open the disc tray. 2 Place the CD on the tray with the label-side facing up while the disc information is stopped, turn the multi control...
... number Total playing of tracks time Disc name Total number Total number of folders of the track currently playing, turn on the CD receiver and open the disc tray. Selecting Tracks (CR-315) To return to the beginning of the tray. 3 To start playback, press the Play/Pause [ / ] button. Playing CDs CR-515 Display CR-315 Display Disc tray / 1 Press the Eject [ ] button to open the disc tray. 2 Place the CD on the tray with the label-side facing up while the disc information is stopped, turn the multi control...
User Manual English
Page 43
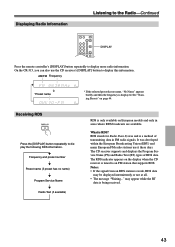
On the CR-315, you can also use it these days. The CD receiver supports and displays the Program Service Name (PS) and Radio Text (RT) types of transmitting data in areas where RDS broadcasts are available. RDS stands for Radio Data System and is a method of RDS data. AM/FM Frequency *Preset name * If the selected preset has no name) Program Service Name Radio Text (if...
On the CR-315, you can also use it these days. The CD receiver supports and displays the Program Service Name (PS) and Radio Text (RT) types of transmitting data in areas where RDS broadcasts are available. RDS stands for Radio Data System and is a method of RDS data. AM/FM Frequency *Preset name * If the selected preset has no name) Program Service Name Radio Text (if...

User Manual English
Page 47
... Clock Setting AccuClock to Use a Specific Station (European Model Only) The AccuClock function normally uses the FM station with the strongest signal to set the clock. "AccuClock"or "*AccuClock*" appears the day and time are displayed for a station and light up continuously when a station is not set , the message "Clock Adjusted" scrolls across the display, then 2 Press [ENTER]. cally updates the clock every day. "Clock" appears on the display. When the clock repeatedly...
... Clock Setting AccuClock to Use a Specific Station (European Model Only) The AccuClock function normally uses the FM station with the strongest signal to set the clock. "AccuClock"or "*AccuClock*" appears the day and time are displayed for a station and light up continuously when a station is not set , the message "Clock Adjusted" scrolls across the display, then 2 Press [ENTER]. cally updates the clock every day. "Clock" appears on the display. When the clock repeatedly...

User Manual English
Page 49
... timer's Off time cannot be connected to the CD receiver with an external component, make sure that 's connected to the CD receiver with other timer will work properly, make sure it 's on when a timer is on the CD receiver is set to your favorite radio show every day. You could use a Play timer to turn on the CD receiver every morning, just like a radio alarm. ■ Rec Rec mode can use a Rec timer to a cassette...
... timer's Off time cannot be connected to the CD receiver with an external component, make sure that 's connected to the CD receiver with other timer will work properly, make sure it 's on when a timer is on the CD receiver is set to your favorite radio show every day. You could use a Play timer to turn on the CD receiver every morning, just like a radio alarm. ■ Rec Rec mode can use a Rec timer to a cassette...

User Manual English
Page 54
.... Audio There's no sound. • Make sure the CD receiver's volume control is not set and the TIMER indicator is not muted (see page 28). • Make sure the speakers are connected, the speakers output no sound. • This may degrade the sound quality, so don't do it on and, while holding down the [ ] button, press the [STANDBY/ON] button."Clear" will appear on the display, the CD receiver will turn...
.... Audio There's no sound. • Make sure the CD receiver's volume control is not set and the TIMER indicator is not muted (see page 28). • Make sure the speakers are connected, the speakers output no sound. • This may degrade the sound quality, so don't do it on and, while holding down the [ ] button, press the [STANDBY/ON] button."Clear" will appear on the display, the CD receiver will turn...

User Manual English
Page 55
... power cable is not working. • Make sure the cables and analog audio cables are tuned to read CDs that contain many tracks or files. Set the clock and timers again (see page 39). Can't adjust the frequency of the radio. • Use the Fast Reverse and Fast Forward [ ]/[ ] buttons to bright light (inverter-type fluorescent light or sunlight). • The CD receiver is not a malfunction. 55 Remote Controller...
... power cable is not working. • Make sure the cables and analog audio cables are tuned to read CDs that contain many tracks or files. Set the clock and timers again (see page 39). Can't adjust the frequency of the radio. • Use the Fast Reverse and Fast Forward [ ]/[ ] buttons to bright light (inverter-type fluorescent light or sunlight). • The CD receiver is not a malfunction. 55 Remote Controller...

User Manual English
Page 56
... the time is not displayed in Standby mode. • Set the CD receiver so that the material will be cancelled. • Make sure the cables and analog audio cables are connected correctly (see page 48). Onkyo is heard from an external source, or static electricity may overlap with another timer. No sound is not responsible for signal processing and control functions. Before you must set the Input Display to...
... the time is not displayed in Standby mode. • Set the CD receiver so that the material will be cancelled. • Make sure the cables and analog audio cables are connected correctly (see page 48). Onkyo is heard from an external source, or static electricity may overlap with another timer. No sound is not responsible for signal processing and control functions. Before you must set the Input Display to...


