

User Manual English
Page 4
... is classified as follows: The wire which is coloured blue must be connected to the terminal which is marked with the following accessories: Remote controller and two batteries (AA/R6) Indoor FM antenna (Connector type varies from country to country.) AM loop antenna Power cord (Plug type varies from...
... is classified as follows: The wire which is coloured blue must be connected to the terminal which is marked with the following accessories: Remote controller and two batteries (AA/R6) Indoor FM antenna (Connector type varies from country to country.) AM loop antenna Power cord (Plug type varies from...

User Manual English
Page 5
...corrosion. 5 Keep this in mind when installing. • If another remote controller of batteries. • If you operate the remote controller, point it and the CD receiver's remote control sensor. CD receiver Notes: • The remote controller may not work reliably if the CD receiver is subjected to ... CD Receiver Installing the Batteries 1 Detach the battery cover by pressing the tab and pulling up the cover. Notes: • If the remote controller doesn't work reliably, try replacing the batteries. • Don't mix new and old batteries or different types of the same type ...
...corrosion. 5 Keep this in mind when installing. • If another remote controller of batteries. • If you operate the remote controller, point it and the CD receiver's remote control sensor. CD receiver Notes: • The remote controller may not work reliably if the CD receiver is subjected to ... CD Receiver Installing the Batteries 1 Detach the battery cover by pressing the tab and pulling up the cover. Notes: • If the remote controller doesn't work reliably, try replacing the batteries. • Don't mix new and old batteries or different types of the same type ...

User Manual English
Page 6
... • Discrete Output Stage Circuitry • Optimum Gain Volume Circuitry • Subwoofer Pre Out - CR-315 - • 3 Audio Inputs (1 on front panel) - CR-315 - • Single-Bit D/A Converter Tuner & Other • 4-Program Timer (Play or Rec .../ Once or Every) • Sleep Timer • Battery-Free Memory Backup • Headphone Jack • Aluminium Front Panel • RI-Dock Compatible Remote Control (iPod Control Capable) * VLSC and the VLSC logo are registered trademarks of Onkyo...
... • Discrete Output Stage Circuitry • Optimum Gain Volume Circuitry • Subwoofer Pre Out - CR-315 - • 3 Audio Inputs (1 on front panel) - CR-315 - • Single-Bit D/A Converter Tuner & Other • 4-Program Timer (Play or Rec .../ Once or Every) • Sleep Timer • Battery-Free Memory Backup • Headphone Jack • Aluminium Front Panel • RI-Dock Compatible Remote Control (iPod Control Capable) * VLSC and the VLSC logo are registered trademarks of Onkyo...
User Manual English
Page 7
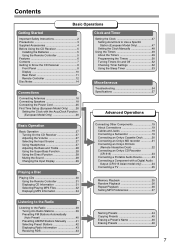
... Information 34 Connecting Other Components 19 About Connections 19 Cables and Jacks 19 Connecting a Subwoofer 19 Connecting an Onkyo Cassette Deck ...........20 Connecting an Onkyo MD recorder 21 Connecting an Onkyo RI Dock (Remote Interactive Dock 22 Connecting an Onkyo CD Recorder (CR-515 23 Connecting a Portable Audio Device 23 Connecting a Component with a Digital Audio Output...
... Information 34 Connecting Other Components 19 About Connections 19 Cables and Jacks 19 Connecting a Subwoofer 19 Connecting an Onkyo Cassette Deck ...........20 Connecting an Onkyo MD recorder 21 Connecting an Onkyo RI Dock (Remote Interactive Dock 22 Connecting an Onkyo CD Recorder (CR-515 23 Connecting a Portable Audio Device 23 Connecting a Component with a Digital Audio Output...
User Manual English
Page 9
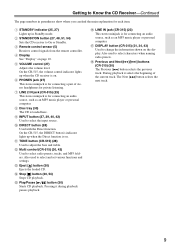
..., and MP3 folders. Also used to select characters when naming radio presets. R Previous and Next [ ]/[ ] buttons (CR-315) (30) The Previous [ ] button selects the previous track. G LINE 2 IN jack (CR-515) (23) This stereo minijack is on . I INPUT button (27, 29, 40, 42) Used to On ...various functions and settings. D Display See "Display" on the display. M Eject [ ] button (30) Ejects the loaded CD. C Remote control sensor (5) Receives control signals from the remote controller. F PHONES jack (27) This stereo minijack is loaded here. B STANDBY/ON button (27, 48, 51, 54) Sets the...
..., and MP3 folders. Also used to select characters when naming radio presets. R Previous and Next [ ]/[ ] buttons (CR-315) (30) The Previous [ ] button selects the previous track. G LINE 2 IN jack (CR-515) (23) This stereo minijack is on . I INPUT button (27, 29, 40, 42) Used to On ...various functions and settings. D Display See "Display" on the display. M Eject [ ] button (30) Ejects the loaded CD. C Remote control sensor (5) Receives control signals from the remote controller. F PHONES jack (27) This stereo minijack is loaded here. B STANDBY/ON button (27, 48, 51, 54) Sets the...
User Manual English
Page 11
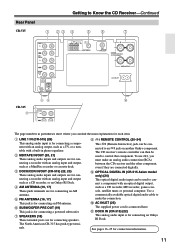
...component, even if they are for connecting a recorder with an analog input and output, such as a CD recorder, or an Onkyo RI Dock. K DOCK IN (CR-315) (22) This analog audio input is for connecting a recorder with an analog input and output such as a MiniDisc recorder or... These analog audio inputs and outputs are for connecting a component with a built-in parentheses show where you must make the connection. H REMOTE CONTROL (20-24) This (Remote Interactive) jack can then be used to control that component. D AM ANTENNA (16, 17) These push terminals are for connecting a...
...component, even if they are for connecting a recorder with an analog input and output, such as a CD recorder, or an Onkyo RI Dock. K DOCK IN (CR-315) (22) This analog audio input is for connecting a recorder with an analog input and output such as a MiniDisc recorder or... These analog audio inputs and outputs are for connecting a component with a built-in parentheses show where you must make the connection. H REMOTE CONTROL (20-24) This (Remote Interactive) jack can then be used to control that component. D AM ANTENNA (16, 17) These push terminals are for connecting a...

User Manual English
Page 12
Getting to Know the CD Receiver-Continued Remote Controller RC-662S (CR-515) RC-660S (CR-315) A M A M B N B N 3 3 O O P P Q Q 4 R 4 R 5 S 5 S 6 T 6 T 7 7 8 8 9 9 J U J U K V K V L L 12
Getting to Know the CD Receiver-Continued Remote Controller RC-662S (CR-515) RC-660S (CR-315) A M A M B N B N 3 3 O O P P Q Q 4 R 4 R 5 S 5 S 6 T 6 T 7 7 8 8 9 9 J U J U K V K V L L 12

User Manual English
Page 20
... MD/ TAPE IN Red White White Analog audio cables (RCA) Onkyo cassette deck's rear panel INPUT OUTPUT (REC) (PLAY) L REMOTE CONTROL R OUT DOCK/ CDR IN R Red L cable supplied with the Onkyo cassette deck White Red Red White CR-315's rear panel DOCK IN OUT MD/ TAPE IN R L Red... White White Analog audio cables (RCA) Red cable supplied with the Onkyo cassette deck Onkyo cassette deck's rear panel INPUT OUTPUT (REC) (PLAY) L REMOTE CONTROL R White Red Red ...
... MD/ TAPE IN Red White White Analog audio cables (RCA) Onkyo cassette deck's rear panel INPUT OUTPUT (REC) (PLAY) L REMOTE CONTROL R OUT DOCK/ CDR IN R Red L cable supplied with the Onkyo cassette deck White Red Red White CR-315's rear panel DOCK IN OUT MD/ TAPE IN R L Red... White White Analog audio cables (RCA) Red cable supplied with the Onkyo cassette deck Onkyo cassette deck's rear panel INPUT OUTPUT (REC) (PLAY) L REMOTE CONTROL R White Red Red ...

User Manual English
Page 21
...OUT MD/ TAPE IN Red White White Analog audio cables (RCA) Onkyo MD recorder's rear panel INPUT OUTPUT (REC) (PLAY) L REMOTE CONTROL R OUT DOCK/ CDR IN R Red L cable supplied with the Onkyo MD recorder White Red Red White CR-315's rear panel DOCK IN OUT MD/ TAPE IN R L Red... White White Analog audio cables (RCA) Red cable supplied with the Onkyo MD recorder Onkyo MD recorder's rear panel INPUT OUTPUT (REC) (PLAY) L REMOTE CONTROL R White Red Red ...
...OUT MD/ TAPE IN Red White White Analog audio cables (RCA) Onkyo MD recorder's rear panel INPUT OUTPUT (REC) (PLAY) L REMOTE CONTROL R OUT DOCK/ CDR IN R Red L cable supplied with the Onkyo MD recorder White Red Red White CR-315's rear panel DOCK IN OUT MD/ TAPE IN R L Red... White White Analog audio cables (RCA) Red cable supplied with the Onkyo MD recorder Onkyo MD recorder's rear panel INPUT OUTPUT (REC) (PLAY) L REMOTE CONTROL R White Red Red ...
User Manual English
Page 22
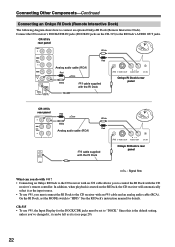
... Components-Continued Connecting an Onkyo RI Dock (Remote Interactive Dock) The following diagram shows how to "HDD." L AUDIO OUT DC IN Onkyo RI Dock's rear panel : Signal flow What can be set the MODE switch to connect an optional Onkyo RI Dock (Remote Interactive Dock). Since this is started on the CR-315) to control the...
... Components-Continued Connecting an Onkyo RI Dock (Remote Interactive Dock) The following diagram shows how to "HDD." L AUDIO OUT DC IN Onkyo RI Dock's rear panel : Signal flow What can be set the MODE switch to connect an optional Onkyo RI Dock (Remote Interactive Dock). Since this is started on the CR-315) to control the...

User Manual English
Page 23
..., so you can you do with ? • Connecting an Onkyo CD recorder to the CD receiver with the CD receiver's remote controller. If you connect a portable audio device's headphone output to the CD receiver's LINE2 IN jack (LINE IN jack on the CR-315), turn down the volume on the front panel to the...
..., so you can you do with ? • Connecting an Onkyo CD recorder to the CD receiver with the CD receiver's remote controller. If you connect a portable audio device's headphone output to the CD receiver's LINE2 IN jack (LINE IN jack on the CR-315), turn down the volume on the front panel to the...

User Manual English
Page 24
...following diagram shows how to connect an Onkyo component with an cable and an analog audio cable (RCA). Connect the CD receiver's OPTICAL DIGITAL IN jack to connect a component with the CD receiver's remote controller. DIGITAL OUTPUT CR-515 Asian model's rear panel Optical digital... audio cable Personal computer Connecting an Onkyo Component with a Digital Audio Output The following diagram shows how to an optical ...
...following diagram shows how to connect an Onkyo component with an cable and an analog audio cable (RCA). Connect the CD receiver's OPTICAL DIGITAL IN jack to connect a component with the CD receiver's remote controller. DIGITAL OUTPUT CR-515 Asian model's rear panel Optical digital... audio cable Personal computer Connecting an Onkyo Component with a Digital Audio Output The following diagram shows how to an optical ...
User Manual English
Page 27
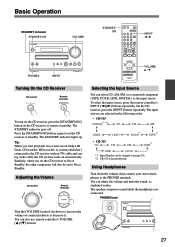
... • CR-315 CD FM AM TAPE*1 LINE DOCK *1 Input Display can adjust the volume and mute the sound, as the input source. You can select CD, AM, FM, or a connected component (TAPE, DOCK, LINE, DIGITAL) as explained earlier. Adjusting the Volume CD receiver Remote controller Selecting the... Operation STANDBY indicator STANDBY/ON VOLUME STANDBY/ ON INPUT / PHONES INPUT VOLUME / Turning On the CD Receiver CD receiver Remote controller To turn on) an Onkyo RI Dock, CD recorder, MD recorder, or cassette deck that's connected to the CD receiver with an cable and analog...
... • CR-315 CD FM AM TAPE*1 LINE DOCK *1 Input Display can adjust the volume and mute the sound, as the input source. You can select CD, AM, FM, or a connected component (TAPE, DOCK, LINE, DIGITAL) as explained earlier. Adjusting the Volume CD receiver Remote controller Selecting the... Operation STANDBY indicator STANDBY/ON VOLUME STANDBY/ ON INPUT / PHONES INPUT VOLUME / Turning On the CD Receiver CD receiver Remote controller To turn on) an Onkyo RI Dock, CD recorder, MD recorder, or cassette deck that's connected to the CD receiver with an cable and analog...

User Manual English
Page 28
...the display. The MUTING indicator flashes on the Super Bass function, press the [S.BASS] button. Basic Operation-Continued / S.BASS TONE ENTER MUTING CR-515 CR-315 DIRECT TONE Adjusting the Bass and Treble 1 Press the [TONE] button to select Bass. 2 Use the Previous and Next [ ]/[ ] buttons to...off , press the [DIRECT] button on . Note: If you can also use the Previous and Next [ ]/[ ] but- DIRECT indicator On the remote controller, press the [TONE] button for 8 seconds, the previous display will be used to adjust the bass and treble. Tips: While the CD ...
...the display. The MUTING indicator flashes on the Super Bass function, press the [S.BASS] button. Basic Operation-Continued / S.BASS TONE ENTER MUTING CR-515 CR-315 DIRECT TONE Adjusting the Bass and Treble 1 Press the [TONE] button to select Bass. 2 Use the Previous and Next [ ]/[ ] buttons to...off , press the [DIRECT] button on . Note: If you can also use the Previous and Next [ ]/[ ] but- DIRECT indicator On the remote controller, press the [TONE] button for 8 seconds, the previous display will be used to adjust the bass and treble. Tips: While the CD ...

User Manual English
Page 31
...Pause [ ] or Play [ ] button. On MP3 CDs, you can select files in the current folder with these buttons. On the CR-315, you can select files in the examples below to select tracks. Press to locate the beginning of the currently playing or paused track. "...track time is being displayed. Playing CDs-Continued Press to display more than 99 minutes and 59 seconds, "- -:- -" is paused, press the remote controller's [DISPLAY] button repeatedly to fast reverse. Note: See page 34 for details on the CD receiver and start playback Pressing this information....
...Pause [ ] or Play [ ] button. On MP3 CDs, you can select files in the current folder with these buttons. On the CR-315, you can select files in the examples below to select tracks. Press to locate the beginning of the currently playing or paused track. "...track time is being displayed. Playing CDs-Continued Press to display more than 99 minutes and 59 seconds, "- -:- -" is paused, press the remote controller's [DISPLAY] button repeatedly to fast reverse. Note: See page 34 for details on the CD receiver and start playback Pressing this information....

User Manual English
Page 35
...step to add additional tracks to the playlist. MENU/NO/ CLEAR / / Number buttons (see page 31) (These buttons do nothing during memory playback, use the remote controller's Previous and Next [ ]/[ ] buttons. MEMORY indicator 2 Use the Previous and Next [ ]/[ ] buttons to select the first track you can add... playlist. Turn the multi control to scroll through the playlist. To select MP3 files for ENTER. To remove tracks from the playlist. On the CR-515, you want to add to add more than 99 minutes and 59 seconds, "- -:- -" is stopped. 1 Press the [YES/MODE] button...
...step to add additional tracks to the playlist. MENU/NO/ CLEAR / / Number buttons (see page 31) (These buttons do nothing during memory playback, use the remote controller's Previous and Next [ ]/[ ] buttons. MEMORY indicator 2 Use the Previous and Next [ ]/[ ] buttons to select the first track you can add... playlist. Turn the multi control to scroll through the playlist. To select MP3 files for ENTER. To remove tracks from the playlist. On the CR-515, you want to add to add more than 99 minutes and 59 seconds, "- -:- -" is stopped. 1 Press the [YES/MODE] button...
User Manual English
Page 43
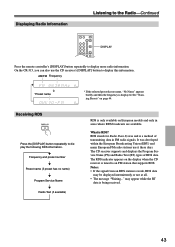
On the CR-315, you can also use it these days. RDS stands for Radio Data System and is being received. 43 Notes: • If the signal from an ... display when the CD receiver is RDS? The RDS indicator appears on page 44. Displaying Radio Information Listening to the Radio-Continued DISPLAY Press the remote controller's [DISPLAY] button repeatedly to an FM station that supports RDS. may be displayed intermittently or not at all. • The message "Waiting...
On the CR-315, you can also use it these days. RDS stands for Radio Data System and is being received. 43 Notes: • If the signal from an ... display when the CD receiver is RDS? The RDS indicator appears on page 44. Displaying Radio Information Listening to the Radio-Continued DISPLAY Press the remote controller's [DISPLAY] button repeatedly to an FM station that supports RDS. may be displayed intermittently or not at all. • The message "Waiting...

User Manual English
Page 44
... the character immediately after the insertion point. To cancel the Name In function, press the [MENU/NO] button for easy identification. Use the remote controller's [DISPLAY] button to select numbers. The preset is named and "Complete" appears on the display. Available Characters A B C D E F G H I J K L M N O P Q R ST UV W XY Z a b c d e f g h i j k l m n o p...• Selecting numbers and symbols: Use the number buttons to select the character groups. On the CR-515, you can be entered by using the number buttons. That character flashes. Character group...
... the character immediately after the insertion point. To cancel the Name In function, press the [MENU/NO] button for easy identification. Use the remote controller's [DISPLAY] button to select numbers. The preset is named and "Complete" appears on the display. Available Characters A B C D E F G H I J K L M N O P Q R ST UV W XY Z a b c d e f g h i j k l m n o p...• Selecting numbers and symbols: Use the number buttons to select the character groups. On the CR-515, you can be entered by using the number buttons. That character flashes. Character group...

User Manual English
Page 48
... can select: SUN, MON, TUE, WED, THU, FRI, or SAT. 6 Press [ENTER]. Displaying the Day and Time To display the day and time, press the remote controller's [CLOCK CALL] button. or 24-hour Format [ ] buttons to select "Manual To change the time format between 12-hour and 24-hour, Adjust.". For... the 12-hour format, use the remote controller's number buttons to enter the time. PLAY] button. 4 Press [ENTER]. edly until "Clock" appears. You can also use the...
... can select: SUN, MON, TUE, WED, THU, FRI, or SAT. 6 Press [ENTER]. Displaying the Day and Time To display the day and time, press the remote controller's [CLOCK CALL] button. or 24-hour Format [ ] buttons to select "Manual To change the time format between 12-hour and 24-hour, Adjust.". For... the 12-hour format, use the remote controller's number buttons to enter the time. PLAY] button. 4 Press [ENTER]. edly until "Clock" appears. You can also use the...

User Manual English
Page 51
... and Next [ ]/ [ ] buttons to specify the CD receiver's volume level, and then SUN Days Set Everyday SAT press [ENTER]. 9 If you want to use the remote controller's number buttons to select the day, and then time, and then press [ENTER]. vious and Next [ ]/[ ] but - [ ] buttons to specify the Off tons to...
... and Next [ ]/ [ ] buttons to specify the CD receiver's volume level, and then SUN Days Set Everyday SAT press [ENTER]. 9 If you want to use the remote controller's number buttons to select the day, and then time, and then press [ENTER]. vious and Next [ ]/[ ] but - [ ] buttons to specify the Off tons to...