Instruction Manual
Page 1
Others Troubleshooting 45 Specifications 47 En Following the instructions in the unit. Please read this manual thoroughly before making connections and plugging in this manual for purchasing an Onkyo Stereo Receiver. Please retain this manual will enable you for future reference. Stereo Receiver TX-8555 Instruction Manual Contents Introduction 2 Connections 13 Enjoying Audio Sources 22 Thank you to obtain optimum performance and listening enjoyment from your new Stereo Receiver.
Others Troubleshooting 45 Specifications 47 En Following the instructions in the unit. Please read this manual thoroughly before making connections and plugging in this manual for purchasing an Onkyo Stereo Receiver. Please retain this manual will enable you for future reference. Stereo Receiver TX-8555 Instruction Manual Contents Introduction 2 Connections 13 Enjoying Audio Sources 22 Thank you to obtain optimum performance and listening enjoyment from your new Stereo Receiver.
Instruction Manual
Page 4
...64257;ed service personnel. IMPORTANT The wires in the mains lead are coloured in own responsibility, that indicated on the body of this instruction manual is marked with an appropriate fuse. The wire which is marked with the following code: Blue: Neutral Brown: Live As the colours ... wire which is coloured blue must be connected to the terminal which is in compliance with the corresponding technical standards such as that the ONKYO product described in this apparatus may not correspond with the coloured markings identifying the terminals in your socket outlets, cut it off and &#...
...64257;ed service personnel. IMPORTANT The wires in the mains lead are coloured in own responsibility, that indicated on the body of this instruction manual is marked with an appropriate fuse. The wire which is marked with the following code: Blue: Neutral Brown: Live As the colours ... wire which is coloured blue must be connected to the terminal which is in compliance with the corresponding technical standards such as that the ONKYO product described in this apparatus may not correspond with the coloured markings identifying the terminals in your socket outlets, cut it off and &#...
Instruction Manual
Page 8
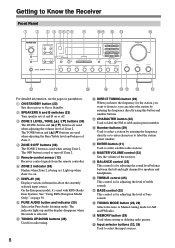
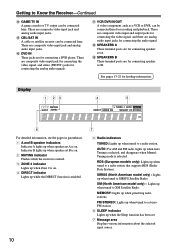
...the sound level balance between the left and right channel for AM and FM radio. R TUNING MODE button (28, 29) Selects the Auto or Manual tuning mode for speakers and headphones. F ZONE 2 indicator (38) Flashes when Zone 2 is used with RDS (Radio Data System). N MASTER .... Getting to turn off . B SPEAKERS A and B switches (23) Turn speaker sets A and B on page 30. The TONE button and buttons are used to Know the Receiver Front Panel 1 2 3 4 5678 9 JK L M N V U T S RQ P O For detailed information, see the pages in parentheses. J DIRECT TUNING button (29) When ...
...the sound level balance between the left and right channel for AM and FM radio. R TUNING MODE button (28, 29) Selects the Auto or Manual tuning mode for speakers and headphones. F ZONE 2 indicator (38) Flashes when Zone 2 is used with RDS (Radio Data System). N MASTER .... Getting to turn off . B SPEAKERS A and B switches (23) Turn speaker sets A and B on page 30. The TONE button and buttons are used to Know the Receiver Front Panel 1 2 3 4 5678 9 JK L M N V U T S RQ P O For detailed information, see the pages in parentheses. J DIRECT TUNING button (29) When ...
Instruction Manual
Page 10
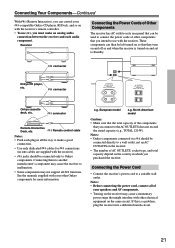
...the video signal, and there are for connecting the audio signal. MEMORY: Lights up when Auto Tuning is selected, and disappears when Manual Tuning mode is on. There are composite video input jack for connecting the video signal, and stereo (FRONT) jacks for connecting ...pages in parentheses. 1 A and B speaker indicators Indicator A lights up when tuned to SIRIUS Satellite Radio. O CBL/SAT IN A cable or satellite receiver can be connected here. R SPEAKERS A These terminal posts are for hookup information. XM (North American model only) : Lights up when speaker set . ...
...the video signal, and there are for connecting the audio signal. MEMORY: Lights up when Auto Tuning is selected, and disappears when Manual Tuning mode is on. There are composite video input jack for connecting the video signal, and stereo (FRONT) jacks for connecting ...pages in parentheses. 1 A and B speaker indicators Indicator A lights up when tuned to SIRIUS Satellite Radio. O CBL/SAT IN A cable or satellite receiver can be connected here. R SPEAKERS A These terminal posts are for hookup information. XM (North American model only) : Lights up when speaker set . ...
Instruction Manual
Page 11
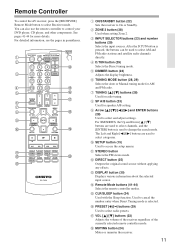
... and FM radio stations and satellite radio channels directly. B ZONE 2 button (38) Used when setting Zone 2. F TUNING MODE button (28, 29) Selects the Auto or Manual tuning mode for speaker A/B setting. Remote Controller To control the AV receiver, press the [RECEIVER] Remote Mode button to control your DVD player, CD player, and other components.
... and FM radio stations and satellite radio channels directly. B ZONE 2 button (38) Used when setting Zone 2. F TUNING MODE button (28, 29) Selects the Auto or Manual tuning mode for speaker A/B setting. Remote Controller To control the AV receiver, press the [RECEIVER] Remote Mode button to control your DVD player, CD player, and other components.
Instruction Manual
Page 21
...of other electrical equipment on the same circuit. See the manuals supplied with your other Onkyo components for connections (no cables are supplied with other components that they turn on and off as and when the receiver is a problem, plug the receiver into a different branch circuit. 21 e.g. Connecting the ...the power cord, connect all of your speakers and AV components. • Turning on the receiver may not support all the way to a wall outlet, not an AC OUTLETS on the receiver. • The number of Other Components The receiver has AC outlets on its rear panel that can...
...of other electrical equipment on the same circuit. See the manuals supplied with your other Onkyo components for connections (no cables are supplied with other components that they turn on and off as and when the receiver is a problem, plug the receiver into a different branch circuit. 21 e.g. Connecting the ...the power cord, connect all of your speakers and AV components. • Turning on the receiver may not support all the way to a wall outlet, not an AC OUTLETS on the receiver. • The number of Other Components The receiver has AC outlets on its rear panel that can...

Instruction Manual
Page 26
... you want to select the component that it's ready for recording. • If necessary, adjust the recording level on the recorder. • See the recorder's manual for anything other than personal enjoyment! This section explains how to record the selected input source to the TAPE OUT, or VCR/DVR OUT jacks...
... you want to select the component that it's ready for recording. • If necessary, adjust the recording level on the recorder. • See the recorder's manual for anything other than personal enjoyment! This section explains how to record the selected input source to the TAPE OUT, or VCR/DVR OUT jacks...
Instruction Manual
Page 28
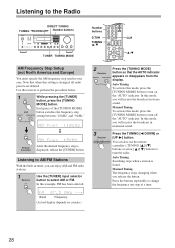
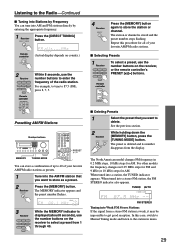
..."9 kHz." Listening to tune the radio. In this example, FM has been selected. 2 Receiver 3 Receiver Press the [TUNING MODE] button so that when this setting is found. Manual Tuning To activate this mode, you will receive the broadcast in tuner, you release the button. In this mode, press the [TUNING MODE...] button to select AM or FM. You can enjoy AM and FM radio stations. 1 Receiver Use the [TUNER] input ...
..."9 kHz." Listening to tune the radio. In this example, FM has been selected. 2 Receiver 3 Receiver Press the [TUNING MODE] button so that when this setting is found. Manual Tuning To activate this mode, you will receive the broadcast in tuner, you release the button. In this mode, press the [TUNING MODE...] button to select AM or FM. You can enjoy AM and FM radio stations. 1 Receiver Use the [TUNER] input ...
Instruction Manual
Page 29
...kHz steps for all of the radio station. For example, to tune to 87.5 (FM), press 8, 7, 5. 4 Receiver Press the [MEMORY] button again to store the station or channel. Repeat this case, switch to Manual Tuning mode and listen to the station in 0.05 MHz steps for FM and 9 kHz (or 10... kHz) steps for AM. Remote controller (Actual display depends on the receiver to select a preset from 1 through 40. ■ Deleting Presets 1...
...kHz steps for all of the radio station. For example, to tune to 87.5 (FM), press 8, 7, 5. 4 Receiver Press the [MEMORY] button again to store the station or channel. Repeat this case, switch to Manual Tuning mode and listen to the station in 0.05 MHz steps for FM and 9 kHz (or 10... kHz) steps for AM. Remote controller (Actual display depends on the receiver to select a preset from 1 through 40. ■ Deleting Presets 1...
Instruction Manual
Page 42
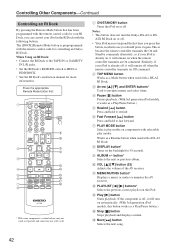
... [ ] button Stops playback and displays a menu. J VOL [ ]/[ ] button (23) Adjusts the volume of the AV receiver. L PLAYLIST [ ]/[ ] buttons* Selects the previous or next playlist on the backlight for controlling an Onkyo RI Dock. O Next [ ] button Selects the next song. 42 The [DOCK] Remote Mode button is already off, ... off , it will turn the Onkyo DS-A2 or DS- Similarly, if your iPod is preprogrammed with the remote control code for 30 seconds. C Arrow [ ]/[ ] and ENTER buttons* Used to HDD or HDD/DOCK. • See the RI Dock's instruction manual for more information. I ALBUM +/-...
... [ ] button Stops playback and displays a menu. J VOL [ ]/[ ] button (23) Adjusts the volume of the AV receiver. L PLAYLIST [ ]/[ ] buttons* Selects the previous or next playlist on the backlight for controlling an Onkyo RI Dock. O Next [ ] button Selects the next song. 42 The [DOCK] Remote Mode button is already off, ... off , it will turn the Onkyo DS-A2 or DS- Similarly, if your iPod is preprogrammed with the remote control code for 30 seconds. C Arrow [ ]/[ ] and ENTER buttons* Used to HDD or HDD/DOCK. • See the RI Dock's instruction manual for more information. I ALBUM +/-...

